如何安装svelte_构建我的第一个Svelte应用程序:想法和印象
如何安装svelte
There are always going to be new JavaScript libraries and frameworks that pop up. Sometimes it's easy to feel that we are in a new JS library fatigue mode. It is an amazing thing though since this means more innovation across all of the JavaScript land.
总是会有新JavaScript库和框架弹出。 有时,很容易感觉到我们处于新的JS库疲劳模式。 尽管这是一件令人惊奇的事情,因为这意味着在所有JavaScript领域中都有更多的创新 。
Svelte v3 (by Rich Harris) hit the scenes back in April and it took the dev world by storm. Everywhere you looked on social media, Svelte was being talked about.
Svelte v3(由Rich Harris撰写 )早在4月就登上了舞台,这使开发界风靡一时。 在社交媒体上到处可见的内容都在谈论Svelte 。

I stayed away from trying out Svelte. Usually I'll dive head first immediately; this time I was a bit busy and thought I'd wait a bit. On yesterday's Twitch stream, I gave it a try on my Twitch channel.
我远离尝试斯维尔特。 通常我会立即先潜水; 这次我有点忙,以为我会等一下。 在昨天的Twitch直播中 ,我在Twitch频道上进行了尝试。
我的主要印象 ( My Main Impressions )
The syntax is so clean!** **For writing your JavaScript and your styles, it just makes sense. It's as close to vanilla JavaScript as it gets.
语法非常干净 !** **对于编写JavaScript和样式,这很有意义。 它尽可能接近原始JavaScript。
The most complex part **(although not that complex) is the templating**. Vue's directives are easy to grasp. JSX is closer to JavaScript. Svelte's seems like a bit of a learning curve.
最复杂的部分**(尽管不那么复杂)是模板**。 Vue的指令很容易掌握。 JSX更接近JavaScript。 Svelte的学习曲线有点像。
I like how components and props are handled. I like how you just have to update a variable and it updates. No worrying about things like setState().
我喜欢组件和道具的处理方式。 我喜欢您只需要更新变量并更新它的方式。 不用担心诸如setState()类的事情。
I like how styles are automatically scoped. Haven't messed with trying to add Sass yet.
我喜欢样式如何自动设置范围。 还未尝试添加Sass的事情。
I still haven't gone in depth enough to judge overall. I'd really like to take Sapper, the Svelte framework, for a try.
我仍然没有足够的深度来判断整体。 我真的很想尝试Svelte框架Sapper 。
Overall very clean and succinct!
总体来说很干净简洁!
最终代码和演示 ( Final Code and Demo )
Here's the final CodeSandbox for this demo:
这是此演示的最终CodeSandbox :
对斯维尔特的好处 ( Benefits to Svelte )
You may be asking why you would use Svelte over something more established like React, Vue, or Angular. This is exactly what I meant to find out in my first experiments.
您可能会问,为什么要对更成熟的东西(如React,Vue或Angular)使用Svelte。 这正是我要在第一个实验中发现的意思。
- Less code to write: Use HTML/CSS/JS without having to remember too much extra stuff 更少的代码编写 :使用HTML / CSS / JS无需记住太多额外的东西
- No Virtual DOM: Svelte compiles your code to tiny, framework-less vanilla JS — your app starts fast and stays fast 没有虚拟DOM :Svelte将您的代码编译为小型,无框架的原始JS —您的应用程序启动Swift且保持快速
- Reactive: Reactivity is built-in so you have to worry less about state management React式 :React式是内置的,因此您不必担心状态管理
This is all the code that is needed for a Hello World in Svelte:
这是Svelte中的Hello World所需的全部代码:
< script >
    let name = 'world' ;
< / script >

< h1 > Hello { name } ! < / h1 >
You might be thinking, well that's just JavaScript! You're right! The only thing in there that's a little different than vanilla JavaScript is Svelte's templating with name.
您可能在想, 那只是JavaScript ! 你是对的! 唯一与香草JavaScript稍有不同的是Svelte的name模板。
Svelte入门教程和示例 (Svelte Starting Tutorial and Examples)
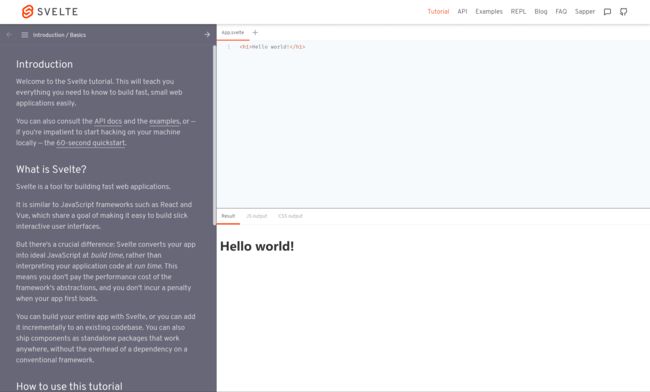
The Svelte website has a great tutorial walkthrough that you can give a try.
Svelte网站上有很棒的教程演练 ,您可以尝试一下。
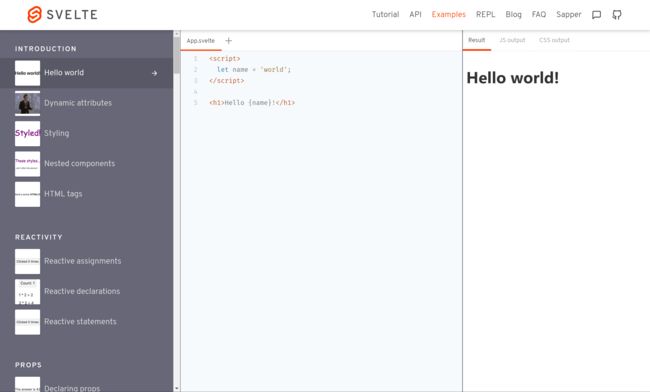
There are also some great examples so you can get an idea of what certain apps look like:
也有一些很好的示例,因此您可以了解某些应用程序的外观:
I always like the approach of building an app after going through beginner tutorials. Let's start working on our tiny first app.
在经历了初学者教程之后,我总是喜欢构建应用程序的方法。 让我们开始开发我们的微型第一个应用程序。
构建一个小型的Svelte应用程序 ( Building a Small Svelte App )
The main things that I like to do when trying out a new library/framework is to build an app that:
在尝试新的库/框架时,我喜欢做的主要事情是构建一个应用程序:
- Grabs data from an API 从API抓取数据
- Show data in a list 在列表中显示数据
- Create an input box 创建一个输入框
- Use that input box to run a search 使用该输入框运行搜索
- Take new search data and update our view 获取新的搜索数据并更新我们的视图
It's a basic app that gives us access to see how the Svelte handles things like:
这是一个基本的应用程序,可让我们访问Svelte如何处理以下内容:
- HTTP requests HTTP请求
- Lifecycle methods 生命周期方法
- Templating - Displaying data 模板-显示数据
- Templating - Looping over things 模板-遍历事物
- Templating - Conditionally showing things 模板-有条件地展示事物
- State - Updating the data and view 状态-更新数据和视图
Let's grab some data from the GitHub API and show that! Not the most advanced app, but it gets the job done while we are experimenting with Svelte for our first time.
让我们从GitHub API中获取一些数据并进行展示! 这不是最先进的应用程序,但是它是我们第一次尝试Svelte时完成的工作。
GitHub API端点 ( GitHub API Endpoints )
We'll be using the GitHub API to grab some users. The GitHub API is good because it doesn't require us to authenticate for small demo apps like the one we'll be building.
我们将使用GitHub API来吸引一些用户。 GitHub API很不错,因为它不需要我们对将要构建的小型演示应用程序进行身份验证。
We'll also be using the API to search for GitHub users. These are our API endpoints:
我们还将使用API搜索GitHub用户。 这些是我们的API端点:
- Get Users: https://api.github.com/users 获取用户: https : //api.github.com/users
- Search Users: https://api.github.com/users/octocat 搜索用户: https : //api.github.com/users/octocat
You can click each of those links to see what the API will return in JSON.
您可以单击每个链接以查看API将以JSON返回的内容。

I'm using the Chrome Extension called JSON Formatter to make the JSON look good in browser.
我正在使用称为JSON Formatter的Chrome扩展程序,以使JSON在浏览器中看起来不错。
启动我们的Svelte应用程序 ( Starting Our Svelte App )
Let's open up CodeSandbox and create a new Svelte app.
让我们打开CodeSandbox并创建一个新的Svelte应用程序。

Once we click on a Svelte app, we can see the base Svelte app that has a few files. index.js is where everything gets bootstrapped and Rollup is used to compile our Svelte app to vanilla JavaScript.
单击Svelte应用程序后,我们可以看到具有一些文件的基本Svelte应用程序。 index.js引导所有内容,并使用Rollup将Svelte应用程序编译为原始JavaScript。

Notice that there is only one dependency: Svelte.
请注意, 只有一个依赖项 :Svelte。
Our index.js file is where our application gets bootstrapped
我们的应用程序被引导到我们的index.js文件中
// index.js

import App from "./App.svelte" ;

const app = new App ( {
  target : document . body
} ) ;

export default app ;
We can look inside of our App.svelte to see what a Svelte component looks like:
我们可以在App.svelte内部查看Svelte组件的外观:
// App.svelte

< script >
    import Button from "./Button.svelte" ;
< / script >

< style >
  main {
    font - family : sans - serif ;
    text - align : center ;
  }
< / style >

< main >
    < h1 > Hello CodeSandbox < / h1 >
    < h2 > Start editing to see some magic happen ! < / h2 >
    < Button / >
< / main >
A Svelte component consists of:
Svelte组件包括:
script: Where all of our JavaScript livesscript:我们所有JavaScript都存在的地方style: All of our scoped styles live herestyle:我们所有范围内的样式都住在这里- Template: Everything outside of a script or style tag will be treated as the template for this component 模板:脚本或样式标签之外的所有内容都将被视为该组件的模板
Unlike Vue, we don't need a tag to tell Svelte where our template lives. Unlike React, we don't need a render() method.
与Vue不同,我们不需要标签来告诉Svelte我们的模板在哪里。 与React不同,我们不需要render()方法。
使用组件 (Using Components)
Svelte allows us to use components like this included Button component. We can import it as if it were a module and use it using .
Svelte允许我们使用类似此包含的Button组件的组件。 我们可以import其作为模块import ,并使用 。
清理App.svelte (Cleaning Up App.svelte)
Let's clean up our app by deleting the Button.svelte and cleaning up the App.svelte. Here's our new App.svelte:
让我们清理通过删除我们的应用程序Button.svelte和清理App.svelte 。 这是我们的新App.svelte :
// App.svelte
< script >
< / script >
< style >
< / style >
< main >
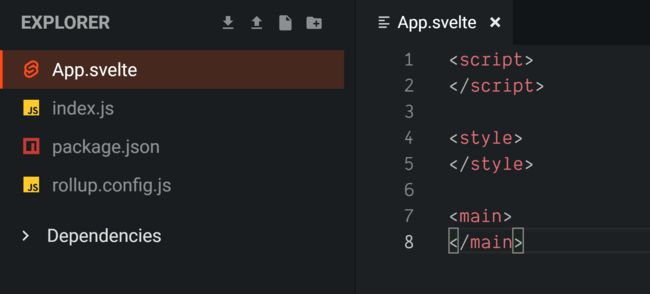
< / main >Here's our new folder structure without the Button.svelte file:
这是我们没有Button.svelte文件的新文件夹结构:
抓住GitHub用户 ( Grabbing GitHub Users )
Let's go and grab users using JavaScript's built-in fetch() since Svelte doesn't come with a built in HTTP library.
我们开始使用JavaScript的内置fetch()来吸引用户,因为Svelte没有内置的HTTP库。
Let's create a function to go and grab data from the GitHub API at that URL from above. Here's our full App.svelte now:
让我们创建一个函数,从上面的URL通过GitHub API获取数据。 现在是我们完整的App.svelte :
// App.svelte

< script >
    / _ *
   _ Grab users from GitHub
   * /
  function getGitHubUsers ( ) {
    fetch ( "https://api.github.com/users" )
      . then ( resp => resp . json ( ) )
      . then ( data => {
        console . log ( data ) ;
        // do something with the users here
      } ) ;
  }
< / script >

< style >
< / style >

< main >
< / main >
We have created a getGitHubUsers() function that will use fetch to get users. We have our function to go and grab the GitHub users, but we haven't called it just yet.
我们创建了一个getGitHubUsers()函数,该函数将使用访 getGitHubUsers()来获取用户。 我们具有捕获GitHub用户的功能,但是我们尚未调用它。
How do we get Svelte to call this function when the app starts up? Lifecycle methods!
应用启动时,如何让Svelte调用此函数? 生命周期方法!
Svelte中的生命周期方法 ( Lifecycle Methods in Svelte )
We have a function to grab users from GitHub. How do we use it when our application starts up? In React, we would use something like componentDidMount() or useEffect(). In Vue, we would use mounted(). Angular would use ngOnInit().
我们具有从GitHub抓取用户的功能。 应用程序启动时如何使用它? 在React中,我们将使用诸如componentDidMount()或useEffect() 。 在Vue中,我们将使用mounted() 。 Angular将使用ngOnInit() 。
Svelte has lifecycle methods that we can import individually! For this case, we will import onMount and use our getGitHubUsers() function within that..
Svelte有可以单独导入的生命周期方法! 对于这种情况,我们将导入onMount并在其中使用我们的getGitHubUsers()函数。
Our new App.svelte looks like this:
我们新的App.svelte看起来像这样:
// App.svelte

< script >
  import { onMount } from "svelte" ;

    // run this when the app starts
  onMount ( ( ) => {
    getGitHubUsers ( ) ;
  } ) ;

  / _ *
   _ Grab users from GitHub
   * /
  // code redacted for brevity
< / script >

< style >
< / style >

< main >
< / main >
Now when we refresh our CodeSandbox browser, we can see all the users in the console.
现在,当我们刷新CodeSandbox浏览器时,我们可以在控制台中看到所有用户。

在Svelte中显示数据 ( Displaying Data in Svelte )
Now that we are able to fetch this data, we need to store these users in a variable and display it.
现在我们已经能够获取这些数据, 我们需要将这些用户存储在变量中并显示出来。
We'll do the following:
我们将执行以下操作:
- Create a variable to hold the users 创建一个变量来容纳用户
- Update those users inside of our
getGitHubUsers()method 在我们的getGitHubUsers()方法中更新那些用户
Here's the new App.svelte:
这是新的App.svelte :
// App.svelte

< script >
  import { onMount } from "svelte" ;

  // create a variable to store our users
  let users ;

  // run this when the app starts
  // code redacted for brevity

  / _ *
   _ Grab users from GitHub
   * /
  function getGitHubUsers ( ) {
    fetch ( "https://api.github.com/users" )
      . then ( resp => resp . json ( ) )
      . then ( data => {
        // bind users to our users variable
        users = data ;
      } ) ;
  }
< / script >

< style >
< / style >

< main >
  { users }
< / main >
We've done three things here:
我们在这里做了三件事:
- Created a
usersvariable withlet users;用let users;创建一个users变量let users; - Bound our GitHub data to this users variable with
users = data将我们的GitHub数据绑定到具有users = data该用户变量 - Displayed the users with
{users}使用{users}向用户显示
Now if you refresh the CodeSandbox browser, you'll see the data in the browser!
现在,如果刷新CodeSandbox浏览器,您将在浏览器中看到数据!

We can simplify our getGitHubUsers() function even further by removing the console.log():
我们可以通过删除console.log()来进一步简化getGitHubUsers()函数:
// App.svelte

    / _ *
   _ Grab users from GitHub
   * /
  function getGitHubUsers ( ) {
    fetch ( "https://api.github.com/users" )
      . then ( resp => resp . json ( ) )
      . then ( data => ( users = data ) ) ;
  }
Now this data is just a bunch of JavaScript objects so it only displays as [object Object]. Let's start looping over this array so that we can show things.
现在,这些数据只是一堆JavaScript对象,因此仅显示为[object Object] 。 让我们开始循环遍历这个数组,以便我们可以展示事物。
在Svelte中循环遍历数组 ( Looping Over An Array in Svelte )
To loop in Svelte, Svelte comes with some special template tags. Svelte comes with the each block to let us loop over data. Svelte also has support for if blocks, else/if blocks, and even await blocks.
要循环使用Svelte,Svelte附带了一些特殊的模板标签。 Svelte随每个块一起提供,使我们可以遍历数据。 Svelte还支持if块 , else / if块 ,甚至是wait块 。
Here's an example of an each block:
这是每个块的示例:
< ul >
    { #each cats as cat }
        < li >

            < a href = "https://www.youtube.com/watch?v={cat.id}" >
                { cat . name }
            < / a >

        < / li >
    { / each }
< / ul >
Let's take the same syntax and use it for our own users:
让我们采用相同的语法并将其用于我们自己的用户:
// App.svelte

< main >

  { # if users }
  < ul >
    { #each users as user }
      < li > { user . login } < / li >
    { / each }
  < / ul >
  { / if }

< / main >
Notice that we are also using an {#if block so that our users section doesn't show until we actually have users data. When our app starts, the users variable is set to undefined. Since Svelte can't loop over undefined, we have to tell Svelte to wait until we actually have an array to loop over.
请注意,我们还使用了{#if块,这样我们的用户部分才会显示,直到我们真正拥有用户数据为止。 当我们的应用程序启动时, users变量将设置为undefined 。 由于Svelte无法循环遍历undefined ,因此我们必须告诉Svelte等待,直到我们实际要遍历一个数组为止。
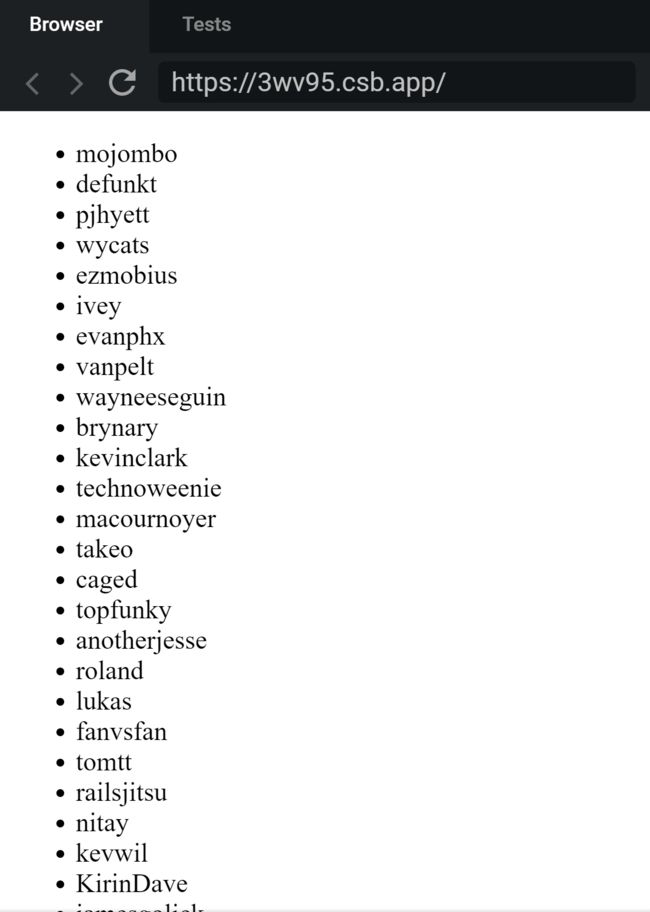
We are looping over users and showing user.login since that's how the GitHub API stores a user's username.
我们正在遍历users并显示user.login因为GitHub API是存储用户名的方式。
Refresh CodeSandbox and you'll see the following list!
刷新CodeSandbox,您将看到以下列表!
使用苗条的子组件 ( Using a Svelte Child Component )
Let's take this a step further and create a child component for each user. We'll name this component User so that we can use it like so:
让我们更进一步,为每个用户创建一个子组件。 我们将这个组件命名为User以便我们可以像这样使用它:
< User username = "username-goes-here" avatar = "avatar-goes-here" / >The first step to creating this new User component is to create a new User.svelte file:
创建这个新的User组件的第一步是创建一个新的User.svelte文件:
// User.svelte

< script >
< / script >
Right now, we have a blank Svelte component. We will pass it two props:
现在,我们有一个空白的Svelte组件。 我们将通过两个道具 :
- username 用户名
- avatar 头像
Each User component will be responsible for showing both the username and the avatar.
每个User组件将负责显示用户名和头像。
将道具传递给苗条的子组件 ( Passing Props to a Svelte Child Component )
We have our child component, but how do we tell it that it will receive props. The Svelte docs shows that we can define props using export let propName
我们有子组件,但是我们如何告诉它它将接收道具。 Svelte文档显示, 我们可以使用export let propName 定义道具。
To tell our
要告诉
// User.svelte

< script >
    export let username ;
  export let avatar ;
< / script >
The next step is to display these in our template:
下一步是在我们的模板中显示这些内容:
// User.svelte

< script >
  export let username ;
  export let avatar ;
< / script >

< div class = "user" >
  < img src = "{avatar}" alt = "{username}'s Avatar" / >
  < h3 > { username } < / h3 >
< / div >
Using our new component in App.svelte:, we'll need to import our User component and then use it inside of our each loop.
使用App.svelte的新组件,我们需要导入User组件,然后在each循环中使用它。
// App.svelte

< script >
  import { onMount } from "svelte" ;
  import User from "./User.svelte" ;

  // ... code redacted for brevity
< / script >

< style >
< / style >

< main >

  { # if users }
  < ul >
    { #each users as user }
      < li >


        < User username = { user . login } avatar = { user . avatar_url } / >


      < / li >
    { / each }
  < / ul >
  { / if }

< / main >
We have imported the User component and used it. We've also passed in our two props that we need here:
我们已经导入并使用了User组件。 我们还传递了我们在这里需要的两个道具:
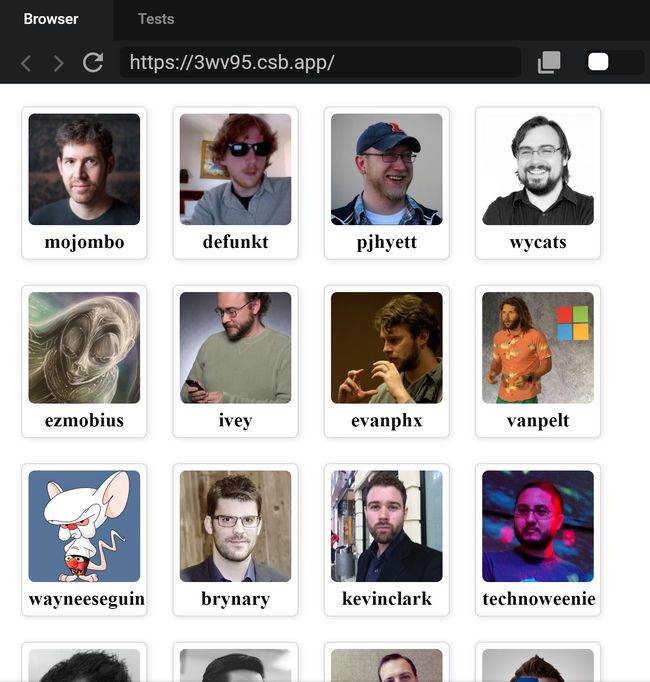
< User username = { user . login } avatar = { user . avatar_url } / >Our users will now show up with their images!
我们的用户现在将显示他们的图像!
一些CSS样式 ( Some CSS Styling )
Let's add some styles to our App.svelte and our User.svelte. The styles for each component are automatically scoped to that file so we'll need to adjust two different files.
让我们为App.svelte和User.svelte添加一些样式。 每个组件的样式都会自动调整到该文件的范围,因此我们需要调整两个不同的文件。
Update your App.svelte to look like the following:
更新您的App.svelte使其如下所示:
// App.svelte

< script >
    // ... redacted for brevity
< / script >

< style >
  . user - list {
    display : flex ;
    flex - flow : wrap ;
    list - style : none ;
    margin : 0 ;
    padding : 0 ;
  }

  . user - list li {
    width : 20 % ;
    padding : 10 px ;
  }
< / style >

< main >

  { # if users }
  < ul class = "user-list" >
    { #each users as user }
      < li >
        < User username = { user . login } avatar = { user . avatar_url } / >
      < / li >
    { / each }
  < / ul >
  { / if }

< / main >
Notice that we've added a user-list class to our ul and also added to the style tag.
请注意,我们已经在ul添加了一个user-list类,并且还添加了了style标签。
Next let's update our User.svelte to add some styles and CSS classes there. Remember that styles are scoped to each component meaning that styles won't bleed out of each component and affect the other components.
接下来,让我们更新User.svelte以在其中添加一些样式和CSS类。 请记住,样式是每个组件的作用域,这意味着样式不会从每个组件中渗出并且不会影响其他组件。
// User.svelte

< script >
  export let username ;
  export let avatar ;
< / script >

< style >
  . user {
    padding : 5 px ;
    border : 1 px solid #ddd ;
    box - shadow : 1 px 1 px 5 px rgba ( 0 , 0 , 0 , 0.1 ) ;
    border - radius : 5 px ;
    text - align : center ;
  }

  img {
    border - radius : 5 px ;
    max - width : 80 px ;
  }

  h3 {
    font - size : 16 px ;
    margin : 0 ;
  }
< / style >

< div class = "user" >
  < img src = "{avatar}" alt = "{username}'s Avatar" / >
  < h3 > { username } < / h3 >
< / div >
We've added a user class and some styles.
我们添加了一个user类和一些样式。
Our app should look like this now. Remember you may need to refresh the CodeSandbox browser because the updates don't automatically update for some frustrating reason.
我们的应用现在应该看起来像这样。 请记住,由于某些令人沮丧的原因,更新不会自动更新,因此您可能需要刷新CodeSandbox浏览器。
搜索用户 ( Searching for Users )
So far we've only been able to get data and show data. The next thing to look at when evaluating any JavaScript library or framework is to see how it handles events. We are going to create a new section of our app that allows us to search for specific GitHub users.
到目前为止,我们只能获取数据并显示数据。 在评估任何JavaScript库或框架时,要看的下一件事是查看其如何处理事件。 我们将在我们的应用程序中创建一个新部分,以允许我们搜索特定的GitHub用户。
Let's create a new component and call it UserSearch.svelte. We'll start with our template:
让我们创建一个新组件并将其UserSearch.svelte 。 我们将从模板开始:
// UserSearch.svelte

< script >
< / script >

< style >
  . user - search {
    padding : 20 px ;
    border - radius : 10 px ;
    margin - bottom : 50 px ;
    background : #efefef ;
  }

  h2 {
    margin : 0 0 15 px ;
  }
< / style >

< div class = "user-search" >
  < h2 > Search for Users < / h2 >

  < form >
    < input type = "text" / >
    < button > Search < / button >
  < / form >
< / div >
We have some styles, a form, and an input. Import this new component into App.svelte and add it to the top of the template:
我们有一些样式,一种形式和一种输入。 将此新组件导入App.svelte并将其添加到模板的顶部:
// App.svelte

< main >

  < UserSearch / >

    // other stuff goes here

< / main >
Now our app has added a new form:
现在我们的应用程序添加了一个新表格:
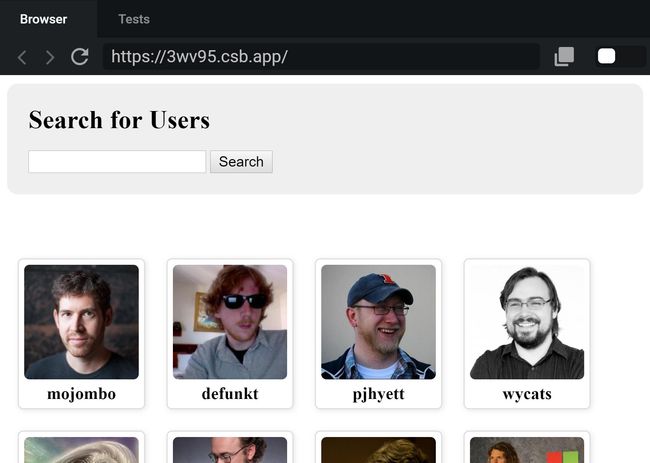
Let's see how we can use this new form.
让我们看看如何使用这种新形式。
将值绑定到Svelte中的输入 ( Binding Values to an Input in Svelte )
The first thing we need to do is find a way to get information out of this input field. Svelte allows us to bind to an input using bind:value on an input. Here's an example:
我们需要做的第一件事是找到一种从该input字段中获取信息的方法。 Svelte允许我们在输入上使用bind:value 绑定到输入。 这是一个例子:
< input bind : value = { name } >We'll create a new variable called usernameQuery and bind it in UserSearch.svelte:
我们将创建一个名为usernameQuery的新变量,并将其绑定到UserSearch.svelte :
// UserSearch.svelte

< script >
  let usernameQuery = "" ;
< / script >

< style >
    // ... removed for brevity
< / style >

< div class = "user-search" >
  < h2 > Search for Users < / h2 >

  < form >
    < input type = "text" bind : value = { usernameQuery } / >
    < button > Search < / button >
  < / form >

  { usernameQuery }
< / div >
Notice how we have created a new variable called usernameQuery and also bound it to our input using bind:value={usernameQuery}. We've also added {usernameQuery} to the template just so we can see if the binding works.
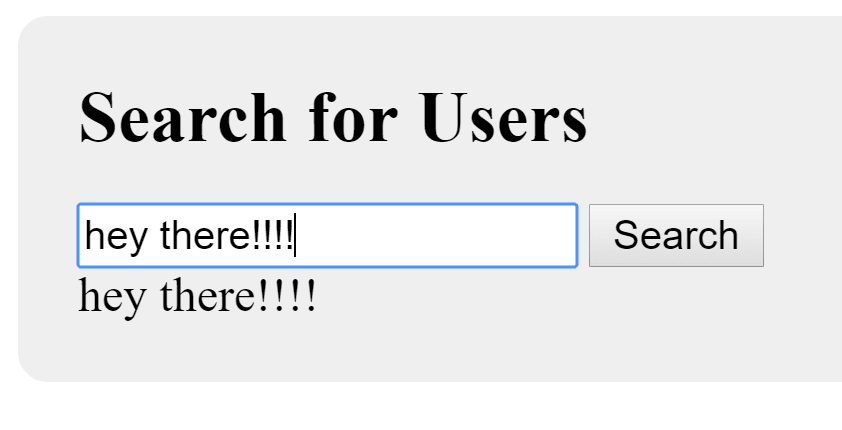
注意,我们如何创建一个名为usernameQuery的新变量,并使用bind:value={usernameQuery}其绑定到我们的输入中。 我们还向模板添加了{usernameQuery} ,以便我们查看绑定是否有效。
Test out your new form! As you type, you should see the usernameQuery updated:
测试您的新表格! 键入时,您应该看到usernameQuery已更新:
在Svelte中处理事件 ( Handling an Event in Svelte )
The next thing we need to handle is searching for a user on GitHub as soon as a user submits the form. To submit the form, the user can either click the Search button or press Enter when inside the input.
我们需要处理的下一步是在用户提交表单后立即在GitHub上搜索用户。 要提交表单,用户可以单击“搜索”按钮,或者在输入内容内按Enter。
处理表格提交 (Handling a Form Submission)
We'll bind an event in Svelte using on:click or in our case on:submit.
我们将使用on:click或本例中的on:submit 在Svelte中绑定一个事件 。
// UserSearch.svelte

< form on : submit = { handleSubmit } >
  < input type = "text" bind : value = { usernameQuery } / >
  < button > Search < / button >
< / form >
We've bound on:submit to use a handleSubmit function. Let's define that now. In the