opencv实现哈哈镜变换
我绝对是无聊爆炸了,所以我又丧心病狂处理二次元图片了。
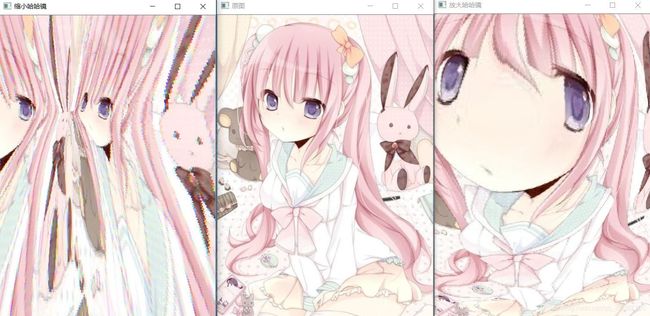
今天基于像素变换来实现图像的哈哈镜变换,效果就是下面这样了:
哈哈镜分两种,一种是挤压,一种是放大。分别对应凹函数和凸函数。
输入一副图像,首先设置缩放中心center,我们取原图鼻子处为中心。
设置图像上任意一点到中心点的相对坐标tx= x-cx,ty=y-cy。
左边为挤压哈哈镜,对应像素映射函数:
//变换后新的坐标
x = cos(atan2(ty , tx))* 12*(sqrt(tx*tx + ty*ty))+cx
y = sin(atan2(ty , tx))* 12*(sqrt(tx*tx + ty*ty))+cy
公式中的常数12代表强度,越大则图像越扭曲。
自定义挤压函数(Python版)(C++版可以关注公众号查看推文):
def MinFrame(frame):                  #定义图像缩小函数
    height, width, n = frame.shape
    center_X = width / 2
    center_Y = height / 2
    radius = 400
    newX = 0
    newY = 0
    real_radius =int(radius / 2.0)
    new_data = frame.copy()

    for i in range(width):
        for j in range(height):
            tX = i - center_X
            tY = j - center_Y
            theta = math.atan2(tY, tX)
            radius = math.sqrt((tX * tX) + (tY * tY))             #与上面一样,计算公式不一样

            newR = math.sqrt(radius) *12
            newX = int(center_X + (newR * math.cos(theta)))
            newY = int(center_Y + (newR * math.sin(theta)))

            if newX < 0 and  newX >width:
                newX = 0

            if newY <0 and newY >height:
                newY = 0

            if newX<width and newY<height:
                new_data[j, i][0] = frame[newY, newX][0]
                new_data[j, i][1] = frame[newY, newX][1]
                new_data[j, i][2] = frame[newY, newX][2]

            else:
                new_data[j, i][0] = frame[j, i][0]
                new_data[j, i][1] = frame[j, i][1]
                new_data[j, i][2] = frame[j, i][2]

    return new_data
右边为放大哈哈镜,对应像素映射函数:
//变换后的新坐标
x = (tx/2)*(sqrt(tx*tx + ty*ty)/radius)+cx
y = (ty/2)*(sqrt(tx*tx + ty*ty)/radius)+cy
自定义放大函数(PY版):
def MaxFrame(frame):                 #定义图像拉伸放大函数
    height, width, n = frame.shape    #获取输入图像的长宽和通道
    center_X = width / 2              #计算公式
    center_Y = height / 2
    radius = 400                     #这里直接定义半径了
    newX = 0                         #初始变换后的坐标
    newY = 0
    real_radius =int(radius / 2.0)   #计算公式
    new_data = frame.copy()         #复制一个与原图像一样的图片

    for i in range(width):                #建立循环移动像素遍历宽度方向的像素
        for j in range(height):               #遍历高度方向的像素
            tX = i - center_X                  #计算公式
            tY = j - center_Y

            distance = tX * tX + tY * tY
            if distance < radius * radius:    #变换点的距离是否太远

                newX = int(tX/ 2.0)
                newY = int(tY/ 2.0)

                newX = int(newX * (math.sqrt(distance) / real_radius))
                newX = int(newX * (math.sqrt(distance)/ real_radius))

                newX = int(newX + center_X)
                newY = int(newY + center_Y)
                if newX<width and newY<height:            #计算出的新坐标可能超出原图层,这里用if加以判断
                    new_data[j, i][0] = frame[newY, newX][0]        #将计算后的坐标移动到原坐标
                    new_data[j, i][1] = frame[newY, newX][1]
                    new_data[j, i][2] = frame[newY, newX][2]

            else:                                          #若变换点距离太远,图像像素不变动
                new_data[j, i][0] = frame[j, i][0]
                new_data[j, i][1] = frame[j, i][1]
                new_data[j, i][2] = frame[j, i][2]

    return new_data
至于这俩函数怎么来的,,我也说不出啥门道来,,欢迎评论告知哈。
结语
欢迎关注公众号【Opencv视觉实践】,利用有趣的实例拯救你的视觉基础~


