Java识别验证码和图像处理
阅读本文可能会解决的问题:
① Java识别验证码
② Tess4J的使用和OCR识别
③ JavaCV的使用二值化和灰度测试
④ Java裁剪和缩放图片
⑤ 如何生成数字&字母验证码
⑥ ...
这里老样子先说几句无关的话,去年毕业的时候帮同学做了一个验证码识别系统,按部就班的参考了大神的操作,对于二值化这些操作都没有深入了解,最近做项目遇到了要实现机器登录的操作,验证码自然绕不过去所以就又翻出来参考总结一下,方便自己也分享给大家。同时我也发现现在除了一些政府网站外,基本很少有采用下面我列出的这种数字&字母验证码了,所以针对项目需求做的这个识别可能目前并没有什么参考价值,但是在学习的过程中也了解了很多比如Tess4J和JavaCV这些技术,图像处理比如缩放和裁剪等,话不多说,下面就搞起吧。
一、常见的验证码识别
1.常见验证码
![]()
![]()
![]()
![]()
这里我主要针对第四种验证码进行识别,其实试验后我发现前面三个都是可以识别的,只是裁剪和二值化的阈值需要调整。
2.识别思路
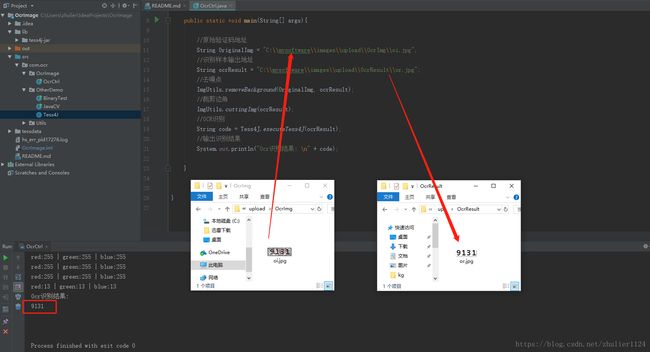
输入原始验证码之后,先对图片进行干扰像素去除,再裁剪边角,最后利用Tess4J进行识别。
3.主要代码
main方法调用具体实现方法
    public static void main(String[] args){

        //原始验证码地址
        String OriginalImg = "C:\\mysoftware\\images\\upload\\OcrImg\\oi.jpg";
        //识别样本输出地址
        String ocrResult = "C:\\mysoftware\\images\\upload\\OcrResult\\or.jpg";
        //去噪点
        ImgUtils.removeBackground(OriginalImg, ocrResult);
        //裁剪边角
        ImgUtils.cuttingImg(ocrResult);
        //OCR识别
        String code = Tess4J.executeTess4J(ocrResult);
        //输出识别结果
        System.out.println("Ocr识别结果: \n" + code);

}public static void removeBackground(String imgUrl, String resUrl){
//定义一个临界阈值
int threshold = 300;
try{
BufferedImage img = ImageIO.read(new File(imgUrl));
int width = img.getWidth();
int height = img.getHeight();
for(int i = 1;i < width;i++){
for (int x = 0; x < width; x++){
for (int y = 0; y < height; y++){
Color color = new Color(img.getRGB(x, y));
System.out.println("red:"+color.getRed()+" | green:"+color.getGreen()+" | blue:"+color.getBlue());
int num = color.getRed()+color.getGreen()+color.getBlue();
if(num >= threshold){
img.setRGB(x, y, Color.WHITE.getRGB());
}
}
}
}
for(int i = 1;i这样就能得到一个降噪之后的验证码,再后续通过颜色反转将验证码的内容显示出来就完成了干扰像素的去除工作,接下来非必要的一项工作就是将验证码进行裁边。为什么要裁边呢,通过观察我们发现验证码的边角部分没有干扰素涂抹,在我们的去除干扰素过程中可能会影响到这部分像素块导致最后边角有噪点,这时将边角裁掉几个像素就可以了。
public static void cuttingImg(String imgUrl){
        try{
            File newfile=new File(imgUrl);
            BufferedImage bufferedimage=ImageIO.read(newfile);
            int width = bufferedimage.getWidth();
            int height = bufferedimage.getHeight();
            if (width > 52) {
                bufferedimage=ImgUtils.cropImage(bufferedimage,(int) ((width - 52) / 2),0,(int) (width - (width-52) / 2),(int) (height));
                if (height > 16) {
                    bufferedimage=ImgUtils.cropImage(bufferedimage,0,(int) ((height - 16) / 2),52,(int) (height - (height - 16) / 2));
                }
            }else{
                if (height > 16) {
                    bufferedimage=ImgUtils.cropImage(bufferedimage,0,(int) ((height - 16) / 2),(int) (width),(int) (height - (height - 16) / 2));
                }
            }
            ImageIO.write(bufferedimage, "jpg", new File(imgUrl));
        }catch (IOException e){
            e.printStackTrace();
        }
}![]() 变为了
变为了 ![]()
到这里就很简单了,我们可以利用裁切将图片平均剪成四份,再通过简单的训练比对完成匹配,详细操作可以看这里,我就不再赘述了。我这里提供另一个思路,就是要说的Tess4J文本识别工具,通过这个工具我可以直接对当前生成的验证码进行OCR识别,准确率接近100%,注意我项目里是采用Tess4J进行最终的验证码图片内容识别的。
二、Tess4J的使用
1.首先需要到官网下载Tess4J的压缩包,下载后先将解压出来的包内tessdata文件拷入项目根目录,然后引入Tess4J\lib包,最后还要单独引入Tess4J\dist\tess4j-3.4.8.jar包
2.编写简单的识别代码
public static String executeTess4J(String imgUrl){
        String ocrResult = "";
        try{
            ITesseract instance = new Tesseract();
            //instance.setLanguage("chi_sim");
            File imgDir = new File(imgUrl);
            //long startTime = System.currentTimeMillis();
            ocrResult = instance.doOCR(imgDir);
        }catch (TesseractException e){
            e.printStackTrace();
        }
        return ocrResult;
    }
ocrResult 即为最终是别的结果,代码相当简单,其中我注释掉的 instance.setLanguage("chi_sim"); 这部分是指定需要识别文本的语言,如果是识别中文按照我注释的chi_sim填写即可,当然这是一个中文包,需要先在这里找到中文包下载后放到Tess4J\tessdata目录下即可使用。
到这里基本就完成了对这个验证码的简单识别,在这个过程中基本没遇到什么有难度的工作,毕竟是站在大佬们的肩膀上操作,其实还是学到了很多东西的,需求这东西说不定哪天就遇到了呢。接下来我在研究验证码识别的过程中了解到了JavaCV,比较感兴趣就记录下来,方便之后使用吧。
三、JavaCV的使用
1. 首先就是去官网下载包啦,点 这里,引入很简单,解压后将javacv-bin包引入项目即可(可以看到封装了OpenCV)2. 基本操作:获取灰度图像、获取二值化处理图像
public static void main(String[] args) {
        //图片地址
        String imgUrl = "C:\\mysoftware\\images\\upload\\OcrImg\\20180607004153.png";
        //得到灰度图像
        getHuidu(imgUrl);
        //得到二值化处理图像
        getErzhihua(imgUrl);
    }

    //得到灰度图像
    public static void getHuidu(String imgUrl){
        Mat image=imread(imgUrl,CV_LOAD_IMAGE_GRAYSCALE);
        //读入一个图像文件并转换为灰度图像(由无符号字节构成)
        Mat image1=imread(imgUrl,CV_LOAD_IMAGE_COLOR);
        //读取图像,并转换为三通道彩色图像,这里创建的图像中每个像素有3字节
        //如果输入图像为灰度图像,这三个通道的值就是相同的
        System.out.println("image has "+image1.channels()+" channel(s)");
        //channels方法可用来检查图像的通道数
        flip(image,image,1);//就地处理,参数1表示输入图像,参数2表示输出图像
        //在一窗口显示结果
        namedWindow("输入图片显示窗口");//定义窗口
        imshow("输入图片显示窗口",image);//显示窗口
        waitKey(0);//因为他是控制台窗口,会在mian函数结束时关闭;0表示永远的等待按键,正数表示等待指定的毫秒数
    }

    //得到二值化处理图像
    public static void getErzhihua(String imgUrl){
        // TODO Auto-generated method stub
        Mat image=imread(imgUrl);	//加载图像
        if(image.empty())
        {
            System.out.println("图像加载错误,请检查图片路径!");
            return ;
        }
        imshow("原始图像",image);
        Mat gray=new Mat();
        cvtColor(image,gray,COLOR_RGB2GRAY);		//彩色图像转为灰度图像
        imshow("灰度图像",gray);
        Mat bin=new Mat();
        threshold(gray,bin,120,255,THRESH_TOZERO); 	//图像二值化
        imshow("二值图像",bin);
        waitKey(0);
    }
看一下效果:
四、生成验证码
生成验证码大致思路:function changeValidateCode() {
var timestamp = new Date().getTime();
$("#randImg").attr('src','../recordHome/getRand?flag='+timestamp);
}2. 后台生成验证码
/**
	 * 随机生成4位验证码
	 * @param httpSession
	 * @param request
	 * @param response
	 */
	@RequestMapping(value="/getRand")
	public void rand(HttpSession httpSession, HttpServletRequest request, HttpServletResponse response){
		// 在内存中创建图象
		int width = 65, height = 20;
		BufferedImage image = new BufferedImage(width, height,BufferedImage.TYPE_INT_RGB);
		// 获取图形上下文
		Graphics g = image.getGraphics();
		// 生成随机类
		Random random = new Random();
		// 设定背景色
		g.setColor(getRandColor(200, 250));
		g.fillRect(0, 0, width, height);
		// 设定字体
		g.setFont(new Font("Times New Roman", Font.PLAIN, 18));
		// 随机产生155条干扰线,使图象中的认证码不易被其它程序探测到
		g.setColor(getRandColor(160, 200));
		for (int i = 0; i < 155; i++) {
			int x = random.nextInt(width);
			int y = random.nextInt(height);
			int xl = random.nextInt(12);
			int yl = random.nextInt(12);
			g.drawLine(x, y, x + xl, y + yl);
		}
		// 取随机产生的认证码(6位数字)
		String sRand = "";
		for (int i = 0; i < 4; i++) {
			String rand = String.valueOf(random.nextInt(10));
			sRand += rand;
			// 将认证码显示到图象中
			g.setColor(new Color(20 + random.nextInt(110), 20 + random
					.nextInt(110), 20 + random.nextInt(110)));
			// 调用函数出来的颜色相同,可能是因为种子太接近,所以只能直接生成
			g.drawString(rand, 13 * i + 6, 16);
		}
		// 将认证码存入SESSION
		ContextHolderUtils.getSession().setAttribute("rand", sRand);
		//httpSession.setAttribute("rand", sRand);
		// 图象生效
		g.dispose();
		try{
			ImageIO.write(image, "JPEG", response.getOutputStream());
			response.getOutputStream().flush();
		}catch (Exception e){
		}
	}

	/**
	 * 给定范围获得随机颜色
	 * @param fc
	 * @param bc
	 * @return
	 */
	private Color getRandColor(int fc, int bc) {
		Random random = new Random();
		if (fc > 255)
			fc = 255;
		if (bc > 255)
			bc = 255;
		int r = fc + random.nextInt(bc - fc);
		int g = fc + random.nextInt(bc - fc);
		int b = fc + random.nextInt(bc - fc);
		return new Color(r, g, b);
}@RequestMapping("/login")
public String login(HttpServletRequest request, HttpServletResponse response, @RequestParam String username, @RequestParam String password, @RequestParam String vcode) {
if(!vcode.equals(ContextHolderUtils.getSession().getAttribute("rand"))){
request.setAttribute("failMsg", "验证码不正确!");
return "/base/login";
}
logger.info("用户登录用户:" + username );
...
}最后是全部代码,这里说到的我都集成到了项目里,直接下载就可以运行,欢迎大家指正。
有用的话可以☆star一下哦
https://github.com/jwwam/OcrImage.git
本文完 2018-6-7
有问题欢迎大家留言指正
来自 https://blog.csdn.net/zhulier1124/article/details/80606647
转载请注明,谢谢。
