Springboot2整合RabbitMQ
1.RabbitMQ简介
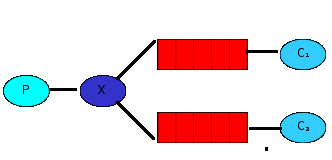
P代表的发送的消息(Message)
X代表的交换机(Exchange)
红色的代表队列(Queue)
C代表着消费者(Consumer)
2.Springboot整合RabbitMQ发送消息的流程
发送什么类型的消息=》什么类型的交换机中=》根据匹配规则=》放人队列中去=》监听队列的消息=》成功消费
Routing key(匹配规则):生产者在将消息发送给Exchange的时候,一般会指定一个routing key,来指定这个消息的路由规则,而这个routing key需要与Exchange Type及binding key联合使用才能最终生效。(意思就是routig key 是一个指标,因为在多个队列和交换机的情况下,消息不知道要投放给哪个队列,所以routing key就是与哪个绑定的队列的routing key一致或者匹配就投送消息到那个队列中去,具体情况代码中详细说明!)
Binding key(匹配规则):是交换机在绑定那个队列的时候会有一个binding key绑定的,真实情况下参数名都是RoutingKey,没有BindingKey这个参数。
Exchange Types(什么类型的交换机):是指交换机的类型,一般有fanout、direct、topic、headers这四种。
fanout:是路由广播的形式,将会把消息发给绑定它的全部队列,即便设置了key,也会被忽略.
direct:RabbitMQ默认的交换机模式,也是最简单的模式.即创建消息队列的时候,指定一个BindingKey.当发送者发送消息的时候,指定对应的Key.当Key和消息队列的BindingKey一致的时候,消息将会被发送到该消息队列中.
topic:转发信息主要是依据通配符,队列和交换机的绑定主要是依据一种模式(通配符+字符串),而当发送消息的时候,只有指定的Key和该模式相匹配的时候,消息才会被发送到该消息队列中(代码中详细解说)
headers:也是根据一个规则进行匹配,在消息队列和交换机绑定的时候会指定一组键值对规则,而发送消息的时候也会指定一组键值对规则,当两组键值对规则相匹配的时候,消息会被发送到匹配的消息队列中
队列(Queue):代码中创建队列指定队列名称(具体代码中有注释)或者在客户端中创建队列。
其他就不多说了自己上代码
3.pom.xml引入依赖
        org.springframework.boot
        spring-boot-starter-parent
        2.1.5.RELEASE


            org.springframework.boot
            spring-boot-starter-web


            org.springframework.boot
            spring-boot-starter-test
            test


            org.springframework.boot
            spring-boot-starter-amqp
4.启动Rabbitmq服务
进入你自己的虚拟机启动或者本地启动服务,我是在虚拟机启动:service rabbitmq-server start
5.Springboot配置文件
server.port=8889

spring.rabbitmq.host=192.168.221.150
spring.rabbitmq.port=5672
spring.rabbitmq.username=zl
spring.rabbitmq.password=123
#开启消息确认机制
spring.rabbitmq.publisher-confirms=true
#支持消息发送失败返回队列
#spring.rabbitmq.publisher-returns=true

#spring.rabbitmq.template.mandatory=true
#连接超时时间
spring.rabbitmq.connection-timeout=15000
#用户虚拟机权限名称
spring.rabbitmq.virtual-host=/
6.编写配置类
@Configuration
public class RabbitmqConfig {
    private static Logger log = LoggerFactory.getLogger(RabbitmqConfig.class);
    @Autowired
    private CachingConnectionFactory connectionFactory;

    //这个用来验证direct Exchange的类型队列
    @Bean("dirQueue")//创建队列和设置名称,不设置默认是方法名。
    public Queue dirQueue() {
        return new Queue("direct");//direct是队列的名称,@Bean("dirQueue")是用来绑定交换机的名称
    }
    //这个用来验证topic Exchange的类型队列
    @Bean(name="message")
    public Queue queueMessage() {
        return new Queue("topic.message");
    }

    @Bean(name="messages")//
    public Queue queueMessages() {
        return new Queue("topic.messages");
    }
    //这个用来验证Fanout Exchange的类型队列,headers类型的队列就不演示了
    @Bean(name="fanoutMessage")
    public Queue AMessage() {
        return new Queue("fanout.A");
    }

    @Bean
    public Queue BMessage() {
        return new Queue("fanout.B");
    }

    @Bean
    public Queue CMessage() {
        return new Queue("fanout.C");
    }

    @Bean
    DirectExchange directExchange(){  //配置Direct类型的交换机
        return new DirectExchange("directExchange");//设置交换机的名称
    }

    @Bean
    TopicExchange exchange() {
        return new TopicExchange("topicExchange");
    }

    @Bean
    FanoutExchange fanoutExchange() {
        return new FanoutExchange("fanoutExchange");
    }

    @Bean   //绑定Direct类型的交换机发送消息到那个队列中去。  @Qualifier("dirQueue")就是上面的队列的名称
    Binding bindingExchangeDirect(@Qualifier("dirQueue")Queue dirQueue, DirectExchange directExchange){
        return  BindingBuilder.bind(dirQueue).to(directExchange).with("direct");
        //with("direct")设置routingKey为direct,生产者发送消息的时候也需要是direct才能发送到dirQueue队列中去。
    }

    @Bean//和上面的一样队列绑定什么样的交换机设置routingKey
    Binding bindingExchangeMessage(@Qualifier("message")Queue queueMessage, TopicExchange exchange) {
        return BindingBuilder.bind(queueMessage).to(exchange).with("topic.message");
    }

    @Bean//和上面的一样队列绑定什么样的交换机设置routingKey
    Binding bindingExchangeMessages(@Qualifier("messages")Queue queueMessages, TopicExchange exchange) {
        return BindingBuilder.bind(queueMessages).to(exchange).with("topic.#");
        //topic.#指的是生产者发送routing key 只要是topic.开头都会发送到改队列来。如果是上面的topic.message就会匹配到上面的队列中去,精准匹配优先。
    }

    @Bean//和上面的一样队列绑定什么样的交换机,不需要设置routingKey因为是发送给全部队列的消息,广播模式。
    Binding bindingExchangeA(@Qualifier("AMessage")Queue AMessage,FanoutExchange fanoutExchange) {
        return BindingBuilder.bind(AMessage).to(fanoutExchange);
    }

    @Bean
    public RabbitTemplate rabbitTemplate(){
        connectionFactory.setPublisherConfirms(true);//配置文件已经配置就不需要配置了
        connectionFactory.setPublisherReturns(true);
        RabbitTemplate rabbitTemplate = new RabbitTemplate(connectionFactory);
        rabbitTemplate.setMandatory(true);
       /**

         * 如果消息没有到exchange,则confirm回调,ack=false

         * 如果消息到达exchange,则confirm回调,ack=true

         * exchange到queue成功,则不回调return

        * exchange到queue失败,则回调return(需设置mandatory=true,否则不回回调,消息就丢了)

        */

        rabbitTemplate.setConfirmCallback(new RabbitTemplate.ConfirmCallback() {  //也可以在生产者类中检查RabbitTemplate.ConfirmCallback类来实现
            @Override
            public void confirm(CorrelationData correlationData, boolean ack, String cause) {
                log.info(" 消息确认的id: " + correlationData);
                if(ack){
                    log.info("消息发送成功");
                }else{
                    log.info("消息发送失败:id "+ correlationData +"消息发送失败的原因"+ cause);

                }
            }
        });
        rabbitTemplate.setReturnCallback(new RabbitTemplate.ReturnCallback() {
            @Override
            public void returnedMessage(Message message, int replyCode, String replyText, String exchange, String routingKey) {

                log.info("消息丢失:exchange({}),route({}),replyCode({}),replyText({}),message:{}",exchange,routingKey,replyCode,replyText,message);
            }
        });
        return rabbitTemplate;
    }
}
7.创建生产者类,使用Direct类型的交换机。
@Component
public class HelloProvider{

    @Autowired
    private RabbitTemplate rabbitTemplate1;


    public void send() {

        String sendMsg = "hello1 " + new Date();
        this.rabbitTemplate1.convertAndSend("directExchange","direct", sendMsg);
    //directExchange是配置类中的交换机名称,指定这条消息发送到那个类型的交换机中。
        //direct是routing Key 必须匹配绑定交换机的时候设置的routing Key匹配才能发送消息到队列中去。
    }


}
8.创建消费者类
@Component
@RabbitListener(queues = "direct") //监听那个队列的名称,有消息就接收到消息。
public class HelloConsumer {

    @RabbitHandler
    public void process(String message, Channel channel) throws Exception {
        System.out.println("Receiver1  : " + message);

    }

}
9.创建控制层类
@RestController
public class JMSController {

    @Autowired
    HelloProvider helloSender1;
    @RequestMapping("/hello")
    public void hello() {
        helloSender1.send();
    }
}
10.运行项目
2020-07-03 17:14:45.534  INFO 12308 --- [68.221.150:5672] c.i.s.config.Application                 : 消息发送成功
Receiver1  : hello1 Fri Jul 03 17:14:45 CST 2020
11.使用TopicExchange,创建生产者。
@Component
public class TopicProvider {

    @Autowired
    private RabbitTemplate rabbitTemplate1;


    public void send(User user) {

        this.rabbitTemplate1.convertAndSend("topicExchange","topic.message", user);

        //topicExchange是配置类中的交换机名称,指定这条消息发送到那个类型的交换机中。
        //topic.message是routing Key 必须匹配绑定交换机的时候设置的routing Key匹配才能发送消息到队列中去。
        //这边的topic.message是routing Key必须和配置文件中的routing Key相符合。
    }

    public void send2(User user) {

        this.rabbitTemplate1.convertAndSend("topicExchange","topic.messages", user);

        //topicExchanges注意这个交换机中在配置类中配置的routing Key是topic.#表示只要是以topic.开头的都会放入到该队列中来,
        //注意topic.message也是topic开头他会匹配到相应的队列中去也回发到到第二个模糊匹配中来。2个都会发送
        //注意配置类中的topic.#,#代表topic.之后的单词都匹配  *代表之后只能匹配一个单词。

    }

}
12.topic消费者
@Component
@RabbitListener(queues = "topic.message")//监听相对应的匹配的队列
public class TopicConsumer {

        @RabbitHandler
        public void process(User user) throws Exception {
            System.out.println("User=:"+user);

        }
}
消费者2
Component
@RabbitListener(queues = "topic.messages")//监听模糊匹配的队列
public class TopicConsumer2 {

        @RabbitHandler
        public void process(User user) throws Exception {
            System.out.println("User=:"+user);

        }
}
13.控制层方法
@RestController
public class JMSController {

    @Autowired
    HelloProvider helloSender1;
    @RequestMapping("/hello")
    public void hello() {
        helloSender1.send();
    }


    @Autowired
    TopicProvider topicProvider;
    @RequestMapping("/topic")  //新增topic交换机类型
    public void topic() {
        User user=new User();
        user.setName("张三");
        user.setPass("123456");
        topicProvider.send(user);

        User user2=new User();
        user2.setName("李四");
        user2.setPass("123456");
        topicProvider.send2(user2);
    }
}
14.访问http://localhost:8889/topic
2020-07-06 15:40:25.685  INFO 15568 --- [68.221.150:5672] c.i.s.config.Application                 :  消息确认的id: null
2020-07-06 15:40:25.685  INFO 15568 --- [68.221.150:5672] c.i.s.config.Application                 : 消息发送成功
2020-07-06 15:40:25.686  INFO 15568 --- [68.221.150:5672] c.i.s.config.Application                 :  消息确认的id: null
2020-07-06 15:40:25.686  INFO 15568 --- [68.221.150:5672] c.i.s.config.Application                 : 消息发送成功

User=:User{name='张三', pass='123456'}
User=:User{name='李四', pass='123456'}
User=:User{name='张三', pass='123456'}

由此可见topic.message匹配了2个队列。发送了2条
15.使用FanoutExchange类型的交换机,创建消费者
@Component
public class FanoutProvider{

    @Autowired
    private AmqpTemplate rabbitTemplate;
    public void send(User user) {
        // 这里不需要routing key,因为是群发,发送到每个被绑定到Fanout交换机的队列。
        this.rabbitTemplate.convertAndSend("fanoutExchange","", user);
    }
}
16.创建3个消费者,群发到3个消费着中,消费者监听不同的队列。
@Component
@RabbitListener(queues = "fanout.A")
public class FanoutConsumer{

    @RabbitHandler
    public void process(User user) {
        System.out.println("FanoutConsumer  : " + user);
    }
}
@Component
@RabbitListener(queues = "fanout.B")
public class FanoutConsumer2 {
@RabbitHandler
public void process(User user) {
System.out.println("FanoutConsumer2 : " + user);
}
}@Component
@RabbitListener(queues = "fanout.C")
public class FanoutConsumer3 {
@RabbitHandler
public void process(User user) {
System.out.println("FanoutConsumer3 : " + user);
}
}17.控制层
 @Autowired
    FanoutProvider fanoutProvider;
    @RequestMapping("/fanout")
    public void fanout() {
        User user=new User();
        user.setName("大家好我叫张三丰");
        user.setPass("密码是xxx");
        fanoutProvider.send(user);
    }
18.访问http://localhost:8889/fanout
2020-07-06 16:13:22.069  INFO 23792 --- [68.221.150:5672] c.i.s.config.Application                 :  消息确认的id: null
2020-07-06 16:13:22.070  INFO 23792 --- [68.221.150:5672] c.i.s.config.Application                 : 消息发送成功
FanoutConsumer2  : User{name='大家好我叫张三丰', pass='密码是xxx'}
FanoutConsumer3  : User{name='大家好我叫张三丰', pass='密码是xxx'}
FanoutConsumer  : User{name='大家好我叫张三丰', pass='密码是xxx'}
分布式开发中使用rabbitmq会存在许多问题。网上也有许多的解决方案。
个人理解不对的地方请小伙伴留言哦,觉得不错的小伙伴麻烦点个赞,谢谢!
