微信小程序之消息订阅的实现
首先创建小程序的时候写上自己的小程序的APPID,不要使用测试号。
一开始写的时候老是报错,出现错误提示
{"errcode":47001,"errmsg":"data format error hint:"},
应该就是传值错误。
而且模板消息马上要下线了,要使用订阅消息,和之前的模板消息还是有一点点区别,至少在前端不需要传值到后端,但是需要一个认证,需要用户授权。
下面正式开始。
根据微信开发文档的步骤一步一步操作
https://developers.weixin.qq.com/miniprogram/dev/framework/open-ability/subscribe-message.html
1.去微信公众平台,自己先添加一个消息模板,记下模板id
2.获取授权
小程序wxml文件代码
小程序的js文件
data: {
    tmplIds: '模板ID',

  },

  getTmplID: function () {
    console.log('已接收消息1')
    wx.requestSubscribeMessage({
      tmplIds: [this.data.tmplIds],
      success(res) {
        console.log(res)
        if (res['模板ID'] === 'accept') {
          console.log('用户同意了')
          wx.showToast({
            title: '订阅OK!',
            duration: 1000,
          })

          wx.request({
            method: 'GET',
            url: '后端接口',
            //不是josn格式
            header: {
              'content-type': 'application/json'
            },
            data: {
            },
            //调用接口成功
            success: function (res) {
              console.log(res);
            },
          });

        }
      },
      fail(err) {
        //失败
        console.error(err);
        reject()
      }
    })

  },
当使用wx.requestSubscribeMessage请求过后,小程序返回的是这样的数据
3.下面就是看后端怎么发送请求数据了。
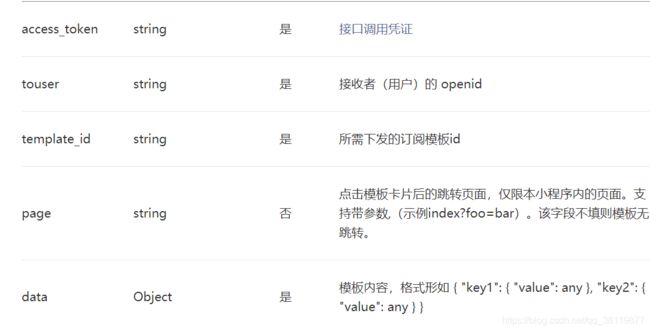
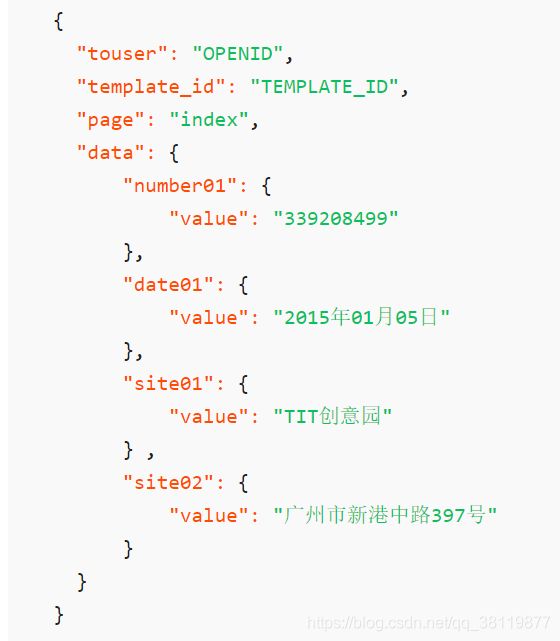
首先要明确你要发送哪些数据,把数据都凑齐了,按照格式发送过去,这是文档里要求格式
那么先获取openid,在小程序端使用wx.login获得code,传到后端,这些代码是我在工程里面摘的,具体细节不太完整。
  private JSONObject getUserWXLoginInfo(String wxCode) {
        String requestUrl = "https://api.weixin.qq.com/sns/jscode2session";
        Map requestUrlParam = new HashMap();
        requestUrlParam.put("appid", AppID);	//开发者设置中的appId
        requestUrlParam.put("secret", AppSecret);	//开发者设置中的appSecret
        requestUrlParam.put("js_code", wxCode);	//小程序调用wx.login返回的code
        requestUrlParam.put("grant_type", "authorization_code");	//默认参数
        //发送post请求读取调用微信 https://api.weixin.qq.com/sns/jscode2session 接口获取openid用户唯一标识
        JSONObject jsonObject = JSON.parseObject(UrlUtil.sendPost(requestUrl, requestUrlParam));
        return jsonObject;
    }

 @GetMapping("getopenid")
 public String login(@RequestParam("code") String wxCode){
        //请求微信api获取用户的openid和sessionKey
        JSONObject jsonObject = getUserWXLoginInfo(wxCode);
        if(jsonObject!=null&&!jsonObject.containsKey("openid")) {
            return R.error().put("no_power","未授权!");
        }
          openid = (String)jsonObject.get("openid");
         return openid
     }
然后获取access_token和发送数据
 //获取订阅消息推送的token
    private JSONObject getUserWXOAthToken( ) {
        String requestUrl = "https://api.weixin.qq.com/cgi-bin/token";
        Map requestUrlParam = new HashMap();
        requestUrlParam.put("appid", AppID);	//开发者设置中的appId
        requestUrlParam.put("secret", AppSecret);	//开发者设置中的appSecret
        requestUrlParam.put("grant_type", "client_credential");	//默认参数
        //获取小程序全局唯一后台接口调用凭据(access_token)。调用绝大多数后台接口时都需使用 access_token,开发者需要进行妥善保存。
        JSONObject jsonObject = JSON.parseObject(UrlUtil.sendPost(requestUrl, requestUrlParam));
        return jsonObject;
    }

 @GetMapping("GetDYMsg")

    public R  msg() {
        JSONObject jsonObject = getUserWXOAthToken();
        String access_token = (String) jsonObject.get("access_token");
        System.out.println(jsonObject);
        String requestUrl = "https://api.weixin.qq.com/cgi-bin/message/subscribe/send?access_token="+access_token;

        Map ParamList = new HashMap();
        Map thing1=new HashMap();
        Map thing8=new HashMap();
        Map thing10=new HashMap();
        thing1.put("value","shuju");
        thing8.put("value","学习");
        thing10.put("value","shuju");
        ParamList.put("thing1",thing1);
        ParamList.put("thing8",thing8);
        ParamList.put("thing10",thing10);

        Map requestUrlParam = new HashMap();

        requestUrlParam.put("touser", openid);	//开发者openid
        requestUrlParam.put("template_id", "模板id");	//模板id
        requestUrlParam.put("data", ParamList);
        JSONObject jsonParamList=new JSONObject(requestUrlParam);

        JSONObject jsonObject1 = JSON.parseObject(UrlUtil.sendPost(requestUrl, jsonParamList));
        System.out.println(jsonObject1);

        return R.ok(jsonObject1);

    }
重点是,附上我的工具类UrlUtil.class,当时真的大部分时间都在这个httpclient的工具类上了。
package io.renren.modules.app.utils;

import java.io.BufferedReader;
import java.io.IOException;
import java.io.InputStreamReader;
import java.io.PrintWriter;
import java.net.URL;
import java.net.URLConnection;
import java.util.Iterator;
import java.util.Map;

import com.alibaba.fastjson.JSON;
import org.apache.log4j.LogManager;
import org.apache.log4j.Logger;

public class UrlUtil {

    private final Logger LOG = LogManager.getLogger(this.getClass());

    /**
     * 向指定 URL 发送POST方法的请求
     *
     * @param url 发送请求的 URL
     * @param paramMap 请求参数
     * @return 所代表远程资源的响应结果
     */
    public static String sendPost(String url, Map paramMap) {
        PrintWriter out = null;
        BufferedReader in = null;
        String result = "";

        String param = "";
        Iterator it = paramMap.keySet().iterator();

        while (it.hasNext()) {
            String key = it.next();
            param += key + "=" + paramMap.get(key) + "&";
        }

        try {
            URL realUrl = new URL(url);
            // 打开和URL之间的连接
            URLConnection conn = realUrl.openConnection();
            // 设置通用的请求属性
            conn.setRequestProperty("accept", "*/*");
            conn.setRequestProperty("connection", "Keep-Alive");
            conn.setRequestProperty("Accept-Charset", "utf-8");
            conn.setRequestProperty("user-agent", "Mozilla/4.0 (compatible; MSIE 6.0; Windows NT 5.1;SV1)");
            // 发送POST请求必须设置如下两行
            conn.setDoOutput(true);
            conn.setDoInput(true);
            // 获取URLConnection对象对应的输出流
            out = new PrintWriter(conn.getOutputStream());
            // 发送请求参数
            out.print(param);
            // flush输出流的缓冲
            out.flush();
            // 定义BufferedReader输入流来读取URL的响应
            in = new BufferedReader(new InputStreamReader(conn.getInputStream(), "UTF-8"));
            String line;
            while ((line = in.readLine()) != null) {
                result += line;
            }
        } catch (Exception e) {
            e.printStackTrace();
        }
        //使用finally块来关闭输出流、输入流
        finally {
            try {
                if (out != null) {
                    out.close();
                }
                if (in != null) {
                    in.close();
                }
            } catch (IOException ex) {
                ex.printStackTrace();
            }
        }
        return result;
    }

    /**
     * 向指定 URL 发送POST方法的请求
     *
     * @param url 发送请求的 URL
     * @param param 请求参数
     * @return 所代表远程资源的响应结果
     */
    public static String sendPost(String url, JSON param) {
        PrintWriter out = null;
        BufferedReader in = null;
        String result = "";

        try {
            URL realUrl = new URL(url);
            // 打开和URL之间的连接
            URLConnection conn = realUrl.openConnection();
            // 设置通用的请求属性
            conn.setRequestProperty("accept", "*/*");
            conn.setRequestProperty("connection", "Keep-Alive");
            conn.setRequestProperty("Accept-Charset", "utf-8");
            conn.setRequestProperty("user-agent", "Mozilla/4.0 (compatible; MSIE 6.0; Windows NT 5.1;SV1)");
            // 发送POST请求必须设置如下两行
            conn.setDoOutput(true);
            conn.setDoInput(true);
            // 获取URLConnection对象对应的输出流
            out = new PrintWriter(conn.getOutputStream());
            // 发送请求参数
            out.print(param);
            // flush输出流的缓冲
            out.flush();
            // 定义BufferedReader输入流来读取URL的响应
            in = new BufferedReader(new InputStreamReader(conn.getInputStream(), "UTF-8"));
            String line;
            while ((line = in.readLine()) != null) {
                result += line;
            }
        } catch (Exception e) {
            e.printStackTrace();
        }
        //使用finally块来关闭输出流、输入流
        finally {
            try {
                if (out != null) {
                    out.close();
                }
                if (in != null) {
                    in.close();
                }
            } catch (IOException ex) {
                ex.printStackTrace();
            }
        }
        return result;
    }
}
至此,就结束了。记下自己学习的过程。


