Win10安装vscode详细过程(下)
在我的分类专栏里有win10安装vscode上哦!!!
粘上链接Win10安装vscode详细过程(上)
然后下面的内容有参考这个dalao的回答
vscode配置过程
上过程啦:
首先随便在哪个盘里建一个文件夹,叫什么都行,英文就可
然后双击打开vscode,,点击File,open folder,打开你刚刚新建的文件夹,在这个文件夹下新建一个folder,它的名字.vscode
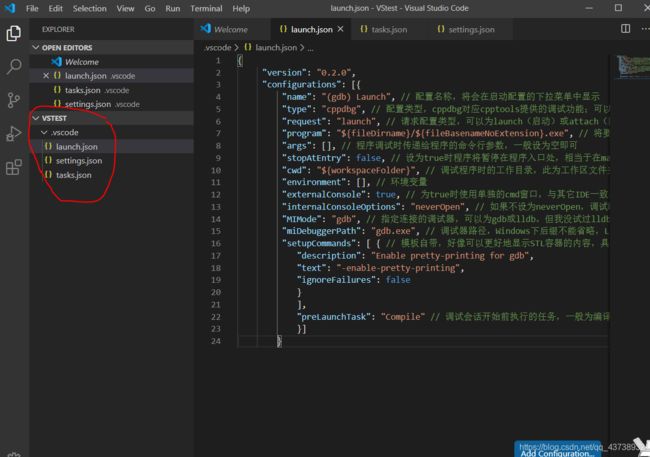
然后在.vscode下新建3个file 分别名字如下图:
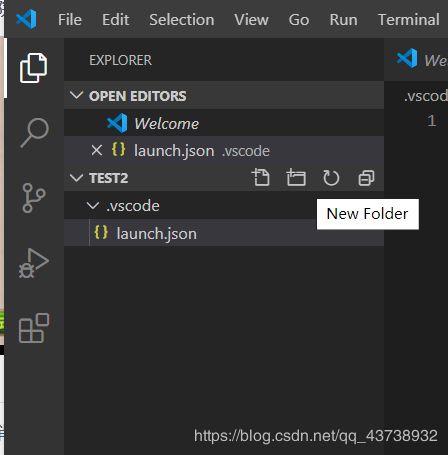
如果你不会建立文件夹的话看这里
↑,然后再鼠标右击.vscode,选择new file,然后输入file名 launch.json
其它两个文件建立过程相同
下面是保存代码的方法
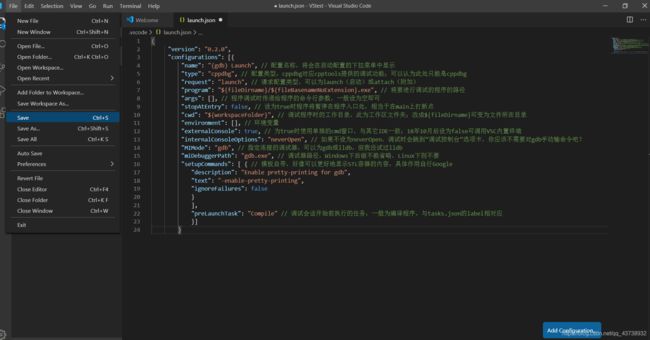
接下来是你建立那几个文件里面的代码,详细的还是去看看大佬的解释,我这里为了让你阅读,增强文章美感,就把注释删掉了
//千万记住,名字别乱改
launch.json
{ "version": "0.2.0",
"configurations": [{
"name": "(gdb) Launch",
"type": "cppdbg",
"request": "launch",
"program":"${fileDirname}/${fileBasenameNoExtension}.exe",
"args": [],
"stopAtEntry": false,
"cwd": "${workspaceFolder}",
"environment": [],
"externalConsole": true,
"internalConsoleOptions": "neverOpen",
"MIMode": "gdb",
"miDebuggerPath": "gdb.exe",
"setupCommands": [ {
"description": "Enable pretty-printing for gdb",
"text": "-enable-pretty-printing",
"ignoreFailures": false
}
],
"preLaunchTask": "Compile"
}]
}再说一遍,不理解以上代码去看文章开头所附的链接,大佬的解释是很详细的,,,,,实在不懂得话,可以私戳问我(23333,骗你的,别问我,问就是不知道,^ ^
tasks.json代码:
{
     "version": "2.0.0",
     "tasks": [{
         "label": "Compile",
         "command": "gcc",
         "args": [
             "${file}",
             "-o",
             "${fileDirname}/${fileBasenameNoExtension}.exe",
             "-g",
             "-Wall",
             "-static-libgcc",
             "-fexec-charset=GBK",
             // "-std=c11",
             ],
             "type": "process",
             "group": {
                 "kind": "build",
                 "isDefault": true
                 },
                 "presentation": {
                     "echo": true,
                     "reveal": "always",
                     "focus": false,
                     "panel": "shared"
                    },
                     // "problemMatcher":"$gcc"
                     }]
}settings.json代码:
{
    "files.defaultLanguage": "c",
    "editor.formatOnType": true,
    "editor.suggest.snippetsPreventQuickSuggestions": false,
    "editor.acceptSuggestionOnEnter": "off",
    // "editor.snippetSuggestions": "top",
    "code-runner.runInTerminal": true,
    "code-runner.executorMap": {
        "c": "cd $dir && gcc '$fileName' -o '$fileNameWithoutExt.exe' -Wall -g -O2 -static-libgcc -std=c11 -fexec-charset=GBK && &'$dir$fileNameWithoutExt'",
        "cpp": "cd $dir && g++ '$fileName' -o '$fileNameWithoutExt.exe' -Wall -g -O2 -static-libgcc -std=c++17 -fexec-charset=GBK && &'$dir$fileNameWithoutExt'"
        // "c": "cd $dir && gcc $fileName -o $fileNameWithoutExt.exe -Wall -g -O2 -static-libgcc -std=c11 -fexec-charset=GBK && $dir$fileNameWithoutExt",
        // "cpp": "cd $dir && g++ $fileName -o $fileNameWithoutExt.exe -Wall -g -O2 -static-libgcc -std=c++17 -fexec-charset=GBK && $dir$fileNameWithoutExt"
    },
        "code-runner.saveFileBeforeRun": true,
        "code-runner.preserveFocus": true,
        "code-runner.clearPreviousOutput": false,
        "code-runner.ignoreSelection": true,
        "C_Cpp.clang_format_sortIncludes": true,
    }
好啦,大功告成啦啦啦啦啦啦,开心心
下面我们开始运行代码
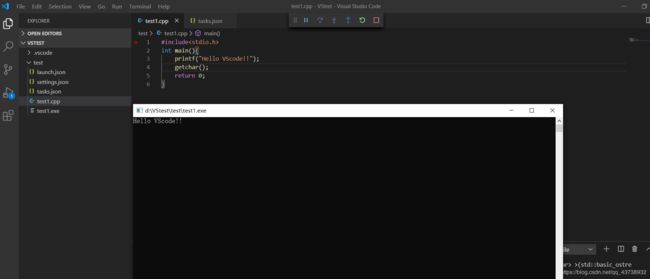
开心吗?不开心,why?
我喜欢写C++,233333
#include好啦,接上修改,毕竟C++爽多了
如果要用C++编程的话修改3个文件即可
launch.json内容
{
    "version": "0.2.0",
    "configurations": [{
          "name": "(gdb) Launch",
          "type": "cppdbg",
          "request": "launch",
          "program":"${fileDirname}/${fileBasenameNoExtension}.exe",
          "args": [],
          "stopAtEntry": false,
          "cwd": "${workspaceFolder}",
          "environment": [],
          "externalConsole": true,
          "internalConsoleOptions": "neverOpen",
          "MIMode": "gdb",
          "miDebuggerPath": "D:\\VSCODE\\MINGW\\mingw64\\bin\\gdb.exe",
          "setupCommands": [ {
          "description": "Enable pretty-printing for gdb",
          "text": "-enable-pretty-printing",
          "ignoreFailures": false
          }
          ],
          "preLaunchTask": "Compile"
    }]
}
tasks.json内容
{
    "version": "2.0.0",
    "tasks": [{
        "label": "Compile",
        "command": "g++",
        "args": [
            "${file}",
            "-o",
            "${fileDirname}/${fileBasenameNoExtension}.exe",
            "-g",
            "-Wall",
            "-static-libgcc",
            "-fexec-charset=GBK",
            // "-std=c11",
            ],
            "type": "process",
            "group": {
                "kind": "build",
                "isDefault": true
                },
                "presentation": {
                    "echo": true,
                    "reveal": "always",
                    "focus": false,
                    "panel": "shared"
                   },
                    // "problemMatcher":"$gcc"
                    }]
}
settings.json其实可以不改的,但是看个人写代码习惯可以做些小修改
{
    "files.defaultLanguage": "c",
    "editor.formatOnType": true,
    "editor.suggest.snippetsPreventQuickSuggestions": false,
    "editor.acceptSuggestionOnEnter": "on",
    // "editor.snippetSuggestions": "top",
    "code-runner.runInTerminal": true,
    "code-runner.executorMap": {
        "c": "cd $dir && gcc '$fileName' -o '$fileNameWithoutExt.exe' -Wall -g -O2 -static-libgcc -std=c11 -fexec-charset=GBK && &'$dir$fileNameWithoutExt'",
        "cpp": "cd $dir && g++ '$fileName' -o '$fileNameWithoutExt.exe' -Wall -g -O2 -static-libgcc -std=c++17 -fexec-charset=GBK && &'$dir$fileNameWithoutExt'"
        // "c": "cd $dir && gcc $fileName -o $fileNameWithoutExt.exe -Wall -g -O2 -static-libgcc -std=c11 -fexec-charset=GBK && $dir$fileNameWithoutExt",
        // "cpp": "cd $dir && g++ $fileName -o $fileNameWithoutExt.exe -Wall -g -O2 -static-libgcc -std=c++17 -fexec-charset=GBK && $dir$fileNameWithoutExt"
    },
        "code-runner.saveFileBeforeRun": true,
        "code-runner.preserveFocus": true,
        "code-runner.clearPreviousOutput": false,
        "code-runner.ignoreSelection": true,
        "C_Cpp.clang_format_sortIncludes": true,
    }
然后开始编写程序,具体过程如下
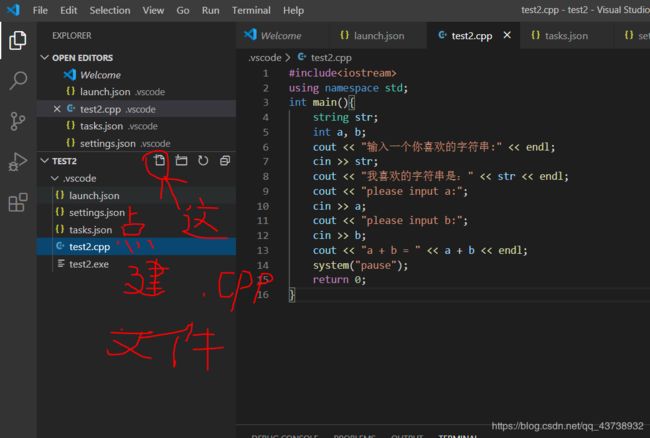
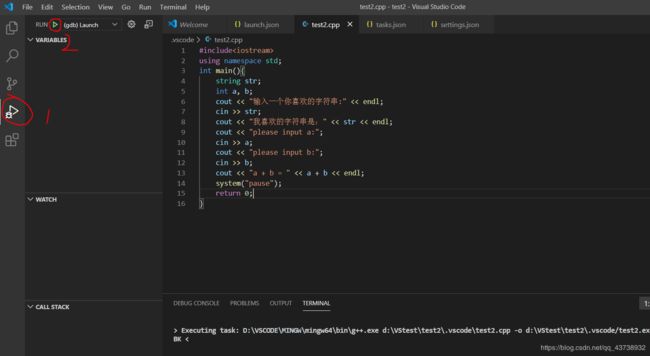
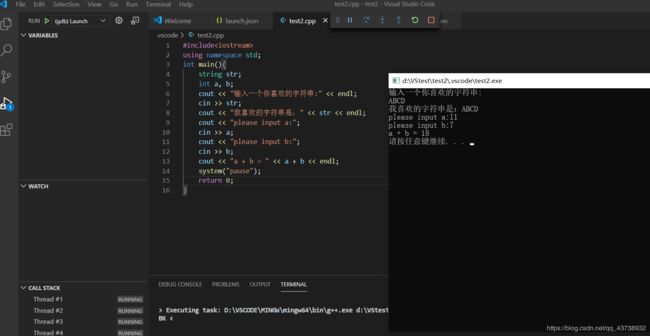
首先在.vscode父目录下,我这里是test2文件夹下建立.cpp,然后开始编写代码,代码写好后,如下图所示,第一步点那个像个虫的图标,第二步点击绿色三角形,然后程序就开始运行了
↑这堆文字不想看的或者看不懂的直接看下面的图
然后开始写代码,代码写好了看下面
#include