RealSense D435深度相机开发(三)----基于距离的图像分割(下)
这次演示的demo是基于OpenCV grabcut分割算法+深度信息去除背景。
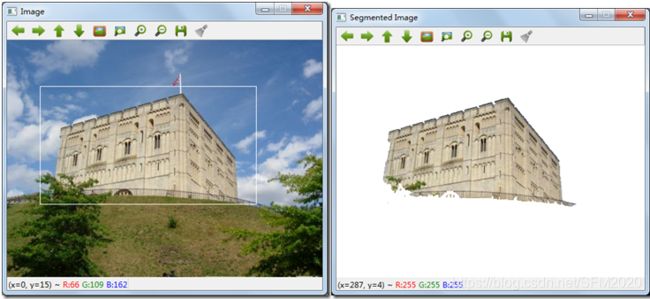
基于RGB相机的grabcut分割算法需要鼠标去框选指定的object,实现分割的目的,类似下图所示:
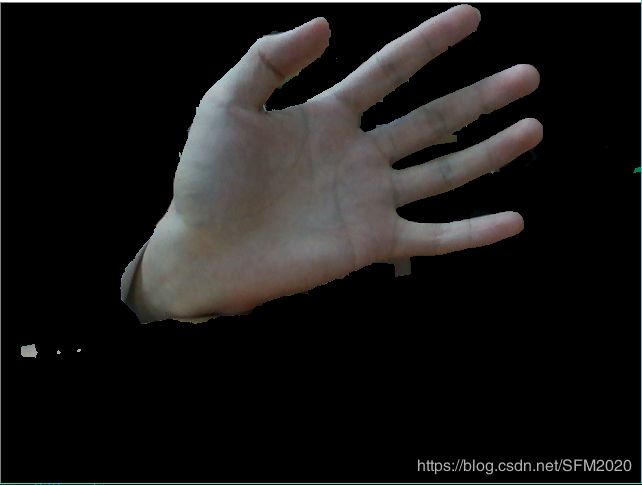
而下图是基于rgb-d相机的grabcut分割算法,它能够根据Z轴的深度信息,自动的分割背景,达到下图的效果,但是缺点在于鲁棒性很差,很难做到正确分割。。
这是源码:
// License: Apache 2.0. See LICENSE file in root directory.
// Copyright(c) 2017 Intel Corporation. All Rights Reserved.

#include  // Include RealSense Cross Platform API
#include    // Include OpenCV API
#include "../cv-helpers.hpp"    // Helper functions for conversions between RealSense and OpenCV

int main(int argc, char * argv[]) try
{
    using namespace cv;
    using namespace rs2;

    // Define colorizer and align processing-blocks
    colorizer colorize;
    align align_to(RS2_STREAM_COLOR);

    // Start the camera
    pipeline pipe;
    pipe.start();

    const auto window_name = "Display Image";
    namedWindow(window_name, WINDOW_AUTOSIZE);

    // We are using StructuringElement for erode / dilate operations
    auto gen_element = [](int erosion_size)
    {
        return getStructuringElement(MORPH_RECT,
            Size(erosion_size + 1, erosion_size + 1),
            Point(erosion_size, erosion_size));
    };

    const int erosion_size = 3;
    auto erode_less = gen_element(erosion_size);
    auto erode_more = gen_element(erosion_size * 2);

    // The following operation is taking grayscale image,
    // performs threashold on it, closes small holes and erodes the white area
    auto create_mask_from_depth = [&](Mat& depth, int thresh, ThresholdTypes type)
    {
        threshold(depth, depth, thresh, 255, type);
        dilate(depth, depth, erode_less);
        erode(depth, depth, erode_more);
    };

    // Skips some frames to allow for auto-exposure stabilization
    for (int i = 0; i < 10; i++) pipe.wait_for_frames();

    while (waitKey(1) < 0 && cvGetWindowHandle(window_name))
    {
        frameset data = pipe.wait_for_frames();
        // Make sure the frameset is spatialy aligned
        // (each pixel in depth image corresponds to the same pixel in the color image)
        frameset aligned_set = align_to.process(data);
        frame depth = aligned_set.get_depth_frame();
        auto color_mat = frame_to_mat(aligned_set.get_color_frame());

        // Colorize depth image with white being near and black being far
        // This will take advantage of histogram equalization done by the colorizer
        colorize.set_option(RS2_OPTION_COLOR_SCHEME, 2);
        frame bw_depth = depth.apply_filter(colorize);

        // Generate "near" mask image:
        auto near = frame_to_mat(bw_depth);
        cvtColor(near, near, CV_BGR2GRAY);
        // Take just values within range [180-255]
        // These will roughly correspond to near objects due to histogram equalization
        create_mask_from_depth(near, 180, THRESH_BINARY);

        // Generate "far" mask image:
        auto far = frame_to_mat(bw_depth);
        cvtColor(far, far, CV_BGR2GRAY);
        far.setTo(255, far == 0); // Note: 0 value does not indicate pixel near the camera, and requires special attention
        create_mask_from_depth(far, 100, THRESH_BINARY_INV);

        // GrabCut algorithm needs a mask with every pixel marked as either:
        // BGD, FGB, PR_BGD, PR_FGB
        Mat mask;
        mask.create(near.size(), CV_8UC1);
        mask.setTo(Scalar::all(GC_BGD)); // Set "background" as default guess
        mask.setTo(GC_PR_BGD, far == 0); // Relax this to "probably background" for pixels outside "far" region
        mask.setTo(GC_FGD, near == 255); // Set pixels within the "near" region to "foreground"

        // Run Grab-Cut algorithm:
        Mat bgModel, fgModel;
        grabCut(color_mat, mask, Rect(), bgModel, fgModel, 1, GC_INIT_WITH_MASK);

        // Extract foreground pixels based on refined mask from the algorithm
        Mat3b foreground = Mat3b::zeros(color_mat.rows, color_mat.cols);
        color_mat.copyTo(foreground, (mask == GC_FGD) | (mask == GC_PR_FGD));
        imshow(window_name, foreground);
    }

    return EXIT_SUCCESS;
}
catch (const rs2::error & e)
{
    std::cerr << "RealSense error calling " << e.get_failed_function() << "(" << e.get_failed_args() << "):\n    " << e.what() << std::endl;
    return EXIT_FAILURE;
}
catch (const std::exception& e)
{
    std::cerr << e.what() << std::endl;
    return EXIT_FAILURE;
}