音视频学习(十三、音频数据处理)
其实对音频确实也没过多的研究,主要还是研究视频方面,不过有视频也有要音频,这样才是鲜活的视频,如果没音频看着视频也是假的,所以还是有必要学习一下音频。
13.1 音频编码
音频编码比较简单,直接使用FFmpeg的音频编码Demo就可以了,我这里也简单的列出调用的函数即可。
初始化函数:
1._code = avcodec_find_encoder(AV_CODEC_ID_AAC);   //老规矩,找到编码器
2._ctx = avcodec_alloc_context3(_codec);		   //通过编码器找到context
3.avcodec_open2(_ctx, _codec, NULL);			   //初始化编码器
4._frame = av_frame_alloc();
5.av_frame_get_buffer(_frame, 0);					//申请一个帧,并获取帧的buff
编码函数也比较简单:
1.av_init_packet(&pkt);											//初始化一个packet
2.avcodec_encode_audio2(_ctx, &pkt, frame, &got_output);		//进行音频编码
13.2 音频重采样
重采样初始化,这个也是有demo程序的,所以只是把函数的主干列出来就可以了:
1._src_channels = av_get_channel_layout_nb_channels(_resample_params.src_channel_layout) //通过布局情况,获取通道数
2._dst_channels = av_get_channel_layout_nb_channels(_resample_params.dst_channel_layout);
3._audio_fifo = av_audio_fifo_alloc(_resample_params.dst_sample_fmt, _dst_channels, 1);    //以目标帧率为主,申请一个buff
4.swr_alloc();						//申请一个视频重采样的结构
5.swr_init(_swr_ctx);				//填充数据,并且初始化swr
6.av_samples_alloc_array_and_samples(&_resampled_data, &linesize, _dst_channels, _resampled_data_size, _resample_params.dst_sample_fmt, 0);		//申请接收数据
初始化完成了之后,就可以直接使用了,使用的步骤:
1.auto ret = _audio_resampler->SendResampleFrame(pcm, size);   //采样到一帧数据之后,就会调用发送重采样函数
1.1 av_rescale_rnd		//计算样本的目的数量
1.2 swr_convert			//音频转化
1.3 av_audio_fifo_write		//把转化后的数据写回audio_fifo

2._audio_resampler->ReceiveResampledFrame(resampled_frames,_audio_encoder->GetFrameSampleSize());
//接收音频重采样后的数据
2.1  av_audio_fifo_read(_audio_fifo, (void **)frame->data, desired_size);//通过读取一帧的数据,然后返回

然后把重采样到的数据送去音频编码
感觉写的很烂,但是不简单了解而无法进入下一步的学习,然后烂就烂把,反正以后再做修改就好了。
13.3 音频采集
音频采集我觉得就不用写了,这次音频采集跟视频采集是一样的,都是直接读取pcm文件,因为我们现在重点应该在rtmp上,所以这些采集可以先通过文件获取,反正以后需要其他方式采集的话,就重写一个类,替换现在的采集类就可以了。
13.4 rtmp推音频流
上面已经采集并编码好音频数据了,现在就可以做推流处理了,
case RTMP_BODY_AUD_SPEC:
{
     AudioSpecMsg* audio_spec = (AudioSpecMsg*)data;
     uint8_t aac_spec_[4];
     aac_spec_[0] = 0xAF;	  //
     aac_spec_[1] = 0x0;     // 0 = aac sequence header
     aacRtmpPackager::GetAudioSpecificConfig(&aac_spec_[2], audio_spec->_profile,
             audio_spec->_sample_rate, audio_spec->_channels);
     SendAudioSpecificConfig((char *)aac_spec_, 4);
     break;
 }
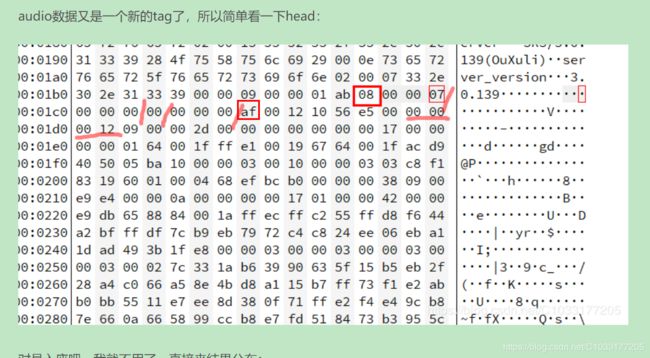
第一个字节0xAF,要回到FLV格式解析音频那一节看就明白了,那个位数对应什么我这里就不解析了,我只贴了一个flv格式的文件出来,看到音频的第一个字节就是0xAF

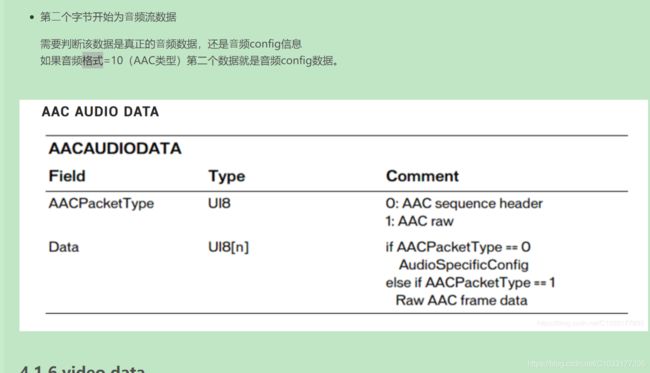
第二个字节就简单了:
如果是AAC配置信息,就是0,如果是裸数据就是1,

flv格式的数据准备好了之后,我们来看一下aac的编码格式,不过这个函数并没有按照AAC的编码格式来写的,详细分析AAC可以会到上一节,
int AACRTMPPackager::GetAudioSpecificConfig(uint8_t* data, const uint32_t profile,
                                            const uint32_t samplerate,
                                            const uint32_t channel_num)
{
    //uint8_t type:5;//编码结构类型,AAC main编码为1,LOW低复杂度编码为2,SSR为3
    //uint8_t sample_rate:4;//采样率
    //uint8_t channel_num:4;//声道数
    //uint8_t tail:3;//最后3位固定为0

    uint16_t _profile = (uint16_t)profile+1;		//哪个级别的AAC
    _profile <<= 11;

    uint32_t _samplerate = 0;				//那个频率的采样
    switch (samplerate)
    {
    case  96000:
        _samplerate = 0;
        break;
    case 88200:
        _samplerate = 1;
        break;
    case 64000:
        _samplerate = 2;
        break;
    case 48000:
        _samplerate = 3;
        break;
    case 44100:
        _samplerate = 4;
        break;
    case 32000:
        _samplerate = 5;
        break;
    case 24000:
        _samplerate = 6;
        break;
    case 22050:
        _samplerate = 7;
        break;
    case 16000:
        _samplerate = 8;
        break;
    case 12000:
        _samplerate = 9;
        break;
    case 11025:
        _samplerate = 10;
        break;
    case 8000:
        _samplerate = 11;
        break;
    case 7350:
        _samplerate = 12;
        break;
    default:
        _samplerate = 4;
        return -1;
        break;
    }

    _samplerate <<= 7;

    uint16_t _channel_num = (uint16_t)channel_num;		//通道
    _channel_num <<= 3;
                        // 2        4  1            3
    uint16_t audio_spec = _profile | _samplerate | _channel_num;

	//这个就是自己数据的封装,到解码的时候,只有自己的解码程序才能解
    data[0] = (uint8_t)(audio_spec >> 8);
    data[1] = 0xff & audio_spec;

    return 0;
}
发送裸数据就比较简单了,只要填充两个字节的数据就可以了,然后调用rtmp发送函数直接发送
aud_raw_msg->data[0] = 0xaf;
aud_raw_msg->data[1] = 0x01;    // 1 =  raw data数据
memcpy(&aud_raw_msg->data[2], _aac_buf, aac_size);
_rtmp_pusher->post(RTMP_BODY_AUD_RAW, aud_raw_msg);
13.5 rtmp接收音频流
我们来接收一下发送端发送过来的音频流,先接收音频的配置信息:
// AAC sequence
 if (sequence)
 {
     format = (packet.m_body[0] & 0xf0) >> 4;               //这个就是分析0xAF的  //音频格式
     samplerate = (packet.m_body[0] & 0x0c) >> 2;			//采样率
     sampledepth = (packet.m_body[0] & 0x02) >> 1;			//采样的长度
     type = packet.m_body[0] & 0x01;						//音频类型
     // sequence = packet.m_body[1];
     // AAC(AudioSpecificConfig)
     if (format == 10) {     // AAC格式
         uint8_t ch0 = packet.m_body[2];         //这个字节的数据,就是我们自己封装的数据了
         uint8_t ch1 = packet.m_body[3];
         uint16_t config = ((ch0 << 8) | ch1);
         _profile = (config & 0xF800) >> 11;		//这个就是我们自己发过来的数据了,但是我们没有按adts格式发送
         _sample_frequency_index = (config & 0x0780) >> 7;
         _channels = (config & 0x78) >> 3;
         frame_length_flag = (config & 0x04) >> 2;
         depend_on_core_coder = (config & 0x02) >> 1;
         extension_flag = config & 0x01;
     }
     // Speex(Fix data here, so no need to parse...)
     else if (format == 11) {    // MP3格式
         // 16 KHz, mono, 16bit/sample
         type = 0;
         sampledepth = 1;
         samplerate = 4;
     }
     audio_sample_rate = rtmpbase::GetSampleRateByFreqIdx(_sample_frequency_index);
     AudioSpecMsg *aud_spec_msg = new  AudioSpecMsg(_profile,
                                                    _channels,
                                                    audio_sample_rate);
     audio_callable_object_(RTMP_BODY_AUD_SPEC, aud_spec_msg, false);		//调用回调,把音频数据返回
 }
接下来看看音频裸数据发送过来的结果:
// Audio frames
else
{
    // 每帧都有一个adts
    // ADTS(7 bytes) + AAC data
    uint32_t data_len = packet.m_nBodySize - 2 + 7;
    uint8_t adts[7];
    //竟然是自己加adts
    adts[0] = 0xff;
    adts[1] = 0xf9;
    adts[2] = ((_profile - 1) << 6) | (_sample_frequency_index << 2) | (_channels >> 2);
    adts[3] = ((_channels & 3) << 6) + (data_len >> 11);
    adts[4] = (data_len & 0x7FF) >> 3;
    adts[5] = ((data_len & 7) << 5) + 0x1F;
    adts[6] = 0xfc;
    // Write audio frames
    AudioRawMsg *aud_raw = new  AudioRawMsg(data_len);
    memcpy(aud_raw->data, adts, 7);
    memcpy(aud_raw->data + 7, packet.m_body + 2, packet.m_nBodySize - 2);	//保存数据-2是要把头去掉
    if(_audio_pre_pts == -1){
        _audio_pre_pts= packet.m_nTimeStamp;
        if(!packet.m_hasAbsTimestamp) {
            printf("no init video pts\n");
        }
    }
    else {
        if(packet.m_hasAbsTimestamp)
            _audio_pre_pts= packet.m_nTimeStamp;
        else
            _audio_pre_pts += packet.m_nTimeStamp;
    }
    aud_raw->pts = _audio_pre_pts;
    audio_callable_object_(RTMP_BODY_AUD_RAW, aud_raw, false);
}
还是按视频的老规矩,裸数据发送过来是不带adts头的,所以我们接受的时候需要补上adts头,这样才能符合AAC格式,AAC格式的详解请看以前的文章,这里我就不再过多分析了,就是对应各个位对应的是啥,保存数据的时候-2是要把FLV表示音频的数据减2,这样就是符合AAC的格式了,然后发送给回调函数。
13.6 接收数据回调函数
回调函数就比较简单了,只需要把数据压入队列,然后另外一个线程,音频解码线程,会自动判断队列中是否有数据,这个下节讲。
void PullWork::audioCallback(int what, MsgBaseObj *data, bool flush)
{

    _audio_decode_loop->post(what, data, flush);
    //int64_t diff = TimesUtil::GetTimeMillisecond() - cur_time;
//    if(diff>5)
//        LogInfo("audioCallback t:%ld", diff);
}
13.7 音频解码初始化
在上节已经提过了,这个是专门负责音频解码部分的,接下来我们看看这个初始化函数,这个类继承于Looper类,这个类之间有讲过,只要是负责创建一个新的线程,然后在线程中循环检测队列中是否有数据,如果有需要就提取出数据,然后传参给回调函数,回调函数就是我们当前音频解码类,这个等下讲述:
int AudioDecodeLopp::Init(const Properties &properties)
{
    _aac_decoder = new aacDecoder();		//音频解码类创建
    if(!_aac_decoder)
    {
        printf("new AACDecoder() failed\n");
        return -1;
    }
    Properties properties2;
    if(_aac_decoder->Init(properties2) != 0)	//音频解初始化
    {
        printf("aac_decoder_ Init failed\n");
        return -2;
    }
    _pcm_buf = new uint8_t[PCM_BUF_MAX_SIZE];	//申请一个buff
    if(!_pcm_buf)
    {
        printf("pcm_buf_ new failed");
        return -3;
    }
    return 0;
}
13.8 AAC解码部分
音频解码比较简单:
1.codec = avcodec_find_decoder(AV_CODEC_ID_AAC);		//查找解码器
2.avcodec_alloc_context3(codec);						//申请解码的数据结构
3.avcodec_open2(ctx, codec, NULL)						//打开解码器
4.packet = av_packet_alloc();							//申请一个包
5.frame = av_frame_alloc();								//申请一帧内存
解码部分:
int aacDecoder::Decode(const uint8_t *in, int inLen, uint8_t *out, int &outLen)
{
    //If we have input
    if (inLen<=0)
        return -1;

    //Set data
    packet->data = (uint8_t *)in;
    packet->size = inLen;

    //Decode it
    if (avcodec_send_packet(ctx, packet)<0)				//发送一帧数据
        //nothing
    {
        printf("-AACDecoder::Decode() Error decoding AAC packet\n");
        return -2;
    }
    //Release side data
    av_packet_free_side_data(packet);					//释放数据

    //If we got a frame
    if (avcodec_receive_frame(ctx, frame)<0)			//接收到解码后的数据
        //Nothing yet
    {
        outLen = 0;
        return -3;
    }
    //Get data
    //1024
    float *buffer1 = (float *) frame->data[0];  //  LLLLL float 32bit [-1~1]
    float *buffer2 = (float *) frame->data[1];  // RRRRRR
    auto len = frame->nb_samples;
    int16_t *sample = (int16_t *)out;
    //Convert to SWORD
    for (size_t i=0; i<len; ++i)		//转化陈lrlrlr格式
    {
        // lrlrlr
        sample[i*2] =  (int16_t)(buffer1[i] * 0x7fff);
        sample[i*2 + 1] =  (int16_t)(buffer2[i] * 0x7fff);
    }
    outLen = 4096;
    static FILE *dump_pcm = NULL;
    if(!dump_pcm)
    {
        dump_pcm = fopen("aac_dump.pcm", "wb");
        if(!dump_pcm)
        {
            printf("fopen aac_dump.pcm failed\n");
        }
    }
    if(dump_pcm)
    {//ffplay -ar 48000 -ac 2 -f s16le -i aac_dump.pcm
        fwrite(out, 1,outLen,  dump_pcm);
        fflush(dump_pcm);
    }
    //Return number of samples
    return 0;
}
13.9 解码线程
上面已经介绍了AAC解码相关模块,虽然已经有了解码函数,但是需要一个驱动源,上面已经介绍过,我们的音频解码模块内部有一个线程,如果队列中有数据的话,就会取出数据,然后调用回调:
void AudioDecodeLopp::handle(int what, MsgBaseObj *data)
{
    if(what == RTMP_BODY_AUD_SPEC)				//这个是音频配置信息,我们接受到音频配置信息之后,会做音频相关的初始化
    {
        AudioSpecMsg *aud_spec = (AudioSpecMsg *)data;
        // 目前没有做音视频同步,所以现在这里进行音频输出的初始化
        if(!_audio_out_sdl)
        {
           //音频初始化
        }

        delete aud_spec;
    }
    else if(what == RTMP_BODY_AUD_RAW)			//这个是音频的裸数据,接受到数据之后,会直接调用解码函数,解码函数返回了数据之后
   	//可以直接播放
    {
        AudioRawMsg *aud_raw = (AudioRawMsg *)data;
        _pcm_buf_size = PCM_BUF_MAX_SIZE;
        // 可以发送adts header, 如果不发送adts则要初始化 ctx的参数
        if(_aac_decoder->Decode(aud_raw->data , aud_raw->size ,
                                _pcm_buf, _pcm_buf_size) == 0)
        {
           //直接播放
        }
        delete aud_raw;     // 要手动释放资源
    }
    else
    {
        printf("can't handle what:%d", what);
        delete data;
    }
}
整个音频的推流拉流就介绍完成了,虽然我也尝试这个代码,感觉bug不少,不过没关系,先能跑起来再说,bug以后再修复,如果一直在修复的话,学习速度就慢,先往后走,这些细节以后再回来修复。