MySQL8.0.19 双主热备
MySQL8.0.19 双主热备
- 一、环境准备
- 二、双主配置
- 2.1 主机A(131)配置
- 2.2 主机B(132)配置
- 2.3 主机A(131)主从配置
- 2.4 主机B(132)主从配置
- 2.5 启动主机A(131)主从复制
- 2.6 启动主机B(132)主从复制
- 三、双主配置测试
- 3.1 主机A创建数据库gohealth-plat
- 3.2 主机A查看创建数据库gohealth-plat
- 3.3 登录主机B查看创建数据库gohealth-plat
- 3.4 登录主机B查看创建数据库gohealth-plat
- 3.5 登录主机A在数据库gohealth-plat中创建表product
- 3.6 登录主机B在数据库gohealth-plat中创建表product
- 四、配置keepalived
- 4.1 主机A(131)安装keepalived
- 4.2 主机A(131)keepalived配置
- 4.3 主机B(132)安装keepalived
- 4.4 主机B(132)keepalived配置
- 4.5 启动keepalived
一、环境准备
| 资源 | 服务器IP |
|---|---|
| 主机A | 192.168.1.131 |
| 主机B | 192.168.1.132 |
| 虚拟IP | 192.168.1.130 |
二、双主配置
2.1 主机A(131)配置
vi /etc/my.cnf
/*配置如下*/
[mysqld]
# 设置3306端口
port=3306
# 允许最大连接数
max_connections=10000
# 允许连接失败的次数。这是为了防止有人从该主机试图攻击数据库系统
max_connect_errors=10
# 服务端使用的字符集默认为UTF8
character-set-server=utf8
# 创建新表时将使用的默认存储引擎
default-storage-engine=INNODB
# 默认使用“mysql_native_password”插件认证
default_authentication_plugin=mysql_native_password
# 表名不区分大小写
lower_case_table_names=1


#任意自然n,只需要保证两台mysql主机不重复就可以
server-id = 131
#开启二进制日志
log-bin=mysql-bin
#binlog单文件最大值
max_binlog_size=1024M
#起始值,一般填写第n台主机mysql.此时为第一台主  mysql
auto_increment_offset=1
#步进值auto_imcrement 。一般有n台主mysql就填n
auto_increment_increment=2
#指定同步的数据库,不填写则默认所有的数据库
replicate-do-db=gohealth-plat
log-slave-updates=true
secure_file_priv=/
[mysql]
# 设置mysql客户端默认字符集
default-character-set=utf8
protocol=tcp
[client]
# 设置mysql客户端连接服务端时默认使用的端口
port=3306
default-character-set=utf8
- 配置完成后重启mysql
systemctl restart mysqld.service
2.2 主机B(132)配置
vi /etc/my.cnf
/*配置如下*/
[mysqld]
# 设置3306端口
port=3306
# 允许最大连接数
max_connections=10000
# 允许连接失败的次数。这是为了防止有人从该主机试图攻击数据库系统
max_connect_errors=10
# 服务端使用的字符集默认为UTF8
character-set-server=utf8
# 创建新表时将使用的默认存储引擎
default-storage-engine=INNODB
# 默认使用“mysql_native_password”插件认证
default_authentication_plugin=mysql_native_password
# 表名不区分大小写
lower_case_table_names=1


#任意自然n,只需要保证两台mysql主机不重复就可以
server-id = 132
#开启二进制日志
log-bin=mysql-bin
#binlog单文件最大值
max_binlog_size=1024M
#起始值,一般填写第n台主机mysql.此时为第一台主  mysql
auto_increment_offset=2
#步进值auto_imcrement 。一般有n台主mysql就填n
auto_increment_increment=2
#指定同步的数据库,不填写则默认所有的数据库
replicate-do-db=gohealth-plat
log-slave-updates=true
secure_file_priv=/
[mysql]
# 设置mysql客户端默认字符集
default-character-set=utf8
protocol=tcp
[client]
# 设置mysql客户端连接服务端时默认使用的端口
port=3306
default-character-set=utf8
- 配置完成后重启mysql
systemctl restart mysqld.service
2.3 主机A(131)主从配置
- 创建复制用户,repel,密码repel
use mysql;
#创建用户 mysql.0中密码需要填写mysql_native_password

create user 'repl'@'192.168.1.132' identified with mysql_native_password by 'repl';

#分配权限
grant replication slave on *.* to 'repl'@'192.168.1.132';
grant replication client on *.* to 'repl'@'192.168.1.132';
flush privileges;
- 查看分配权限
show grants for 'repl'@'192.168.1.132';
- 查看主机A(131)MySQL状态,记录二进制文件名和位置
show master status;
- 登陆主机B(132)数据库,执行同步语句
change master to
    master_host='192.168.1.131',
    master_user='repl',
    master_password='repl',
    master_log_file='mysql-bin.000001',
    master_log_pos=871;
2.4 主机B(132)主从配置
- 创建复制用户,repel,密码repel
use mysql;
#创建用户 mysql.0中密码需要填写mysql_native_password

create user 'repl'@'192.168.1.131' identified with mysql_native_password by 'repl';

#分配权限
grant replication slave on *.* to 'repl'@'192.168.1.131';
grant replication client on *.* to 'repl'@'192.168.1.131';
flush privileges;
- 查看分配权限
show grants for 'repl'@'192.168.1.131';
- 查看主机B(132)MySQL状态,记录二进制文件名和位置
show master status;
- 登陆主机A(131)数据库,执行同步语句
change master to
    master_host='192.168.1.132',
    master_user='repl',
    master_password='repl',
    master_log_file='mysql-bin.000001',
    master_log_pos=871;
2.5 启动主机A(131)主从复制
- 登陆主机B(132)数据库,启动主从复制
start slave;
- 查看主从复制状态,没有错误就代表启动正常
show slave status\G
2.6 启动主机B(132)主从复制
- 登陆主机A(131)数据库,启动主从复制
start slave;
- 查看主从复制状态,没有错误就代表启动正常
show slave status\G
三、双主配置测试
3.1 主机A创建数据库gohealth-plat
CREATE DATABASE `gohealth-plat` CHARACTER SET 'utf8mb4' COLLATE 'utf8mb4_general_ci';
3.2 主机A查看创建数据库gohealth-plat
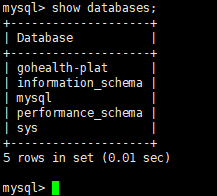
show databases;
3.3 登录主机B查看创建数据库gohealth-plat
show databases;
3.4 登录主机B查看创建数据库gohealth-plat
show databases;
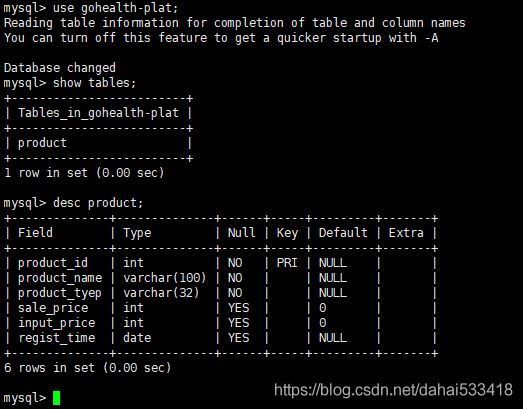
3.5 登录主机A在数据库gohealth-plat中创建表product
use gohealth-plat;
create table product(
	product_id int(10) not NULL,
	product_name varchar(100) not NULL,
	product_tyep varchar(32) not NULL,
	sale_price int(10) default 0,
	input_price int(10) default 0,
	regist_time date,
	primary key (product_id)
);

show tables;
desc product;
3.6 登录主机B在数据库gohealth-plat中创建表product
use gohealth-plat;

show tables;
desc product;
至此,主机A和主机B的MySQL主主复制,已经配置完成。
四、配置keepalived
4.1 主机A(131)安装keepalived
yum install -y keepalived

/*查看版本*/
keepalived -v
4.2 主机A(131)keepalived配置
- 主机A下keepalived的配置文件
vi /etc/keepalived/keepalived.conf

/*修改配置如下*/
! Configuration File for keepalived
global_defs {
   #设置报警通知邮件地址
   notification_email {
        sygy@gohealth.com.cn
   }
   notification_email_from sygy@gohealth.com.cn
   smtp_server 127.0.0.1
   smtp_connect_timeout 30
   #运行Keepalived服务器的标识
   router_id HA_MYSQL
}

vrrp_script chk_mysql {                                         #定义VRRP脚本,检测mysql主从状态
    script "/etc/keepalived/check_mysql.sh"                     #脚本名称
    interval 30                                                 #检查间隔时长
    wight   2
    fall  2                                                     #失败检查2次才确认真失败
    rise 1                                                      #成功1次就算真成功
}

vrrp_instance VI_1 {                                            #实例名字V1_1,相同的实例备节点名字要和这个相同
    state BACKUP                                                #两边都设置为BACKUP,通过下面的priority来区分MASTER和BACKUP,也只有如此,底下的nopreempt才有效
    interface eno16777736                                       #定义通信接口为eno16777736,此参数备节点和主节点相同,根据网卡实际名称来
    virtual_router_id 51                                        #实例ID为51,主备相同
    priority 100                                                #优先级为100,备节点的优先级必须比此数字低
    advert_int 1                                                #通信检查检查间隔时间为1秒
    nopreempt                                                   #采取非抢占模式,防止切换到从库后,主keepalived恢复后自动切换回主库
    authentication {
        auth_type PASS                                          #认证类型,此参数备节点设置和主节点设置相同
        auth_pass 1111                                          #密码是1111,此参数备节点设置和主节点相同
    }
    track_script {
        chk_mysql
    }

    virtual_ipaddress {
        192.168.1.130/24                                        #虚拟机IP,即VIP为192.168.1.130/24,此参数备节点设置和主节点相同
    }
}
- check_mysql.sh内容如下:
#!/bin/bash

###判断如果上次检查的脚本还没执行完,则退出此次执行
if [ `ps -ef|grep -w "$0"|grep -v "grep"|wc -l` -gt 2 ];then
    exit 0
fi
mysql_con='mysql -uroot -proot'
error_log="/etc/keepalived/logs/check_mysql.err"

###定义一个简单判断mysql是否可用的函数
function excute_query {
    ${mysql_con} -e "select 1;" 2>> ${error_log}
}

###定义无法执行查询,且mysql服务异常时的处理函数
function service_error {
    echo -e "`date "+%F  %H:%M:%S"`    -----mysql service error,now stop keepalived-----" >> ${error_log}
    service keepalived stop &>> ${error_log}
    echo "DB1 keepalived 已停止" | mail -s "DB1 keepalived 已停止,请及时处理!" sygy@gohealth.com.cn 2>> ${error_log}
    echo -e "\n---------------------------------------------------------\n" >> ${error_log}
}

###定义无法执行查询,但mysql服务正常的处理函数
function query_error {
    echo -e "`date "+%F  %H:%M:%S"`    -----query error, but mysql service ok, retry after 30s-----" >> ${error_log}
    sleep 30
    excute_query
    if [ $? -ne 0 ];then
        echo -e "`date "+%F  %H:%M:%S"`    -----still can't execute query-----" >> ${error_log}

        ###对DB1设置read_only属性
        echo -e "`date "+%F  %H:%M:%S"`    -----set read_only = 1 on DB1-----" >> ${error_log}
        mysql_con -e "set global read_only = 1;" 2>> ${error_log}

        ###kill掉当前客户端连接
        echo -e "`date "+%F  %H:%M:%S"`    -----kill current client thread-----" >> ${error_log}
        rm -f /tmp/kill.sql &>/dev/null
        ###这里其实是一个批量kill线程的小技巧
        mysql_con -e 'select concat("kill ",id,";") from  information_schema.PROCESSLIST where command="Query" or command="Execute" into outfile "/tmp/kill.sql";'
        mysql_con -e "source /tmp/kill.sql"
        sleep 2    ###给kill一个执行和缓冲时间
        ###关闭本机keepalived
        echo -e "`date "+%F  %H:%M:%S"`    -----stop keepalived-----" >> ${error_log}
        service keepalived stop &>> ${error_log}
        echo "DB1 keepalived 已停止"|mail -s "DB1 keepalived 已停止,请及时处理!" sygy@gohealth.com.cn 2>> ${error_log}
        echo -e "\n---------------------------------------------------------\n" >> ${error_log}
    else
        echo -e "`date "+%F  %H:%M:%S"`    -----query ok after 30s-----" >> ${error_log}
        echo -e "\n---------------------------------------------------------\n" >> ${error_log}
    fi
}

###检查开始: 执行查询
excute_query
if [ $? -ne 0 ];then
    service mysqld status &>/dev/null
    if [ $? -ne 0 ];then
        service_error
    else
        query_error
    fi
fi
通过具体的查询语句来判断数据库服务的可用性,如果查询失败,则判断mysqld进程本身的状态,如果不正常,则直接停止当前节点的keepalived,将VIP转移到另外一个节点,如果正常,则等待30s,再次执行查询语句,还是失败,则将当前的master节点设置为read_only,并kill掉当前的客户端连接,然后停止当前的keepalived。
- 设置脚本可执行权限
mkdir /etc/keepalived/logs
chmod 755 /etc/keepalived/check_mysql.sh
4.3 主机B(132)安装keepalived
yum install -y keepalived

/*查看版本*/

keepalived -v
4.4 主机B(132)keepalived配置
- 主机B下keepalived的配置文件
vi /etc/keepalived/keepalived.conf

! Configuration File for keepalived
global_defs {
   #设置报警通知邮件地址
   notification_email {
        sygy@gohealth.com.cn
   }
   notification_email_from sygy@gohealth.com.cn
   smtp_server 127.0.0.1
   smtp_connect_timeout 30
   #运行Keepalived服务器的标识
   router_id HA_MYSQL
}

vrrp_instance VI_1 {                                            #实例名字V1_1,相同的实例备节点名字要和这个相同
    state BACKUP                                                #两边都设置为BACKUP,通过下面的priority来区分MASTER和BACKUP,也只有如此,底下的nopreempt才有效
    interface eno16777736                                       #定义通信接口为eno16777736,此参数备节点和主节点相同,根据网卡实际名称来
    virtual_router_id 51                                        #实例ID为51,主备相同
    priority 90                                                 #优先级为90,备节点的优先级比主节点优先级低100
    advert_int 1                                                #通信检查检查间隔时间为1秒
    authentication {
        auth_type PASS                                          #认证类型,此参数备节点设置和主节点设置相同
        auth_pass 1111                                          #密码是1111,此参数备节点设置和主节点相同
    }
    notify_master   /etc/keepalived/notify_master_mysql.sh
    virtual_ipaddress {
        192.168.1.130/24                                        #虚拟机IP,即VIP为192.168.1.130/24,此参数备节点设置和主节点相同
    }
}
- notify_master_mysql.sh内容如下:
 mkdir /etc/keepalived/logs
 touch /etc/keepalived/notify_master_mysql.sh
 chcon -v -t keepalived_unconfined_script_exec_t /etc/keepalived/notify_master_mysql.sh
#!/bin/bash
###当keepalived监测到本机转为MASTER状态时,执行该脚本

change_log="/etc/keepalived/logs/state_change.log"
mysql_con='mysql -uroot -proot'
echo -e "`date "+%F  %H:%M:%S"`   -----keepalived change to MASTER-----" >> ${change_log}

slave_info() {
    ###统一定义一个函数取得slave的position、running、和log_file等信息
    ###根据函数后面所跟参数来决定取得哪些数据
    if [ $1 = slave_status ];then
        slave_stat=`${mysql_con} -e "show slave status\G;"|egrep -w "Slave_IO_Running|Slave_SQL_Running"`
        Slave_IO_Running=`echo $slave_stat|awk '{print $2}'`
        Slave_SQL_Running=`echo $slave_stat|awk '{print $4}'`
    elif [ $1 = log_file -a $2 = pos ];then
        log_file_pos=`${mysql_con} -e "show slave status\G;"|egrep -w "Master_Log_File|Read_Master_Log_Pos|Relay_Master_Log_File|Exec_Master_Log_Pos"`
        Master_Log_File=`echo $log_file_pos|awk '{print $2}'`
        Read_Master_Log_Pos=`echo $log_file_pos|awk '{print $4}'`
        Relay_Master_Log_File=`echo $log_file_pos|awk '{print $6}'`
        Exec_Master_Log_Pos=`echo $log_file_pos|awk '{print $8}'`
    fi
}

action() {
    ###经判断'应该&可以'切换时执行的动作
    echo -e "`date "+%F  %H:%M:%S"`    -----set read_only = 0 on DB2-----" >> ${change_log}

    ###解除read_only属性
    ${mysql_con} -e "set global read_only = 0;" 2>> ${change_log}

    echo "DB2 keepalived转为MASTER状态,线上数据库切换至DB2" | mail -s "DB2 keepalived change to MASTER" sygy@gohealth.com.cn 2>> ${change_log}

    echo -e "---------------------------------------------------------\n" >> ${change_log}
}

slave_info slave_status
if [ $Slave_SQL_Running = Yes ];then
    i=0    #一个计数器
    slave_info log_file pos
        ###判断从master接收到的binlog是否全部在本地执行(这样仍无法完全确定从库已追上主库,因为无法完全保证io_thread没有延时(由网络传输问题导致的从库落后的概率很小)
    until [ $Master_Log_File = $Relay_Master_Log_File -a $Read_Master_Log_Pos = $Exec_Master_Log_Pos ]
     do
        if [ $i -lt 10 ];then    #将等待exec_pos追上read_pos的时间限制为10s
            echo -e "`date "+%F  %H:%M:%S"`    -----Relay_Master_Log_File=$Relay_Master_Log_File,Exec_Master_Log_Pos=$Exec_Master_Log_Pos is behind Master_Log_File=$Master_Log_File,Read_Master_Log_Pos=$Read_Master_Log_Pos, wait......" >> ${change_log}    #输出消息到日志
,等待exec_pos=read_pos
            i=$(($i+1))
            sleep 1
            slave_info log_file pos
        else
            echo -e "The waits time is more than 10s,now force change. Master_Log_File=$Master_Log_File Read_Master_Log_Pos=$Read_Master_Log_Pos Relay_Master_Log_File=$Relay_Master_Log_File Exec_Master_Log_Pos=$Exec_Master_Log_Pos" >> ${change_log}
            action
            exit 0
        fi
    done
    action

else
    slave_info log_file pos
    echo -e "DB2's slave status is wrong,now force change. Master_Log_File=$Master_Log_File Read_Master_Log_Pos=$Read_Master_Log_Pos Relay_Master_Log_File=$Relay_Master_Log_File Exec_Master_Log_Pos=$Exec_Master_Log_Pos" >> ${change_log}
    action
fi
通过具体的查询语句来判断数据库服务的可用性,如果查询失败,则判断mysqld进程本身的状态,如果不正常,则直接停止当前节点的keepalived,将VIP转移到另外一个节点,如果正常,则等待30s,再次执行查询语句,还是失败,则将当前的master节点设置为read_only,并kill掉当前的客户端连接,然后停止当前的keepalived。
- 设置脚本可执行权限
chmod 755 /etc/keepalived/notify_master_mysql.sh
#!/bin/bash
###手动执行将主库切换回DB1的操作

mysql_con='mysql -uroot -proot'

echo -e "`date "+%F  %H:%M:%S"`    -----change to BACKUP manually-----" >> /etc/keepalived/logs/state_change.log
echo -e "`date "+%F  %H:%M:%S"`    -----set read_only = 1 on DB2-----" >> /etc/keepalived/logs/state_change.log
$mysql_con -e "set global read_only = 1;" 2>> /etc/keepalived/logs/state_change.log

###kill掉当前客户端连接
echo -e "`date "+%F  %H:%M:%S"`    -----kill current client thread-----" >> /etc/keepalived/logs/state_change.log
rm -f /tmp/kill.sql &>/dev/null
###这里其实是一个批量kill线程的小技巧
$mysql_con -e 'select concat("kill ",id,";") from  information_schema.PROCESSLIST where command="Query" or command="Execute" into outfile "/tmp/kill.sql";'
$mysql_con -e "source /tmp/kill.sql" 2>> /etc/keepalived/logs/state_change.log
sleep 2    ###给kill一个执行和缓冲时间

###确保DB1已经追上了,下面的repl为复制所用的账户,-h后跟DB1的内网IP
log_file_pos=`mysql -urepl -prepl -h192.168.1.131 -e "show slave status\G;"|egrep -w "Master_Log_File|Read_Master_Log_Pos|Relay_Master_Log_File|Exec_Master_Log_Pos"`
Master_Log_File=`echo $log_file_pos|awk '{print $2}'`
Read_Master_Log_Pos=`echo $log_file_pos|awk '{print $4}'`
Relay_Master_Log_File=`echo $log_file_pos|awk '{print $6}'`
Exec_Master_Log_Pos=`echo $log_file_pos|awk '{print $8}'`
until [ $Read_Master_Log_Pos = $Exec_Master_Log_Pos -a $Master_Log_File = $Relay_Master_Log_File ]
do
    echo -e "`date "+%F  %H:%M:%S"`    -----DB1 Exec_Master_Log_Pos($exec_pos) is behind Read_Master_Log_Pos($read_pos), wait......" >> /etc/keepalived/logs/state_change.log
    sleep 1
done

###然后解除DB1的read_only属性
echo -e "`date "+%F  %H:%M:%S"`    -----set read_only = 0 on DB1-----" >> /etc/keepalived/logs/state_change.log
ssh 192.168.1.131 'mysql -uroot -proot -e "set global read_only = 0;" && /sbin/service keepalived start' 2>> /etc/keepalived/logs/state_change.log

###重启DB2的keepalived使VIP漂移到DB1
echo -e "`date "+%F  %H:%M:%S"`    -----make VIP move to DB1-----" >> /etc/keepalived/logs/state_change.log
/sbin/service keepalived restart &>> /etc/keepalived/logs/state_change.log

echo "DB2 keepalived转为BACKUP状态,线上数据库切换至DB1" | mail -s "DB2 keepalived change to BACKUP" sygy@gohealth.com.cn 2>> /etc/keepalived/logs/state_change.log

echo -e "--------------------------------------------------\n" >> /etc/keepalived/logs/state_change.log
4.5 启动keepalived
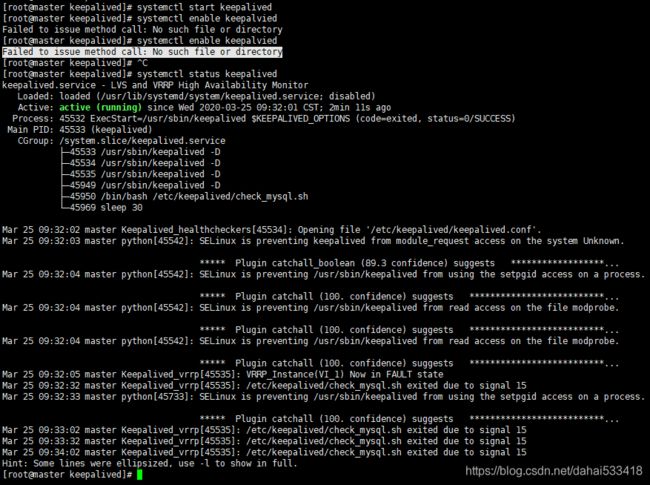
- 依次启动主机A和主机B,keepalived
- 启动主机A
systemctl start keepalived

/*查看状态*/
systemctl enable keepalvied
- 启动主机B
systemctl start keepalived

/*查看状态*/
systemctl enable keepalvied


