使用 Keras 与 Tensorflow 构建车道跟踪自动汽车 (树莓派自动驾驶)
本文将介绍如何使用 Keras + Tensorflow 创建卷积神经网络,并对其进行训练,以使得车辆保持在两条白线之间。
import os
import urllib.request
import pickle

get_ipython().run_line_magic('matplotlib', 'inline')
import matplotlib
from matplotlib.pyplot import imshow
1.获取驾驶数据
数据集由 ~7900 个图像和手动开车时收集的转向角组成。大约三分之二的图像与线之间的汽车。另外三分之一的车开始偏离航线,并且驶回线路之间。
数据:https://s3.amazonaws.com/donkey_resources/indoor_lanes.pkl
with open('../kernel//indoor_lanes.pkl', 'rb') as f:
     X, Y = pickle.load(f)

print('X.shape: ', X.shape)
print('Y.shape: ', Y.shape)
imshow(X[0])
2.拆分数据
在这里,我们将洗牌(shuffle)我们的数据,并将数据分成三部分。训练数据将用于训练我们的驾驶模型,使用验证数据避免过度拟合模型,测试数据用于测试我们的模型是否学到了什么。
import numpy as np


#shuffle  both X and Y the same way
def unison_shuffled_copies(X, Y):
    assert len(X) == len(Y)
    p = np.random.permutation(len(X))
    return X[p], Y[p]

shuffled_X, shuffled_Y = unison_shuffled_copies(X,Y)

len(shuffled_X)
test_cutoff = int(len(X) * .8) # 80% of data used for training
val_cutoff = test_cutoff + int(len(X) * .1) # 10% of data used for validation and test data

train_X, train_Y = shuffled_X[:test_cutoff], shuffled_Y[:test_cutoff]
val_X, val_Y = shuffled_X[test_cutoff:val_cutoff], shuffled_Y[test_cutoff:val_cutoff]
test_X, test_Y = shuffled_X[val_cutoff:], shuffled_Y[val_cutoff:]

len(train_X) + len(val_X) + len(test_X)
3.增强训练数据
为了加倍我们的训练数据并防止转向偏差,我们翻转每个图像和转向角并将其添加到数据集中。还有其他的方法来增加使用翻译和假阴影驾驶数据,但我没有使用这些自动驾驶仪。
X_flipped = np.array([np.fliplr(i) for i in train_X])
Y_flipped = np.array([-i for i in train_Y])
train_X = np.concatenate([train_X, X_flipped])
train_Y = np.concatenate([train_Y, Y_flipped])
len(train_X)
4.建立驾驶模式
这种驾驶模式将是一个端到端的神经网络,接受图像阵列作为输入,并输出-90(左)和90(右)之间的转向角。 要做到这一点,我们将使用一个完全连接图层的3层卷积网络。该模型基于 Otavio 的 Carputer,但不产生油门值输出,不使用过去的转向值作为模型的输入,并且使用较少的卷积层。
from keras.models import Model, load_model
from keras.layers import Input, Convolution2D, MaxPooling2D, Activation, Dropout, Flatten, Dense


# 使用 TensorFlow 后端。

# In[39]:


img_in = Input(shape=(120, 160, 3), name='img_in')
angle_in = Input(shape=(1,), name='angle_in')

x = Convolution2D(8, 3, 3)(img_in)
x = Activation('relu')(x)
x = MaxPooling2D(pool_size=(2, 2))(x)

x = Convolution2D(16, 3, 3)(x)
x = Activation('relu')(x)
x = MaxPooling2D(pool_size=(2, 2))(x)

x = Convolution2D(32, 3, 3)(x)
x = Activation('relu')(x)
x = MaxPooling2D(pool_size=(2, 2))(x)

merged = Flatten()(x)

x = Dense(256)(merged)
x = Activation('linear')(x)
x = Dropout(.2)(x)

angle_out = Dense(1, name='angle_out')(x)

model = Model(input=[img_in], output=[angle_out])
model.compile(optimizer='adam', loss='mean_squared_error')
model.summary()
5.训练模型
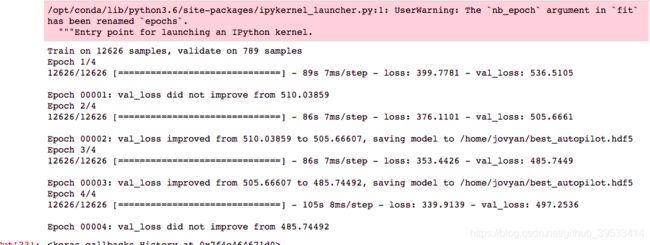
我已经学会了很难的方法,即使这一切都是完美的,如果你没有正确地训练,你的自动驾驶仪将无法工作。我遇到的最大的问题是过度适应模型,以至于在很少的情况下都不能正常工作。 这里是 2 个 Keras回调,将节省您的时间。
import os
from keras import callbacks

model_path = os.path.expanduser('~/best_autopilot.hdf5')

#Save the model after each epoch if the validation loss improved.
save_best = callbacks.ModelCheckpoint(model_path, monitor='val_loss', verbose=1,
                                     save_best_only=True, mode='min')

#stop training if the validation loss doesn't improve for 5 consecutive epochs.
early_stop = callbacks.EarlyStopping(monitor='val_loss', min_delta=0, patience=5,
                                     verbose=0, mode='auto')

callbacks_list = [save_best, early_stop]


# 对于这个笔记本,我只会训练模型 4 个时代(epochs)。

# In[23]:


model.fit(train_X, train_Y, batch_size=64, nb_epoch=4, validation_data=(val_X, val_Y), callbacks=callbacks_list)
6.评估性能
我们可以通过绘制预测值和实际值来检查我们的模型预测是否合理。第一个图表显示我们的测试数据中存在一个学习的关系(在训练期间模型没有看到)。
import pandas as pd

model = load_model(model_path)
test_P = model.predict(test_X)
test_P = test_P.reshape((test_P.shape[0],))


# In[25]:


df = pd.DataFrame({'predicted':test_P, 'actual':test_Y})
ax = df.plot.scatter('predicted', 'actual')
#ax.set_ylabel("steering angle")


#  第二张图,使用包含训练数据的非混洗(unshuffled)数据,来显示预测角度紧跟实际转向角度。

# In[26]:


P = model.predict(X[:700])
#predict outputs nested arrays so we need to reshape to plot.
P = P.reshape((P.shape[0],))

ax = pd.DataFrame({'predicted':P, 'actual':Y[:700]}).plot()
ax.set_ylabel("steering angle")
下一步
改善模型,这个模型是纯粹(navie)的,因为它不使用过去的值来帮助预测未来。我们可以通过将过去的转向角度作为模型的输入来进行试验,添加一个递归层,或者只是改变卷积层的结构。
添加更多数据,随着我们添加更多驾驶数据,此模型将会得到改进。 预测油门,输出目前自动驾驶仪只能转向并保持恒定的速度。一个更复杂的模型将加速在直路上,并在路缘之前放缓。
https://biendata.com/models/detail/427#/


