磁盘的分区及管理
一· 磁盘的分区。
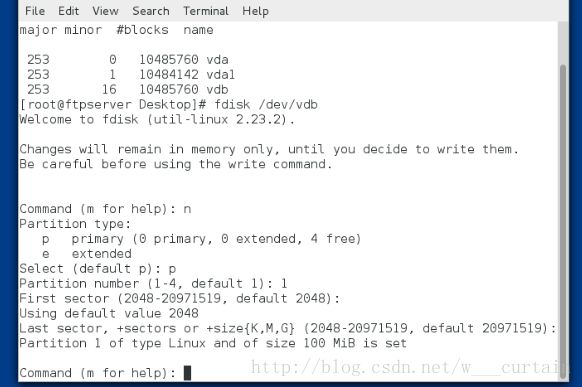
1.设备的查看。
fdisk -l ###查看系统中真实存在的设备。###
cat /proc/partitions ###查看系统中存在的并且被系统识别的设备。###
fdisk -l 和cat /proc/partitions 的区别就在于前一个的范围要大于后面,因为系统中真实存在的设备不一定能被系统识别。###
blkid ###这个是最高级的,它是指系统发现的,并且被系统利用的,有id信息的。###
blkid 这个命令常用来查看被系统利用的设备的id
df -h 和df -H 发现并且在挂载的设备。
2.创建分区。
wq退出保存。
partprobe 同步分区表。
cat /proc/partitions 查看系统识别的分区信息。
如上图我们建立的 /dev/vdb1已经被系统识别,但是还不能被使用我们还要将新建利的分区进行格式化。
mkfs.xfs /dev/vdb1
下面我们将格式化的分区挂载在/mnt这个目录上。
 如上图通过df 这个命令我们可以看到我们新建里的并且格式化的/dev/vdb1已经挂在/mnt这个目录上。
二.磁盘管理。
1.将文件系统为xfs类型改变成swap文件类型。
mkswap /dev/vdb1
swapon -a /dev/vdb1
swapon -s
2.设备的挂载使用。
设备必须要用目录来对设备中的内容进行读取,所以设备在使用时需要做挂载动作。
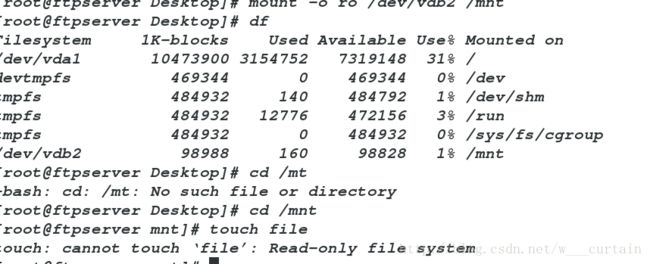
只读挂载
mount -o ro /dev/vdb2 /mnt
如上图所是我对/dev/vdb2进行只读挂载 当我在他的挂载目录中进行文件建立的时候会报错显示只读。
热更改,当设备在使用时更改设备的挂载参数,例:
如上所是就是当设备被使用时我们仍然可以对设备的挂载参数进行修改。
当设备在被使用时,我们想要卸载他的时候会报以下错误:
@1. 发现进程:fuser -vm /dev/sdb1
终止进程:fuser -kvm /dev/vdb1
如上我们就结束了进程,然后就可以卸载了。
@2 发现进程:losf /地vvdb
终止进程 :kill -9 pid
然后在对设备进行卸载。
3.磁盘配额。
为磁盘使用的用户分配额度。
[root@localhost ~]# mkdir /peie
[root@localhost ~]# fdisk /dev/vdb
Welcome to fdisk (util-linux 2.23.2).
Changes will remain in memory only, until you decide to write them.
Be careful before using the write command.
Command (m for help): p
Disk /dev/vdb: 10.7 GB, 10737418240 bytes, 20971520 sectors
Units = sectors of 1 * 512 = 512 bytes
Sector size (logical/physical): 512 bytes / 512 bytes
I/O size (minimum/optimal): 512 bytes / 512 bytes
Disk label type: dos
Disk identifier: 0x09ee18d7
Device Boot Start End Blocks Id System
/dev/vdb1 2048 1026047 512000 8e Linux LVM
/dev/vdb2 1026048 1230847 102400 83 Linux
Command (m for help): n
Partition type:
p primary (2 primary, 0 extended, 2 free)
e extended
Select (default p): p
Partition number (3,4, default 3): 3
First sector (1230848-20971519, default 1230848):
Using default value 1230848
Last sector, +sectors or +size{K,M,G} (1230848-20971519, default 20971519): +200M
Partition 3 of type Linux and of size 200 MiB is set
Command (m for help): wq
The partition table has been altered!
Calling ioctl() to re-read partition table.
WARNING: Re-reading the partition table failed with error 16: Device or resource busy.
The kernel still uses the old table. The new table will be used at
the next reboot or after you run partprobe(8) or kpartx(8)
Syncing disks.
[root@localhost ~]# partprobe
[root@localhost ~]# mkfs.xfs /dev/vdb3
meta-data=/dev/vdb3 isize=256 agcount=4, agsize=12800 blks
= sectsz=512 attr=2, projid32bit=1
= crc=0
data = bsize=4096 blocks=51200, imaxpct=25
= sunit=0 swidth=0 blks
naming =version 2 bsize=4096 ascii-ci=0 ftype=0
log =internal log bsize=4096 blocks=853, version=2
= sectsz=512 sunit=0 blks, lazy-count=1
realtime =none extsz=4096 blocks=0, rtextents=0
[root@localhost ~]# mount -o usrquota /dev/vdb3 /peie
[root@localhost ~]# edquota -u student /dev/vdb3
进入到配置文件并修改参数,这样就给student用户分配了额都。
注意:在使用dd命令的时候要切换到student用户。
3.分区加密。
新建一个分区,并且分区设置盖子。


