(四)深度学习入门之对图像进行简单分类(cifar10数据集)
cifar-10简介
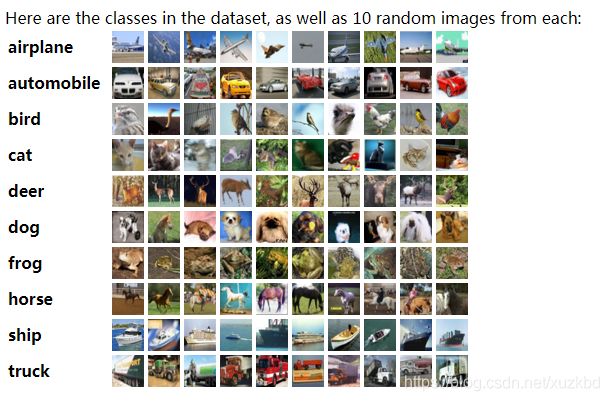
cifar-10是一个有十个类的32*32色图片数据集,共有60000张。官方网址如下:
http://www.cs.toronto.edu/~kriz/cifar.html
我在官方网站上下载了这个数据集的python版。
1.该数据集的data是10000X3072的numpy数组。每张32*32=1024的图用3072个数表示其各像素点的RGB值,前1024表示红色值,接下来1024表示绿色值,最后1024表示蓝色值。
2.该数据集的label值表示这些图的标签,用0-9表示。
3.label_names表示各个label数表示的标签类别的英文名。
4.data_batch_1到data_batch_5以及test_batch这几个文件每个文件都存了10000张图片以及其描述,其中test_batch是用来做测试的。
准备工作
官网上比较关键的信息就这些了,具体的内容还是手动操作一下吧。
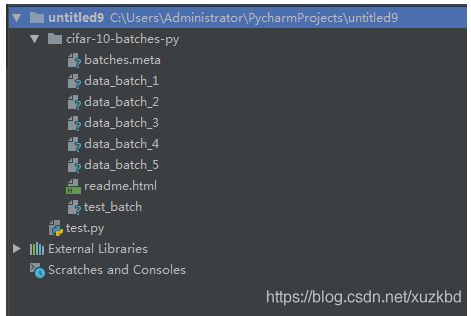
打开pycharm新建一个项目,结构如下:
然后依次给项目对应的虚拟环境装上numpy,matplotlib,pandas,tensorflow
这个东西直接在pycharm环境里面配置好就行了,应该不会遇到什么问题。
首先我们写个程序来看看这些数据集里都是什么玩意儿
import pickle
import matplotlib.pyplot as plt
import numpy as np
import os
import tensorflow as tf


# 数据集的根目录
CIFAR_10_PATH = "./cifar-10-batches-py"
# 打开这个根目录下的data_batch_1文件看看
with open(os.path.join(CIFAR_10_PATH, "data_batch_1"), "rb") as f:
    # python3需要额外指出编码类型为二进制
    data = pickle.load(f, encoding="bytes")
# 看一下这个文件的数据类型,可以看到是字典型的
print("1.data的类型:")
print(type(data))
# data应该就是前面说的图片数据了
print("2.data的keys:")
print(data.keys())
# 因为数据时二进制存储的python3这前面得加个b,可以看到,这玩意是个numpy数组
print("3.data[b'data']的类型:")
print(type(data[b'data']))
# filenames
print("4.data[b'filenames']的类型:")
print(type(data[b'filenames']))
# batch_label
print("5.data[b'batch_label']的类型:")
print(type(data[b'batch_label']))
# labels
print("6.data[b'labels']的类型:")
print(type(data[b'labels']))
# 和文章描述的一样,是10000*3072的
print("7.data[b'data']的shape:")
print(data[b'data'].shape)
# 这个labels是一个10000的数组,看起来是各个图片的标签
print("8.data[b'labels']的长度:")
print(len(data[b'labels']))
# 这个是各个图片的文件名
print("9.data[b'filenames']的前两个内容:")
print(data[b'filenames'][0:2])
# 这玩意是文件名
print("10.data[b'batch_label']的内容:")
print(data[b'batch_label'])
输出结果:
1.data的类型:
<class 'dict'>
2.data的keys:
dict_keys([b'filenames', b'data', b'labels', b'batch_label'])
3.data[b'data']的类型:
<class 'numpy.ndarray'>
4.data[b'filenames']的类型:
<class 'list'>
5.data[b'batch_label']的类型:
<class 'bytes'>
6.data[b'labels']的类型:
<class 'list'>
7.data[b'data']的shape:
(10000, 3072)
8.data[b'labels']的长度:
10000
9.data[b'filenames']的前两个内容:
[b'leptodactylus_pentadactylus_s_000004.png', b'camion_s_000148.png']
8.data[b'batch_label']的长度:
b'training batch 1 of 5'
这样一来,结合着官网上的描述,我们就基本搞清楚这些文件的结构了
用matplotlib.pyplot显示一张图片看看效果
这里的话会涉及到numpy的一些东西
代码如下
import pickle
import matplotlib.pyplot as plt
import numpy as np
import os
import tensorflow as tf


# 数据集的根目录
CIFAR_10_PATH = "./cifar-10-batches-py"
# 打开这个根目录下的data_batch_1文件看看
with open(os.path.join(CIFAR_10_PATH, "data_batch_1"), "rb") as f:
    # python3需要额外指出编码类型为二进制
    data = pickle.load(f, encoding="bytes")
# 看一下这个文件的数据类型,可以看到是字典型的
print("data的keys:")
print(data.keys())
# 取第一张图片的数据
t = data[b'data'][0]
# 按照文档里说的,图片是以1024+1024+1024的方式线性存储各像素点的色值得,我们得把他处理成能显示的类型。我们先把原数组划分为一个3*32*32的np对象
t = t.reshape(3, 32, 32)
# transpose方法中,如一个点坐标为(1,2,3)对其作(1,2,0)的变换,则其新坐标为(2,3,1),即原本的0轴坐标变为1轴坐标,1轴坐标变为2轴坐标,2轴坐标变为0轴。同时,整个numpy对象的shape也会发生这样的变换
# t.transpose(1, 2, 0)可以将原本格式的数据转换成32*32*3的形式,且这个3是二维图片的每个像素点的RGB三元组的值。
# 变换后,原本的第一个(0,0,0)位置上的数成了二维平面上第一个像素位置上(0,0)的第一个红色值,(2,0,0)成了(0,0)上的绿色值,以此类推
t = t.transpose(1, 2, 0)
# 使用plt中的方法将这张图片显示出来看看
plt.imshow(t)
plt.show()
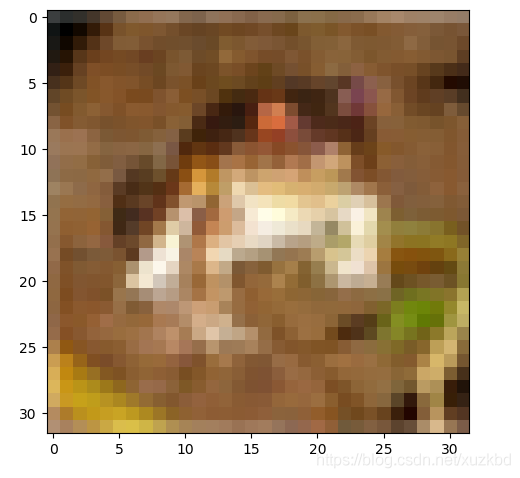
效果如下,图片原本是32*32的,放大了以后就变得这么丑了,说实话我也没看出来这玩意是什么。。。应该是青蛙或则狗吧—.—
简单二分类器的实现
这里取cifar10数据集中标签为0和1的数据,使用一个神经元,用逻辑斯蒂二分类模型实现了对图像的分类,用p_y_1=sigmoid(_y)表示预测标签为1的概率,若p_y_1>0.5,则预测标签为1,否则,预测标签为0。模型很简单,比较麻烦的地方还是在数据的处理上。
test.py
import pickle
import numpy
import os
import matplotlib.pyplot

CIFAR_PATH = './cifar10'

'''load data from package'''
def load_data(filename):
    with open(os.path.join(CIFAR_PATH,filename),'rb') as f:
        data = pickle.load(f,encoding = 'bytes')
        return data[b'data'],data[b'labels']

# 对数据集进行管理
class CifarData:
    def __init__(self, filenames, need_shuffle):
        all_datas = []
        all_labels = []
        for filename in filenames:
            datas,labels = load_data(filename)
            for data,label in zip(datas,labels) :
                if label in [0, 1]:
                    all_datas.append(data)
                    all_labels.append(label)
        self._data = np.vstack(all_datas)
        self._data = self._data / 127.5 - 1
        self._label = np.hstack(all_labels)
        print(self._data.shape)
        print(self._label.shape)

        self._num_examples = self._data.shape[0]
        self._need_shuffle = need_shuffle
        self._indicator = 0

        if self._need_shuffle :
            self._shuffle_data()
    # 洗牌
    def _shuffle_data(self):
        p = np.random.permutation(self._num_examples)
        self._data = self._data[p]
        self._label = self._label[p]

    # 从数据集中取一部分数据
    def next_batch(self,batch_size):
        end_indicator = self._indicator + batch_size
        if end_indicator > self._num_examples :
            if self._need_shuffle :
                self._shuffle_data()
                self._indicator = 0
                end_indicator = batch_size
            else :
                raise Exception("Have no more examples")
        if end_indicator > self._num_examples :
            raise Exception("Have no more examples")
        batch_data = self._data[self._indicator:end_indicator]
        batch_label = self._label[self._indicator:end_indicator]
        self._indicator = end_indicator

        return batch_data,batch_label
# 注意,range(a,b)返回的数在[a,b-1]之间
train_data = CifarData(['data_batch_%d' % i for i in range(1, 6)],need_shuffle=True)
test_data = CifarData(['test_batch'],need_shuffle=False)

import tensorflow as tf

# 重置图
tf.reset_default_graph()

x = tf.placeholder(tf.float32,[None, 3072])
y = tf.placeholder(tf.int64,[None])

# (3072,1)
w = tf.get_variable('w', [x.get_shape()[-1],1], initializer=tf.random_normal_initializer(0,1))
# (1,)
b = tf.get_variable('b', [1],initializer = tf.constant_initializer(0.0))

# (None,3072)* (3072,1) = [None,1]
_y = tf.matmul(x, w) + b

# [None,1]
p_y_1 = tf.nn.sigmoid(_y)


# 损失函数的计算
# 把样例的标签整理成[None,1]的形式,int64
y_reshape = tf.reshape(y,(-1,1))
y_reshape_float32 = tf.cast(y_reshape,tf.float32)
# 要缩减的损失函数
loss = tf.reduce_mean(tf.square(y_reshape_float32 - p_y_1))


# 精度计算
# bool
predict = p_y_1 > 0.5
# 预测值与真实值的差值向量
correct_prediction = tf.equal(tf.cast(predict,tf.int64), y_reshape)
# 取均值,即为精度
accuracy = tf.reduce_mean(tf.cast(correct_prediction,tf.float32))

with tf.name_scope('train_op'):
    train_op = tf.train.AdamOptimizer(1e-3).minimize(loss)

# 训练参数
init = tf.global_variables_initializer()
batch_size = 20
train_step = 100000
test_step = 100

with tf.Session() as sess:
    sess.run(init)

    for i in range(train_step):
        batch_data,batch_label = train_data.next_batch(batch_size)
        loss_val,acc_val,_=sess.run([loss,accuracy,train_op],feed_dict={x:batch_data,y:batch_label})
        # 每五百次输出一次训练结果
        if (i + 1) % 500 == 0:
            print('[train]step:%d,loss:%4.5f,acc:%4.5f' % (i+1,loss_val,acc_val))

        # 每500次输出一次测试结果
        if (i + 1) % 5000 == 0:
            test_data = CifarData(['test_batch'],need_shuffle=False)
            acc_test_val = []
            for j in range(test_step):
                test_batch_data,test_batch_label = test_data.next_batch(batch_size)
                test_val = sess.run(accuracy,feed_dict = {x:test_batch_data,y:test_batch_label})
                acc_test_val.append(test_val)
            acc_test = np.mean(acc_test_val)
            print('[test]step:%d,acc:%4.5f'%(i+1,acc_test))
结果如下(还蛮不错的,成功率达到82.2%):
[test]step:95000,acc:0.81950
[train]step:95500,loss:0.10036,acc:0.90000
[train]step:96000,loss:0.20069,acc:0.80000
[train]step:96500,loss:0.23392,acc:0.75000
[train]step:97000,loss:0.10037,acc:0.90000
[train]step:97500,loss:0.35115,acc:0.65000
[train]step:98000,loss:0.14999,acc:0.85000
[train]step:98500,loss:0.02582,acc:0.95000
[train]step:99000,loss:0.15360,acc:0.85000
[train]step:99500,loss:0.20095,acc:0.80000
[train]step:100000,loss:0.15004,acc:0.85000
[test]step:100000,acc:0.82200
3多分类
cifar10数据集共有10个类,我们在对其进行分类时使用softmax模型(和逻辑斯蒂多分类差不多)来计算预测概率,对于每个输入向量x,输出为一组10列的向量p_y,p_y的每一列i的值p(i|x)代表在已知特曾x的情况下y的标签为i的概率。我们取p(i|x)概率最大的列值i作为预测标签。
import pickle
import tensorflow as tf
import numpy as np
import os

CIFAR_PATH = './cifar10'

# 从文件中读取数据
def load_data(filename):
    with open(filename,'rb') as f:
        datas = pickle.load(f,encoding = "bytes")
        return datas[b'data'],datas[b'labels']

# 数据集的操作方法
class CifarData:
    def __init__(self,filenames,need_shuffle):
        all_datas = []
        all_labels = []
        for filename in filenames:
            datas,labels = load_data(filename)
            for data,label in zip(datas,labels):
                all_datas.append(data)
                all_labels.append(label)
        self._data = np.vstack(all_datas)
        self._data = self._data / 127.5 - 1
        self._label = np.hstack(all_labels)
        print(self._data.shape,self._label.shape)

        # 数据集的大小
        self._length = self._label.shape[0]
        # 下标
        self._indicator = 0
        # 是否需要洗牌
        self._need_shuffle = need_shuffle
        if self._need_shuffle:
            self._shuffle_data()

    # 洗牌
    def _shuffle_data(self):
        p = np.random.permutation(self._length)
        self._data = self._data[p]
        self._label = self._label[p]

    # 从数据集中抽牌
    def next_batch(self,batch_size):
        end_indicator = self._indicator + batch_size
        if end_indicator > self._length :
            if self._need_shuffle :
                self._shuffle_data()
                self._indicator = 0
                end_indicator = batch_size
            else :
                raise Exception('have no more examples')
        if end_indicator > self._length :
            raise Exception('have no more examples')
        res_data,res_label = self._data[self._indicator:end_indicator],self._label[self._indicator:end_indicator]
        self._indicator = end_indicator
        return res_data, res_label

train_data = CifarData([os.path.join(CIFAR_PATH,'data_batch_%d') % i for i in range(1,6)],True)
test_data = CifarData([os.path.join(CIFAR_PATH,'test_batch')],False)

tf.reset_default_graph()
# data
x = tf.placeholder(dtype=tf.float64, shape=[None, 3072])
# labels 数据集要处理成[None,1]
y = tf.placeholder(dtype=tf.int32, shape=[None])
# wights
w = tf.get_variable(name='w',dtype=tf.float64,shape=[3072,10],initializer=tf.random_normal_initializer(0,1))
b = tf.get_variable(name='b',dtype=tf.float64,shape=[10],initializer=tf.constant_initializer(0.0))

# (None,3072)*(3072,10)=(None,10)
_y = tf.matmul(x,w) + b

"""
# 计算损失,这里的话,计算损失的方法默认是用交叉熵法计算的
y_one_hot = tf.one_hot(y, 10)
loss = tf.losses.softmax_cross_entropy(onehot_labels = y_one_hot, logits = _y)
"""

# 计算损失
# (None, 10)概率分布
# 每行为像[0.1,0.2,...0.3]这样的值
# 而我们的预测值为最大值的下标
p_y = tf.nn.softmax(_y)
# (None,10),将验证数据one_shot一下再用于比较
y_one_hot = tf.one_hot(y,10,dtype=tf.float64)
# 用平方差计算差值
loss = tf.reduce_mean(tf.square(y_one_hot - p_y))

#  计算精度
predict = tf.argmax(_y, 1)
differences = tf.equal(tf.cast(predict, tf.int32),y)
accuracy = tf.reduce_mean(tf.cast(differences,tf.float64))

# 优化器
train_op = tf.train.AdamOptimizer(1e-3).minimize(loss)

# 变量初始化器
init = tf.global_variables_initializer()

train_step = 100000
batch_size = 20
test_step = 100

with tf.Session() as sess:
    sess.run(init)

    for i in range(train_step):
        batch_data,batch_label = train_data.next_batch(batch_size)
        loss_val,acc_val,_=sess.run([loss,accuracy,train_op],feed_dict={x:batch_data,y:batch_label})
        # 每五百次输出一次训练结果
        if (i + 1) % 500 == 0:
            print('[train]step:%d,loss:%4.5f,acc:%4.5f' % (i+1,loss_val,acc_val))
        if (i + 1) % 5000 == 0:
            all_acc_test=[]
            test_data = CifarData([os.path.join(CIFAR_PATH,'test_batch')],False)
            for i in range(test_step) :
                test_batch_data,test_batch_label = test_data.next_batch(batch_size)
                test_acc_val=sess.run(accuracy,feed_dict={x:test_batch_data,y:test_batch_label})
                all_acc_test.append(test_acc_val)
            acc_test = np.mean(all_acc_test)
            print('[test]step:%d,acc:%4.5f' % (i+1,acc_test))
效果一般,成功率只有39.15%,可能是因为只用了一层神经网络的原因,结果如下:
[train]step:95500,loss:0.10000,acc:0.50000
[train]step:96000,loss:0.08386,acc:0.55000
[train]step:96500,loss:0.13897,acc:0.25000
[train]step:97000,loss:0.08978,acc:0.55000
[train]step:97500,loss:0.08825,acc:0.55000
[train]step:98000,loss:0.06987,acc:0.60000
[train]step:98500,loss:0.08933,acc:0.50000
[train]step:99000,loss:0.09738,acc:0.50000
[train]step:99500,loss:0.13745,acc:0.30000
[train]step:100000,loss:0.11990,acc:0.40000
(10000, 3072) (10000,)
[test]step:100,acc:0.39150
用三层神经网络模型进行多分类
用一个三层的神经网络进行分类,代替原来的单层神经网络,这里需要用到tf.layers.dense()方法
tf.layers.dense函数
tf.layers.dense(
    inputs,
    units,
    activation=None,
    use_bias=True,
    kernel_initializer=None,
    bias_initializer=tf.zeros_initializer(),
    kernel_regularizer=None,
    bias_regularizer=None,
    activity_regularizer=None,
    kernel_constraint=None,
    bias_constraint=None,
    trainable=True,
    name=None,
    reuse=None
)
其中,inputs为输入数据
units为输出的数据数
activation为激活函数,常用tf.nn.relu,默认值为线性输出,ReLu=max(0,x) ,论文参考:Deep Sparse Rectifier Neural Networks (很有趣的一篇paper)
分类器代码如下
import pickle
import tensorflow as tf
import numpy as np
import os

CIFAR_PATH = './cifar10'

# 从文件中读取数据
def load_data(filename):
    with open(filename,'rb') as f:
        datas = pickle.load(f,encoding = "bytes")
        return datas[b'data'],datas[b'labels']

# 数据集的操作方法
class CifarData:
    def __init__(self,filenames,need_shuffle):
        all_datas = []
        all_labels = []
        for filename in filenames:
            datas,labels = load_data(filename)
            for data,label in zip(datas,labels):
                all_datas.append(data)
                all_labels.append(label)
        self._data = np.vstack(all_datas)
        self._data = self._data / 127.5 - 1
        self._label = np.hstack(all_labels)
        print(self._data.shape,self._label.shape)

        # 数据集的大小
        self._length = self._label.shape[0]
        # 下标
        self._indicator = 0
        # 是否需要洗牌
        self._need_shuffle = need_shuffle
        if self._need_shuffle:
            self._shuffle_data()

    # 洗牌
    def _shuffle_data(self):
        p = np.random.permutation(self._length)
        self._data = self._data[p]
        self._label = self._label[p]

    # 从数据集中抽牌
    def next_batch(self,batch_size):
        end_indicator = self._indicator + batch_size
        if end_indicator > self._length :
            if self._need_shuffle :
                self._shuffle_data()
                self._indicator = 0
                end_indicator = batch_size
            else :
                raise Exception('have no more examples')
        if end_indicator > self._length :
            raise Exception('have no more examples')
        res_data,res_label = self._data[self._indicator:end_indicator],self._label[self._indicator:end_indicator]
        self._indicator = end_indicator
        return res_data, res_label

train_data = CifarData([os.path.join(CIFAR_PATH,'data_batch_%d') % i for i in range(1,6)],True)
test_data = CifarData([os.path.join(CIFAR_PATH,'test_batch')],False)

train_data.next_batch(2)

tf.reset_default_graph()
# data
x = tf.placeholder(dtype=tf.float64, shape=[None, 3072])
# labels 数据集要处理成[None,1]
y = tf.placeholder(dtype=tf.int32, shape=[None])

# 使用三层隐藏层的网络代替原来的单层网络
hidden1 = tf.layers.dense(x, 100, activation = tf.nn.relu)
hidden2 = tf.layers.dense(hidden1, 100, activation = tf.nn.relu)
hidden3 = tf.layers.dense(hidden2, 50, activation = tf.nn.relu)
_y = tf.layers.dense(hidden3, 10)

"""
# 计算损失,这里的话,计算损失的方法默认是用交叉熵法计算的
y_one_hot = tf.one_hot(y, 10)
loss = tf.losses.softmax_cross_entropy(onehot_labels = y_one_hot, logits = _y)
"""

# 计算损失
# (None, 10)概率分布
# 每行为像[0.1,0.2,...0.3]这样的值
# 而我们的预测值为最大值的下标
p_y = tf.nn.softmax(_y)
# (None,10),将验证数据one_shot一下再用于比较
y_one_hot = tf.one_hot(y,10,dtype=tf.float64)
# 用平方差计算差值
loss = tf.reduce_mean(tf.square(y_one_hot - p_y))

#  计算精度
predict = tf.argmax(_y, 1)
differences = tf.equal(tf.cast(predict, tf.int32),y)
accuracy = tf.reduce_mean(tf.cast(differences,tf.float64))

# 优化器
train_op = tf.train.AdamOptimizer(1e-3).minimize(loss)

# 变量初始化器
init = tf.global_variables_initializer()

train_step = 100000
batch_size = 20
test_step = 100

with tf.Session() as sess:
    sess.run(init)

    for i in range(train_step):
        batch_data,batch_label = train_data.next_batch(batch_size)
        loss_val,acc_val,_=sess.run([loss,accuracy,train_op],feed_dict={x:batch_data,y:batch_label})
        # 每五百次输出一次训练结果
        if (i + 1) % 500 == 0:
            print('[train]step:%d,loss:%4.5f,acc:%4.5f' % (i+1,loss_val,acc_val))
        if (i + 1) % 5000 == 0:
            all_acc_test=[]
            test_data = CifarData([os.path.join(CIFAR_PATH,'test_batch')],False)
            for i in range(test_step) :
                test_batch_data,test_batch_label = test_data.next_batch(batch_size)
                test_acc_val=sess.run(accuracy,feed_dict={x:test_batch_data,y:test_batch_label})
                all_acc_test.append(test_acc_val)
            acc_test = np.mean(all_acc_test)
            print('[test]step:%d,acc:%4.5f' % (i+1,acc_test))
结果精度提高了不少,达到52%:
[train]step:95500,loss:0.04466,acc:0.60000
[train]step:96000,loss:0.03369,acc:0.75000
[train]step:96500,loss:0.01416,acc:0.85000
[train]step:97000,loss:0.05579,acc:0.55000
[train]step:97500,loss:0.01928,acc:0.80000
[train]step:98000,loss:0.04388,acc:0.75000
[train]step:98500,loss:0.03115,acc:0.75000
[train]step:99000,loss:0.01569,acc:0.90000
[train]step:99500,loss:0.04594,acc:0.70000
[train]step:100000,loss:0.02289,acc:0.85000
(10000, 3072) (10000,)
[test]step:100,acc:0.52000


