Dlib 人脸对齐源代码 学习笔记
Dlib中对 One Millisecond Face Alignment with an Ensemble of Regression Trees 中的人脸对齐算法进行了实现,以下是对其源码的学习笔记
-
- 模型使用
- 流程
- 实现
- 模型训练
- 流程
- 实现
- 模型使用
模型使用
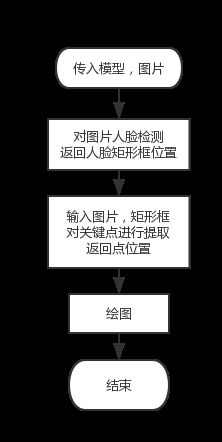
在Dlib/example目录下的face_landmark_detection_ex文件实现了人脸对齐的简单使用方法,这一程序需要传入两个参数,一个是模型文件,一个是需要进行处理的图片文件。
流程
实现
读入两个参数
//模型序列化读入
deserialize(argv[1]) >> sp;
//图片读入
array2d img;
load_image(img, argv[i]);
首先进行面部检测:
//建立人脸检测器
frontal_face_detector detector = get_frontal_face_detector();
//使用人脸检测器处理图片,返回矩形框位置确定人脸位置
std::vector之后进行关键点检测
//建立脸部关键点检测器
shape_predictor sp;
//关键点存储方式为full_object_detection,这是一种包含矩形框和关键点位置的数据格式
std::vector其中比较关键的人脸对齐部分主要是使用了Shape-Predictor类。
这一类中的私有数据成员包括,
//一维向量形式储存的初始形状
matrix<float,0,1> initial_shape;
//多级回归所形成的回归树的森林
std::vector<std::vectorvector<float,2> > > deltas;在使用模型过程中主要通过重载()完成,解释如下:
template <typename image_type>
full_object_detection operator()(
const image_type& img,
const rectangle& rect
) const
{
using namespace impl;
//首先将模型中存储的初始关键点位置进行赋值
matrix<float,0,1> current_shape = initial_shape;
std::vector<float> feature_pixel_values;
//第一层级联回归
for (unsigned long iter = 0; iter < forests.size(); ++iter)
{
extract_feature_pixel_values(img, rect, current_shape, initial_shape,
anchor_idx[iter], deltas[iter], feature_pixel_values);
unsigned long leaf_idx;
// 进入第二层回归
for (unsigned long i = 0; i < forests[iter].size(); ++i)
current_shape += forests[iter][i](feature_pixel_values, leaf_idx);
}
// 将当前结果存储为full_object_detection
//这里需要将处理结果解除归一化,回归真实像素位置,进行返回
const point_transform_affine tform_to_img = unnormalizing_tform(rect);
std::vector模型训练
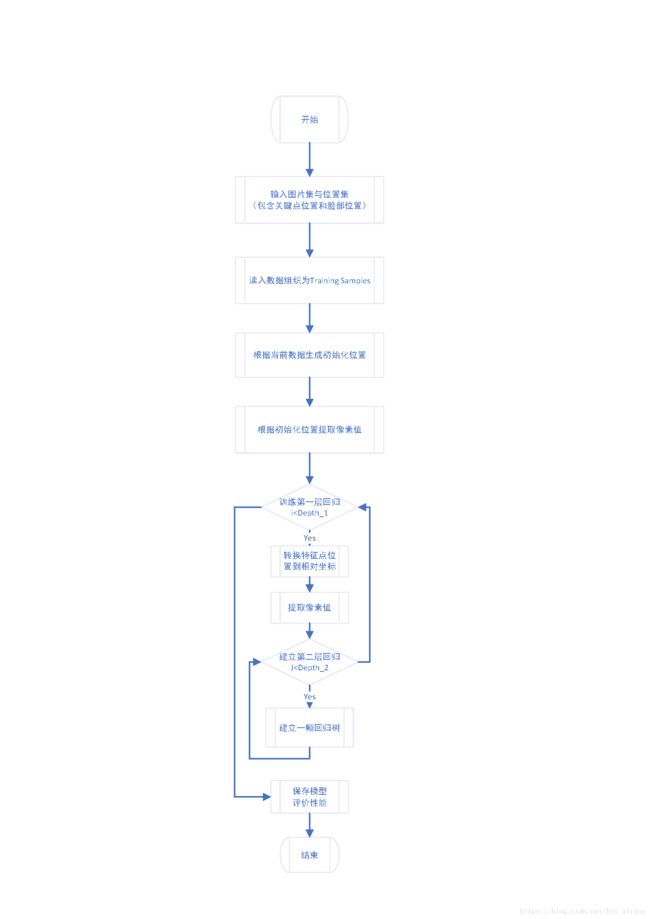
流程
实现
在Dlib/example目录下的train_shape_predictor_ex文件实现了模型训练的例子,这一程序需要传入一个参数,为数据存储的文件夹,文件夹中包含图片与对应full_object_detection格式的XML文件。
在例子中,首先读入数据
//分别建立图片和关键点位置的训练与测试集
dlib::arrayunsigned char> > images_train, images_test;
std::vector<std::vector之后建立训练器并且设置训练的超参数
shape_predictor_trainer trainer;
trainer.set_oversampling_amount(2);
将训练图片与训练脸部位置数据传入训练函数生成模型,模型为shape_predictor类型,包含着上面介绍的类内数据。
shape_predictor sp = trainer.train(images_train, faces_train);最后使用双眼中心点距离作为度量来评价正确率。
可以看到,训练中train函数是关键,这一函数位于shape_predictor_trainer类内,所以对这一函数做出解释。
在模型训练中,有以下的超参数可以调节
//第一层级层数
unsigned long _cascade_depth;
//第二层级联中每颗回归树的树深度
unsigned long _tree_depth;
//第二层级联层数
unsigned long _num_trees_per_cascade_level;
//学习率
double _nu;
//重采样,用来对数据进行扩充
unsigned long _oversampling_amount;
//每次建立回归选取的像素数
unsigned long _feature_pool_size;
//用来控制选取像素位置
double _lambda;
//在寻找最后建立节点时测试的节点数目
unsigned long _num_test_splits;
在训练函数中,首先将数据组织为训练样本,每一个训练样本包含以下内容
struct training_sample
{
//图片序号
unsigned long image_idx;
//人脸矩形框位置
rectangle rect;
//真实的脸部关键点位置,这里存储方式为将二维坐标一维化后给出的向量
matrix<float,0,1> target_shape;
//描述特征点是否缺失
matrix<float,0,1> present;
//当前预测的形状
matrix<float,0,1> current_shape;
//真实形状与当前形状的差值
matrix<float,0,1> diff_shape;
//样本中特征点的值
std::vector这里是将数据组织为训练样本:
std::vector之后使用训练样本开始训练过程:
//初始化模型
std::vector<std::vectorvector<float,2> > deltas;
create_shape_relative_encoding(initial_shape, pixel_coordinates[cascade], anchor_idx, deltas);
//依据当前位置点提取特征像素点
parallel_for(tp, 0, samples.size(), [&](unsigned long i)
{
impl::extract_feature_pixel_values(images[samples[i].image_idx], samples[i].rect,
samples[i].current_shape, initial_shape, anchor_idx,
deltas, samples[i].feature_pixel_values);
}, 1);
//这里开始训练回归树,开始第二层迭代训练
for (unsigned long i = 0; i < get_num_trees_per_cascade_level(); ++i)
{
forests[cascade].push_back(make_regression_tree(tp, samples, pixel_coordinates[cascade]));
}
}经过这样的训练,就可以形成由回归树组成的森林模型了

