storm安装记录
安装:
要使用storm首先要安装以下工具:
python、zookeeper、zeromq、jzmq、storm
python安装3以上的版本,具体参照https://www.cnblogs.com/windinsky/archive/2012/09/25/2701851.html
安装zookeeper,安装单机版即可,具体百度,会出现的问题比较少,测试安装成功一般启动没问题即可,也可以重新开一个窗口,telnet ip port 使用stat一下看看结果
安装zeromq 和jzmq
jzmq的安装貌似是依赖zeromq的,所以应该先装zeromq,再装jzmq
1)安装zeromq:
wget http://download.zeromq.org/zeromq-2.2.0.tar.gz(如果不可以,使用代理)
tar zxf zeromq-2.2.0.tar.gz
cd zeromq-2.2.0
./configure
make
make install
遇到报错:
1、No rule to make target ‘org/zeromq/ZMQ$Context.class’, needed by ‘all’. Stop
进入/src/org/zeromq,手动编译java
javac *.java
2、make[1]: * No rule to make target classdist_noinst.stamp’, needed byorg/zeromq/ZMQ.class’. Stop.
解决方法是创建 classdist_noinst.stamp 文件,
touch src/classdist_noinst.stamp
2)安装jzmq
git clone https://github.com/zeromq/jzmq.git(没有git 先安装apt install git)
cd jzmq/
$ ./autogen.sh
$ ./configure
$ make
$ make install
不报错安装成功,如有error 需要看情况
1、在./autogen.sh这步如果报错:autogen.sh:error:could not find libtool is required to run autogen.sh,这是因为缺少了libtool,可以用#apt install libtool*来解决。
autoconf不存在,使用如下命令
1.  sudo apt-get install autoconf
2.  sudo apt-get install automake
3.sudo apt-get install libtool
准备工作都做好了,现在安装storm1.2.2
到官网下载最新的storm版本:https://mirrors.tuna.tsinghua.edu.cn/apache/storm/apache-storm-1.2.2/apache-storm-1.2.2.tar.gz选择一个镜像即可
将文件放在usr/lib/storm1.2.2下
tar zxvf apache-storm-1.2.2.tar.gz设置环境变量vi /etc/profile(下面是我这次所有的变量设置)
#set java env
export JAVA_HOME=/usr/lib/jdk18/jdk1.8.0_201
export JRE_HOME=${JAVA_HOME}/jre
export CLASSPATH=.:${JAVA_HOME}/lib:${JRE_HOME}/lib
export PATH=${JAVA_HOME}/bin:$PATH
#set zookeeper
export ZOOKEEPER_HOME=/usr/lib/zookeeper-3.5.4/zookeeper-3.5.4-beta
export PATH=$JAVA_HOME/bin:$ZOOKEEPER_HOME/bin:$JRE_HOME/bin:$PATH
#配置storm的环境变量
export STORM_HOME=/usr/lib/storm1.2.2/apache-storm-1.2.2
export PATH=$STORM_HOME/bin:$PATH
#set jps
export PATH="/usr/lib/jdk18/jdk1.8.0_201/bin:$PATH"
另外一点,hostname 添加到/etc/hosts中 (一般启动不起来和这个名字有关,具体还没有了解原理)
127.0.0.1       dm-test-152
::1     localhost ip6-localhost ip6-loopback
fe00::0 ip6-localnet
ff00::0 ip6-mcastprefix
ff02::1 ip6-allnodes
ff02::2 ip6-allrouters
配置storm的配置文件:storm.yaml(注意点,配置时,不要清空重新写,在原配置中去掉注释等,没有的变量,小心添加,规则就是冒号后面一个空格, 开头也需要一个空格, 百度都有)
我的配置文件:(斜体字是我的配置)
# Licensed to the Apache Software Foundation (ASF) under one
# or more contributor license agreements.  See the NOTICE file
# distributed with this work for additional information
# regarding copyright ownership.  The ASF licenses this file
# to you under the Apache License, Version 2.0 (the
# "License"); you may not use this file except in compliance
# with the License.  You may obtain a copy of the License at
#
# http://www.apache.org/licenses/LICENSE-2.0
#
# Unless required by applicable law or agreed to in writing, software
# distributed under the License is distributed on an "AS IS" BASIS,
# WITHOUT WARRANTIES OR CONDITIONS OF ANY KIND, either express or implied.
# See the License for the specific language governing permissions and
# limitations under the License.

########### These MUST be filled in for a storm configuration
 *storm.zookeeper.servers:
     - "127.0.0.1"*#看其他blog这里可以写hostname的,我这里没测试,不过应该可以的
#     - "server2"
#
 *nimbus.seeds: ["127.0.0.1"]*#看其他blog这里可以写hostname的,我这里没测试,不过应该可以的
#
#
# ##### These may optionally be filled in:
#
## List of custom serializations
# topology.kryo.register:
#     - org.mycompany.MyType
#     - org.mycompany.MyType2: org.mycompany.MyType2Serializer
#
## List of custom kryo decorators
# topology.kryo.decorators:
#     - org.mycompany.MyDecorator
#
## Locations of the drpc servers
# drpc.servers:
#     - "server1"
#     - "server2"

## Metrics Consumers
## max.retain.metric.tuples
## - task queue will be unbounded when max.retain.metric.tuples is equal or less than 0.
## whitelist / blacklist
## - when none of configuration for metric filter are specified, it'll be treated as 'pass all'.
## - you need to specify either whitelist or blacklist, or none of them. You can't specify both of them.
## - you can specify multiple whitelist / blacklist with regular expression
## expandMapType: expand metric with map type as value to multiple metrics
## - set to true when you would like to apply filter to expanded metrics
## - default value is false which is backward compatible value
## metricNameSeparator: separator between origin metric name and key of entry from map
## - only effective when expandMapType is set to true
# topology.metrics.consumer.register:
#   - class: "org.apache.storm.metric.LoggingMetricsConsumer"
#     max.retain.metric.tuples: 100
#     parallelism.hint: 1
#   - class: "org.mycompany.MyMetricsConsumer"
#     max.retain.metric.tuples: 100
#     whitelist:
#       - "execute.*"
#       - "^__complete-latency$"
#     parallelism.hint: 1
#     argument:
#       - endpoint: "metrics-collector.mycompany.org"
#     expandMapType: true
#     metricNameSeparator: "."

## Cluster Metrics Consumers
# storm.cluster.metrics.consumer.register:
#   - class: "org.apache.storm.metric.LoggingClusterMetricsConsumer"
#   - class: "org.mycompany.MyMetricsConsumer"
#     argument:
#       - endpoint: "metrics-collector.mycompany.org"
#
# storm.cluster.metrics.consumer.publish.interval.secs: 60

# Event Logger
# topology.event.logger.register:
#   - class: "org.apache.storm.metric.FileBasedEventLogger"
#   - class: "org.mycompany.MyEventLogger"
#     arguments:
#       endpoint: "event-logger.mycompany.org"

# Metrics v2 configuration (optional)
#storm.metrics.reporters:
#  # Graphite Reporter
#  - class: "org.apache.storm.metrics2.reporters.GraphiteStormReporter"
#    daemons:
#        - "supervisor"
#        - "nimbus"
#        - "worker"
#    report.period: 60
#    report.period.units: "SECONDS"
#    graphite.host: "localhost"
#    graphite.port: 2003
#
#  # Console Reporter
#  - class: "org.apache.storm.metrics2.reporters.ConsoleStormReporter"
#    daemons:
#        - "worker"
#    report.period: 10
#    report.period.units: "SECONDS"
#    filter:
#        class: "org.apache.storm.metrics2.filters.RegexFilter"
#        expression: ".*my_component.*emitted.*"
 *storm.local.dir: /opt/storm/data(这个路径需要自己建立指定)
 ui.port: 28081*
环境变量和配置文件都配置完成后,就可以启动了
切换到bin目录上,
#执行命令启动nimbus主节点:
nohup bin/storm nimbus >> /dev/null &
#继续启动supervisor从节点(切换一个窗口):
nohup bin/storm supervisor >> /dev/null &
#都启动完毕之后,启动strom ui管理界面:
bin/storm ui &
利用jps查看是否存在一下五个进程:
29127 QuorumPeerMain
32647 Supervisor
1629 Jps
32365 nimbus
525 core
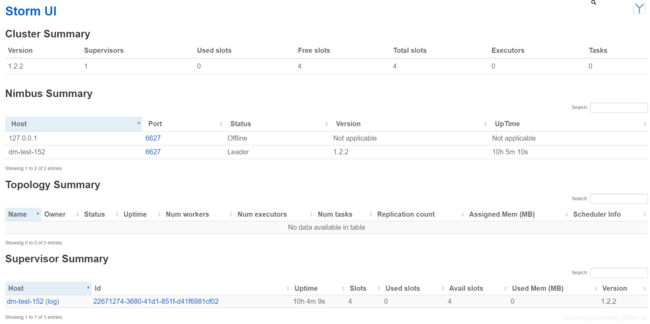
现在可以登陆sotrm ui界面查看是否成功了
nimbus节点的ip:配置文件的ui.port (默认8080)
登陆上

介绍ui界面的各个节点的含义:https://blog.csdn.net/pengzonglu7292/article/details/81017630