Android开发案例:网络交互&XML与json数据解析&HttpUtil优化
本文主要介绍如何在手机端使用http协议和服务器端进行网络交互,并对服务器返回的xml和json数据进行解析。
1、服务器和数据准备
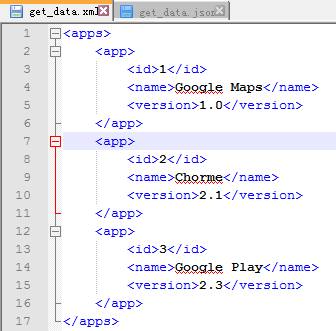
本文使用的服务器是Apache服务器,可以去官网下载,解压配置即可使用(需要提前安装jdk),不再赘述。Xml文件和json文件放在服务器webapps\htdocs文件夹中,其中,get_data.xml文件和get_data.json文件内容如下图。
打开服务器。
2、获取并解析数据,分别使用了Pull方式和SAX方式解析xml文件,使用JSONObject和GSON解析json(需要添加jar包),主要代码见下:
public class MainActivity extends Activity implements OnClickListener {

	public static final int SHOW_RESPONSE = 0;

	private Button sendRequest;

	private TextView responseText;

	private Handler handler = new Handler() {

		public void handleMessage(Message msg) {
			switch (msg.what) {
			case SHOW_RESPONSE:
				String response = (String) msg.obj;
				// 在这里进行UI操作,将结果显示到界面上,异步消息处理机制
				responseText.setText(response);
			}
		}

	};

	@Override
	protected void onCreate(Bundle savedInstanceState) {
		super.onCreate(savedInstanceState);
		setContentView(R.layout.activity_main);
		sendRequest = (Button) findViewById(R.id.send_request);
		responseText = (TextView) findViewById(R.id.response_text);
		sendRequest.setOnClickListener(this);
	}

	@Override
	public void onClick(View v) {
		if (v.getId() == R.id.send_request) {
			sendRequestWithHttpClient();
		}
	}

	private void sendRequestWithHttpClient() {
		new Thread(new Runnable() {
			@Override
			public void run() {
				try {
					HttpClient httpClient = new DefaultHttpClient();
					// 指定访问的服务器地址是电脑本机
					HttpGet httpGet = new HttpGet(
							"http://10.0.2.2/get_data.json");
					HttpResponse httpResponse = httpClient.execute(httpGet);
					if (httpResponse.getStatusLine().getStatusCode() == 200) {
						// 请求和响应都成功了
						HttpEntity entity = httpResponse.getEntity();
						String response = EntityUtils.toString(entity, "utf-8");
						parseJSONWithGSON(response);
						// parseJSONWithJSONObject(response);
						// parseXMLWithPull(response);
						// parseXMLWithSAX(response);
						// Message message = new Message();
						// message.what = SHOW_RESPONSE;
						// // 将服务器返回的结果存放到Message中
						// message.obj = response.toString();
						// handler.sendMessage(message);
					}
				} catch (Exception e) {
					e.printStackTrace();
				}
			}
		}).start();
	}

	private void sendRequestWithHttpURLConnection() {
		// 开启线程来发起网络请求
		new Thread(new Runnable() {
			@Override
			public void run() {
				HttpURLConnection connection = null;
				try {
					URL url = new URL("http://www.baidu.com");
					connection = (HttpURLConnection) url.openConnection();
					connection.setRequestMethod("GET");
					connection.setConnectTimeout(8000);
					connection.setReadTimeout(8000);
					connection.setDoInput(true);
					connection.setDoOutput(true);
					InputStream in = connection.getInputStream();
					// 下面对获取到的输入流进行读取
					BufferedReader reader = new BufferedReader(
							new InputStreamReader(in));
					StringBuilder response = new StringBuilder();
					String line;
					while ((line = reader.readLine()) != null) {
						response.append(line);
					}
					Message message = new Message();
					message.what = SHOW_RESPONSE;
					// 将服务器返回的结果存放到Message中
					message.obj = response.toString();
					handler.sendMessage(message);
				} catch (Exception e) {
					e.printStackTrace();
				} finally {
					if (connection != null) {
						connection.disconnect();
					}
				}
			}
		}).start();
	}

	private void parseJSONWithGSON(String jsonData) {
		Gson gson = new Gson();
		List appList = gson.fromJson(jsonData, new TypeToken>() {
		}.getType());
		for (App app : appList) {
			Log.d("MainActivity", "id is " + app.getId());
			Log.d("MainActivity", "name is " + app.getName());
			Log.d("MainActivity", "version is " + app.getVersion());
		}
	}

	private void parseJSONWithJSONObject(String jsonData) {
		try {
			JSONArray jsonArray = new JSONArray(jsonData);
			for (int i = 0; i < jsonArray.length(); i++) {
				JSONObject jsonObject = jsonArray.getJSONObject(i);
				String id = jsonObject.getString("id");
				String name = jsonObject.getString("name");
				String version = jsonObject.getString("version");
				Log.d("MainActivity", "id is " + id);
				Log.d("MainActivity", "name is " + name);
				Log.d("MainActivity", "version is " + version);
			}
		} catch (Exception e) {
			e.printStackTrace();
		}
	}

	private void parseXMLWithSAX(String xmlData) {
		try {
			SAXParserFactory factory = SAXParserFactory.newInstance();
			XMLReader xmlReader = factory.newSAXParser().getXMLReader();
			ContentHandler handler = new ContentHandler();
			xmlReader.setContentHandler(handler);
			xmlReader.parse(new InputSource(new StringReader(xmlData)));
		} catch (Exception e) {
			e.printStackTrace();
		}
	}

	private void parseXMLWithPull(String xmlData) {
		try {
			XmlPullParserFactory factory = XmlPullParserFactory.newInstance();
			XmlPullParser xmlPullParser = factory.newPullParser();
			xmlPullParser.setInput(new StringReader(xmlData));
			int eventType = xmlPullParser.getEventType();
			String id = "";
			String name = "";
			String version = "";
			while (eventType != XmlPullParser.END_DOCUMENT) {
				String nodeName = xmlPullParser.getName();
				switch (eventType) {
				// 开始解析某个结点
				case XmlPullParser.START_TAG: {
					if ("id".equals(nodeName)) {
						id = xmlPullParser.nextText();
					} else if ("name".equals(nodeName)) {
						name = xmlPullParser.nextText();
					} else if ("version".equals(nodeName)) {
						version = xmlPullParser.nextText();
					}
					break;
				}
				// 完成解析某个结点
				case XmlPullParser.END_TAG: {
					if ("app".equals(nodeName)) {
						Log.d("MainActivity", "id is " + id);
						Log.d("MainActivity", "name is " + name);
						Log.d("MainActivity", "version is " + version);
					}
					break;
				}
				default:
					break;
				}
				eventType = xmlPullParser.next();
			}
		} catch (Exception e) {
			e.printStackTrace();
		}
	}
}
3、优化
将通用的网络操作提取到一个公共的类里,并提供一个静态方法,当想要发起网络请求的时候只需简单地调用一下这个方法即可。比如使用下面的写法:
public classHttpUtil {
      public static void sendHttpRequest(Stringaddress) {
             HttpURLConnection connection =null;
                    try {
                           URL url = newURL(address);
                           connection =(HttpURLConnection) url.openConnection();
                           connection.setRequestMethod("GET");
                           connection.setConnectTimeout(8000);
                           connection.setReadTimeout(8000);
                           connect.setDoInput(true);
                           connect.setOutInput(true);
                           InputStream in =connection.getInputStream();
                           BufferedReader reader= new BufferedReader(new InputStreamReader(in));
                           StringBuilderresponse = new StringBuilder();
                           String line;
                           while ((line =reader.readLine()) != null) {
                                  response.append(line);
                           }
                           returnresponse.toString();
                    } catch (Exception e) {
                           e.printStackTrace();
                           returne.getMessage();
                    } finally {
                           if (connection !=null) {
                                  connection.disconnect();
                           }
                    }
      }
}
以后每当需要发起一条HTTP请求的时候就如下写,在获取到服务器响应的数据后就可以对数据进行处理了。
Stringaddress="http://www.baidu.com";
Stringresponse=HttpUtil.sendHttpRequest(address);
但是需要注意,网络操作通常都是耗时操作,而sendHttpRequest()方法的内部并没有开启线程,这样就有可能导致在调用sendHttpRequest()方法的时候使得主线程被阻塞住。而直接在sendHttpRequest()方法中开启一个线程发起HTTP请求,那么服务器响应的数据是无法进行返回的,所有的耗时逻辑都是在子线程里进行的,sendHttpRequest()方法会在服务器还来不及响应的时候就执行结束了,当然也就无法返回响应的数据了。
这里需要使用Java的回调机制。
首先定义一个接口,可以命名为HttpCallbackListener,代码如下:
public interfaceHttpCallbackListener{
      //onFinish()方法表示当服务器成功响应我们请求的时候调用,参数代表返回的数据
      void onFinish(String response);
      //onError()方法表示当进行网络操作出现错误的时候调用,参数记录着错误的详细信息
      void onError(Exception e);
}
接着修改HttpUtil中的代码如下:
public classHttpUtil {
      public static void sendHttpRequest(finalString address,
                    final HttpCallbackListenerlistener) {
             new Thread(new Runnable() {
                    @Override
                    public void run() {
                           HttpURLConnectionconnection = null;
                           try {
                                  URL url = newURL(address);
                                  connection =(HttpURLConnection) url.openConnection();
                                  connection.setRequestMethod("GET");
                                  connection.setConnectTimeout(8000);
                                  connection.setReadTimeout(8000);
                                  connect.setDoInput(true);
                                  connect.setOutInput(true);
                                  InputStream in= connection.getInputStream();
                                  BufferedReaderreader = new BufferedReader(new InputStreamReader(in));
                                  StringBuilderresponse = new StringBuilder();
                                  String line;
                                  while ((line =reader.readLine()) != null) {
                                         response.append(line);
                                  }
                                  if (listener!= null) {
                                         // 回调onFinish()方法
                                         listener.onFinish(response.toString());
                                  }
                           } catch (Exception e){
                                  if (listener!= null) {
                                         // 回调onError()方法
                                         listener.onError(e);
                                  }
                           } finally {
                                  if (connection!= null) {
                                         connection.disconnect();
                                  }
                           }
                    }
             }).start();
      }
}
首先给sendHttpRequest()方法添加了一个HttpCallbackListener参数,并在方法的内部开启了一个子线程,然后在子线程里去执行具体的网络操作。注意子线程中是无法通过return语句来返回数据的,因此这里我们将服务器响应的数据传入了HttpCallbackListener的onFinish()方法中,如果出现了异常就传入到onError()方法中。
现在sendHttpRequest()方法接收两个参数了,因此我们在调用它的时候还需要将HttpCallbackListener的实例传入,如下:
HttpUtil.sendHttpRequest(address,new HttpCallbackListener(){
      @Override
      public void onFinish(String response){
             // 在这里根据返回内容执行具体的逻辑
      }

      @Override
      public void onError(Exception e){
             // 在这里对异常情况进行处理
      }
});
onFinish()方法和onError()方法最终还是在子线程中运行的,因此不可以在这里执行任何的UI操作,如果需要根据返回的结果更新UI,仍然需要使用异步消息处理机制。

