Tensorflow入门(10)——Deep Dream
一、模型
1.AlexNet
卷积神经网络的演进从
LeNet
到
AlexNet
到
VGGNet
、
GoogleNet
到
ResNet
。演进的方式是有一定规律的,并且它们也都在ImageNet LSVRC
竞赛上,用
120
万张图片,
1000
类的标记, 取得了很好的成绩。
AlexNet
是
2012
年
ImageNet
图像分类竞赛冠军,它之所以能成功地让卷积的方法重新 回到人们的视野,在于使用了如下的方法: 首先是防止过拟合。在防止过拟合方面,它使用了两个方法:
- 一个是数据增强(data augmentation):增加训练数据来防止过拟合
- 一个是dropout:AlexNet以一定的概率(比如0.5),将每个隐层的神经元的输出设为0
除了数据增强和
dropout
,
AlexNet
还使用了非线性激活函数
ReLU
代替之前的
Sigmoid 函数。用了ReLu
后得到的随机梯度下降的收敛速度比之前用
Sigmoid
和用
tanh
的时候快很多。
此外,
AlexNet
将网络分布到两个
GPU
上:特征图分为了两组,各自在一个独立的
GPU上进行运算,这样能够直接从另外一个GPU的内存读入和写出而不需要通过主机内存,因此它能够极大地增加训练的规模。

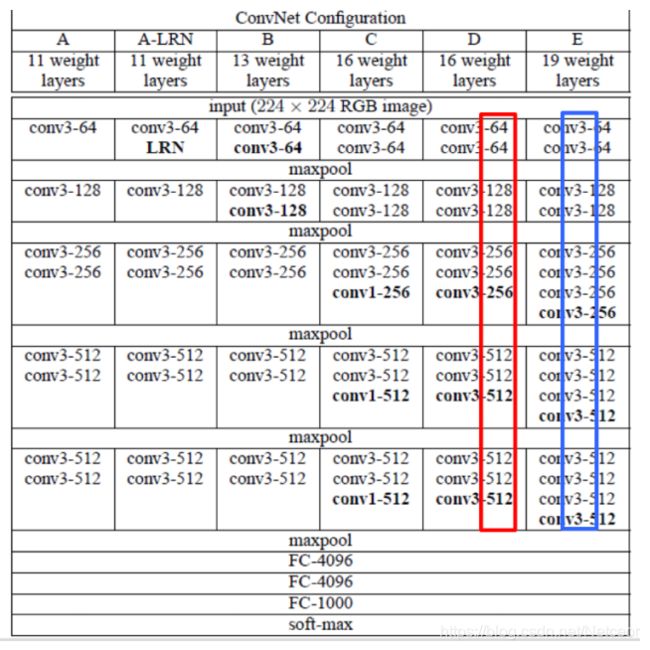
2.VGGNet
可以看成是加深版本的
AlexNet
。
- 相似:VGGNet和AlexNet的相似之处在于都使用了5个卷积组,不管是配置A还是B、C、D、E都使用了5个卷积组。
- 区别:1)VGGNet的层数更多;2)VGGNet中,卷积核的大小绝大部分为3*3;3)VGGNet卷积核的深度逐层递增
3.GoogleNet
是由谷歌公司提出的,在
2014年获得了LSVRC挑战赛的冠军,当时它将top-5错误率降到了百分之六点多。其思想主要是围绕着深度和宽度去实现的。


4.ResNet
VGG-16
是
AlexNet
的网络加深,
GoogleNet
增加了卷积层的功能,把网络加深和增加卷积层功能这两个演化的方向结合起来,就诞生了ResNet
。

ResNet
怎样实现卷积功能的增强呢?按照一般的经验,只要没有发生梯度消失或梯度爆炸,而且不过拟合的话,网络应该是越深越好的,但是论文作者发现,层数从20
层增加到
56
层,训练的错误率上升了。其原因是梯度消失。
ResNet
中引入了
shortcut connections,即捷径连接。解决网络层数加深出现的梯度消失的问题。捷径连接指的就是这个弧线的箭头部分。它将输入直接跳层传递与卷积核的结果相加,并不依次经过中间层。

一、导入模型
1.导入
我们选择预训练好的
ImageNet图像识别模型,导入Inception模型
Tensorflow
提供了以下两种方式来存储和加载模型:
- 生成检查点文件(checkpoint file), 扩展名一般为.ckpt,通过在tf.train.Saver对象上调用Saver.save()生成,通过saver.restore()来加载。
- 生成图协议文件(graph proto file),这是一个二进制文件,扩展名一般为.bp,用tf.train.write_graph()保存,然后使用tf.import_graph_def()来加载图。
from __future__ import print_function
import os
from io import BytesIO
import numpy as np
from functools import partial
import PIL.Image
import scipy.misc
import tensorflow as tf

'''创建图和会话'''

graph = tf.Graph()
sess = tf.InteractiveSession(graph=graph)

'''导入模型'''

model_fn = 'tensorflow_inception_graph.pb'#导入Inception网络
# tensorflow_inception_graph.pb文件的下载:
# https://storage.googleapis.com/download.tensorflow.org/models/inception5h.zip

#with tf.gfile.FastGFile(model_fn, 'rb') as f:
with tf.gfile.GFile(model_fn, 'rb') as f:
    graph_def = tf.GraphDef()
    graph_def.ParseFromString(f.read())
2、图像预处理
使用的图像数据格式通常是(height,width,channel),只能表示一张图像; 而Inception模型要求的输入格式却是(batch,height, width, channel),即同时将多张图像送入网络
tf.expand_dims(input, dim, name=None)
Returns:
A Tensor. Has the same type as input. Contains the same data as input, but its shape has an additional dimension of size 1 added.
向
tensor
中插入维度
1
,插入位置就是参数代表的位置(维度从
0
开始)
# 定义输入图像的占位符
t_input = tf.placeholder(np.float32, name='input')

#图像预处理——减均值
imagenet_mean = 117.0 #在训练Inception模型时做了减均值预处理,此处也需减同样的均值以保持一致

#图像预处理——增加维度
# 图像数据格式一般是(height,width,channels),为同时将多张图片输入网络而在前面增加一维
# 变为(batch,height,width,channel)
t_preprocessed = tf.expand_dims(t_input - imagenet_mean, 0)

# 导入模型并将经预处理的图像送入网络中
tf.import_graph_def(graph_def, {'input': t_preprocessed})
3、找到卷积层
在导入模型之后,需要找出模型中所有的卷积层,或是需要可视化的卷积层
layers = [op.name for op in graph.get_operations() if op.type == 'Conv2D']
# 输出卷积层层数
print('Number of layers', len(layers))

# 输出所有卷积层名称
print(layers)

# 还可输出指定卷积层的参数
name1 = 'mixed4d_3x3_bottleneck_pre_relu'
print('shape of %s: %s' % (name1, str(graph.get_tensor_by_name('import/' + name1 + ':0').get_shape())))

name2 = 'mixed4e_5x5_bottleneck_pre_relu'
print('shape of %s: %s' % (name2, str(graph.get_tensor_by_name('import/' + name2 + ':0').get_shape())))
这里指定了两个卷积层,对它们的shape分别进行输出。
第一个卷积层的shape是(?,?,?,144)。问号代表什么呢?卷积层的格式一般是批量中样本的数量、像素的高、像素的宽以及通道数。因为现在还没有真正输入图像,所以并不清楚输入图像的个数以及它的尺寸,就用问号表示。这里的通道数(144)是固定的,因为Inception是已经预训练好的模型,所以它的结构、通道数都是固定的。
三、Dream图像生成(以噪声为起点)
1、生成原始图像
# 把一个numpy.ndarray保存成图像文件
def savearray(img_array, img_name):
scipy.misc.toimage(img_array).save(img_name)
print('img saved: %s' % img_name)
# 渲染函数
def render_naive(t_obj, img0, iter_n=20, step=1.0):
# t_obj:是layer_output[:, :, :, channel],即卷积层某个通道的值
# img0:初始图像(噪声图像)
# iter_n:迭代次数
# step:用于控制每次迭代步长,可以看作学习率
t_score = tf.reduce_mean(t_obj)
# t_score是t_obj的平均值
# 由于我们的目标是调整输入图像使卷积层激活值尽可能大
# 即最大化t_score
# 为达到此目标,可使用梯度下降
# 计算t_score对t_input的梯度
t_grad = tf.gradients(t_score, t_input)[0]
img = img0.copy()#复制新图像可避免影响原图像的值
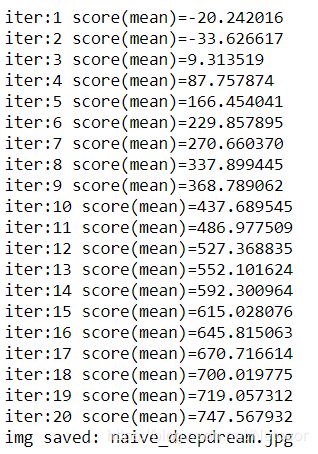
for i in range(iter_n):
# 在sess中计算梯度,以及当前的t_score
g, score = sess.run([t_grad, t_score], {t_input: img})
# 对img应用梯度
# 首先对梯度进行归一化处理
g /= g.std() + 1e-8
# 将正规化处理后的梯度应用在图像上,step用于控制每次迭代步长,此处为1.0
img += g * step
#print('score(mean)=%f' % (score))
print('iter:%d' %(i+1), 'score(mean)=%f' % score)
# 保存图片
savearray(img, 'naive_deepdream.jpg')2.通过单通道特征生成DeepDream图像
通过单通道特征生成Deep Dream图像,关键有这几步:
- 取出指定的卷积层、通道数并取出对应的tensor
- 把它传递到渲染函数中
- 保存并显示
它的核心就在于渲染函数。
# 定义卷积层、通道数,并取出对应的tensor
name = 'mixed4d_3x3_bottleneck_pre_relu'# (?, ?, ?, 144)
channel = 139
# 'mixed4d_3x3_bottleneck_pre_relu'共144个通道
# 此处可选任意通道(0~143之间任意整数)进行最大化

layer_output = graph.get_tensor_by_name("import/%s:0" % name)
# layer_output[:, :, :, channel]即可表示该卷积层的第140个通道

# 定义图像噪声
img_noise = np.random.uniform(size=(224, 224, 3)) + 100.0

# 调用render_naive函数渲染
render_naive(layer_output[:, :, :, channel], img_noise, iter_n=20)

# 保存并显示图片
im = PIL.Image.open('naive_deepdream.jpg')
im.show()
im.save('naive_single_chn.jpg')
3.利用较低层单通道卷积特征生成DeepDream图像
mixed4d
是
Inception
里的第四个卷积模块,如果用更浅层的卷积层,比如第三个卷积模块中的某一个卷积层,它的结果会变成这样
# 定义卷积层、通道数,并取出对应的tensor
name3 = 'mixed3a_3x3_bottleneck_pre_relu'
layer_output = graph.get_tensor_by_name("import/%s:0" % name3)
print('shape of %s: %s' % (name3, str(graph.get_tensor_by_name('import/' + name3 + ':0').get_shape())))

# 定义噪声图像
img_noise = np.random.uniform(size=(224, 224, 3)) + 100.0

# 调用render_naive函数渲染
channel = 86 # (?, ?, ?, 96)
render_naive(layer_output[:, :, :, channel], img_noise, iter_n=20)

# 保存并显示图片
im = PIL.Image.open('naive_deepdream.jpg')
im.show()
im.save('shallow_single_chn.jpg')
4.利用较高层单通道卷积特征生成DeepDream图像
除了对较低层的卷积特征进行可视化,若还想知道高层的卷积特征是什么样的,也可以通过同样的方法对它进行可视化。
![]()
# 定义卷积层、通道数,并取出对应的tensor
name4 = 'mixed5b_5x5_pre_relu'
layer_output = graph.get_tensor_by_name("import/%s:0" % name4)
print('shape of %s: %s' % (name4, str(graph.get_tensor_by_name('import/' + name4 + ':0').get_shape())))

# 定义噪声图像
img_noise = np.random.uniform(size=(224, 224, 3)) + 100.0

# 调用render_naive函数渲染
channel =118 # (?, ?, ?, 128)
render_naive(layer_output[:, :, :, channel], img_noise, iter_n=20)

# 保存并显示图片
im = PIL.Image.open('naive_deepdream.jpg')
im.show()
im.save('deep_single_chn.jpg')
5.通过组合多个通道特征生成DeepDream图像
# 定义卷积层、通道数,并取出对应的tensor
name1 = 'mixed4d_3x3_bottleneck_pre_relu' #(?, ?, ?, 144)
name2= 'mixed4e_5x5_bottleneck_pre_relu' # (?, ?, ?, 32)
channel1 = 139 #因为共144通道,此处可选择0~143之间任意整数
channel2 = 28 # 因为共32通道,此处可选择0~31之间任意整数

layer_output1= graph.get_tensor_by_name("import/%s:0" % name1)
layer_output2= graph.get_tensor_by_name("import/%s:0" % name2)

# 定义噪声图像
img_noise = np.random.uniform(size=(224, 224, 3)) + 100.0

# 调用render_naive函数渲染
render_naive(layer_output1[:, :, :, channel1]+layer_output2[:, :, :, channel2], img_noise, iter_n=20)

# 保存并显示图片
im = PIL.Image.open('naive_deepdream.jpg')
im.show()
im.save('multi_chn.jpg')
6.利用所有通道特征生成DeepDream图像
# 定义卷积层,并取出对应的tensor
name = 'mixed4d_3x3_bottleneck_pre_relu'
layer_output= graph.get_tensor_by_name("import/%s:0" % name)

# 定义噪声图像
img_noise = np.random.uniform(size=(224, 224, 3)) + 100.0

# 调用render_naive函数渲染
render_naive(layer_output, img_noise, iter_n=20) # 不指定特定通道,即表示利用所有通道特征
# 单通道时:layer_output[:, :, :, channel]

# 保存并显示图片
im = PIL.Image.open('naive_deepdream.jpg')
#im = PIL.Image.open('deepdream.jpg')
im.show()
im.save('all_chn.jpg')
通过对比可以发现:同样的卷积层,利用所有的通道所生成的图像比用单通道时所生成的图像更加抽象
四、Dream图像生成(以背景图为起点)
1.以背景图为起点
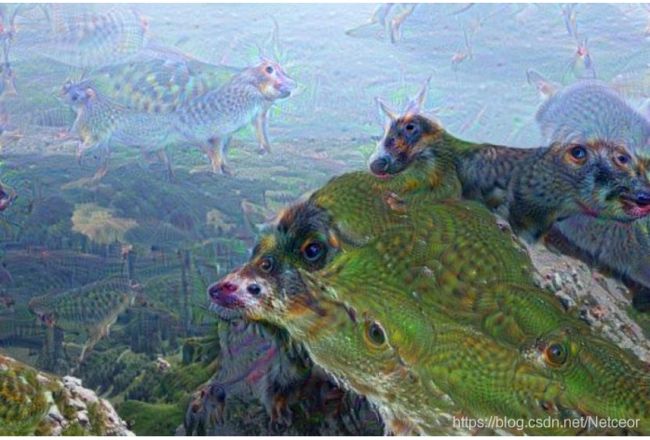
刚刚已经介绍了如何通过极大化卷积层的某个通道的平均值来生成
Deep Dream
图像,但最终的Deep Dream
模型还需要对图片添加背景,然后生成类似下面的图像,这才是最终的Deep Dream图像。以下是一张非常著名的含有动物的Deep Dream图像。
之前介绍的例子,都是以噪声图像作为优化的起点的。如果使用一张背景图像来作为起点对图像进行优化,就可以生成带有背景的Deep Dream图像了。它们的代码只有红框里面的部分和之前的不同,其他部分都是一样的:


可以看到,图像的纹理和颜色都已经发生了变化,但这个效果并不理想,所以接下来需要提高生成图像的质量。
2.提高生成图像的质量
同样的,先定义目标函数
t_score
,然后定义梯度t_grad
,因为每一步都要将梯度应用到
图像上,再然后通过
copy
来避免操作影响到原图像。所增加的地方就是两段代码:第一段代码是将图像进行金字塔分解,第二段代码有关图像的生成(在代码中注释)。
在图像算法中,有高频成分
和低频成分的概念。简单的说,高频成分就是图像中灰度、颜色、明度变化比较大的地方,比如图像的边缘和细节部分。低频成分就是图像中变化不大的地方,比如大块色块、整体风格。因此,对于刚刚生成的Deep Dream
图像,它的高频成分太多,颜色、明度变化都比较剧烈。 而理想是图像的低频成分更多一些,这样生成的图像才能够更加柔和。

在图像分解时,是从金字塔底层开始的,比如从level0
(原图)开始,分解出
level1
高频成分,把当时的低频成分留作level2
,然后再把level2
分解成高频成分和更低频成分的level3
,逐步分解,来得到更加低频的信息。
在图像生成时,是从金字塔顶层开始的。首先生成低频的图像,把低频成分(level4)放大成跟level3一样的尺寸后,加到level3,得到比较高频的成分,然后再把合成之后的level3’放大,加到level2,逐层相加,得到最后的最大尺寸图像,即合成图像。
在前面生成图像的时候,尺寸是
224×224×3
,正是之前传递的
img_noise
噪音图像的大小。如果传递更大的img_noise
就会生成更大的图片,但这样有一个潜在的问题:如果要生成的图片很大,它会占用很大的内存。当生成的图片特别大时,有可能因为内存不足导致渲染失败,这时就需要calc_grad_tiled()
函数。
①导入库与Inception模型
from __future__ import print_function
import os
from io import BytesIO
import numpy as np
from functools import partial
import PIL.Image
import scipy.misc
import tensorflow as tf


graph = tf.Graph()
model_fn = 'tensorflow_inception_graph.pb'
sess = tf.InteractiveSession(graph=graph)
with tf.gfile.FastGFile(model_fn, 'rb') as f:
    graph_def = tf.GraphDef()
    graph_def.ParseFromString(f.read())
t_input = tf.placeholder(np.float32, name='input')
imagenet_mean = 117.0
t_preprocessed = tf.expand_dims(t_input - imagenet_mean, 0)
tf.import_graph_def(graph_def, {'input': t_preprocessed})
②定义相关的函数
# 保存图像
def savearray(img_array, img_name):
    scipy.misc.toimage(img_array).save(img_name)
    print('img saved: %s' % img_name)

# 将图像放大ratio倍
def resize_ratio(img, ratio):
    min = img.min()
    max = img.max()
    img = (img - min) / (max - min) * 255
    img = np.float32(scipy.misc.imresize(img, ratio))
    img = img / 255 * (max - min) + min
    return img

# 调整图像尺寸
def resize(img, hw):
    min = img.min()
    max = img.max()
    img = (img - min) / (max - min) * 255
    img = np.float32(scipy.misc.imresize(img, hw))
    img = img / 255 * (max - min) + min
    return img

# 原始图像尺寸可能很大,从而导致内存耗尽问题
# 每次只对 tile_size * tile_size 大小的图像计算梯度,避免内存问题
def calc_grad_tiled(img, t_grad, tile_size=512):
    sz = tile_size
    h, w = img.shape[:2]
    sx, sy = np.random.randint(sz, size=2)
    img_shift = np.roll(np.roll(img, sx, 1), sy, 0)  # 先在行上做整体移动,再在列上做整体移动
    grad = np.zeros_like(img)
    for y in range(0, max(h - sz // 2, sz), sz):
        for x in range(0, max(w - sz // 2, sz), sz):
            sub = img_shift[y:y + sz, x:x + sz]
            g = sess.run(t_grad, {t_input: sub})
            grad[y:y + sz, x:x + sz] = g
    return np.roll(np.roll(grad, -sx, 1), -sy, 0)

def render_deepdream(t_obj, img0,
                     iter_n=10, step=1.5, octave_n=4, octave_scale=1.4):
    t_score = tf.reduce_mean(t_obj)
    t_grad = tf.gradients(t_score, t_input)[0]
    img = img0.copy()

    # 将图像进行金字塔分解
    # 从而分为高频、低频部分
    octaves = []
    for i in range(octave_n - 1):
        hw = img.shape[:2]
        lo = resize(img, np.int32(np.float32(hw) / octave_scale))
        hi = img - resize(lo, hw)
        img = lo
        octaves.append(hi)

    # 首先生成低频的图像,再依次放大并加上高频
    for octave in range(octave_n):
        if octave > 0:
            hi = octaves[-octave]
            img = resize(img, hi.shape[:2]) + hi
        for i in range(iter_n):
            g = calc_grad_tiled(img, t_grad)
            img += g * (step / (np.abs(g).mean() + 1e-7))

    img = img.clip(0, 255)
    savearray(img, 'mountain_deepdream.jpg')
    im = PIL.Image.open('mountain_deepdream.jpg').show()
③生成以背景图像作为起点的DeepDream图像
name = 'mixed4c'
layer_output = graph.get_tensor_by_name("import/%s:0" % name)

img0 = PIL.Image.open('cat.png') # 自己找一张图片
img0 = np.float32(img0)
render_deepdream(tf.square(layer_output), img0)
我找了两张图片测试了一下。
下图的原图是WLOP画的K/DA阿卡丽,我可太爱了哈哈哈,渲染后倒是有点克苏鲁,当然还可以再调试一下背景图像、通道数、卷积层得到各种各样的生成图像。