EJB入门例子
说明:本文从一个实例说明EJB的基本理念
1. 简单说一下EJB概念
引用几句比较官方的话来定义EJB
"EJB(Enterprise JavaBeans) is a server-side component framework that simplifies the process of building enterprise-class distributed component applications in java. By using EJB, you can write scalable, reliable, secure applications without writing your own complex distibuted component framework."
这句话主要说明EJB是服务器端的组件框架,用来构建分布式应用;
"EJB is a standard for developing and deploying server-side distributed components in Java. It defines an agreement (contract) between components and application servers that enables any component to run in any compliant application server."
这句话定义了EJB。
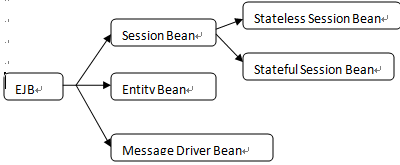
看一个图说明EJB的分类
2. EJB运行环境JBoss安装
下载4.2版本以后,我这里就用4.2.1因为工作中用的就是这个版本,下载链接http://www.jboss.org/jbossas/downloads/
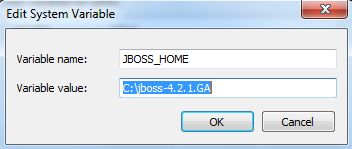
下载完解压,我将其解压到C盘根目录,解压完成配置JBoss Home,如下图:
单机C:\jboss-4.2.1.GA\bin下run.bat可以启动JBoss,如果启动过程不抛出异常,说明JBoss启动正常。
3.安装Ant
下载http://ant.apache.org/下载完我同样解压到C盘根目录,配置Ant Home,如下图

将路径C:\apache-ant-1.8.1\bin添加到系统path.
4. 开发只实现Remote接口的无状态Session Bean
Step1: Eclipse下新建一个JavaProject com.ejb.helloworld;
Step2: 定义一个包括业务方法的接口。调用EJB的客户端只需要使用这个接口变可以调用服务器内部这个接口的实现,接口代码:
- packagecom.ejb.helloworld;
- publicinterfaceHelloWorld{
- publicStringsayHello(Stringname);
- }
Step3:编写Bean Class,此类是上述接口在服务器端的实现,代码
- packagecom.ejb.helloworld.impl;
- importjavax.ejb.Remote;
- importjavax.ejb.Stateless;
- importcom.ejb.helloworld.HelloWorld;
- @Stateless
- @Remote({HelloWorld.class})
- publicclassHelloWorldBeanimplementsHelloWorld{
- publicStringsayHello(Stringname){
- returnname+"sayingHelloWorldLoudly...";
- }
- }
注意加粗两行代表该Bean定义EJB规范。
Step4:Ant将上述工程打包,发布到JBoss。
在com.ejb.helloworld根目录下构建build.xml,XML内容:
- xmlversion="1.0"?>
- <projectname="com.ejb.helloworld"default="deploy"basedir="..">
- <propertyenvironment="env"/>
- <propertyname="app.dir"value="${basedir}\com.ejb.helloworld"/>
- <propertyname="src.dir"value="${app.dir}\src"/>
- <propertyname="jboss.home"value="${env.JBOSS_HOME}"/>
- <propertyname="jboss.server.config"value="default"/>
- <propertyname="build.dir"value="${app.dir}\build"/>
- <propertyname="build.classes.dir"value="${build.dir}\classes"/>
- <pathid="build.classpath">
- <filesetdir="${jboss.home}\client">
- <includename="*.jar"/>
- fileset>
- <pathelementlocation="${build.classes.dir}"/>
- path>
- <targetname="prepare"depends="clean">
- <mkdirdir="${build.dir}"/>
- <mkdirdir="${build.classes.dir}"/>
- target>
- <targetname="compile"depends="prepare"description="compile">
- <javacsrcdir="${src.dir}"destdir="${build.classes.dir}"debug="on"deprecation="on"optimize="off"includes="com/**">
- <classpathrefid="build.classpath"/>
- javac>
- target>
- <targetname="ejbjar"depends="compile"description="caeatehelloworldjarfile...">
- <jarjarfile="${app.dir}\HelloWorld.jar">
- <filesetdir="${build.classes.dir}">
- <includename="com/**/*.class"/>
- fileset>
- jar>
- target>
- <targetname="deploy"depends="ejbjar">
- <copyfile="${app.dir}\HelloWorld.jar"todir="${jboss.home}\server\${jboss.server.config}\deploy"/>
- target>
- <targetname="clean">
- <deletedir="${build.dir}"/>
- <deletefile="${jboss.home}\server\${jboss.server.config}\deploy\HelloWorld.jar"/>
- target>
- project>
关于如何使用Ant这里不多说,Build成功后在JBoss的Console中会有相应提示,如下图:
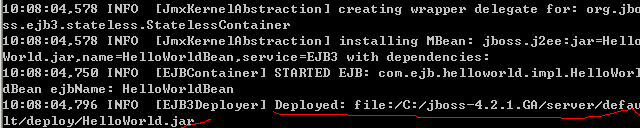
上图说明com.ejb.helloworldbuild成功是jar包已经部署到JBoss,并且部署成功,当然可以到C:\jboss-4.2.1.GA\server\default\deploy目录下查看,
另外还可以到http://127.0.0.1:8080/jmx-console/HtmlAdaptor处查看
在打开页面中

单机service=JNDIView查看JNDI名称
在出现的页面中找到“List of Mbean opreations”点击invoke按钮
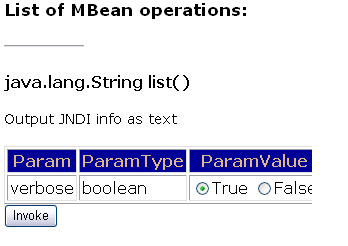
在弹出页面Global JNDI Namespace最下端会出现HelloWorld.jar的JNDI信息
![]()
5.客户端开发
客户端为简单的Web界面,就一个jsp文件
- <%@pagecontentType="text/html;charset=GBK"%>
- <%@pageimport="com.ejb.helloworld.HelloWorld,javax.naming.*,java.util.Properties"%>
- <%
- Propertiesprops=newProperties();
- props.setProperty("java.naming.factory.initial","org.jnp.interfaces.NamingContextFactory");
- props.setProperty("java.naming.provider.url","localhost:1099");
- try{
- InitialContextctx=newInitialContext(props);
- HelloWorldhelloworld=(HelloWorld)ctx.lookup("HelloWorldBean/remote");
- out.println(helloworld.sayHello("Kobebryant"));
- }catch(NamingExceptione){
- out.println(e.getMessage());
- }
- %>
同样build次项目
build.xml内容如下
- xmlversion="1.0"?>
- <projectname="EJBTest"default="deploy"basedir=".">
- <propertyenvironment="env"/>
- <propertyname="resouce.dir"value="${basedir}\web"/>
- <propertyname="jboss.home"value="${env.JBOSS_HOME}"/>
- <propertyname="jboss.server.config"value="default"/>
- <targetname="web-war"description="careatewebwar"depends="clean">
- <warwarfile="${basedir}\hello.war"webxml="${resouce.dir}\WEB-INF\web.xml">
- <filesetdir="${resouce.dir}">
- <includename="**/*"/>
- fileset>
- war>
- target>
- <targetname="deploy"depends="web-war">
- <copyfile="${basedir}\hello.war"todir="${jboss.home}\server\${jboss.server.config}\deploy"/>
- target>
- <targetname="clean">
- <deletefile="${jboss.home}\server\${jboss.server.config}\deploy\hello.war"/>
- target>
- project>
6。测试
http://127.0.0.1:8080/hello/hello.jsp会出现页面输出一行字符
- KobebryantsayingHelloWorldLoudly...
7.总结
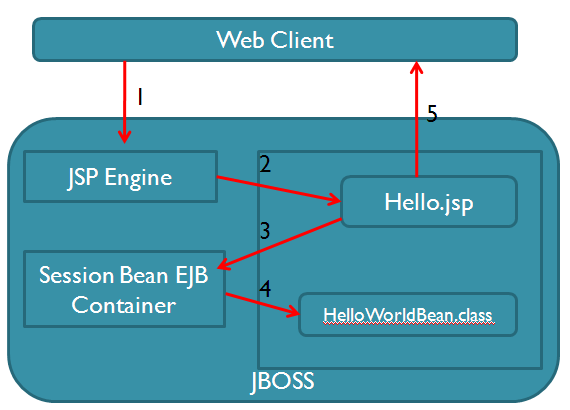
本例子主要流程:
1 客户端(Web Client)请求hello.jsp文件
2 应用服务器引擎编译hello.jsp
3 hello.jsp通过JNDI查找HelloWorldBean的EJB存根,调运sayHello方法
4 将结果返回客户
8。由于时间关系,本例子写的比较粗,如果有人提出不同意见欢迎。项目在附件dev-workspace.rar