STM32F1的IO口模式有很多种,需要按照设计进行配置,IO的操作还是比较简单的
STM32的内部IO口结构为:

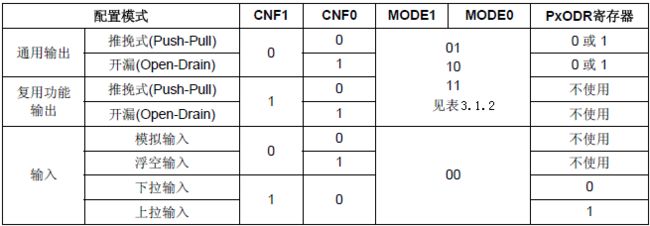
寄存器的配置说明:

寄存器的复位值为:0X4444 4444(0100 0100 0100 0100 0100 0100 0100 0100),
即IO口默认为浮空输入,
STM32 的 CRL 控制着每组 IO 端口(A~G)的低 8 位的模式。
每个 IO 端口的位占用 CRL 的 4 个位,高两位为 CNF,低两位为 MODE。这里我们可以记住几个常用的配置,比如 0X0 表示模拟输入模式(ADC 用)、0X3 表示推挽输出模式(做输出口用,50M 速率)、0X8 表示上/下拉输入模式(做输入口用)、0XB 表示复用输出(使用 IO 口的第二功能,50M 速率)。
GPIO 相关的函数和定义分布在固件库文件stm32f10x_gpio.c 和头文件stm32f10x_gpio.h 文件中。
void GPIO_Init(GPIO_TypeDef* GPIOx, GPIO_InitTypeDef* GPIO_InitStruct);//初始化
这个函数有两个参数,第一个参数是用来指定 GPIO,取值范围为 GPIOA~GPIOG。
GPIO口的结构体为:
typedef struct
{
uint16_t GPIO_Pin; /*!< Specifies the GPIO pins to be configured.
This parameter can be any value of @ref GPIO_pins_define */
GPIOSpeed_TypeDef GPIO_Speed; /*!< Specifies the speed for the selected pins.
This parameter can be a value of @ref GPIOSpeed_TypeDef */
GPIOMode_TypeDef GPIO_Mode; /*!< Specifies the operating mode for the selected pins.
This parameter can be a value of @ref GPIOMode_TypeDef */
}GPIO_InitTypeDef;//端口,速度,模式
初始化过程:
GPIO_InitTypeDef GPIO_InitStructure;
GPIO_InitStructure.GPIO_Pin = GPIO_Pin_5; //LED0-->PB.5 端口配置
GPIO_InitStructure.GPIO_Mode = GPIO_Mode_Out_PP; //推挽输出
GPIO_InitStructure.GPIO_Speed = GPIO_Speed_50MHz;//速度50MHz
GPIO_Init(GPIOB, &GPIO_InitStructure);//根据设定参数配置 GPIO
关于GPIO口的几种操作说明:
1、uint8_t GPIO_ReadInputDataBit(GPIO_TypeDef* GPIOx, uint16_t GPIO_Pin)
比如我要读 GPIOA.5 的电平状态,那么方法是:
GPIO_ReadInputDataBit(GPIOA, GPIO_Pin_5); //返回值为1或0
2、void GPIO_Write(GPIO_TypeDef* GPIOx, uint16_t PortVal);
//BSRR 寄存器是端口位设置/清除寄存器
该函数一般用来往一次性一个 GPIO 的多个端口设值。
如GPIOA->BSRR=1<<1; //GPIOA的第一个端口设置为1
3、void GPIO_SetBits(GPIO_TypeDef* GPIOx, uint16_t GPIO_Pin);
void GPIO_ResetBits(GPIO_TypeDef* GPIOx, uint16_t GPIO_Pin) ;
//BRR 寄存器是端口位清除寄存器。
如:GPIO_SetBits(GPIOB, GPIO_Pin_5); //输出1
GPIO_ResetBits (GPIOB, GPIO_Pin_5); //输出0
所以最后的程序为:
H文件:定义
#ifndef __LED_H
#define __LED_H
#include "common.h"
#include "stm32f10x.h"
#define ON 0
#define OFF 1
//宏定义
#define LED0(a) if (a) \
GPIO_SetBits(GPIOG,GPIO_Pin_13);\
else \
GPIO_ResetBits(GPIOG,GPIO_Pin_13)
#define LED1(a) if (a) \
GPIO_SetBits(GPIOG,GPIO_Pin_14);\
else \
GPIO_ResetBits(GPIOG,GPIO_Pin_14)
#define LED2(a) if (a) \
GPIO_SetBits(GPIOG,GPIO_Pin_15);\
else \
GPIO_ResetBits(GPIOG,GPIO_Pin_15)
void LED_Init(void);//初始化
#endif
C文件:初始化操作
#include "led.h"
void LED_Init(void)
{
GPIO_InitTypeDef GPIO_InitStructure;//IO口结构体
RCC_APB2PeriphClockCmd(RCC_APB2Periph_GPIOG, ENABLE);//IO口时钟使能
GPIO_InitStructure.GPIO_Pin = GPIO_Pin_13 | GPIO_Pin_14 | GPIO_Pin_15;//IO口管脚
GPIO_InitStructure.GPIO_Mode = GPIO_Mode_Out_PP; //输出模式
GPIO_InitStructure.GPIO_Speed = GPIO_Speed_50MHz;//输出速度
GPIO_Init(GPIOG, &GPIO_InitStructure);//初始化
GPIO_SetBits(GPIOG,GPIO_Pin_13 | GPIO_Pin_14 | GPIO_Pin_15);//默认值
}
主函数main:执行操作
#include "led.h"
#include "common.h"
int main(void)
{
delay_init();//延时函数初始化,其他C文件中定义
LED_Init(); //初始化
while(1)
{
LED0(0); //操作
delay_ms(500);
LED0(1);
delay_ms(500);
}
}