python计算机视觉——相机标定之张正友标定法
文章目录
- 1. 相机标定的目的
- 1.1 相机的成像原理
- 1.2 相机标定的目的
- 1.3 畸变与畸变矫正
- 2. 张正友标定法简介
- 3. 标定相机的内参矩阵和外参矩阵
- 3.1 求解内参矩阵与外参矩阵的积
- 3.2 求解内参矩阵
- 3.3 求解外参矩阵
- 3.4 标定相机的畸变参数
- 4. 相机标定的步骤
- 5. 源代码
- 5.1 实验截图:
- 6. 代码详解:
1. 相机标定的目的
1.1 相机的成像原理
相机成像系统中,共包含四个坐标系:世界坐标系、相机坐标系、图像坐标系、像素坐标系。

这四个坐标系之间的转化关系为:
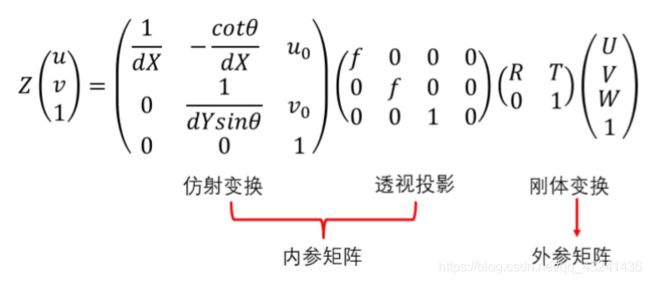
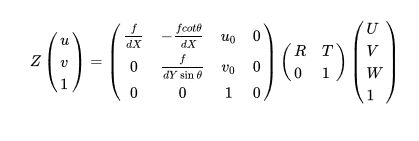
其中,(U,V,W)为在世界坐标系下一点的物理坐标, (u,v) 为该点对应的在像素坐标系下的像素坐标, Z 为尺度因子。我们将矩阵:

称为相机的内参矩阵,内参矩阵取决于相机的内部参数。其中,f 为像距,dX,dY别表示X,Y方向上的一个像素在相机感光板上的物理长度(即一个像素在感光板上是多少毫米),u0,v0分别表示相机感光板中心在像素坐标系下的坐标,θ 表示感光板的横边和纵边之间的角度(90°表示无误差)。
将矩阵![]()
称为相机的外参矩阵,外参矩阵取决于相机坐标系和世界坐标系的相对位置,R表示旋转矩阵T,表示平移矢量。
即无畸变的相机成像模型如下:
1.2 相机标定的目的
当我们拿到一张图片,进行识别之后,得到的两部分之间的距离为多少多少像素,但是这多少多少像素究竟对应实际世界中的多少米呢?这就需要利用相机标定的结果来将像素坐标转换到物理坐标来计算距离(当然这里值得说明,仅仅利用单目相机标定的结果,是无法直接从像素坐标转化到物理坐标的,因为透视投影丢失了一个维度的坐标,所以测距其实需要双目相机)。
相机标定的目的其实很简单,我们要想对一个成像系统建模,进而进行相应的计算,所必须的参数就是相机的内参矩阵和相机的外参矩阵,因此,相机标定的第一个目的就是获得相机的内参矩阵和外参矩阵。
1.3 畸变与畸变矫正
另外,相机拍摄的图片还存在一定的畸变,畸变包括桶形畸变和枕形畸变。
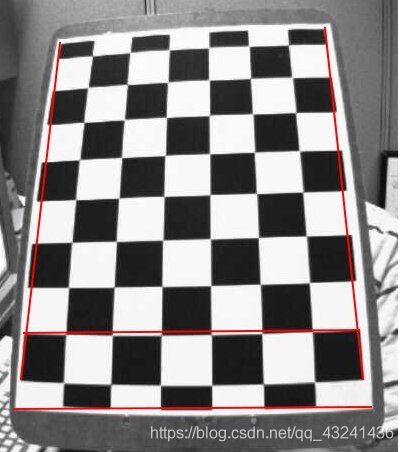
由于径向畸变,直线会变弯。距离图片中心越远,它的影响越大。如下面这张图片,棋盘格中被红线标记的边缘。你会发现棋盘格的边缘并不与直红线重合,而是变弯了。可以到维基百科查看更多细节Distortion (optics) 。
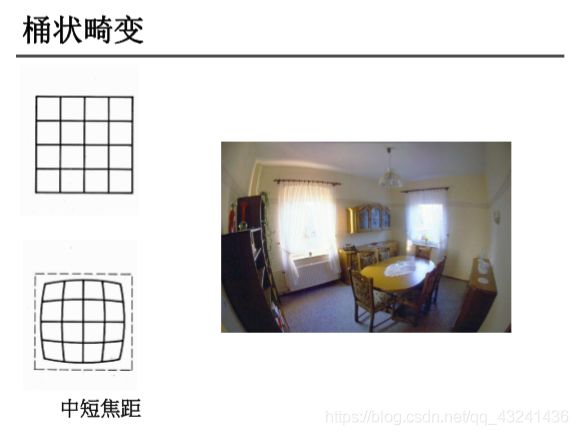
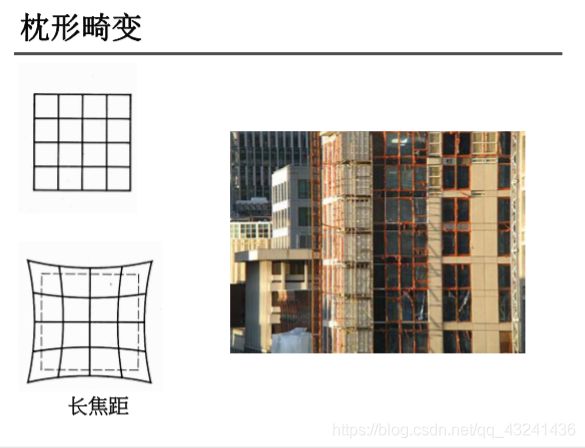
畸变模型包括径向畸变和切向畸变。
径向畸变公式(3阶)如下:

切向畸变公式如下:

其中, ( x , y ) ( x ^ , y ^ ) (x,y)(\hat{x},\hat{y}) (x,y)(x^,y^)分别为理想的无畸变的归一化的图像坐标、畸变后的归一化图像坐标, 为图像像素点到图像中心点的距离,即 r 2 = x 2 + y 2 r^2=x^2+y^2 r2=x2+y2 。
相机标定的第二个目的就是获得相机的畸变参数,如上式中的 等,进而对拍摄的图片进行去畸变处理。
2. 张正友标定法简介
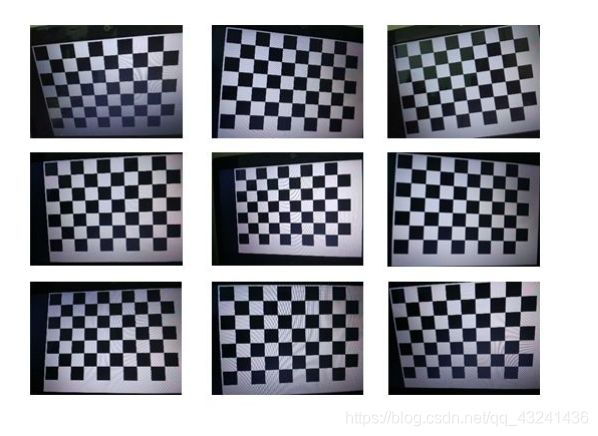
张正友标定法利用如下图所示的棋盘格标定板,在得到一张标定板的图像之后,可以利用相应的图像检测算法得到每一个角点的像素坐标 (u,v) 。张正友标定法将世界坐标系固定于棋盘格上,则棋盘格上任一点的物理坐标W=0,由于标定板的世界坐标系是人为事先定义好的,标定板上每一个格子的大小是已知的,我们可以计算得到每一个角点在世界坐标系下的物理坐标(U,V,W=0) 。我们将利用这些信息:每一个角点的像素坐标 、每一个角点在世界坐标系下的物理坐标,来进行相机的标定,获得相机的内外参矩阵、畸变参数。
3. 标定相机的内参矩阵和外参矩阵
3.1 求解内参矩阵与外参矩阵的积
张正友标定法标定相机的内外参数的思路如下:
- 求解内参矩阵与外参矩阵的积(含尺度因子);
- 求解内参矩阵;
- 求解外参矩阵。
3.2 求解内参矩阵
3.3 求解外参矩阵
3.4 标定相机的畸变参数
4. 相机标定的步骤
- 准备一个张正友标定法的棋盘格,棋盘格大小已知,用相机对其进行不同角度的拍摄,得到一组图像(标定图片的数量通常在15~25张之间,图像数量太少,容易导致标定参数不准确。);
- 对图像中的特征点如标定板角点进行检测,得到标定板角点的像素坐标值,根据已知的棋盘格大小和世界坐标系原点,计算得到标定板角点的物理坐标值;
- 求解内参矩阵与外参矩阵。根据物理坐标值和像素坐标值的关系,求出H矩阵,进而构造v矩阵,求解B矩阵,利用B矩阵求解相机内参矩阵A,最后求解每张图片对应的相机外参矩阵;
- 求解畸变参数。利用 u ^ , u , v ^ , v \hat{u},u,\hat{v},v u^,u,v^,v构造矩阵,计算径向畸变参数;
- 利用L-M(Levenberg-Marquardt)算法对上述参数进行优化。
参考文章:https://zhuanlan.zhihu.com/p/94244568
其他注意事项:
准备数据集时,标定板拍摄的张数要能覆盖整个测量空间及整个测量视场,把相机图像分成四个象限,应保证拍摄的标定板图像均匀分布在四个象限中,且在每个象限中建议进行不同方向的两次倾斜;
圆或者圆环特征的像素数尽量大于20,标定板的成像尺寸应大致占整幅画面的1/4;
用辅助光源对标定板进行打光,保证标定板的亮度足够且均匀;
标定板成像不能过爆,过爆会导致特征轮廓的提取的偏移,从而导致圆心提取不准确;
标定板特征成像不能出现明显的离焦距,出现离焦时可通过调整调整标定板的距离、光圈的大小和像距(对于定焦镜头,通常说的调焦就是指调整像距);
标定过程,相机的光圈、焦距不能发生改变,改变需要重新标定;
原文:https://blog.csdn.net/j_shui/article/details/77262947
5. 源代码
关键代码:
calib_RGB.py
# -*- coding: utf-8 -*-
"""
Homework: Calibrate the Camera with ZhangZhengyou Method.
Picture File Folder: ".\pic\RGB_camera_calib_img", Without Distort.

By YouZhiyuan 2019.11.18
"""
import os
import numpy as np
import cv2
import glob


def calib(inter_corner_shape, size_per_grid, img_dir,img_type):
    # criteria: only for subpix calibration, which is not used here.
    # criteria = (cv2.TERM_CRITERIA_EPS + cv2.TERM_CRITERIA_MAX_ITER, 30, 0.001)
    w,h = inter_corner_shape
    # cp_int: corner point in int form, save the coordinate of corner points in world sapce in 'int' form
    # like (0,0,0), (1,0,0), (2,0,0) ....,(10,7,0).
    cp_int = np.zeros((w*h,3), np.float32)
    cp_int[:,:2] = np.mgrid[0:w,0:h].T.reshape(-1,2)
    # cp_world: corner point in world space, save the coordinate of corner points in world space.
    cp_world = cp_int*size_per_grid

    obj_points = [] # the points in world space
    img_points = [] # the points in image space (relevant to obj_points)
    images = glob.glob(img_dir + os.sep + '**.' + img_type)
    for fname in images:
        img = cv2.imread(fname)
        gray_img = cv2.cvtColor(img,cv2.COLOR_BGR2GRAY)
        # find the corners, cp_img: corner points in pixel space.
        ret, cp_img = cv2.findChessboardCorners(gray_img, (w,h), None)
        # if ret is True, save.
        if ret == True:
            # cv2.cornerSubPix(gray_img,cp_img,(11,11),(-1,-1),criteria)
            obj_points.append(cp_world)
            img_points.append(cp_img)
            # view the corners
            cv2.drawChessboardCorners(img, (w,h), cp_img, ret)
            cv2.imshow('FoundCorners',img)

            cv2.waitKey(1)
    cv2.destroyAllWindows()
    # calibrate the camera
    ret, mat_inter, coff_dis, v_rot, v_trans = cv2.calibrateCamera(obj_points, img_points, gray_img.shape[::-1], None, None)
    print (("ret:"),ret)
    print (("internal matrix:\n"),mat_inter)
    # in the form of (k_1,k_2,p_1,p_2,k_3)
    print (("distortion cofficients:\n"),coff_dis)
    print (("rotation vectors:\n"),v_rot)
    print (("translation vectors:\n"),v_trans)
    # calculate the error of reproject
    total_error = 0
    for i in range(len(obj_points)):
        img_points_repro, _ = cv2.projectPoints(obj_points[i], v_rot[i], v_trans[i], mat_inter, coff_dis)
        error = cv2.norm(img_points[i], img_points_repro, cv2.NORM_L2)/len(img_points_repro)
        total_error += error
    print(("Average Error of Reproject: "), total_error/len(obj_points))

    return mat_inter, coff_dis


if __name__ == '__main__':
    inter_corner_shape = (7,7)
    size_per_grid = 1.5
    img_dir = "C://Users//Garfield//Desktop//pic//RGB_img"
    img_type = "jpg"
    calib(inter_corner_shape, size_per_grid, img_dir,img_type)
calib_IR.py
# -*- coding: utf-8 -*-
"""
Homework: Calibrate the Camera with ZhangZhengyou Method.
Picture File Folder: ".\pic\IR_camera_calib_img", With Distort.

By YouZhiyuan 2019.11.18
"""

import os
import numpy as np
import cv2
import glob

import pylab


def calib(inter_corner_shape, size_per_grid, img_dir,img_type):
    # criteria: only for subpix calibration, which is not used here.
    # criteria = (cv2.TERM_CRITERIA_EPS + cv2.TERM_CRITERIA_MAX_ITER, 30, 0.001)
    w,h = inter_corner_shape
    # cp_int: corner point in int form, save the coordinate of corner points in world sapce in 'int' form
    # like (0,0,0), (1,0,0), (2,0,0) ....,(10,7,0).
    cp_int = np.zeros((w*h,3), np.float32)
    cp_int[:,:2] = np.mgrid[0:w,0:h].T.reshape(-1,2)
    # cp_world: corner point in world space, save the coordinate of corner points in world space.
    cp_world = cp_int*size_per_grid

    obj_points = [] # the points in world space
    img_points = [] # the points in image space (relevant to obj_points)
    images = glob.glob(img_dir + os.sep + '**.' + img_type)
    for fname in images:
        img = cv2.imread(fname)
        gray_img = cv2.cvtColor(img,cv2.COLOR_BGR2GRAY)
        # find the corners, cp_img: corner points in pixel space.
        ret, cp_img = cv2.findChessboardCorners(gray_img, (w,h), None)
        # if ret is True, save.
        if ret == True:
            # cv2.cornerSubPix(gray_img,cp_img,(11,11),(-1,-1),criteria)
            obj_points.append(cp_world)
            img_points.append(cp_img)
            # view the corners
            cv2.drawChessboardCorners(img, (w,h), cp_img, ret)
            cv2.imshow('FoundCorners',img)

            cv2.waitKey(10)
    cv2.destroyAllWindows()
    # calibrate the camera
    ret, mat_inter, coff_dis, v_rot, v_trans = cv2.calibrateCamera(obj_points, img_points, gray_img.shape[::-1], None, None)
    print (("ret:"),ret)
    print (("internal matrix:\n"),mat_inter)
    # in the form of (k_1,k_2,p_1,p_2,k_3)
    print (("distortion cofficients:\n"),coff_dis)
    print (("rotation vectors:\n"),v_rot)
    print (("translation vectors:\n"),v_trans)

    # calculate the error of reproject
    total_error = 0
    for i in range(len(obj_points)):
        img_points_repro, _ = cv2.projectPoints(obj_points[i], v_rot[i], v_trans[i], mat_inter, coff_dis)
        error = cv2.norm(img_points[i], img_points_repro, cv2.NORM_L2)/len(img_points_repro)
        total_error += error
    print(("Average Error of Reproject: "), total_error/len(obj_points))

    return mat_inter, coff_dis

def dedistortion(inter_corner_shape, img_dir,img_type, save_dir, mat_inter, coff_dis):
    w,h = inter_corner_shape
    images = glob.glob(img_dir + os.sep + '**.' + img_type)
    for fname in images:
        img_name = fname.split(os.sep)[-1]
        img = cv2.imread(fname)
        newcameramtx, roi = cv2.getOptimalNewCameraMatrix(mat_inter,coff_dis,(w,h),0,(w,h)) # 自由比例参数
        dst = cv2.undistort(img, mat_inter, coff_dis, None, newcameramtx)
        # clip the image
        # x,y,w,h = roi
        # dst = dst[y:y+h, x:x+w]
        cv2.imwrite(save_dir + os.sep + img_name, dst)
    print('Dedistorted images have been saved to: %s successfully.' %save_dir)

if __name__ == '__main__':
    inter_corner_shape = (11,8)
    size_per_grid = 0.02
    img_dir = "C://Users//Garfield//Desktop//pic//IR_camera_calib_img"
    img_type = "png"
    # calibrate the camera
    mat_inter, coff_dis = calib(inter_corner_shape, size_per_grid, img_dir,img_type)
    # dedistort and save the dedistortion result.
    save_dir = "C://Users//Garfield//Desktop//pic//save_dedistortion"
    if(not os.path.exists(save_dir)):
        os.makedirs(save_dir)
    dedistortion(inter_corner_shape, img_dir, img_type, save_dir, mat_inter, coff_dis)
5.1 实验截图:
数据集:

实验结果:
![]()
内参矩阵为:


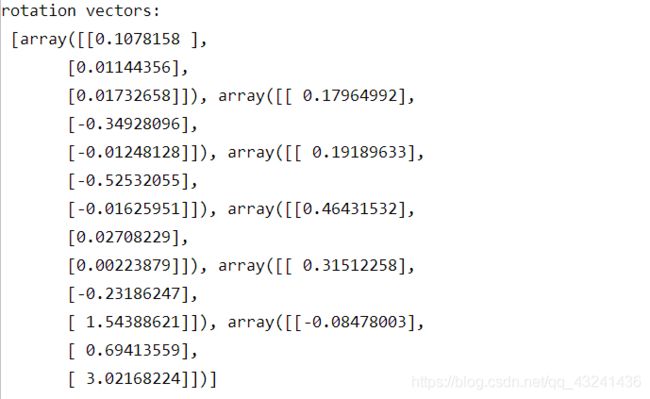
旋转向量为:
平移向量为:
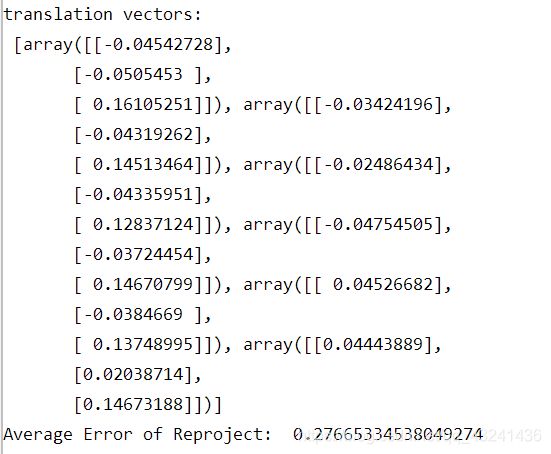
平均重投影误差约为为0.27665
常用术语:
内参矩阵: Intrinsic Matrix
焦距: Focal Length
主点: Principal Point
径向畸变: Radial Distortion
切向畸变: Tangential Distortion
旋转矩阵: Rotation Matrices
平移向量: Translation Vectors
平均重投影误差: Mean Reprojection Error
重投影误差: Reprojection Errors
重投影点: Reprojected Points
python基于opencv的源代码
Calibration_ZhangZhengyou_Method
- “calib_IR.py"和"calib_RGB.py"分别对应”.\pic\IR_camera_calib_img"文件夹和".\pic\RGB_camera_calib_img"文件夹;
- “.\pic\IR_camera_calib_img"文件夹下图片含有畸变,执行"calib_IR.py"得到到相机的内外参数与畸变参数,并对畸变图片做矫正,矫正图片保存在”.\pic\save_dedistortion"文件夹下;
- ".\pic\RGB_camera_calib_img"文件夹下图片不含畸变,执行"calib_RGB.py"得到到相机的内外参数与畸变参数;
- 棋盘格规格为12乘9,格点长度0.02m,由于opencv输入参数为内角点个数,所以输入参数为11乘8。
本次实验结果基于没有畸变的图片,运行的是calib_RGB.py代码。
6. 代码详解:
- 标定图像检测角点:cv2.findChessboardCorners
retval, corners =cv.findChessboardCorners(image, patternSize[, corners[, flags]])
参数:
image:棋盘图像,8位灰度或彩色图像。
patternSize:棋盘的尺寸(注意应为内角点个数,内角点是和其他格子连着的点,边边上的不是!不是不是不是有几个方格!比如说“田”字只有一个内角点!)
如下图:
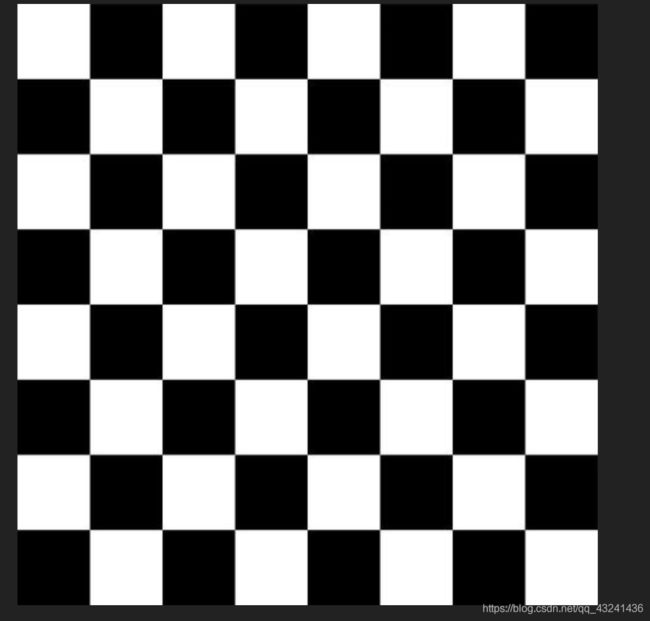
横着的内角点为7,竖着的内角点也为7
corners:存放角点的位置。
flags:迭代的准则
返回值:
retval:是否检测出角点
corners:角点的位置。
- 显示角点位置(可选):cv2.drawChessboardCorners
image =cv.drawChessboardCorners(image, patternSize, corners, patternWasFound )
patternWasFound:标志位,检测是否所有 board 都被检测到,若为是,则将角点连线,否则不连线。
- 进行标定,计算参数cv2.calibrateCamera
retval, cameraMatrix, distCoeffs, rvecs, tvecs = cv.calibrateCamera( objectPoints, imagePoints, imageSize, cameraMatrix, distCoeffs[, rvecs[, tvecs[, flags[, criteria]]]])
objectPoints:世界坐标系里的位置。
imagePoints: 像素坐标。
imageSize:为图像的像素尺寸大小。
cameraMatrix:3*3矩阵,相机内参数矩阵。
disCoeffs:畸变矩阵
rvecs:旋转向量
tvecs:位移向量
flags:标定采用的算法
criteria:迭代终止条件设定。
参考博客: