原文:Implementing Batch Normalization in Tensorflow
来源:R2RT
黑猿大叔注:本文基于一个最基础的全连接网络,演示如何构建Batch Norm层、如何训练以及如何正确进行测试,玩转这份示例代码是理解Batch Norm的最好方式。
文中代码可在jupyter notebook环境下运行:
- nn_withBN.ipynb,
- nn_withBN_ok.ipynb
批标准化,是Sergey Ioffe和Christian Szegedy在2015年3月的论文BN2015中提出的一种简单、高效的改善神经网络性能的方法。论文BN2015中,Ioffe和Szegedy指出批标准化不仅能应用更高的学习率、具有正则化器的效用,还能将训练速度提升14倍之多。本文将基于TensorFlow来实现批标准化。
问题的提出
批标准化所要解决的问题是:模型参数在学习阶段的变化,会使每个隐藏层输出的分布也发生改变。这意味着靠后的层要在训练过程中去适应这些变化。
批标准化的概念
为了解决这个问题,论文BN2015提出了批标准化,即在训练时作用于每个神经元激活函数(比如sigmoid或者ReLU函数)的输入,使得基于每个批次的训练样本,激活函数的输入都能满足均值为0,方差为1的分布。对于激活函数σ(Wx+b),应用批标准化后变为σ(BN(Wx+b)),其中BN代表批标准化。
批标准化公式
对一批数据中的某个数值进行标准化,做法是先减去整批数据的均值,然后除以整批数据的标准差√(σ2+ε)。注意小的常量ε加到方差中是为了防止除零。给定一个数值xi,一个初始的批标准化公式如下:
上面的公式中,批标准化对激活函数的输入约束为正态分布,但是这样一来限制了网络层的表达能力。为此,可以通过乘以一个新的比例参数γ,并加上一个新的位移参数β,来让网络撤销批标准化变换。γ和β都是可学习参数。
加入γ和β后得到下面最终的批标准化公式:
基于TensorFlow实现批标准化
我们将把批标准化加进一个有两个隐藏层、每层包含100个神经元的全连接神经网络,并展示与论文BN2015中图1(b)和(c)类似的实验结果。
需要注意,此时该网络还不适合在测试期使用。后面的“模型预测”一节中将会阐释其中的原因,并给出修复版本。
Imports, config
import numpy as np, tensorflow as tf, tqdm
from tensorflow.examples.tutorials.mnist
import input_data
import matplotlib.pyplot as plt
%matplotlib inline
mnist = input_data.read_data_sets('MNIST_data', one_hot=True)
# Generate predetermined random weights so the networks are similarly initialized
w1_initial = np.random.normal(size=(784,100)).astype(np.float32)
w2_initial = np.random.normal(size=(100,100)).astype(np.float32)
w3_initial = np.random.normal(size=(100,10)).astype(np.float32)

# Small epsilon value for the BN transform
epsilon = 1e-3
Building the graph
# Placeholders
x = tf.placeholder(tf.float32, shape=[None, 784])
y_ = tf.placeholder(tf.float32, shape=[None, 10])
# Layer 1 without BN
w1 = tf.Variable(w1_initial)
b1 = tf.Variable(tf.zeros([100]))
z1 = tf.matmul(x,w1)+b1
l1 = tf.nn.sigmoid(z1)
下面是经过批标准化的第一层:
# Layer 1 with BN
w1_BN = tf.Variable(w1_initial)

# Note that pre-batch normalization bias is ommitted. The effect of this bias would be
# eliminated when subtracting the batch mean. Instead, the role of the bias is performed
# by the new beta variable. See Section 3.2 of the BN2015 paper.
z1_BN = tf.matmul(x,w1_BN)

# Calculate batch mean and variance
batch_mean1, batch_var1 = tf.nn.moments(z1_BN,[0])

# Apply the initial batch normalizing transform
z1_hat = (z1_BN - batch_mean1) / tf.sqrt(batch_var1 + epsilon)

# Create two new parameters, scale and beta (shift)
scale1 = tf.Variable(tf.ones([100]))
beta1 = tf.Variable(tf.zeros([100]))

# Scale and shift to obtain the final output of the batch normalization
# this value is fed into the activation function (here a sigmoid)
BN1 = scale1 * z1_hat + beta1
l1_BN = tf.nn.sigmoid(BN1)
# Layer 2 without BN
w2 = tf.Variable(w2_initial)
b2 = tf.Variable(tf.zeros([100]))
z2 = tf.matmul(l1,w2)+b2
l2 = tf.nn.sigmoid(z2)
TensorFlow提供了tf.nn.batch_normalization,我用它定义了下面的第二层。这与上面第一层的代码行为是一样的。查阅官方文档在这里,查阅开源代码在这里。
# Layer 2 with BN, using Tensorflows built-in BN function
w2_BN = tf.Variable(w2_initial)
z2_BN = tf.matmul(l1_BN,w2_BN)
batch_mean2, batch_var2 = tf.nn.moments(z2_BN,[0])
scale2 = tf.Variable(tf.ones([100]))
beta2 = tf.Variable(tf.zeros([100]))
BN2 = tf.nn.batch_normalization(z2_BN,batch_mean2,batch_var2,beta2,scale2,epsilon)
l2_BN = tf.nn.sigmoid(BN2)
# Softmax
w3 = tf.Variable(w3_initial)
b3 = tf.Variable(tf.zeros([10]))
y  = tf.nn.softmax(tf.matmul(l2,w3)+b3)

w3_BN = tf.Variable(w3_initial)
b3_BN = tf.Variable(tf.zeros([10]))
y_BN  = tf.nn.softmax(tf.matmul(l2_BN,w3_BN)+b3_BN)
# Loss, optimizer and predictions
cross_entropy = -tf.reduce_sum(y_*tf.log(y))
cross_entropy_BN = -tf.reduce_sum(y_*tf.log(y_BN))

train_step = tf.train.GradientDescentOptimizer(0.01).minimize(cross_entropy)
train_step_BN = tf.train.GradientDescentOptimizer(0.01).minimize(cross_entropy_BN)

correct_prediction = tf.equal(tf.arg_max(y,1),tf.arg_max(y_,1))
accuracy = tf.reduce_mean(tf.cast(correct_prediction,tf.float32))
correct_prediction_BN = tf.equal(tf.arg_max(y_BN,1),tf.arg_max(y_,1))
accuracy_BN = tf.reduce_mean(tf.cast(correct_prediction_BN,tf.float32))
Training the network
zs, BNs, acc, acc_BN = [], [], [], []

sess = tf.InteractiveSession()
sess.run(tf.global_variables_initializer())
for i in tqdm.tqdm(range(40000)):
    batch = mnist.train.next_batch(60)
    train_step.run(feed_dict={x: batch[0], y_: batch[1]})
    train_step_BN.run(feed_dict={x: batch[0], y_: batch[1]})
    if i % 50 is 0:
        res = sess.run([accuracy,accuracy_BN,z2,BN2],feed_dict={x: mnist.test.images, y_: mnist.test.labels})
        acc.append(res[0])
        acc_BN.append(res[1])
        zs.append(np.mean(res[2],axis=0)) # record the mean value of z2 over the entire test set
        BNs.append(np.mean(res[3],axis=0)) # record the mean value of BN2 over the entire test set

zs, BNs, acc, acc_BN = np.array(zs), np.array(BNs), np.array(acc), np.array(acc_BN)
速度和精度的提升
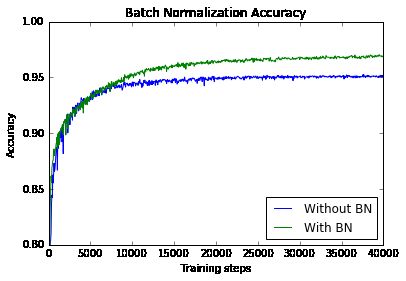
如下所示,应用批标准化后,精度和训练速度均有可观的改善。论文BN2015中的图2显示,批标准化对于其他网络架构也同样具有重要作用。
fig, ax = plt.subplots()

ax.plot(range(0,len(acc)*50,50),acc, label='Without BN')
ax.plot(range(0,len(acc)*50,50),acc_BN, label='With BN')
ax.set_xlabel('Training steps')
ax.set_ylabel('Accuracy')
ax.set_ylim([0.8,1])
ax.set_title('Batch Normalization Accuracy')
ax.legend(loc=4)
plt.show()
激活函数输入的时间序列图示
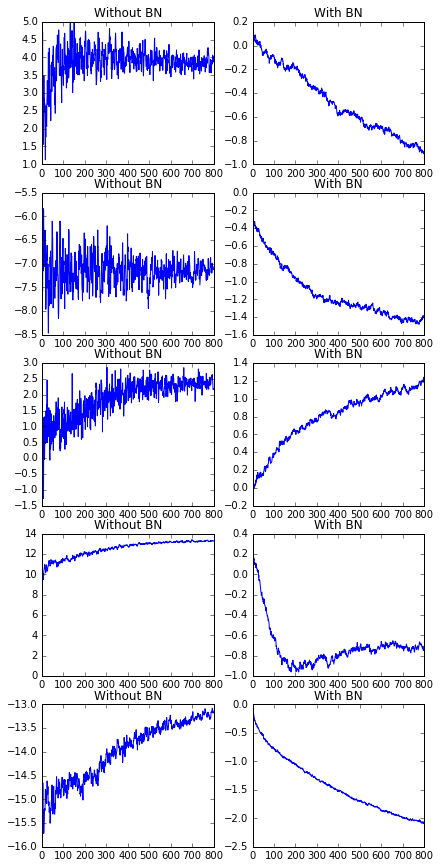
下面是网络第2层的前5个神经元的sigmoid激活函数输入随时间的分布情况。批标准化在消除输入的方差/噪声上具有显著的效果。
fig, axes = plt.subplots(5, 2, figsize=(6,12))
fig.tight_layout()

for i, ax in enumerate(axes):
    ax[0].set_title("Without BN")
    ax[1].set_title("With BN")
    ax[0].plot(zs[:,i])
    ax[1].plot(BNs[:,i])
模型预测
使用批标准化模型进行预测时,使用批量样本自身的均值和方差会适得其反。想象一下单个样本进入我们训练的模型会发生什么?激活函数的输入将永远为零(因为我们做的是均值为0的标准化),而且无论输入是什么,我们总得到相同的结果。
验证如下:
predictions = []
correct = 0
for i in range(100):
    pred, corr = sess.run([tf.arg_max(y_BN,1), accuracy_BN],
                         feed_dict={x: [mnist.test.images[i]], y_: [mnist.test.labels[i]]})
    correct += corr
    predictions.append(pred[0])
print("PREDICTIONS:", predictions)
print("ACCURACY:", correct/100)
PREDICTIONS: [8, 8, 8, 8, 8, 8, 8, 8, 8, 8, 8, 8, 8, 8, 8, 8, 8, 8, 8, 8, 8, 8, 8, 8, 8, 8, 8, 8, 8, 8, 8, 8, 8, 8, 8, 8, 8, 8, 8, 8, 8, 8, 8, 8, 8, 8, 8, 8, 8, 8, 8, 8, 8, 8, 8, 8, 8, 8, 8, 8, 8, 8, 8, 8, 8, 8, 8, 8, 8, 8, 8, 8, 8, 8, 8, 8, 8, 8, 8, 8, 8, 8, 8, 8, 8, 8, 8, 8, 8, 8, 8, 8, 8, 8, 8, 8, 8, 8, 8, 8]
ACCURACY: 0.02
我们的模型总是输出8,在MNIST的前100个样本中8实际上只有2个,所以精度只有2%。
修改模型的测试期行为
为了修复这个问题,我们需要将批均值和批方差替换成全局均值和全局方差。详见论文BN2015的3.1节。但是这会造成,上面的模型想正确的工作,就只能一次性的将测试集所有样本进行预测,因为这样才能算出理想的全局均值和全局方差。
为了使批标准化模型适用于测试,我们需要在测试前的每一步批标准化操作时,都对全局均值和全局方差进行估算,然后才能在做预测时使用这些值。和我们需要批标准化的原因一样(激活输入的均值和方差在训练时会发生变化),估算全局均值和方差最好在其依赖的权重更新完成后,但是同时进行也不算特别糟,因为权重在训练快结束时就收敛了。
现在,为了基于TensorFlow来实现修复,我们要写一个batch_norm_wrapper函数,来封装激活输入。这个函数会将全局均值和方差作为tf.Variables来存储,并在做标准化时决定采用批统计还是全局统计。为此,需要一个is_training标记。当is_training == True,我们就要在训练期学习全局均值和方差。代码骨架如下:
def batch_norm_wrapper(inputs, is_training):
    ...
    pop_mean = tf.Variable(tf.zeros([inputs.get_shape()[-1]]), trainable=False)
    pop_var = tf.Variable(tf.ones([inputs.get_shape()[-1]]), trainable=False)

    if is_training:
        mean, var = tf.nn.moments(inputs,[0])
        ...
        # learn pop_mean and pop_var here
        ...
        return tf.nn.batch_normalization(inputs, batch_mean, batch_var, beta, scale, epsilon)
    else:
        return tf.nn.batch_normalization(inputs, pop_mean, pop_var, beta, scale, epsilon)
注意变量节点声明了 trainable = False,因为我们将要自行更新它们,而不是让最优化器来更新。
在训练期间,一个计算全局均值和方差的方法是指数平滑法,它很简单,且避免了额外的工作,我们应用如下:
decay = 0.999 # use numbers closer to 1 if you have more data
train_mean = tf.assign(pop_mean, pop_mean * decay + batch_mean * (1 - decay))
train_var = tf.assign(pop_var, pop_var * decay + batch_var * (1 - decay))
最后,我们需要解决如何调用这些训练期操作。为了完全可控,你可以把它们加入到一个graph collection(可以看看下面链接的TensorFlow源码),但是简单起见,我们将会在每次计算批均值和批方差时都调用它们。为此,当is_training为True时,我们把它们作为依赖加入了batch_norm_wrapper的返回值中。最终的batch_norm_wrapper函数如下:
# this is a simpler version of Tensorflow's 'official' version. See:
# https://github.com/tensorflow/tensorflow/blob/master/tensorflow/contrib/layers/python/layers/layers.py#L102
def batch_norm_wrapper(inputs, is_training, decay = 0.999):

    scale = tf.Variable(tf.ones([inputs.get_shape()[-1]]))
    beta = tf.Variable(tf.zeros([inputs.get_shape()[-1]]))
    pop_mean = tf.Variable(tf.zeros([inputs.get_shape()[-1]]), trainable=False)
    pop_var = tf.Variable(tf.ones([inputs.get_shape()[-1]]), trainable=False)

    if is_training:
        batch_mean, batch_var = tf.nn.moments(inputs,[0])
        train_mean = tf.assign(pop_mean,
                               pop_mean * decay + batch_mean * (1 - decay))
        train_var = tf.assign(pop_var,
                              pop_var * decay + batch_var * (1 - decay))
        with tf.control_dependencies([train_mean, train_var]):
            return tf.nn.batch_normalization(inputs,
                batch_mean, batch_var, beta, scale, epsilon)
    else:
        return tf.nn.batch_normalization(inputs,
            pop_mean, pop_var, beta, scale, epsilon)
实现正常测试
现在为了证明修复后的代码可以正常测试,我们使用batch_norm_wrapper重新构建模型。注意,我们不仅要在训练时做一次构建,在测试时还要重新做一次构建,所以我们写了一个build_graph函数(实际的模型对象往往也是这么封装的):
def build_graph(is_training):
    # Placeholders
    x = tf.placeholder(tf.float32, shape=[None, 784])
    y_ = tf.placeholder(tf.float32, shape=[None, 10])

    # Layer 1
    w1 = tf.Variable(w1_initial)
    z1 = tf.matmul(x,w1)
    bn1 = batch_norm_wrapper(z1, is_training)
    l1 = tf.nn.sigmoid(bn1)

    #Layer 2
    w2 = tf.Variable(w2_initial)
    z2 = tf.matmul(l1,w2)
    bn2 = batch_norm_wrapper(z2, is_training)
    l2 = tf.nn.sigmoid(bn2)

    # Softmax
    w3 = tf.Variable(w3_initial)
    b3 = tf.Variable(tf.zeros([10]))
    y  = tf.nn.softmax(tf.matmul(l2, w3))

    # Loss, Optimizer and Predictions
    cross_entropy = -tf.reduce_sum(y_*tf.log(y))

    train_step = tf.train.GradientDescentOptimizer(0.01).minimize(cross_entropy)

    correct_prediction = tf.equal(tf.arg_max(y,1),tf.arg_max(y_,1))
    accuracy = tf.reduce_mean(tf.cast(correct_prediction,tf.float32))

    return (x, y_), train_step, accuracy, y, tf.train.Saver()
#Build training graph, train and save the trained model

sess.close()
tf.reset_default_graph()
(x, y_), train_step, accuracy, _, saver = build_graph(is_training=True)

acc = []
with tf.Session() as sess:
    sess.run(tf.global_variables_initializer())
    for i in tqdm.tqdm(range(10000)):
        batch = mnist.train.next_batch(60)
        train_step.run(feed_dict={x: batch[0], y_: batch[1]})
        if i % 50 is 0:
            res = sess.run([accuracy],feed_dict={x: mnist.test.images, y_: mnist.test.labels})
            acc.append(res[0])
    saved_model = saver.save(sess, './temp-bn-save')

print("Final accuracy:", acc[-1])
Final accuracy: 0.9721
现在应该一切正常了,我们重复上面的实验:
tf.reset_default_graph()
(x, y_), _, accuracy, y, saver = build_graph(is_training=False)

predictions = []
correct = 0
with tf.Session() as sess:
    sess.run(tf.global_variables_initializer())
    saver.restore(sess, './temp-bn-save')
    for i in range(100):
        pred, corr = sess.run([tf.arg_max(y,1), accuracy],
                             feed_dict={x: [mnist.test.images[i]], y_: [mnist.test.labels[i]]})
        correct += corr
        predictions.append(pred[0])
print("PREDICTIONS:", predictions)
print("ACCURACY:", correct/100)
PREDICTIONS: [7, 2, 1, 0, 4, 1, 4, 9, 6, 9, 0, 6, 9, 0, 1, 5, 9, 7, 3, 4, 9, 6, 6, 5, 4, 0, 7, 4, 0, 1, 3, 1, 3, 4, 7, 2, 7, 1, 2, 1, 1, 7, 4, 2, 3, 5, 1, 2, 4, 4, 6, 3, 5, 5, 6, 0, 4, 1, 9, 5, 7, 8, 9, 3, 7, 4, 6, 4, 3, 0, 7, 0, 2, 9, 1, 7, 3, 2, 9, 7, 7, 6, 2, 7, 8, 4, 7, 3, 6, 1, 3, 6, 9, 3, 1, 4, 1, 7, 6, 9]
ACCURACY: 0.99
我的博客已同步至腾讯云+社区,https://cloud.tencent.com/developer/article/1092219


