Bugly热更新使用
首先简单介绍一下,热更新,即不需要用户重新下载app的情况下,悄悄的就将bug解决了。这样可以减少app版本频繁的发布,提升用户体验。
腾讯的Bugly热更新采用的是微信团队的Tinker方案,只需要集成SDK,就可以实现自动下载补丁包,合成,并应用补丁,同时,还提供了补丁管理后台供开发这操作。
目前市面上有几种热更新的方案,微信的Tinker、QQ空间的QZone、阿里的AndFix以及美团的Robust等,下面进行比较
很明显,就可以看出Tinker的优势了
下面开始介绍如何使用Bugly的热更新
注意:接入的热更新,就已经有错误上报功能了,所以就不需要单独接入异常上报了。
具体集成过程请看官方文档,Bugly的官方文档地址:https://bugly.qq.com/docs/user-guide/instruction-manual-android-hotfix/?v=20170912151050
这里我们就说一下需要注意的地方
1、在工程的根目录下(即最外层)的build.gradle文件中加入如下
buildscript {
    repositories {
        jcenter()
    }
    dependencies {
        classpath 'com.android.tools.build:gradle:2.3.1'
        // tinkersupport插件, 其中lastest.release指拉取最新版本,也可以指定明确版本号,例如1.0.4
        classpath "com.tencent.bugly:tinker-support:1.1.1"
        // NOTE: Do not place your application dependencies here; they belong
        // in the individual module build.gradle files
    }
}

allprojects {
    repositories {
        jcenter()
    }
}
注意:tinker-support最新版本要指定1.1.5
2、集成SDK
在app modle下的build.gradle中加入
apply plugin: 'com.android.application'

android {
    compileSdkVersion 26
    buildToolsVersion "26.0.2"
    defaultConfig {
        applicationId "com.example.lzq.buglyhotfix"
        minSdkVersion 15
        targetSdkVersion 26
        versionCode 1
        versionName "1.0.2"
        testInstrumentationRunner "android.support.test.runner.AndroidJUnitRunner"
        ndk {
            //设置支持的SO库架构
            abiFilters 'armeabi' //, 'x86', 'armeabi-v7a', 'x86_64', 'arm64-v8a'
        }
    }
    signingConfigs {
        debug {
            storeFile file('../buglyfix.jks')//签名文件路径
            storePassword "a123456"
            keyAlias "key0"
            keyPassword "a123456"  //签名密码
            println("====== signingConfigs.debug ======")
        }
        release {
            storeFile file('../buglyfix.jks')//签名文件路径
            storePassword "a123456"
            keyAlias "key0"
            keyPassword "a123456"  //签名密码
            println("====== signingConfigs.release ======")
        }
    }
    buildTypes {
        release {
            minifyEnabled true
            proguardFiles getDefaultProguardFile('proguard-android.txt'), 'proguard-rules.pro'
            signingConfig signingConfigs.release
        }
        debug {
            signingConfig signingConfigs.release
        }
    }
}

dependencies {
    compile fileTree(dir: 'libs', include: ['*.jar'])
    androidTestCompile('com.android.support.test.espresso:espresso-core:2.2.2', {
        exclude group: 'com.android.support', module: 'support-annotations'
    })
    compile 'com.android.support:appcompat-v7:26.+'
    compile 'com.android.support.constraint:constraint-layout:1.0.2'
    testCompile 'junit:junit:4.12'
    compile "com.android.support:multidex:1.0.1" // 多dex配置
    //注释掉原有bugly的仓库
    //compile 'com.tencent.bugly:crashreport:latest.release'//其中latest.release指代最新版本号,也可以指定明确的版本号,例如2.3.2
    compile 'com.tencent.bugly:crashreport_upgrade:1.3.4'//注意 此处版本号 一定要是最新的
    compile 'com.tencent.bugly:nativecrashreport:latest.release' //其中latest.release指代最新版本号,也可以指定明确的版本号,例如2.2.0
}
// 依赖插件脚本
apply from: 'tinker-support.gradle'注意 此处版本号 一定要是最新的
    compile 'com.tencent.bugly:nativecrashreport:latest.release' //其中latest.release指代最新版本号,也可以指定明确的版本号,例如2.2.0
}
// 依赖插件脚本
apply from: 'tinker-support.gradle'
注意:要配置ndk
 ndk {
            //设置支持的SO库架构
            abiFilters 'armeabi' //, 'x86', 'armeabi-v7a', 'x86_64', 'arm64-v8a'
        }
注意:一定要配置好签名
要配置默认签名,同时要设置混淆代码,依赖crashreport_upgrade时,要用最新的版本,在最后要依赖插件脚本,applay from:'tinker-support.gradle'
tinker-support.gradle要和src在同级目录下,代码如下
apply plugin: 'com.tencent.bugly.tinker-support'

def bakPath = file("${buildDir}/bakApk/")

/**
 * 此处填写每次构建生成的基准包目录
 */
def baseApkDir = "app-0108-13-29-16"

/**
 * 对于插件各参数的详细解析请参考
 */
tinkerSupport {

    // 开启tinker-support插件,默认值true
    enable = true

    // 自动生成tinkerId, 你无须关注tinkerId,默认为false
    autoGenerateTinkerId = true

    // 指定归档目录,默认值当前module的子目录tinker
    autoBackupApkDir = "${bakPath}"

    // 是否启用覆盖tinkerPatch配置功能,默认值false
    // 开启后tinkerPatch配置不生效,即无需添加tinkerPatch
    overrideTinkerPatchConfiguration = true

    // 编译补丁包时,必需指定基线版本的apk,默认值为空
    // 如果为空,则表示不是进行补丁包的编译
    // @{link tinkerPatch.oldApk }
    baseApk = "${bakPath}/${baseApkDir}/app-release.apk"
//    baseApk =  "${bakPath}/${baseApkDir}/app-debug.apk"

    // 对应tinker插件applyMapping
    baseApkProguardMapping = "${bakPath}/${baseApkDir}/app-release-mapping.txt"
//    baseApkProguardMapping = "${bakPath}/${baseApkDir}/app-debug-mapping.txt"

    // 对应tinker插件applyResourceMapping
    baseApkResourceMapping = "${bakPath}/${baseApkDir}/app-release-R.txt"
//    baseApkResourceMapping = "${bakPath}/${baseApkDir}/app-debug-R.txt"

    // 构建基准包跟补丁包都要修改tinkerId,主要用于区分
    tinkerId = "patch-1.0.7"

    // 打多渠道补丁时指定目录
    // buildAllFlavorsDir = "${bakPath}/${baseApkDir}"

    // 是否使用加固模式,默认为false
    // isProtectedApp = true

    // 是否采用反射Application的方式集成,无须改造Application
    enableProxyApplication = true

    // 支持新增Activity
    supportHotplugComponent = true

}

/**
 * 一般来说,我们无需对下面的参数做任何的修改
 * 对于各参数的详细介绍请参考:
 * https://github.com/Tencent/tinker/wiki/Tinker-%E6%8E%A5%E5%85%A5%E6%8C%87%E5%8D%97
 */
tinkerPatch {
    tinkerEnable = true
    ignoreWarning = false
    useSign = false
    dex {
        dexMode = "jar"
        pattern = ["classes*.dex"]
        loader = []
    }
    lib {
        pattern = ["lib/*/*.so"]
    }

    res {
        pattern = ["res/*", "r/*", "assets/*", "resources.arsc", "AndroidManifest.xml"]
        ignoreChange = []
        largeModSize = 100
    }

    packageConfig {
    }
    sevenZip {
        zipArtifact = "com.tencent.mm:SevenZip:1.1.10"
//        path = "/usr/local/bin/7za"
    }
    buildConfig {
        keepDexApply = false
//      tinkerId = "base-2.0.1"
    }
}
注意:app要有网络、读取内存卡等权限
且要适配6.0动态权限
3、打基准包
首先要在tinker-support.gradle中设置基准包的tinkerId 每次又要不一样,最好是app的版本号,如tinkerId="base-1.1.2"
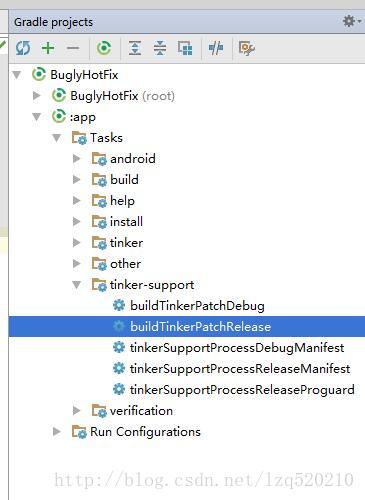
利用gradle进行打包,如截图
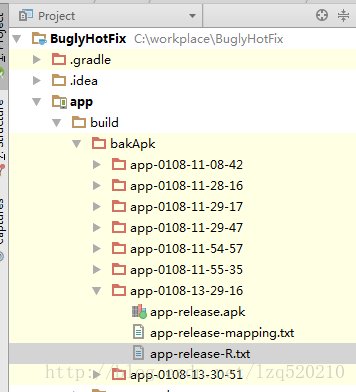
完成后,会在module工程下的build文件中,生成一个bakApk目录,其中会有每次生成的包文件夹,包括apk,app-release-mapping.txt和app-release-R.txt
4、打补丁包
修改bug,接下来要打补丁包,
需要注意的是,
1、要设置tinker-support.gradle中的baseApkDir,内容为刚才打基准包生成的路径名称,如app-0108-13-29-16
需要注意补丁包是要根据这个baseApkDir去区分是对应哪个基准包的打的补丁包,也就是说要解决哪个版本的bug,下发时,只有这个版本的apk才能获取到对应的补丁包。
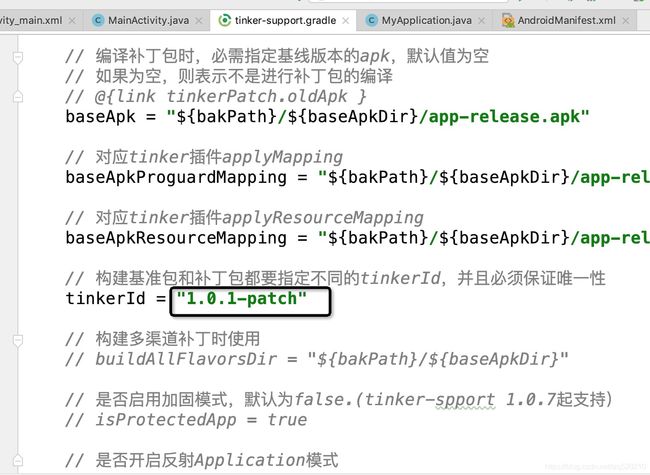
2、需要修改tinkerId
接下来利用gradle开始打补丁包

然后就可以将此安装包传到bugly的管理平台了,这里需要注意,先把我们之前打好的基准包运行起来,会有联网上报,观察log日志,如果success的话,接下来在将补丁包传到bugly的管理平台,成功后,将app杀死重新打开,过几分钟后,重启app,开始下载补丁包,合并,然后再重启,补丁包生效,是不是很简单,省去了很多步骤。


