spring oauth2 social实现QQ登录
文章目录
- 介绍
- 实现功能
- 开发步骤
- 开发流程图
- 引入jar包
- 数据库sql
- QQ用户信息实体类
- QQapi
- 重写OAuth2Template
- 编写自己的QQServiceProvider
- 编写自己的QQAdapter
- QQ连接工厂QQConnectionFactory
- 自定义QQ的服务提供商ID
- 自定义生成自己的处理的URL
- 创建UsersConnectionRepository
- 自定义处理注册实现
- 编写配置applicaion.yml
- 重写MyWebSecurityConfig
- 重写登录页
- 测试
- 项目源码
介绍
出了上一章节中的手机号+验证码的登录方式外,还有现在出现的社交登录。用户可以使用自己的QQ后者微信账号来登录,并且能够自动注册用户信息,省却用户注册步骤。极大的提高用户的体验度。
实现功能
实现QQ登录功能,并且能自动注册QQ
开发步骤
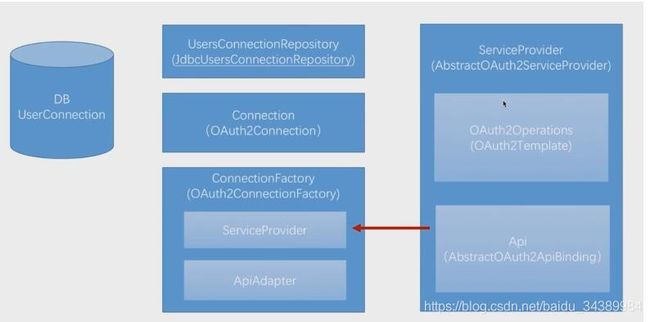
开发流程图
引入jar包
主要是关于spring social的包
            org.springframework.social
            spring-social-config


            org.springframework.social
            spring-social-core


            org.springframework.social
            spring-social-security


            org.springframework.social
            spring-social-web
数据库sql
主要用来保存社交用户的信息数据。
DROP TABLE IF EXISTS `userconnection`;

CREATE TABLE `userconnection` (
  `userId` varchar(255) NOT NULL,
  `providerId` varchar(255) NOT NULL,
  `providerUserId` varchar(255) NOT NULL DEFAULT '',
  `rank` int(11) NOT NULL,
  `displayName` varchar(255) DEFAULT NULL,
  `profileUrl` varchar(512) DEFAULT NULL,
  `imageUrl` varchar(512) DEFAULT NULL,
  `accessToken` varchar(512) NOT NULL,
  `secret` varchar(512) DEFAULT NULL,
  `refreshToken` varchar(512) DEFAULT NULL,
  `expireTime` bigint(20) DEFAULT NULL,
  PRIMARY KEY (`userId`,`providerId`,`providerUserId`),
  UNIQUE KEY `UserConnectionRank` (`userId`,`providerId`,`rank`)
) ENGINE=InnoDB DEFAULT CHARSET=latin1;
QQ用户信息实体类
关于里面的字段信息要及时跟进QQ官方给出的文档进行补充。
@Data
public class QQUserInfo {

    /**
     * 返回码
     */
    private String ret;
    /**
     * 如果ret<0,会有相应的错误信息提示,返回数据全部用UTF-8编码。
     */
    private String msg;
    /**
     *
     */
    private String openId;
    /**
     * 不知道什么东西,文档上没写,但是实际api返回里有。
     */
    private String is_lost;
    /**
     * 省(直辖市)
     */
    private String province;
    /**
     * 市(直辖市区)
     */
    private String city;
    /**
     * 出生年月
     */
    private String year;
    /**
     * 用户在QQ空间的昵称。
     */
    private String nickname;
    /**
     * 大小为30×30像素的QQ空间头像URL。
     */
    private String figureurl;
    /**
     * 大小为50×50像素的QQ空间头像URL。
     */
    private String figureurl_1;
    /**
     * 大小为100×100像素的QQ空间头像URL。
     */
    private String figureurl_2;
    /**
     * 大小为40×40像素的QQ头像URL。
     */
    private String figureurl_qq_1;
    /**
     * 大小为100×100像素的QQ头像URL。需要注意,不是所有的用户都拥有QQ的100×100的头像,但40×40像素则是一定会有。
     */
    private String figureurl_qq_2;
    /**
     * 性别。 如果获取不到则默认返回”男”
     */
    private String gender;
    /**
     * 标识用户是否为黄钻用户(0:不是;1:是)。
     */
    private String is_yellow_vip;
    /**
     * 标识用户是否为黄钻用户(0:不是;1:是)
     */
    private String vip;
    /**
     * 黄钻等级
     */
    private String yellow_vip_level;
    /**
     * 黄钻等级
     */
    private String level;
    /**
     * 标识是否为年费黄钻用户(0:不是; 1:是)
     */
    private String is_yellow_year_vip;

    private String constellation;
}
QQapi
通过这个api来获取用户信息
public interface QQService {

    QQUserInfo getUserInfo();
}

/**
 * @author lvhaibao
 * @description
 * @date 2019/1/3 0003 9:59
 */
@Slf4j
public class QQServiceImpl extends AbstractOAuth2ApiBinding implements QQService {

    /**
     * 获取openId,需要参数token
     */
    private static final String URL_GET_OPENID = "https://graph.qq.com/oauth2.0/me?access_token=%s";

    /**
     * 获取用户信息,需要openId和oauth_consumer_key
     */
    private static final String URL_GET_USERINFO = "https://graph.qq.com/user/get_user_info?oauth_consumer_key=%s&openid=%s";

    private String appId;
    private String openId;
    private ObjectMapper objectMapper = new ObjectMapper();


    /**
     * 通过构造方法,来获取openid,以及appId
     *
     * @param accessToken accessToken
     * @param appId       appId
     */
    public QQServiceImpl(String accessToken, String appId) {
        //把accessToken放进url中
        super(accessToken, TokenStrategy.ACCESS_TOKEN_PARAMETER);
        this.appId = appId;

        String url = String.format(URL_GET_OPENID, accessToken);
        //发起请求
        String result = getRestTemplate().getForObject(url, String.class);

        System.out.println(result);

        //放进openId
        this.openId = StringUtils.substringBetween(result, "\"openid\":\"", "\"}");
    }


    @Override
    public QQUserInfo getUserInfo() {
        String url = String.format(URL_GET_USERINFO, appId, openId);
        //发起请求
        String result = getRestTemplate().getForObject(url, String.class);

        //
        log.info(result);

        QQUserInfo userInfo;
        //保存
        try {
            userInfo = objectMapper.readValue(result, QQUserInfo.class);
            userInfo.setOpenId(openId);
            return userInfo;
        } catch (IOException e) {
            e.printStackTrace();
            throw new RuntimeException("获取用户信息失败", e);
        }
    }
}
重写OAuth2Template
/**
 * @author lvhaibao
 * @description 重写OAuth2Template
 * @date 2019/1/3 0003 10:13
 */
@Slf4j
public class QQOAuth2Template extends OAuth2Template {

    public QQOAuth2Template(String clientId, String clientSecret, String authorizeUrl, String accessTokenUrl) {
        super(clientId, clientSecret, authorizeUrl, accessTokenUrl);
        //当true的时候,才会带上参数去获取token
        setUseParametersForClientAuthentication(true);
    }

    @Override
    protected AccessGrant postForAccessGrant(String accessTokenUrl, MultiValueMap parameters) {
        String responseStr = getRestTemplate().postForObject(accessTokenUrl, parameters, String.class);

        log.info("获取accessToke的响应:"+responseStr);

        String[] items = StringUtils.splitByWholeSeparatorPreserveAllTokens(responseStr, "&");

        //返回的参数
        String accessToken = StringUtils.substringAfterLast(items[0], "=");
        Long expiresIn = new Long(StringUtils.substringAfterLast(items[1], "="));
        String refreshToken = StringUtils.substringAfterLast(items[2], "=");

        return new AccessGrant(accessToken, null, refreshToken, expiresIn);
    }

    @Override
    protected RestTemplate createRestTemplate() {
        RestTemplate restTemplate = super.createRestTemplate();
        //添加处理text/html的处理
        restTemplate.getMessageConverters().add(new StringHttpMessageConverter(Charset.forName("UTF-8")));
        return restTemplate;
    }
}
编写自己的QQServiceProvider
/**
 * @author lvhaibao
 * @description
 * @date 2019/1/3 0003 10:10
 */
public class QQServiceProvider extends AbstractOAuth2ServiceProvider {

    /**
     * 导向authorizeUrl地址
     */
    private static final String URL_AUTHORIZE = "https://graph.qq.com/oauth2.0/authorize";

    /**
     * 得到code之后,导向申请获取token
     */
    private static final String URL_ACCESS_TOKEN = "https://graph.qq.com/oauth2.0/token";

    private String appId;


    public QQServiceProvider(String appId, String appSecret) {
        super(new QQOAuth2Template(appId, appSecret, URL_AUTHORIZE, URL_ACCESS_TOKEN));
        this.appId = appId;
    }

    @Override
    public QQService getApi(String accessToken) {
        return new QQServiceImpl(accessToken, appId);
    }
}
编写自己的QQAdapter
/**
 * @author lvhaibao
 * @description
 * @date 2019/1/3 0003 10:21
 */
public class QQAdapter implements ApiAdapter {
    @Override
    public boolean test(QQService api) {
        return true;
    }

    @Override
    public void setConnectionValues(QQService api, ConnectionValues values) {
        QQUserInfo userInfo = api.getUserInfo();

        //用户的名字
        values.setDisplayName(userInfo.getNickname());
        //用户的头像
        values.setImageUrl(userInfo.getFigureurl_qq_1());
        //个人主页,QQ没个人主页
        values.setProfileUrl(null);
        //用户的ID
        values.setProviderUserId(userInfo.getOpenId());
    }

    @Override
    public UserProfile fetchUserProfile(QQService qqService) {
        return null;
    }

    @Override
    public void updateStatus(QQService qqService, String s) {

    }
}
QQ连接工厂QQConnectionFactory
/**
 * @author lvhaibao
 * @description QQ连接工厂
 * @date 2019/1/3 0003 10:24
 */
public class QQConnectionFactory extends OAuth2ConnectionFactory {

    /**
     * 创建连接工厂
     *
     * @param providerId 服务提供商
     * @param appId      serviceProvider
     * @param appSecret  apiAdapter
     */
    public QQConnectionFactory(String providerId, String appId, String appSecret) {
        super(providerId, new QQServiceProvider(appId, appSecret), new QQAdapter());


    }
}

/**
 * @author lvhaibao
 * @description
 * @date 2019/1/3 0003 11:01
 */
@Configuration
@ConditionalOnProperty(prefix = "system.social.qq", name = "app-id")
public class QQAutoConfig extends SocialAutoConfigurerAdapter {


    @Autowired
    private SecurityProperties securityProperties;

    @Override
    protected ConnectionFactory createConnectionFactory() {
        QQProperties qqConfig = securityProperties.getSocial().getQq();
        return new QQConnectionFactory(qqConfig.getProviderId(), qqConfig.getAppId(), qqConfig.getAppSecret());
    }
}
自定义QQ的服务提供商ID
/**
 * @author lvhaibao
 * @description 自定义QQ的服务提供商ID
 * @date 2019/1/3 0003 10:58
 */
@Data
public class QQProperties extends SocialProperties {

    private String providerId = "qq";
}

/**
 * @author lvhaibao
 * @description
 * @date 2019/1/3 0003 10:57
 */
@Data
public class SocialProperties {

    private QQProperties qq = new QQProperties();

    private String filterProcessesUrl = "/auth";

    //private WeixinProperties weixin = new WeixinProperties();
}
自定义生成自己的处理的URL
/**
 * @author lvhaibao
 * @description 自定义生成自己的处理的URL
 * @date 2019/1/3 0003 10:27
 */
@Data
public class MySpringSocialConfigurer  extends SpringSocialConfigurer {

    private String filterProcessesUrl;

    MySpringSocialConfigurer(String filterProcessesUrl) {
        this.filterProcessesUrl = filterProcessesUrl;
    }

    @SuppressWarnings("unchecked")
    @Override
    protected  T postProcess(T object) {
        SocialAuthenticationFilter filter = (SocialAuthenticationFilter) super.postProcess(object);
        filter.setFilterProcessesUrl(filterProcessesUrl);

        return (T) filter;
    }
}
创建UsersConnectionRepository
/**
 * @author lvhaibao
 * @description 关于社交的的配置
 * @date 2019/1/3 0003 10:21
 */
@Configuration
@EnableSocial
@Order(1)
public class SocialConfig extends SocialConfigurerAdapter {

    @Autowired
    private DataSource dataSource;

    @Autowired
    private SecurityProperties securityProperties;
    @Autowired(required = false)
    private ConnectionSignUp connectionSignUp;

//    @Autowired(required = false)
//    private SocialAuthenticationFilterPostProcessor socialAuthenticationFilterPostProcessor;


    /**
     * 创建UsersConnectionRepository
     *
     * @param connectionFactoryLocator connectionFactoryLocator
     * @return repository
     */
    @Override
    public UsersConnectionRepository getUsersConnectionRepository(ConnectionFactoryLocator connectionFactoryLocator) {
        JdbcUsersConnectionRepository repository = new JdbcUsersConnectionRepository(dataSource,
                connectionFactoryLocator, Encryptors.noOpText());
        //如果不为空
        if (connectionSignUp != null) {
            repository.setConnectionSignUp(connectionSignUp);
        }
        return repository;
    }


    /**
     * 生成自己的mySocialSecurityConfig的bean
     *
     * @return configurer
     */
    @Bean
    public SpringSocialConfigurer mySocialSecurityConfig() {
        String filterProcessesUrl = securityProperties.getSocial().getFilterProcessesUrl();
        //配置处理的url
        MySpringSocialConfigurer configurer = new MySpringSocialConfigurer(filterProcessesUrl);
        //配置注册页
        configurer.signupUrl("/defaultSignUp.html");
        //configurer.setSocialAuthenticationFilterPostProcessor(socialAuthenticationFilterPostProcessor);
        return configurer;
    }


    @Bean
    public ProviderSignInUtils providerSignInUtils(ConnectionFactoryLocator connectionFactoryLocator) {
        return new ProviderSignInUtils(connectionFactoryLocator,
                getUsersConnectionRepository(connectionFactoryLocator)) {
        };
    }


}
自定义处理注册实现
/**
 * @author lvhaibao
 * @description 自定义注册处理
 * @date 2019/1/3 0003 11:24
 */
@Component
public class DemoConnectionSignUp implements ConnectionSignUp {

    @Autowired
    private JpaRepository jpaRepository;

    @Override
    public String execute(Connection connection) {
        //根据社交用户信息默认创建用户并返回用户唯一标识,当不用@Component时,就用

        //这时候,偷偷给用户添加一条user表,并且返回用户的uin

        //业务需要1
        //当用户直接用QQ登录的时候,不需要提示用户注册,后台直接注册给用户注册
        String uin = RandomUtil.randomString(6);

        UserModel userModel = new UserModel(Long.parseLong(uin), connection.getDisplayName(), "123456", null);
        //在微服务中,最好是RPC调用
        jpaRepository.save(userModel);

        //业务需求2
        //当改用户第一次注册没手机号,就提示用手机号绑定


        return uin;
    }
}
编写配置applicaion.yml
system:
  social:
    qq:
      app-id: 自己的id
      app-secret: 自己的secret
      providerId: callback.do
    filterProcessesUrl: /qqLogin
重写MyWebSecurityConfig
/**
 * @author lvhaibao
 * @description 浏览器配置
 * @date 2018/12/25 0025 10:53
 */
@Configuration
public class MyWebSecurityConfig extends WebSecurityConfigurerAdapter {

    @Autowired
    private SecurityProperties securityProperties;
    @Autowired
    private VcodeManager vcodeManager;
    @Autowired
    private SmsCodeAuthenticationSecurityConfig smsCodeAuthenticationSecurityConfig;
    @Autowired
    private SpringSocialConfigurer mySocialSecurityConfig;
    @Autowired
    private DataSource dataSource;
    @Bean
    public PasswordEncoder passwordEncoder() {
        return new BCryptPasswordEncoder();
    }

//    @Override
//    @Bean
//    public AuthenticationManager authenticationManagerBean() throws Exception {
//        return super.authenticationManagerBean();
//    }


    /**
     * 生成记得我的token
     *
     * @return
     */
    @Bean
    public PersistentTokenRepository persistentTokenRepository() {
        //使用jdbc来存储
        JdbcTokenRepositoryImpl tokenRepository = new JdbcTokenRepositoryImpl();
        //设置数据源
        tokenRepository.setDataSource(dataSource);
        //当为true的时候就会自动创建表
        //tokenRepository.setCreateTableOnStartup(true);
        return tokenRepository;
    }

    @Override
    protected void configure(HttpSecurity http) throws Exception {

        SmsCodeFilter smsCodeFilter = new SmsCodeFilter(vcodeManager);
        smsCodeFilter.setSecurityProperties(securityProperties);
        smsCodeFilter.afterPropertiesSet();

        http.addFilterBefore(smsCodeFilter, UsernamePasswordAuthenticationFilter.class)
                //表单登录,loginPage为登录请求的url,loginProcessingUrl为表单登录处理的URL
                .formLogin().loginPage(FromLoginConstant.LOGIN_PAGE).loginProcessingUrl(FromLoginConstant.LOGIN_PROCESSING_URL)
                //允许访问
                .and().authorizeRequests().antMatchers(
                FromLoginConstant.LOGIN_PROCESSING_URL,
                FromLoginConstant.LOGIN_PAGE,
                securityProperties.getOauthLogin().getOauthLogin(),
                securityProperties.getOauthLogin().getOauthGrant(),
                "/myLogout",
                "/code/sms")
//                "/oauth/**")
                .permitAll().anyRequest().authenticated()
                //禁用跨站伪造
                .and().csrf().disable()
                //短信验证码配置
                .apply(smsCodeAuthenticationSecurityConfig)
                //qq登录
                .and().apply(mySocialSecurityConfig);

    }


}
重写登录页
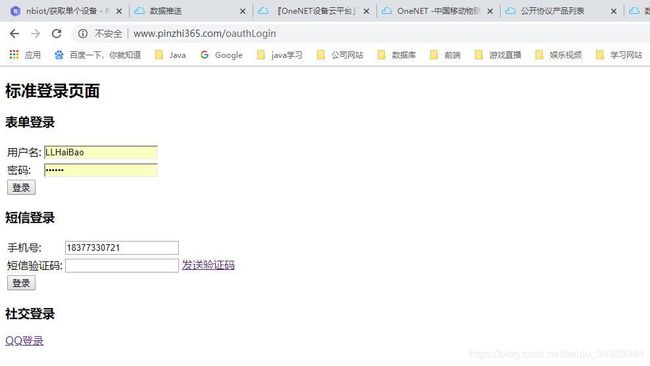
社交登录

QQ登录
测试
我自己修改了应用的端口为80端口,并且在host文件中添加了wwww.pinzhi365.com的域名配置。
先在浏览器打开wwww.pinzhi365.com/user/hello。
页面跳转到登录页如下:
点击QQ登录,并且进行登录之后,会跳转到如下:

在数据库中可以看到如下数据:

项目源码
https://gitee.com/lvhaibao/spring-lhbauth/tree/08ee33f3b947aeb70cdb5a84caf6dbda1fa87472/