【CoppeliaSim仿真】用UR5进行识别、抓取和码垛
简介
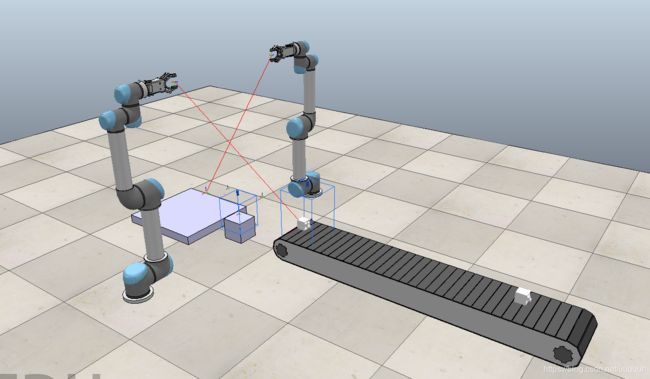
场景中有一条传送带,传送带上有多个传感器,传送带前方分别是两个UR5和一个同样带有传感器的中转台,再往前则是一个用来展示码垛的平板。开始传送带产生并运送物块至它的前端,此时每个物块的朝向是随机的,然后两个UR5负责分工将物块(在中转台交接后)整齐摆放至展示平板上,不仅如此,摆放的物块之间还需要进行齿合,摆成多层的样式(如3×3×2层)。
仿真演示:
传送带随机生成物块
对传送带脚本优化后,物块的生成、传送带的启停都十分完好

传送带脚本:非线程脚本,跟随仿真频率同步刷新。每次刷新读取前端速度传感器,若未检测到物体,则按心跳生成物块;若检测到物体,则心跳暂停,并等待至该物块消失。
(重要: lua里面的高级存储结构的赋值是浅复制,修改一个新复制的列表,老的列表仍然会被修改。)
function sysCall_init()
    tick=0 -- 物块生成心跳
    pathHandle=sim.getObjectHandle("ConveyorBeltPath")
    forwarder=sim.getObjectHandle('ConveyorBelt_forwarder')
    sensor=sim.getObjectHandle('ConveyorBelt_sensor')
    sim.setPathTargetNominalVelocity(pathHandle,0) -- for backward compatibility
    handle=sim.getObjectHandle("Shape")
    block_handle={handle}
end

function sysCall_actuation()
    beltVelocity=sim.getScriptSimulationParameter(sim.handle_self,"conveyorBeltVelocity")
    local grippingSignal = sim.getIntegerSignal('beltRing')
    if (sim.readProximitySensor(sensor)>0) then -- when detected cube, emit working signal
        sim.setIntegerSignal('beltRing', 1)
    end
    if grippingSignal ~= nil then -- pending for compeleting work -- 检测到物块,便停止传送带,而且只有在外部清除'beltRing'之后传送带才会继续
        beltVelocity=0
    end

    -- 传送带移动模块
    local dt=sim.getSimulationTimeStep()
    local pos=sim.getPathPosition(pathHandle)
    pos=pos+beltVelocity*dt
    sim.setPathPosition(pathHandle,pos) -- update the path's intrinsic position

    relativeLinearVelocity={beltVelocity,0,0}
    -- Reset the dynamic rectangle from the simulation (it will be removed and added again)
    sim.resetDynamicObject(forwarder)
    -- Compute the absolute velocity vector:
    m=sim.getObjectMatrix(forwarder,-1)
    m[4]=0 -- Make sure the translation component is discarded
    m[8]=0 -- Make sure the translation component is discarded
    m[12]=0 -- Make sure the translation component is discarded
    absoluteLinearVelocity=sim.multiplyVector(m,relativeLinearVelocity)
    -- Now set the initial velocity of the dynamic rectangle:
    sim.setObjectFloatParameter(forwarder,sim.shapefloatparam_init_velocity_x,absoluteLinearVelocity[1])
    sim.setObjectFloatParameter(forwarder,sim.shapefloatparam_init_velocity_y,absoluteLinearVelocity[2])
    sim.setObjectFloatParameter(forwarder,sim.shapefloatparam_init_velocity_z,absoluteLinearVelocity[3])

    if (beltVelocity>0) then
        tick=tick+1
        -- 生成物块
        if tick == 40 then
            copy=sim.copyPasteObjects(block_handle,2) -- 复制初始物块
            local matrix=sim.getObjectMatrix(sim.getObjectHandle('beltStart'),-1) --起始点位姿
            local temp=math.random(6) -- 获取随机姿态,下面是对位姿矩阵的修改
            if temp==1 then
                matrix[1]=90
            elseif temp==2 then
                matrix[2]=90
                matrix[3]=90
            elseif temp==3 then
                matrix[2]=90
                matrix[3]=-90
            elseif temp==4 then
                matrix[1]=90
                matrix[3]=90
            elseif temp==5 then
                matrix[1]=90
                matrix[3]=-90
            elseif temp==6 then
            end
            sim.setObjectMatrix(copy[1],-1,matrix) -- 将复制的物块投放到起始点处
            tick = 0
        end
    end
end
UR5逆解
这里的逆解是用IKgroup实现的,是一个软件内置的实时计算功能,它能自动计算一组dummy之间的逆解并且实现自动跟随。
ikgroup设置方法:
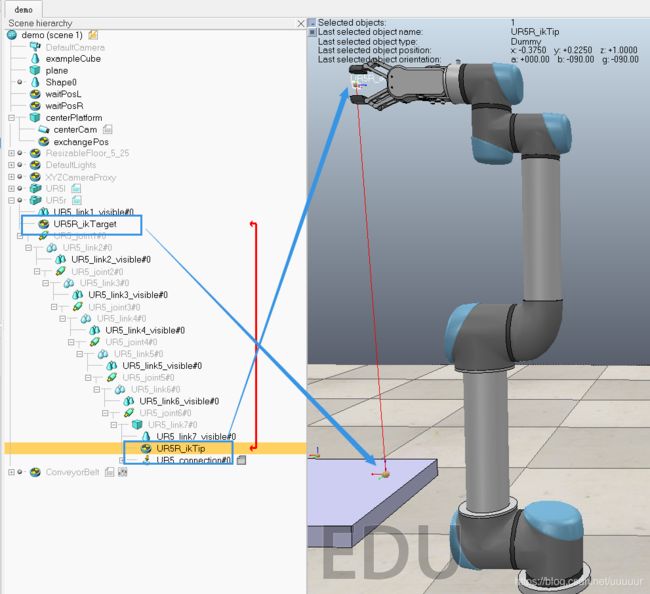
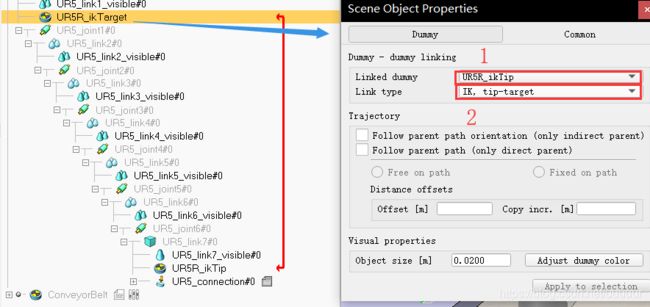
- 在场景中添加两个dummy:1. 在你的UR5根节点下添加一个dummy(如
UR5L_ikTarget),这个节点是一个领航节点,其作用是控制你的手抓到达的位姿的;2. 在RG2的节点下(UR5_link7也行)添加一个dummy(如UR5L_ikTip),这个节点与你的手抓绑定在一起,请务必将其位置调到手抓的两个指头夹紧处,因为移动它就是移动你的手抓;3. 双击dummy图标(如UR5L_ikTip)打开属性编辑界面,点击Linked dummy选择另外一个建好的dummy(如UR5L_ikTarget),这一选项实现两个dummy的关联;再点击Link type选择IK, tip-target即逆解模式,这时两个dummy便成功连接起来,且会有一条红线连接着双方。
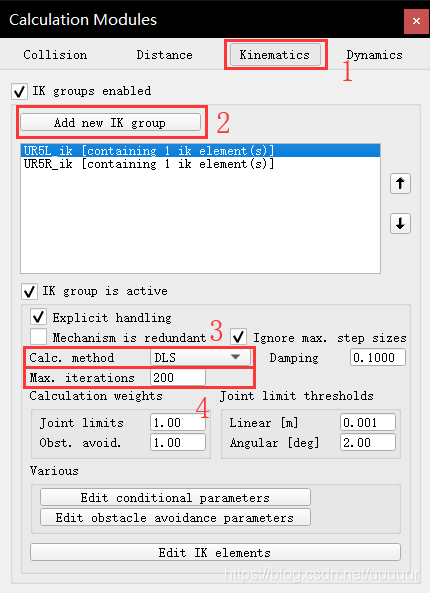
- 选择侧边栏的第三个按钮进入
Calculation Modules properties计算模块,点击Kinematics->Add new IK group添加一个逆解组并命名(如UR5L_ik)。这样,你就建立了一个逆解组,但此时组中还没有计算的目标,需要接下来的设置; - 设置逆解组的属性:设置计算模式
Calc. method为DLS;设置最大迭代次数Max. iterations为200,这个是越大得到的跟踪效果越好
- 点击
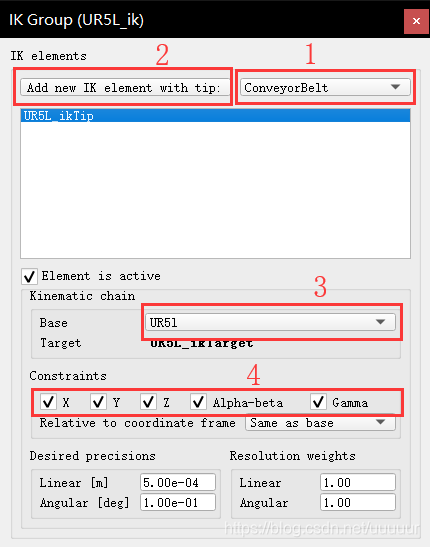
Edit IK elements进入;然后在下拉页中选择绑定在你的手抓上的那个dummy(UR5L_ikTip),注意一定是绑定在手抓上的,另外一个是领航点,是随意摆放的;然后点Add new IK element with tip添加;接下来进行它的属性设置,选择计算基Base为UR5根节点(如UR5L),然后下面的Target会以粗体的形式自动给出;最后将X、Y、Z、Alpha-beta、Gamma全部打上勾就完成了
至此,该UR5(及其手抓RG2)就已经具备了逆解结算、轨迹规划的能力了,它的位姿将由你的UR5L_ikTarget给定,使用时在代码中获取导航点句柄,再移动目标点就能移动机械臂和手抓了
--示例代码:获取导航点句柄,然后直接用函数移动到目标位置
ikTarget=sim.getObjectHandle('UR5L_ikTarget')
ikMaxVel={0.4,0.4,0.4,1.8}
ikMaxAccel={0.8,0.8,0.8,0.9}
ikMaxJerk={0.6,0.6,0.6,0.8}

local gripPos = sim.getObjectPosition(ikTarget,-1) --这是导航点的位置,放在工作空间中的一个点处
local gripQuat = sim.getObjectQuaternion(ikTarget,-1) --导航点姿态
sim.rmlMoveToPosition(ikTarget,-1,-1,nil,nil,ikMaxVel,ikMaxAccel,ikMaxJerk,gripPos,gripQuat,nil)
RG2抓取物块
要实现手抓对物块的抓取,有两条路可以实现:这里采用的第二种实现
- 选择按照真实夹取的方式取实现夹取,去计算力、摩擦、速度等,这样十分的麻烦且不稳定;
- 将手抓中的物块以父子节点绑定的方式,来实现手抓抓取物块;
这里是官方给的实现思路,大体上也就是上面所说的两种方法。
-- 1. You try to grasp it in a realistic way. This is quite delicate and sometimes requires
--    to carefully adjust several parameters (e.g. motor forces/torques/velocities, friction
--    coefficients, object masses and inertias)
--
-- 2. You fake the grasping by attaching the object to the gripper via a connector. This is
--    much easier and offers very stable results.
这里给出绑定抓取的实现:
当控制信号RG2_open在外部被设置成0时,手抓夹紧并抓住其中物块;当为1时手抓松开,释放物块;当为2,手抓在释放物块的同时,将物块设置成not dynamic使其完全静止。
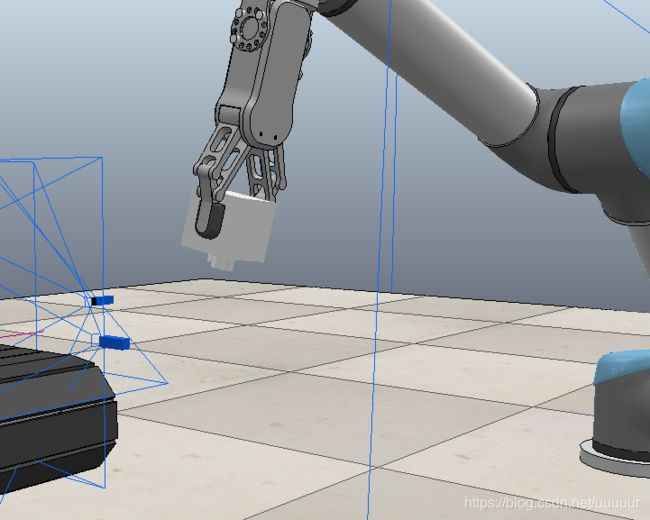
值得注意的是,手抓的脚本是一个非线程脚本。它的函数入口是sysCall_actuation,也就意味着仿真的每一帧都会去刷新这个脚本;换个角度解释,也就是手抓每关闭一帧/传感器每读取一次数据,这个脚本都要刷新一遍。
function sysCall_init()
    motorHandle=sim.getObjectHandle('RG2_openCloseJoint')
    motorVelocity=0.05 -- m/s
    motorForce=10 -- N
    tick=0
    lock = true
end
-- 存放手抓之间的距离,当有物块存在时会依次递减到距离最小以保证加夹紧
attachFlag = 1  -- this falg store the distance between gripper and cube,
                -- it stoped when reach minimum

function sysCall_actuation()
    tick  = tick+1
    if tick == 5 then
        local v=-motorVelocity
        local data=sim.getIntegerSignal('RG2l_open')

        --连接点和传感器句柄
        connector=sim.getObjectHandle('RG2_attachPoint')
        objectSensor=sim.getObjectHandle('RG2_attachProxSensor')

        if data==1 then	-- loose gripper: release the cube and set it child of the world
            v=motorVelocity
            loose(connector, objectSensor)
        elseif data == 2 then -- loose gripper & make cube static
            v=motorVelocity
            loose(connector, objectSensor, true)
        else	-- tighten gripper: make cube child of the gripper
            tighten(connector, objectSensor)
        end
        --手柄动作执行
        sim.setJointForce(motorHandle,motorForce)
        sim.setJointTargetVelocity(motorHandle,v)
        tick = 0
    end
end

function tighten(father, fatherSensor)
    index=0 -- shape序号从0开始
    while true do	--在这一桢中,遍历场景中的所有shape
        shape=sim.getObjects(index,sim.object_shape_type)
        if (shape==-1) then
            break
        end

        res, dis= sim.checkProximitySensor(fatherSensor,shape)--速度传感器做检测
        if res~=nil and dis~=nil then -- 只有在手抓闭合动作时才有值

            _, para1 = sim.getObjectInt32Parameter(shape,sim.shapeintparam_respondable)
            _, para2 = sim.getObjectInt32Parameter(shape,sim.shapeintparam_static)
            if para1 == 1 and para2 == 0 then -- 筛选出cube
                -- step minus attachFlag and make it reach to minimum
                if attachFlag > dis+0.03 then
                    attachFlag = dis
                else
                    attachedShape=shape
                    -- Do the connection:
                    sim.setObjectParent(attachedShape,father,true)--将物块绑定在手抓上
                    lock = false
                    break
                end
            end
        end
        index=index+1
    end
end

function loose(father, fatherSensor, make_static)
    child = sim.getObjectChild(father, 0) -- get children of this father
    if child ~= -1 then
        sim.setObjectParent(child,-1,true) -- 释放物块,将其还原到世界中
        attachFlag = 1  -- recover  the distance ffalg
        if make_static==true then
            -- 将物块设置成not dynamic
            sim.setModelProperty(child, sim.modelproperty_not_dynamic)
        end
    end
end
视觉传感器初步
在世界中右键->Add->Vision sensor->Orthographic type便可添加一个视觉传感器
简单获取图像并保存至本地
这只是对图像的简单处理,在程序中任何地方都可以调用sim的接口来获取视觉传感器的信息。
getVisionSensorCharImage()获取图像传感器的图像信息,(虽然还有别的接口,但是好像就这个好用一点)。接收参数:传感器句柄[、图像起始位置、图像范围、图像模式];返回:图像流指针、X方向分辨率、Y方向分辨率sim.saveImage()保存图像到缓存或文件。接收参数:图片流指针、XY分辨率列表、图像模式、保存文件路径、图片质量;返回:保存结果
--简单获取图像
topSensor=sim.getObjectHandle('Vsup') -- 传感器句柄
image, resX, resY =sim.getVisionSensorCharImage(topSensor)--读取传感器内容
sim.saveImage(image,{resX, resY}, 0, 'C:\\Users\\Administrator\\Desktop\\demo.png', -1)--保存传感器图片到本地,(resX、resY为256)

--获取部分图像
image, resX, resY =sim.getVisionSensorCharImage(topSensor, 0, 0, 100, 100, 0) --后面5个参数分别是:截取图像的X、Y坐标,截取图像的X、Y长度,图像模式
sim.saveImage(image,{100, 100},0, 'C:\\Users\\Administrator\\Desktop\\demo.png', 0) --注意,由于image是100像素的图片,所以此处第二个参数不能再是{resX,resY},必须与现在的图像分辨率一样
用窗口显示传感器图像
- 世界中右键->
add->floating view - 显示窗口中右键->
view->绑定选中相机即可为传感器建立一个实时的显示界面。注意相机只有在开始仿真时才有图像
相机的简单设置
相机分为透视相机和正交相机,二者的区别也只有镜头上的差异,一个的视界为锥形、一个为柱形。
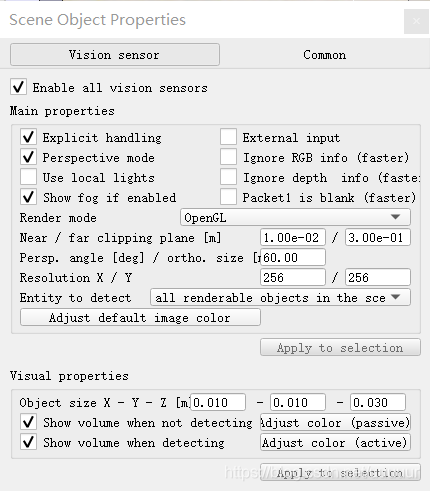
这是设置界面,其中:
explicit handling可以理解为自己控制相机脚本的触发。在不勾选的情况下相机脚本的刷新频率为仿真频率,勾选后相机的刷新可以由自己来控制,但是这需要自己手动调用handleVisionSensor句柄。perspective mode:透视模式/或正交模式Ignore RGB/depth info:在处理时忽视RGB/深度信息,一般选择性勾选Packet1 is blank:勾选后使用readVisionSensor等类似接口将得不到处理的数据包。一般不勾选Packet1 - 15 auxiliary values:也就是read传感器接口得到的数据包,其中包含了灰度、RGB、深度信息。
P a c k e t 1 = { I m i n , R m i n , G m i n , B m i n , D m i n , I m a x , R m a x , G m a x , B m a x , D m a x , I a v g , R a v g , G a v g , B a v g , D a v g } Packet1 = \{Imin,Rmin,Gmin,Bmin,Dmin,\ Imax,Rmax,Gmax,Bmax,Dmax,\ Iavg,Ravg,Gavg,Bavg,Davg\} Packet1={Imin,Rmin,Gmin,Bmin,Dmin, Imax,Rmax,Gmax,Bmax,Dmax, Iavg,Ravg,Gavg,Bavg,Davg}
Near/far clipping plane:相机的最近/最远拍摄距离,一般包括到你所拍摄的物体就够了persp. angle / ortho. size:当为透视模式时,这个值是相机的张角(角度为单位);当为正交模式时,这个值是相机视角的宽度值(m为单位)Resolution X/Y:相机的分辨率。数值越高运算越慢
添加脚本处理图片:
这才是正确的处理方式,将图片处理大部分交给相机脚本去做:
- 添加一个
non-thread script:其中init部分仅开始时执行一遍;actuation刷新频率为仿真设置的频率,基本在50ms量级。
function sysCall_init()
    -- do some initialization here
    cam = sim.getObjectAssociatedWithScript(sim.handle_self)	--获取该相机句柄
    view = sim.floatingViewAdd(0.9, 0.9, 0.9, 0.9, 0)	--添加子窗口
    sim.adjustView(view, cam ,64)
    res = sim.getVisionSensorResolution(cam)	--获取相机分辨率
    tick = 0
end

function sysCall_actuation()
    -- put your actuation code here
    tick = tick + 1	--自定义触发频率
    if tick%10 == 0 then
        sim.handleVisionSensor(cam)	--调用处理脚本
        res, t0, t1 = sim.readVisionSensor(cam)
    end
end
- 编写
handleVisionSensor函数所触发的函数,即如下的sysCall_vision函数。其中:- 工作空间(workImg)是相机处理图片的内部空间;
- 传感器空间(sensorImg)是传感器输出到外界的图片信息,也就是显示在窗口上、或者在别的脚本处理时所使用的空间;
- buffer1指的是一个新建的图层,原处理是在工作空间的图层0上进行的,需要新的图层使用它即可,在最后别忘了将所有图层的信息汇总。
function sysCall_vision(inData)
    local handler = inData.handle
    simVision.sensorImgToWorkImg(handler)	--将传感器数据保存到工作空间来处理
    simVision.selectiveColorOnWorkImg(handler, {1,1,1}, {0.15, 0.15, 0.15}, true,true,false)	-- 由颜色来分割当前图片
    simVision.workImgToSensorImg(handler)	--将工作空间的图像输出到传感器空间去
end
- 这里用到的
simVision是coppeliaSim内置的一个简单处理图像的包,能够完成对图像的滤波、边缘检测、区域分割等功能。内置还有一个openCV的包*simIM**,功能十分强大。*
传感器信号订阅发布:
在完成一个动作时(如速度传感器检测到物体),发送信号到一个主题上,此后在ur5中就可以根据这个信号(或者数据)来做接下来的逻辑。例:
传送带脚本:检测速度传感器的值,当检测到物体时发送和信号beltRing
if (sim.readProximitySensor(sensor)>0) then
    sim.setIntegerSignal('beltRing', 1) -- when belt stopped, emit signal
    beltVelocity=0
else
    sim.clearIntegerSignal('beltRing')-- when belt started, clear signal
end
ur5l脚本:执行ur5l循环,在每个循环中等待beltRing
while true do
    backToWait(waitPos, waitQuat)
    sim.waitForSignal('beltRing')   -- block for beltRing, ifso grip cube
    								-- and clear signal for next waiting
    gripCube(gripPos)
    backToWait(waitPos, waitQuat)
    deliverCube(exchangePos, exchangeQuat)
end
数据块存储:
一般的,在视觉传感器的处理脚本和ur5的运行脚本往往独立,而ur5在需要得到处理的数据时就会用到数据块存储技术。数据块存储包括:一般数据存储和持续数据存储。
- 一般数据存储为
sim.writeCustomDataBlock(),它将数据保存在它的脚本对应的存储区中,在此次仿真运行期间有效,外界需要使用时凭句柄号就可访问; - 持续数据存储为
sim.persistentDataWrite(),它将数据保存在ttt文件中,不论打开或关闭项目都不会失效,不同的,它是凭键名访问。
视觉传感器脚本:将direction数据保存在该脚本的数据存储区中
sim.writeCustomDataBlock(handler, 'data', sim.packTable(direction))
ur5l脚本:获取视觉传感器的数据存储区中data数据,并解码
local gripQuat = sim.unpackTable(sim.readCustomDataBlock(topSensor, 'data'))
值得注意的是:数据块中的数据是以字符串编码的形式保存的,在存/取时都要进行编码解码操作。
视觉传感器
传送带视觉传感器:
当传送带运送物块至前端时,此处的视觉传感器Vsup便能拍摄到物块的信息。然后通过物块的朝向控制ur5l的抓取姿态。
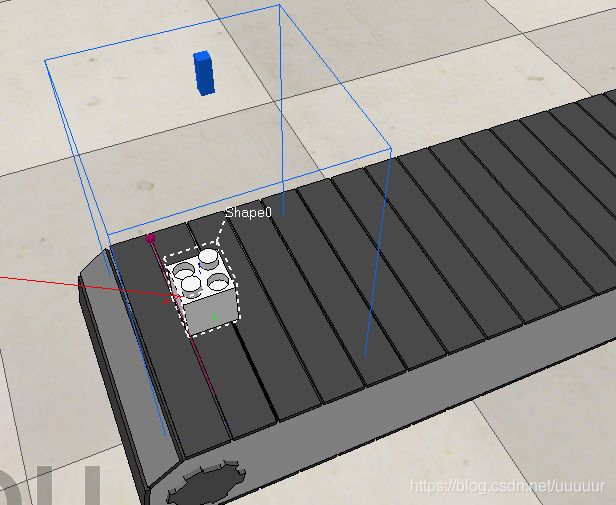
获取每一帧的图像,对图像做光斑检测,分割出物块;通过检测物块的像素和深度信息从而得到物块的朝向,最后保存至脚本的数据存储区中由外界(ur5l)调用。如下:
function sysCall_init()
    -- do some initialization here
    cam = sim.getObjectAssociatedWithScript(sim.handle_self) -- 获取传感器句柄
    view = sim.floatingViewAdd(0.9, 0.9, 0.9, 0.9, 0)	-- 建立一个悬浮窗用以显示图像
    sim.adjustView(view, cam ,64)

    resolution = sim.getVisionSensorResolution(cam)
    tick = 0
end

function sysCall_actuation()
    -- put your actuation code here
    tick = tick + 1
    if tick==10 then
        sim.handleVisionSensor(cam) -- 执行图像处理
        tick = 0
    end
end

function sysCall_vision(inData)
    -- beacuse outside cant receive the data we return through
    -- interface sim.readVisionSensor, so we keep data handled here
    local flag = false
    local packet = {}

    local handler = inData.handle
    simVision.sensorImgToWorkImg(handler)
    simVision.selectiveColorOnWorkImg(handler, {1,1,1}, {0.15, 0.15, 0.15}, true,true,false) -- 分割出图像中白色区域

    local _, ans = simVision.blobDetectionOnWorkImg(handler, 0.1, 0, false)
    packet = sim.unpackFloatTable(ans) --should unpack first
    if #packet == packet[2]+2 then    -- the detection is safe
        flag = true
    end
    if flag then
        blobSize = packet[3] -- 光斑面积
        blobOrientation = packet[4] -- 光斑旋转角度
        blobDimension = {packet[7]*resolution[1], packet[8]*resolution[2]}    -- width, height
        blobCenter = {packet[5]*resolution[1], packet[6]*resolution[2]} -- 光斑重心
        blobPosition = {packet[5]*resolution[1]-blobDimension[1]/2, packet[6]*resolution[2]-blobDimension[2]/2}
        --sim.addStatusbarMessage(string.format('size:'..blobSize))
        --sim.addStatusbarMessage(string.format('orientation:'..blobOrientation))
        --sim.addStatusbarMessage(string.format('center:%f, %f',blobCenter[1], blobCenter[2]))
        --sim.addStatusbarMessage(string.format('width&height:%f, %f',blobDimension[1], blobDimension[2]))
    else
        return 0
    end

    simVision.workImgToSensorImg(handler)
    local direction = {}
     -- focus on depth data, the smaller the closer to camera, the bigger the farther
    center = sim.getVisionSensorDepthBuffer(handler,blobCenter[1],blobCenter[2],1,1)	--光斑重心的深度
    if math.abs(blobDimension[1]-blobDimension[2]) < 2 then  -- the cube lay up
        direction = {0, 0, -math.sqrt(2)/2, math.sqrt(2)/2} -- 给出朝上时手抓的四元数
    else -- cube lay right/left/front/behind
        local width = blobDimension[1]
        local height = blobDimension[2]
        if width < height then
            target = sim.getVisionSensorDepthBuffer(handler,blobCenter[1]-blobDimension[1]/4,blobCenter[2]-blobDimension[2]/2.5,1,1)
            if math.abs(center[1] - target[1]) < 0.01 then  --lay behind
                direction = {0, -math.sqrt(2)/2, 0, math.sqrt(2)/2}--{0,0,1,0}
            else    -- lay front
                direction = {-math.sqrt(2)/2, 0, -math.sqrt(2)/2, 0}--{0,0,0,1}
            end
        else
            target = sim.getVisionSensorDepthBuffer(handler,blobCenter[1]-blobDimension[1]/2.5,blobCenter[2]-blobDimension[2]/4,1,1)
            if math.abs(center[1] - target[1]) < 0.01 then  --lay right
                direction = {0.5,0.5,0.5,-0.5}
            else    -- lay left
                direction = {0.5,-0.5,0.5,0.5}--{0, 0, -math.sqrt(2)/2, math.sqrt(2)/2}
            end
        end
    end
    -- store to 'data'
    sim.writeCustomDataBlock(handler, 'data', sim.packTable(direction)) -- 保存至脚本的数据块中,在外界可以方便调用
    --return direction
end
中台视觉传感器:
在ur5l在传送带前端抓取到物块之后,便转而将物块转运到中台并且使之朝上;然后ur5r在通过中台视觉传感器的识别后以准确的姿态抓取物块,进行码垛。在这其中,中台起了转存和识别物体的作用。
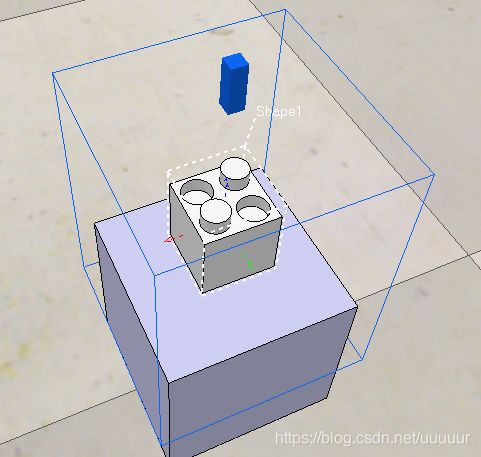
获取每一帧图像,通过区域分割、光斑检测获取到物块的二值图像;然后结合*键槽(图中的凸起和凹槽)*的深度信息计算图像的图像矩,从而映射到手抓的朝向中去,进而精确地抓取到物块。
- 图像的分割
function sysCall_init()
    -- do some initialization here
    cam = sim.getObjectAssociatedWithScript(sim.handle_self)
    view = sim.floatingViewAdd(0.9, 0.5, 0.3, 0.3, 0)
    sim.adjustView(view, cam ,64)
    resolution = sim.getVisionSensorResolution(cam)
    cam_pos = sim.getObjectPosition(cam,-1) -- 相机的世界坐标
    cam_xy = 0.15 -- view angle width
    tick = 0
end

function sysCall_actuation()
    -- put your actuation code here
    tick = tick + 1
    if tick==5 then
        sim.handleVisionSensor(cam)
        tick = 0
    end
end


function sysCall_vision(inData)
    -- beacuse outside cant receive the data we return through
    -- interface sim.readVisionSensor, so we keep data handled here
    -- and store it in data block
    local flag = false
    local packet = {}

    local handler = inData.handle -- 传感器句柄
    simVision.sensorImgToWorkImg(handler)	--	将传感器信息拷贝到工作空间
    simVision.selectiveColorOnWorkImg(handler, {1,1,1}, {0.15, 0.1, 0.15}, true,true,false)	-- 选出rgb为1,1,1的图像,并提供一定的容差

    local _, ans = simVision.blobDetectionOnWorkImg(handler, 0.1, 0, false)	-- 光斑检测
    packet = sim.unpackFloatTable(ans) --should unpack first
    if #packet == packet[2]+2 then    -- the detection is safe
        flag = true
    end
    if flag then
        blobSize = packet[3]
        blobOrientation = packet[4]*180/math.pi --angle
        if blobOrientation > 0 then	-- 传感器计算待正方形的图像矩很不平滑, 后面又专门的操作
            blobOrientation = -90 + blobOrientation
        end
        blobDimension = {packet[7]*resolution[1], packet[8]*resolution[2]}    -- width, height -- 将光斑的宽、高投射到图像空间
        blobCenter = {packet[5]*resolution[1], packet[6]*resolution[2]}	-- 光斑的重心
        blobPosition = {packet[5]*resolution[1]-blobDimension[1]/2, packet[6]*resolution[2]-blobDimension[2]/2}	-- 光斑的起始点
    else
        return 0
    end
    simVision.workImgToSensorImg(handler)
- 图像矩的计算:
	-- color some key point, like center of blob, center of circle
    local image, resx, resy = sim.getVisionSensorCharImage(handler)
    local point = {blobCenter[1], blobCenter[2]}
    ans = colorAPoint(image, point[1], point[2], resx, resy) --给图像中的特殊点上色,调试时用到
    point = {
        blobCenter[1]-math.sqrt(2)*(blobDimension[1]/4*math.cos((45+blobOrientation)*math.pi/180)),
        blobCenter[2]-math.sqrt(2)*(blobDimension[2]/4*math.sin((45+blobOrientation)*math.pi/180))
    } -- 用来提取深度的特殊点
    ans = colorAPoint(ans, point[1], point[2], resx, resy)
    sim.setVisionSensorCharImage(handler, ans)
    if point[1]<0 or point[2]<0 then
        return 0
    end
    -- use oritation to obtain the center of circle and judge direction with depth info
    local depth_center = sim.getVisionSensorDepthBuffer(handler,blobCenter[1],blobCenter[2],1,1)
    local depth_point = sim.getVisionSensorDepthBuffer(handler, point[1], point[2],1,1)
    local rotate = 0
    if depth_point[1] < depth_center[1] then    --higher
        rotate = blobOrientation+90
    else    --lower
        rotate = blobOrientation
    end

    local data = {cam_pos[1] - (blobCenter[2]/resolution[2]-0.5)*cam_xy, cam_pos[2] + (blobCenter[1]/resolution[1]-0.5)*cam_xy, rotate*math.pi/180} --x, y, oritentation
    -- store to 'data'
    sim.writeCustomDataBlock(handler, 'data', sim.packFloatTable(data)) -- 保存至脚本的数据块中,在外界可以方便调用

function colorAPoint(imageString, x, y, resX, resY)   -- 上色
    local image = sim.unpackUInt8Table(imageString)
    local point = math.floor(y-1)*resY+math.floor(x-1)
    image[point*3+1] = 255
    image[point*3+2] = 0
    image[point*3+3] = 0
    image = sim.packUInt8Table(image)
    return image
    --sim.saveImage(image, {x,y}, 0, 'C:\\Users\\Administrator\\Desktop\\a.png',0)
end
机械臂
UR5L:
左机械臂是一个ur5机械臂,执行一个子线程脚本。这个脚本功能上完成物块从传送带到中台的转移,将随机朝向的物块按照统一的朝向——朝上放置到中台上,然后通知右机械臂ur5r来接取。
- 左机械臂包含三个执行过程:抓取—等待—放置。这三个过程分别对应了三个位置:
gripPos、waitPos、exchangePos。 - 仿真开始,机械臂运动到等待位置
waitPos,等待传送带的到来信号beltRing; - 执行抓取过程,机械臂运动到抓取位置
gripPos,并且读取传送带视觉传感器的位姿数据,以恰当的姿势抓取物块; - 回到
waitPos,并等待ur5r将完成信号doorRing消除,说明此时右机械臂已经将中台上的物块取走; - 执行放置过程,将物块放置到中台
exchangePos,并设置完成信号; - 回到2,结束此次循环;
enableIk=function(enable)
    if enable then
        sim.setObjectMatrix(ikTarget,-1,sim.getObjectMatrix(ikTip,-1))
        for i=1,#jointHandles,1 do
            sim.setJointMode(jointHandles[i],sim.jointmode_ik,1)
        end

        sim.setExplicitHandling(ikGroupHandle,0)
    else
        sim.setExplicitHandling(ikGroupHandle,1)
        for i=1,#jointHandles,1 do
            sim.setJointMode(jointHandles[i],sim.jointmode_force,0)
        end
    end
end

function pendingForGripper(attachHandle, signal)
    if signal == true then -- if true ,wait for gripper finish loosing
        while true do
            child = sim.getObjectChild(attachHandle,0) -- if exist, return child Number, otherwise -1
            if child==-1 then
                --sim.addStatusbarMessage(child)
                return 0
            end
            wait(500)
        end
    else -- tighting
        while true do
            child = sim.getObjectChild(attachHandle,0) -- if exist, return child Number, otherwise -1
            if child~=-1 then
                --sim.addStatusbarMessage(child)
                return 0
            end
            wait(500)
        end
    end
end

function loosegripper(signal)
    if signal==true then	-- loose gripper
        sim.setIntegerSignal('RG2l_open', 1)
    else -- tighten gripper
        sim.setIntegerSignal('RG2l_open', 0)
        sim.waitForSignal('RG2lRing')
        sim.clearIntegerSignal('RG2lRing')
    end
    pendingForGripper(attachPoint, signal)
end

function backToWait(waitPos, waitQuat)
            sim.rmlMoveToPosition(ikTarget,-1,-1,nil,nil,ikMaxVel,ikMaxAccel,ikMaxJerk,waitPos,waitQuat,nil)
end

function gripCube(gripPos)
    -- check vision sensor 'Vsup'
    local gripQuat = sim.unpackTable(sim.readCustomDataBlock(topSensor, 'data'))
    --sim.addStatusbarMessage(string.format('direction: %f, %f, %f, %f',gripQuat[1], gripQuat[2], gripQuat[3], gripQuat[4]))

    -- at last we choose a direction to grip it
    sim.rmlMoveToPosition(ikTarget,-1,-1,nil,nil,ikMaxVel,ikMaxAccel,ikMaxJerk,gripPos,gripQuat,nil)
    wait(500)
    loosegripper(false)
end

function deliverCube(exchangePos, exchangeQuat)
    while true do -- wait for ur5r to finish receiving(clearing the doorRing)
        local s = sim.getIntegerSignal('doorRing')
        if s == nil then
            break
        end
        wait(500)
    end
    sim.rmlMoveToPosition(ikTarget,-1,-1,nil,nil,ikMaxVel,ikMaxAccel,ikMaxJerk,{exchangePos[1], exchangePos[2], exchangePos[3]+0.03}, exchangeQuat,nil)
    loosegripper(true)
    -------------------------------------------------------------------------
    -- finally, ur5l delievered a cube to the platform and now needs to
    -- send a signal to notify ur5r to get it
    -------------------------------------------------------------------------
    sim.setIntegerSignal('doorRing', 1)
end

function sysCall_threadmain()
    -- Initialize some values:
    jointHandles={-1,-1,-1,-1,-1,-1}
    for i=1,6,1 do
        jointHandles[i]=sim.getObjectHandle('UR5_joint'..i)
    end

    ikGroupHandle=sim.getIkGroupHandle('UR5L_ik')
    ikTip=sim.getObjectHandle('UR5L_ikTip')
    attachPoint = sim.getObjectHandle('RG2_attachPoint')
    ikTarget=sim.getObjectHandle('UR5L_ikTarget')
    exchange=sim.getObjectHandle('exchangePos')
    waitHandle = sim.getObjectHandle('waitPosL')
    topSensor=sim.getObjectHandle('Vsup')

    -- Set-up some of the RML vectors:
    ikMaxVel={0.4,0.4,0.4,1.8}
    ikMaxAccel={0.8,0.8,0.8,0.9}
    ikMaxJerk={0.6,0.6,0.6,0.8}

    local waitPos = sim.getObjectPosition(waitHandle,-1)
    local waitQuat = sim.getObjectQuaternion(waitHandle,-1)
    local gripPos = sim.getObjectPosition(ikTarget,-1)
    local gripQuat = sim.getObjectQuaternion(ikTarget,-1)
    local exchangePos = sim.getObjectPosition(exchange, -1)
    local exchangeQuat = sim.getObjectQuaternion(exchange,-1)

    enableIk(true)
    if sim.getSimulationState()~=sim.simulation_advancing_abouttostop then
        loosegripper(true)
        while true do
            backToWait(waitPos, waitQuat)
            sim.waitForSignal('beltRing')   -- block for beltRing, ifso grip cube
                                            -- and clear signal for next waiting
            gripCube(gripPos)
            backToWait(waitPos, waitQuat)
            sim.clearIntegerSignal('beltRing')
            deliverCube(exchangePos, exchangeQuat)
        end
    end
    enableIk(false)
end
UR5R:
右臂同样也是一个ur5机械臂,执行一个子线程脚本。将物块从中台上取出,并且将物块翻转,然后按照特定的位置放到平板上。
- 右机械臂同样包含三个位置:
exchangePos、waitPos、startPos,交换点是右臂从中台抓取物块的点,等待点做与左臂的交互工作,开始点是展示平板上的开始摆放的位置 - 仿真开始,机械臂运动到等待位置
waitPos,等待ur5l的完成信号doorRing; - 执行抓取过程,机械臂运动到
exchangePos,并且读中台带视觉传感器的位姿数据,以精确的姿势抓取物块; - 判断当前码垛的层数,若该层为偶数层则将物块倒向抓取;
- 回到
waitPos,并清除信号doorRing; - 将物块放置到中台
startPos,并添加合适的偏置; - 回到2,结束此次循环;
核心代码:(代码中的码垛层数与上面的层数不一致)
local workPos = {}
local workQuat = startQuat
local Floor = 0 -- the floor of 3*3 grids, place cubes face up
				-- when it's odd, face down when even
local Floor_height = 0.051
while true do
    for i=1,#xy_table,1 do
        backToWait(waitPos, waitQuat)
        sim.waitForSignal('doorRing')   -- block for doorRing, ifso grip cube
        								-- and clear signal for next waiting
        wait(1500)
        -- grip the cube
        gripCube(exchangePos)

        -- make cube face down when the floor is even
        workPos = {startPos[1]+xy_table[i][1], startPos[2]+xy_table[i][2], startPos[3] + Floor*Floor_height}
        if Floor%2 == 1 then
            makeCubeUpsideDown(exchangePos)
            workPos = {startPos[1]+xy_table[i][1], startPos[2]+xy_table[i][2]+0.0006, startPos[3] + Floor*Floor_height}
        end
        -- clear the signal emitted by ur5l, now ut5l can deliver cube to platform
        sim.clearIntegerSignal('doorRing')

        -- rg2 back to wait pos
        backToWait(waitPos, waitQuat)

        -- rg2 diliver cube and place it well
        deliverCube(workPos, workQuat)
    end
    Floor = Floor + 1
end
偶数层倒向码垛处理办法:
由于是4×9的码垛规格,第一层的物块可以按中台的姿势直接进行摆放,但是第2、4层的物块就要求面朝下摆放。此时的处理便是:在中台将物块由朝上变成躺平,然后再抓取物块的底部,最后便可以按照一样的目标位姿摆放第二层的物块。
(有一个重要的点就是,在手抓旋转的时候一定要按照原路转回去,否则旋转角度一直累加便会超限)
转换代码:
function makeCubeUpsideDown(workPos)
    --rotate rg2 faced left horizon and loose gripper
    local temp = {0,-math.sqrt(2)/2,0,math.sqrt(2)/2}
    sim.rmlMoveToPosition(ikTarget,-1,-1,nil,nil,ikMaxVel,ikMaxAccel,ikMaxJerk,{workPos[1], workPos[2], workPos[3]+0.03},temp,nil)
    loosegripper(true)

    -- then make it above cube, grip cube and rotate 180
    temp = {0,0,0,1}
    sim.rmlMoveToPosition(ikTarget,-1,-1,nil,nil,ikMaxVel,ikMaxAccel,ikMaxJerk,{workPos[1], workPos[2], workPos[3]},temp,nil)
    loosegripper(false)
    pendingForGripper(attchPoint)
    -- WARNING:In order to avoid the rotation joint of the hand from
    -- exceeding the limit, it must be returned in the original way
    temp = {0,0,math.sqrt(2)/2,-math.sqrt(2)/2} -- {0,0,math.sqrt(2)/2,math.sqrt(2)/2}
    sim.rmlMoveToPosition(ikTarget,-1,-1,nil,nil,ikMaxVel,ikMaxAccel,ikMaxJerk,{workPos[1], workPos[2], workPos[3]+0.03},temp,nil)
    temp = {0,0,-1,0}
    sim.rmlMoveToPosition(ikTarget,-1,-1,nil,nil,ikMaxVel,ikMaxAccel,ikMaxJerk,{workPos[1], workPos[2], workPos[3]+0.03},temp,nil)
    loosegripper(true)

    -- again rg2 faced left horizon and in this case griper reach to the butt of cube ^^
    temp = {0,0,math.sqrt(2)/2,-math.sqrt(2)/2}
    sim.rmlMoveToPosition(ikTarget,-1,-1,nil,nil,ikMaxVel,ikMaxAccel,ikMaxJerk,{workPos[1], workPos[2], workPos[3]+0.03},temp,nil)
    temp = {0,0,0,1}
    sim.rmlMoveToPosition(ikTarget,-1,-1,nil,nil,ikMaxVel,ikMaxAccel,ikMaxJerk,{workPos[1], workPos[2], workPos[3]+0.03},temp,nil)
    temp = {0,-math.sqrt(2)/2,0,math.sqrt(2)/2}--{math.sqrt(2)/2,0,-math.sqrt(2)/2,0}
    sim.rmlMoveToPosition(ikTarget,-1,-1,nil,nil,ikMaxVel,ikMaxAccel,ikMaxJerk,{workPos[1], workPos[2], workPos[3]},temp,nil)
    loosegripper(false)
    pendingForGripper(attchPoint)
    temp = {0,0,0,1}
    sim.rmlMoveToPosition(ikTarget,-1,-1,nil,nil,ikMaxVel,ikMaxAccel,ikMaxJerk,{workPos[1], workPos[2], workPos[3]+0.03},temp,nil)
    wait(500)
end
常见bug解决:
物块无法咬合bug:
期望的是物块倒置的时候两个工件是能够咬合的,但是由于模型(设置)的问题,在Bullet引擎下它们会悬浮在交合面处,即是给上方一个力它也会迅速弹开。目前还没有找到原因
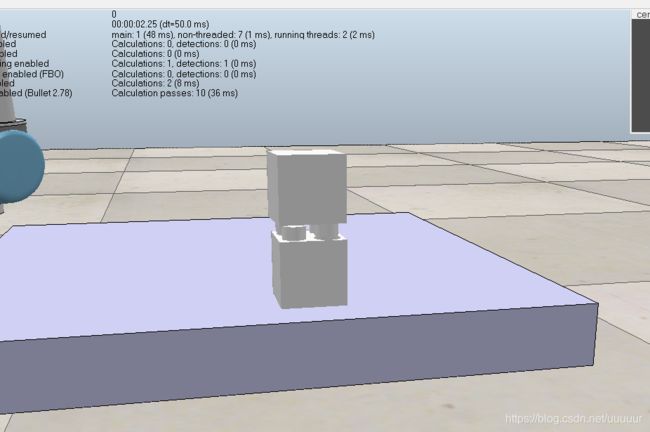
有两个解决办法:
- 将引擎设置成
ODE引擎便能实现咬合(但是即使咬合了仍会在莫名其妙的时候弹开); - 在右臂释放时将物块设置成
not dynamic模式,即此时物块不参与引擎的碰撞检测。这种方法十分稳固。见RG2的抓取
物块莫名其妙的粘在手抓上bug:
手抓在释放物块时偶尔可以看到即使物块已经脱离ur5的绑定(属于世界的子类),但是它仍然“粘”在手抓上。
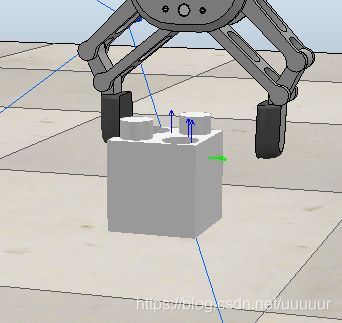
引擎问题,不论是使用的绑定为子类的抓取方法还是力控的抓取方法,都有可能出现这个问题。在抓取的时候尽量保证与抓取面平行就好。
有一个解决办法:
- (绑定为子类的抓取)将物块设置成子类时,手抓中距离传感器的阈值设置的比物块大即可。换言之,就是在手抓还没有完全接触到物块时就设置成子类就行了。
handleVisionSensor函数无法得到packet2/3等的bug:
写的时候碰到了个很头疼的问题,在调用handleVisionSensor之时只能获取到res和packet1,也就是检测数和默认打包的参数,而自己处理后返回的参数无法得到。使用readVisionSensor也是如此。

其实这完全就不是一个bug,观察能够获取到的packet1就可知,返回的packet是需要解码的,因此,我们在sysCall_vision中返回的packet2/3等就需要先编码后才能return。
在不知道这一点的情况下有一种解决办法:
- 使用
dataBlock,即数据块存储;
总结
制作时长:5-6D
工程文件也同步分享了出来:https://download.csdn.net/download/uuuuur/12722192