unity 资源管理器 AssetBundle
对于资源管理的理解
什么是资源管理?我的理解是按照一个既定的规则去将游戏中需要用到的资源进行分类、整理,然后提供统一的接口,让玩家在游戏中可以方便的加载调用资源。基于这个准则,就对资源管理器的框架有了一个初步的构想。
资源管理器目标:
制定一个资源存放的规则,包含资源命名、资源存储路径、路径命名等。
提供统一的资源动态加载的接口(AssetBundle和Resources文件夹下的资源的动态加载)
这只是第一版,所以比较简单,后面还会继续更新,在具体实现这个资源管理器之前,我们必须对AssetsBundle有一定的了解先。
为什么要使用AssetBundle?
Unity提供了两种动态加载资源的方式,分别是Resource.Load、和AssetBundle。我们先分别介绍下这两种加载方式的优缺点。
Resouce.Load的优缺点:
优点:
使用方便。只需要把资源放在Resources文件夹下,无需额外操作,就可以使用Resource.Load动态的加载资源。
好像就只有方便在这一个优点了。
缺点:
Resources文件夹存储过多之后,会增加程序的启动时间。
增加了多平台资源替换的难度。
Resources具体的内容可以查看这个博客:https://blog.csdn.net/qq_21397217/article/details/80542155
AssetBundle的优缺点:
优点:
可以放在服务器,供游戏运行时下载使用,降低了初始包的大小。
热更新
可以使用LZMA和LZ4压缩算法,减少包的大小
缺点:
使用起来相对于Resource文件,要繁琐一点,需要先打包,然后再加载使用。
会有一些坑,但是现在应该很多坑都已经填好了(使用不多,暂时还没遇到过什么坑)
综上所述,除非在Editor模式下,最终包都不推荐使用Resource.Load()去动态的加载资源。下面就来简要的介绍一下AssetsBundle的使用过程(比较浅)。
AssetBundle打包
手动设置AssetBundle名称
在打包之前,我们需要先设置为资源设置AssetBundle,在inspector视图底部,找到AssetBundle选项,默认是None,如图:
第一个参数是AB包的名称,第二个参数是别名(后缀)。AssetBundle名称不区分大小写,打包的时候都会转为小写,相同名称的资源,会被打在一个AssetBundle包里。
使用脚本自动为资源添加AssetBundle名称
我们先将我们需要打包的资源放到指定文件夹。可以将同一个AB包里的资源放在同一个文件夹下,然后获取该文件夹下所有的资源,并为其设置AssetBundle名称,核心代码如下:
///
/// 删除所有AssetBundleName
///
public static void ClearAssetBundlesName()
{
    int length = AssetDatabase.GetAllAssetBundleNames().Length;
    string[] oldAssetBundleNames = new string[length];

    for (int i = 0; i < length; i++)
    {
        oldAssetBundleNames[i] = AssetDatabase.GetAllAssetBundleNames()[i];
    }

    for (int j = 0; j < length; j ++)
    {
        AssetDatabase.RemoveAssetBundleName(oldAssetBundleNames[j], true);
    }
    Debug.LogError("已经成功删除项目中所有已设置的AssetBundleName");
}

///
/// 为资源重新设置AssetBundleName
///
public static void ReSetAssetBundlesName(string path, string abName, string abVariant)
{
    AssetImporter asset = AssetImporter.GetAtPath(path); // 把一个目录的对象检索为AssetImporter

    if (asset)
    {
        asset.assetBundleName = abName;      //设置Bundle文件的名称
        asset.assetBundleVariant = abVariant;  // 设置Bundle文件的扩展名
        asset.SaveAndReimport();    // 保存设置,并重新导入资源
    }
    else
    {
        Debug.LogError("获取该资源失败" + file.FullName);
    }

    AssetDatabase.Refresh();
}
打包
据说以前打包AssetBundle巨麻烦(我还年轻,没有经历过那个时代),现在精简为两个接口。
// 方法一:BuildPipeline.BuildAssetBundle,将指定资源集合打包
Obsolete public static bool BuildAssetBundle(Object mainAsset, Object[] assets, string pathName, BuildAssetBundleOptions assetBundleOptions, BuildTarget targetPlatform);
Obsolete public static bool BuildAssetBundle(Object mainAsset, Object[] assets, string pathName, out uint crc, BuildAssetBundleOptions assetBundleOptions, BuildTarget targetPlatform);

// 方法二:BuildPipeline.BuildAssetBundles,打包所有设置了AssetBundle的资源
public static AssetBundleManifest BuildAssetBundles(string outputPath, BuildAssetBundleOptions assetBundleOptions, BuildTarget targetPlatform);
我比较懒,所以直接使用了第二个函数去打包。具体打包代码如下:
[MenuItem("Assets/Build AssetBundles")]
void static Build()
{
    BuildTarget buildTarget = BuildTarget.StandaloneWindows;
    string buildPath = Path.Combine(Application.streamingAssetsPath, buildTarget.ToString());

    // 若路径不存在则创建
    if (!Directory.Exists(buildPath))
    {
        Directory.CreateDirectory(buildPath);
    }

    // 打包
    BuildPipeline.BuildAssetBundles(buildPath, BuildAssetBundleOptions.None, buildTarget);
    AssetDatabase.Refresh();
}
备注:MenuItem可以在Assets菜单下面添加一个菜单项——Build AssetBundles
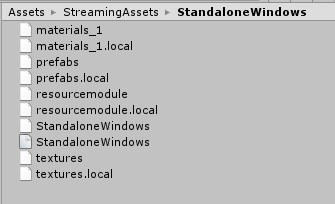
到这里我们就打包完成了,可以在我们设置的路径 [streamingAssetsPath/StandaloneWindows] 下看到我们刚刚打包的资源文件。
AssetsBundle 加载
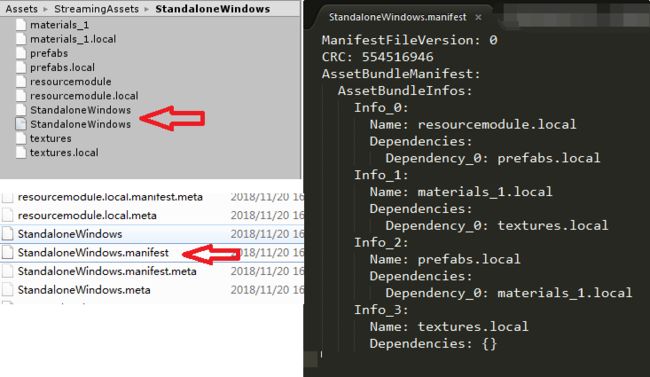
每次打包AssetBundle包,都会自动创建一个与文件夹名字相同的AssetBundle,这个AssetBundle存储这次打包的所有AssetBundle依赖信息。如下图:
我们在加载一个AssetBundle之前,需要先将其相关的依赖给加载进来,比如当我们要加载一个模型,则需要先将其材质和贴图加载进来,否则材质就是丢失,当然如果我们全部打包在一个文件夹中,就不会有这些问题了。
所以在加载资源之前,我们先要加载上图所示的依赖包StandaloneWindows。具体代码如下所示:
///
/// 获取 AssetBundleManifest
///
/// ("AssetBundleManifest");
return _abManifest;
}
加载完依赖包之后,我们就可以开始加载AssetBundle了。代码如下
///
/// 加载 AssetBundle,同时加载所有的依赖
///
///
///
/// 只加载需要加载的 AssetBundle,不加载对应的依赖
///
///
/// 最后,再从或得到的AssetBundle中加载我们需要的资源:
///
/// 同步 从指定AssetsBundle中加载资源
///
/// (string assetbundleName, string assetsName) where T : Object
{
AssetBundle bundle = LoadAssetBundleWithAllDependencies(assetbundleName);
if (bundle == null)
{
Debug.LogError(string.Format("不存在路径为{0}的AssetBundle!!!", assetbundleName));
return null;
}
return bundle.LoadAsset(assetsName);
}
///
/// 异步 从指定AssetsBundle中加载资源
///
/// (string assetbundleName, string assetsName, System.Action onFinish) where T : Object
{
CoroutineManager.Instance.AddTask(LoadAssetBundleWithAllDependenciesAsync(assetbundleName, (bundle) =>
{
CoroutineManager.Instance.AddTask(LoadAssetsFromBundleAsync(bundle, assetsName, onFinish));
}));
}
///
/// 异步 从指定AssetsBundle中加载资源
///
///
/// (AssetBundle bundle, string assetsName, System.Action onFinish) where T : Object
{
if (bundle == null)
{
onFinish(null);
yield break;
}
AssetBundleRequest request = bundle.LoadAssetAsync(assetsName);
yield return request;
if (onFinish != null)
onFinish(request.asset as T);
}
到这里,AssetBundle的初步使用就介绍完了。

