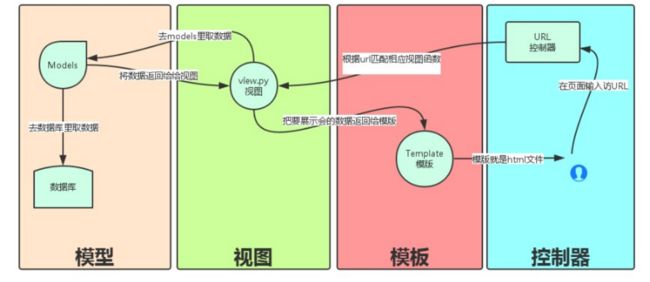
一、一般流程
- 用户输入 URL。
- 基于正则的 URL 分发器会匹配相应的视图。
- 视图去模型那取数据。
- 视图对数据进行处理。
- 视图把数据传给模板。
- 模板渲染出网页。
二、基本配置
1. 创建
- 创建项目:django-admin startproject projectname
- 创建应用:python manage.py startapp appname
2. 项目目录
projectname
 │  manage.py    // 管理项目
 │
 ├─appname      // 一个 APP,也是一个包
 │  │  admin.py    // 在后台管理模型
 │  │  apps.py      // 配置 APP
 │  │  models.py  // 模型
 │  │  tests.py
 │  │  views.py    //视图
 │  │  __init__.py
 │  │
 │  └─migrations    // 与数据库迁移有关
 │          __init__.py
 │
 └─projectname  // 与项目名相同的 APP
       settings.py    // 整个项目的配置
       urls.py          // 整个项目的路由配置
       wsgi.py
       __init__.py
3. 静态文件
- 在项目根目录下创建 static 目录。
- 在 settings.py 下添加 STATICFILES_DIRS。
# settings.py

STATIC_URL = '/static/'   # 默认已添加,使用静态文件时的前缀
STATICFILES_DIRS = [      # 静态文件搜索路径
        os.path.join(BASE_DIR,'static'),
    ]

# static 模板标签位于 django.contrib.staticfiles 应用下的 staticfiles 模块
# 且 staticfiles 应用已默认注册了
{% load staticfiles %}
4. 模板文件
- 在项目根目录下创建 templates 目录。
- 在 settings.py 中添加到 TEMPLATES 中的 DIRS 。
三、路由
每个 URL 都应以 / 结尾。
直接捕获 URL 中的值,用括号括起来,当做位置参数传入视图。
url(r'^(\d{4}/$)', views.index)对应的视图函数index(request, year)用正则分组来匹配 URL,类似默认参数传递给视图(参数名必须和组名相同)。
url(r'^(?P对应的视图函数是\d{4}/$)', views.index) index(request, year)。对某模式 URL 把字典参数传给视图,类似默认参数(参数名必须与键名相同)。
url(r'^(?P对应\d{4})/$', views.index, {'foo': 'bar'}) index(request, year, foo)。二级路由:在项目路由中添加
path('app/', include('app.urls'))。模板标签
url可以解析视图得到 url 模式,并传入值构造出 url。
url(r'^archives/(?P\d{4})/(?P\d+)/$', views.archives, name='archives')

{% for date in date_list %}
- 通过调用自身方法构造 URL。
# 模板中:
href="{{ post.make_post_url }}"

# Post 模型中:
def make_post_url(self):
      return reverse('app:post', kwargs={'pk': self.pk}

# app 中的 urls.py
app_name = app
...
url(r'^post/(?P\d+)/$', views.post, name='post')
四、视图
HTTP 请求中有两个核心对象:HttpRequest、HttpResponse
1. HttpRequest 对象
就是视图函数的第一个参数 request,有许多属性。
# views.py
def index(request):
    fmt = 'path: {}---method: {}---COOKIES: {}'
    return HttpResponse(fmt.format(request.path, request.method, request.COOKIES))

# 页面显示
path: /app/---method: GET---COOKIES: {}
2. HttpResponse 对象
视图函数的返回值必须是一个 HttpResponse 对象。
3. render 函数
该函数返回的就是一个 HttpResponse 对象。
两个位置参数:request,template_name。
一个常用的默认参数:context=None。
五、模型
内容有点多,故另起一文。
详见:https://www.jianshu.com/p/7c514a9c348d
六、模板
1. 模板的执行
从视图中的 context 获取数据,传给模板。
# views.py
from django.shortcuts import render

def index(request):
    context = {'title': 'Hello', 'welcome': 'Django'}
    return render(request, 'index.html', context=context)

# index.html


    {{ title }}


{{ welcome }}
2. 模板语言
- 除了 item 用 {{ }},其他含 Python 关键字的用 {% %} 括起来。
- 字典数据类型的取值是通过 dict.xxx,而不是 dict[xxx] 。
- 每个实例都会自动添加 pk 属性,为主键值。
- 常见模板语言:
{{ item }}
{% if xxx %} {% else %} {% endif %}
{% for item in item_list %} {{ item }} {% empty %}{% endfor %}
forloop.counter
forloop.first
forloop.last母板:{% block title %}{% endblock %}
子板:{% extends "base.html" %}
{% block title %}{% endblock %}帮助方法:
{{ item.event_start|date:"Y-m-d H:i:s"}}
{{ bio|truncatewords:"30" }}
{{ my_list|first|upper }}
{{ name|lower }}
3. 自定义标签
为了在模板语言中做一些复杂操作。有两种:simple_tag、filter 。
simple_tag:任意传递参数,但是不能用作布尔判断。
filter:最多只能传递二个参数,可以用作布尔判断。
具体步骤如下:
a. 在已注册的 app 下创建一个 templatetags 包。具体目录如下:
app/      # app 应用
    __init__.py
    models.py
    templatetags/    # templatetags 包
        __init__.py
        mytag.py    # 自定义标签模块,相应的用法:{% load mytag %}
    views.py
b. 需要有一个叫 register 的全局变量使标签生效。
from django import template

register = template.Library()
c. 注册自定义标签
@register.simple_tag
def myadd(a, b, c):
    return  a + b + c
d. 使用标签,先 load 再使用。
{% load mytag %}
...
{% myadd 3 4 5 %}  # 参数之间用空格隔开,而不是逗号。
e. 如果函数返回的是一个序列,用 as 把值存起来,再 for 循环。
{% recent_post as posts %}
{% for post in posts %}
-
{{post.title}}
{% endfor %}
参考文档:
https://www.cnblogs.com/LiCheng-/p/6920900.html
https://docs.djangoproject.com/en/2.0/howto/custom-template-tags/#custom-template-tags-and-filters

