Tensorflow学习笔记(五)深度前馈神经网络
一、神经元与全连接
w代表神经元的参数,为权重;
w右上角的(a)a为数字代表第几层(从第几层开始),右下角a,b…代表路径,如w1,2代表第一个输入单元至下一层的第二个单元。
x代表输入值;
右下角的数字标识为输入的单元的排序,1就是第一个。
y代表输出值;
一个神经元可以有多个输入,一个输出;
每个神经元的输入可以来自其他神经元的输出;
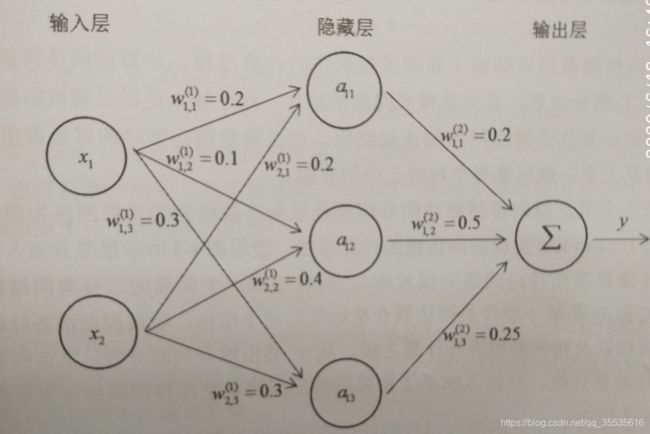
图中输出为:
y=[0.2x1 + 0.2x2]a110.2 + [0.1x1 + 0.4x2]a120.5 + [0.3x1 + 0.3x2]a130.25
二、前向传播算法
一个前向传播算法主要包含以下信息:
①、神经网络的输入(经过提取的特征向量数据)
②、神经网络的连接结构(权重)
③、每个神经元的参数(如上图中系数a)
上图示例程序如下:
import tensorflow as tf
tf.compat.v1.disable_eager_execution()
x = tf.constant([0.9,0.85],shape = [1,2])
w1 = tf.Variable(tf.constant([[0.2,0.1,0.3],[0.2,0.4,0.3]],shape = [2,3]),name = "w1")
w2 = tf.Variable(tf.constant([0.2,0.5,0.25],shape = [3,1]),name = "w2")
b1 = tf.constant([-0.3,0.1,0.2],shape=[1,3],name= "b1")
b2 = tf.constant([-0.3],shape=[1],name= "b2")
init_op = tf.compat.v1.global_variables_initializer()
a = tf.matmul(x,w1)+b1
y = tf.matmul(a,w2)+b2
with tf.compat.v1.Session() as sess:
    sess.run(init_op)
    print(sess.run(y))
结果如下:
......
......
......
Skipping registering GPU devices...
2020-06-19 21:22:19.879160: I tensorflow/core/platform/cpu_feature_guard.cc:143] Your CPU supports instructions that this TensorFlow binary was not compiled to use: AVX2
2020-06-19 21:22:19.893234: I tensorflow/compiler/xla/service/service.cc:168] XLA service 0x1cf9067aee0 initialized for platform Host (this does not guarantee that XLA will be used). Devices:
2020-06-19 21:22:19.893796: I tensorflow/compiler/xla/service/service.cc:176]   StreamExecutor device (0): Host, Default Version
2020-06-19 21:22:19.894327: I tensorflow/core/common_runtime/gpu/gpu_device.cc:1102] Device interconnect StreamExecutor with strength 1 edge matrix:
2020-06-19 21:22:19.894750: I tensorflow/core/common_runtime/gpu/gpu_device.cc:1108]
[[0.15625]]
程序二:
import tensorflow as tf
tf.compat.v1.disable_eager_execution()
x = tf.constant([0.9,0.85],shape=[1,2])
w1 = tf.Variable(tf.compat.v1.random_normal([2,3],stddev=1,seed=1),name= "w1")
w2 = tf.Variable(tf.compat.v1.random_normal([3,1],stddev=1,seed=1),name= "w2")
#这里使用了随机种子参数,保证每次运行得到的结果是一样的
b1 = tf.Variable(tf.zeros([1,3]))
b2 = tf.Variable(tf.ones([1]))
init_op = tf.compat.v1.global_variables_initializer()
a = tf.matmul(x,w1)+b1
y = tf.matmul(a,w2)+b2
with tf.compat.v1.Session() as sess:
    sess.run(init_op)
    print(sess.run(y))

结果如下:
.....
.....
.....
Skipping registering GPU devices...
2020-06-19 21:14:18.566467: I tensorflow/core/platform/cpu_feature_guard.cc:143] Your CPU supports instructions that this TensorFlow binary was not compiled to use: AVX2
2020-06-19 21:14:18.581795: I tensorflow/compiler/xla/service/service.cc:168] XLA service 0x166642a71c0 initialized for platform Host (this does not guarantee that XLA will be used). Devices:
2020-06-19 21:14:18.582376: I tensorflow/compiler/xla/service/service.cc:176]   StreamExecutor device (0): Host, Default Version
2020-06-19 21:14:18.582921: I tensorflow/core/common_runtime/gpu/gpu_device.cc:1102] Device interconnect StreamExecutor with strength 1 edge matrix:
2020-06-19 21:14:18.583337: I tensorflow/core/common_runtime/gpu/gpu_device.cc:1108]
[[5.422497]]
关于获取节点取值:
a(1) = X*W(1)+b(1)
其中X是输入单元组成的向量,W(1)是权重参数组成的矩阵,如上图有x→a1的过程有六个权重参数,按照输入单元的数量和神经元单元的数量可以分成2行三列的矩阵。
关于二分类问题的个人理解(有错误后期会修正):
对于实际应用中,在上述图中,y代表输出,通常作为最后的指标,假设y是一个百分比指标,我们把90%作为判断标准,y超过百分之90则为合格,否则则为不合格,因此,若y=0.92则产品合格。而我们无法直接测量获得这个所谓的y指标。但是,实际上我们可以测量得到和y相关的另外两个指标。比如,要算一个铁块的密度,我们无法直接测量,但是我们可以测量这个铁块的重量和体积,而重量和体积就是两个指标,在上述模型中构成X,接下来的过程就是如何利用W→a(1)→这一过程将X转化成y。简单将就是线性运算。
三、前向传播算法局限性
作为线性模型,当特征数据分布情况比较复杂的时候,线性模型就是去了分类能力。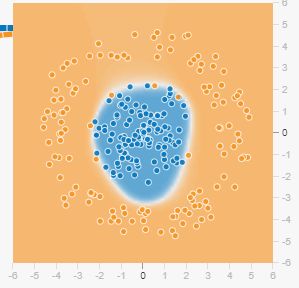
无法正确的把噪音点分类。
使用激活函数可以使线性模型变得非线性化。
四、激活函数
将每个神经元的节点通过一个非线性函数,整个神经网络的模型就不是非线性的了。
这个非线性函数我们通常称作激活函数。
1、ReLU激活函数
定义:max{0,z}在输入和0之间取最大值。

整流线性单元。
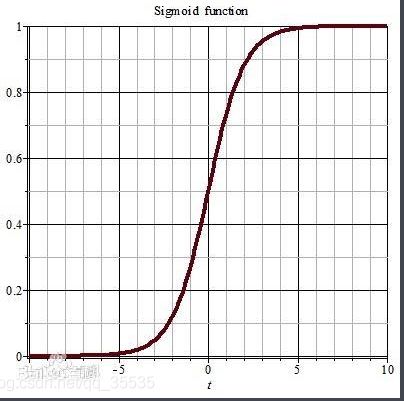
2、sigmoid激活函数
定义:1/(1+exp(-z))
3、tanh(双曲正切函数)
定义:(1 - exp(-2z))/(1 + exp(-2z))
1 - 2sigmoid(z)=-tanh(z / 2)
4、relu6:和relu一样但是限制了最大输出值为
五、多层网络解决异或问题

即便增加了激活函数,也解决不了异或问题(没有办法通过x1去影响x2的系数值)
模拟训练结果如下:
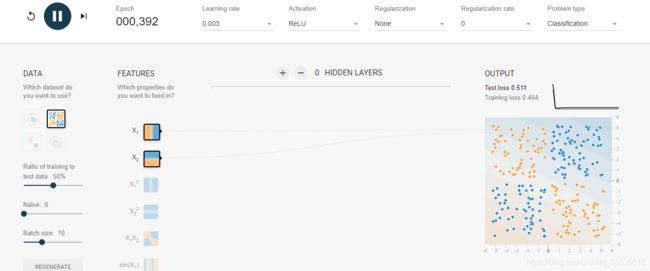
没有隐藏层的时候无法进行分类;
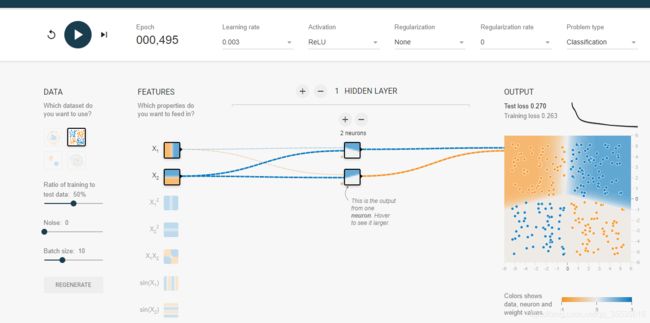
一层的情况;
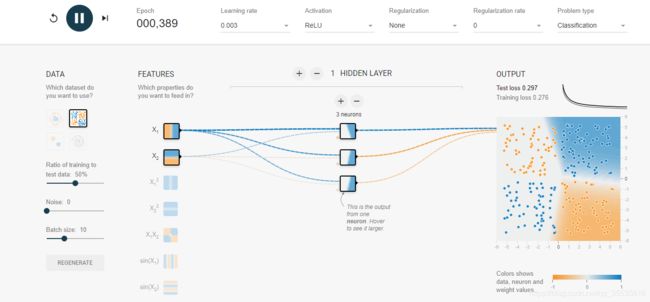
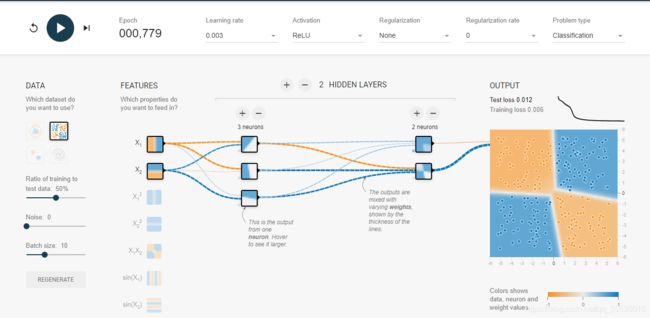
多层。
加入隐藏层后,这种分类问题就很好解决了。
总结:使用网络来组合提取出的特征能够解决特征向量不容易人工提取的问题,在一些复杂的应用场合中(图片识别,语音识别等)这样的方式提供了很大的帮助。
六、损失函数
香农熵:引用360百科的介绍进行说明。(转自:https://baike.so.com/doc/3291228-3467016.html)
马上要举行世界杯赛了。大家都很关心谁会是冠军。假如我错过了看世界杯,赛后我问一个知道比赛结果的观众"哪支球队是冠军"? 他不愿意直接告诉我, 而要让我猜,并且我每猜一次,他要收一元钱才肯告诉我是否猜对了,那么我需要付给他多少钱才能知道谁是冠军呢? 我可以把球队编上号,从 1 到 32, 然后提问: “冠军的球队在 1-16 号中吗?” 假如他告诉我猜对了, 我会接着问: “冠军在 1-8 号中吗?” 假如他告诉我猜错了, 我自然知道冠军队在 9-16 中。 这样最多只需要五次, 我就能知道哪支球队是冠军。所以,谁是世界杯冠军这条消息的信息量只值五块钱。
如一些或一个基因在不同组织材料中表达情况己知,但如何确定这些基因是组织特异性表达,还是广泛表达的,那我们就来计算这些基因在N个样本中的香农熵,结果越趋近于零,则表明它是一个越特异表达的基因,结果越趋近于log2(N)则表示它是一个广泛表达的基因。
变量的不确定性越大,熵也就越大,把它搞清楚所需要的信息量也就越大。
通常定义一件事情的信息量为:
I(x) = -log(P(x))
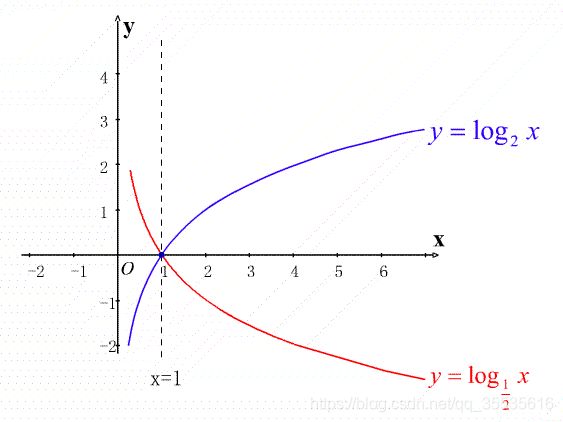
图为log的图像,描述信息量的时候取正,因此,log前取 “-” 。
其中P(x)为样本X的分布律。
而香农熵则取I(x)的期望总量为为结果:
H(X)= E[I(x)] = E[-log(P(x))]
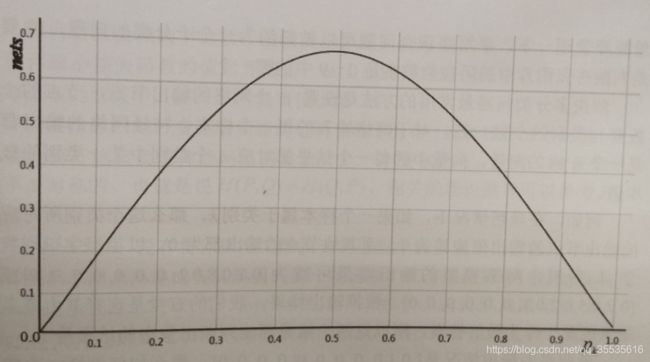
上图为香农熵随pk变化的规律。
香农熵可以理解为遵循一个分布的事件,所产生的期望信息总量。
确定的分布,香农熵越小,越接近均匀分布的分布香农熵越大。
验证推算:观察log图像,x越接近0则log函数的绝对值越大,x越接近1log的函数值越小;然而香农上不光雨log的值有关,同样和对应的pk有关,而总所周知,y = x 的变化速度 要远快于y = log(x)。因此,无论pk趋向1还是趋向0,[-log(P(x)*P(x)] 都是趋向于0的,而pk等于0.5时则为 [-log(P(x)*P(x)] 的最大值点,因此熵越大。
所以说越不确定的分布,它的概率越接近0.5,它的熵越大。
注意:香农熵处理的不是X,而是X样本对应的每个分布律,即概率。
若X是连续的,则称香农熵为微分熵。
交叉熵实例:
import tensorflow as tf
import numpy as np
tf.compat.v1.disable_eager_execution()
m = tf.constant([[1,2,1,1,1,3,5,6,4,1]],name = "m")
n = tf.constant([[0,2,5,1,3,5,8,9,9,4]],name = "n")
m1 = tf.compat.v1.bincount(m)
n1 = tf.compat.v1.bincount(n)
#计算整数中每一个值出现的次数
value1 = tf.reduce_sum(m1)
value2 = tf.reduce_sum(n1)
#对整个m,n进行求和得到的结果为每个常量内数据数量的总和
m11 = tf.divide(m1,value1)
n11 = tf.divide(n1,value2)
#用出现的次数除以总和得到的是每个数出现的概率
d = 10
d1 = np.float64(d)
#d和d1是用来辅助计算而设的,因为tf中log为自然对数,需要转化成我们需要的计算形式
s1 = tf.math.log(m11)/tf.math.log(d1)
#自然对数的转换
s11 = tf.clip_by_value(s1,-10,10)
#可以把一个张量的数值限定再某一个范围内,我的范围是随便取的,因为此例中log0是不存在的,如果不加以限制会出现错误
s2 = tf.math.log(n11)/tf.math.log(d1)
s22 = tf.clip_by_value(s2,-10,10)
d1 = tf.multiply(m11,s11)
d2 = tf.multiply(n11,s22)
#交叉熵计算第一步,概率×log概率
d11 = tf.reduce_sum(d1)
d22 = tf.reduce_sum(d2)
#交叉熵计算第二部,求和
with tf.compat.v1.Session() as sess:
    print(m,n)
    p = sess.run(m1)
    q = sess.run(n1)
    value11 = sess.run(value1)
    value22 = sess.run(value2)
    print(p,q,value1,value2,value11,value22)
    print(sess.run(s1),sess.run(s2))
    print(sess.run(s11))
    print(sess.run(n11),sess.run(m11))
    print(sess.run(d11),sess.run(d22))
#方便检查,把最后结果和中间关键步骤结果均显示出来
结果如下:
......
......
......
Skipping registering GPU devices...
2020-06-24 21:22:17.070080: I tensorflow/core/platform/cpu_feature_guard.cc:143] Your CPU supports instructions that this TensorFlow binary was not compiled to use: AVX2
2020-06-24 21:22:17.079637: I tensorflow/compiler/xla/service/service.cc:168] XLA service 0x27f844b0880 initialized for platform Host (this does not guarantee that XLA will be used). Devices:
2020-06-24 21:22:17.080004: I tensorflow/compiler/xla/service/service.cc:176]   StreamExecutor device (0): Host, Default Version
2020-06-24 21:22:17.080324: I tensorflow/core/common_runtime/gpu/gpu_device.cc:1102] Device interconnect StreamExecutor with strength 1 edge matrix:
2020-06-24 21:22:17.080590: I tensorflow/core/common_runtime/gpu/gpu_device.cc:1108]
Tensor("m:0", shape=(1, 10), dtype=int32) Tensor("n:0", shape=(1, 10), dtype=int32)
[0 5 1 1 1 1 1] [1 1 1 1 1 2 0 0 1 2] Tensor("Sum:0", shape=(), dtype=int32) Tensor("Sum_1:0", shape=(), dtype=int32) 10 10
[    -inf -0.30103 -1.      -1.      -1.      -1.      -1.     ] [-1.      -1.      -1.      -1.      -1.      -0.69897     -inf     -inf
 -1.      -0.69897]
[-10.       -0.30103  -1.       -1.       -1.       -1.       -1.     ]
[0.1 0.1 0.1 0.1 0.1 0.2 0.  0.  0.1 0.2] [0.  0.5 0.1 0.1 0.1 0.1 0.1]
-0.6505149978319904 -0.8795880017344073

Process finished with exit code 0
七、softmax回归
在分类问题中,将神经网络前向传播得到的结果变成概率分布提供给交叉熵损失函数进行计算常用softmax回归方法。
softmax的处理方法如下:

分子部分的i为softmax前的输出y,因此分子为e的y次方。
分母的部分为全部分子的求和。
上面的例程采用的就是这样的方法。
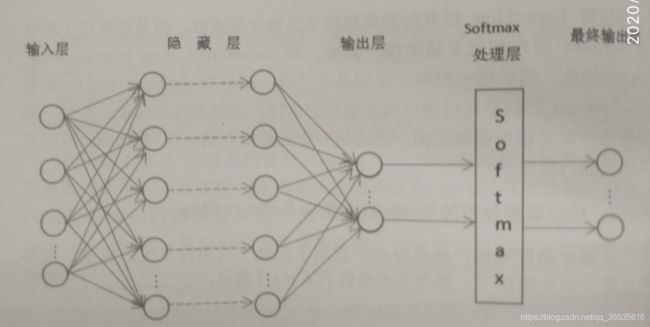
上图为加入softmax的全连接神经网络。
调用softmax的程序如下:
cross_entropy = tf.nn.softmax_cross_entropy_with_logits(y,y_)
#(logits, labels, name=None)logits为softmax前的输出y