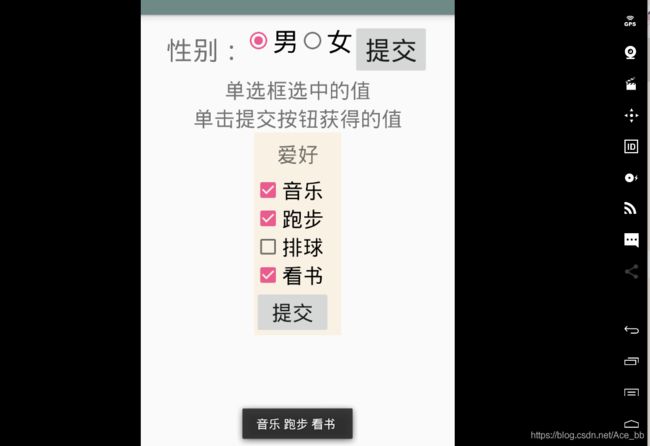
Android studio APP开发 单选框和复选框
单选框和复选框
单选按钮和复选按钮都是普通按钮Button的子类,所以可以使用所有Button的方法和属性。也有自己特有的属性方法
单选框
单选框就是在多个选项中只选择一个。 在Android中,单选按钮用RadioButton表示,而RadioButton类又是Button子类。
通常情况下,RadioButton组件需要与RadioGroup组件一起使用。
设置单选框
<LinearLayout xmlns:android="http://schemas.android.com/apk/res/android"
    android:orientation="horizontal"
    android:layout_width="fill_parent"
    android:layout_height="fill_parent"
    android:id="@+id/layout"
    android:padding="10dp"
    android:gravity="center_horizontal">

    <TextView
        android:layout_width="wrap_content"
        android:layout_height="wrap_content"
        android:text="性别:"
        android:height="45dp"
        android:textSize="30sp"/>

    <RadioGroup
        android:id="@+id/radioGroup1"
        android:layout_width="wrap_content"
        android:layout_height="wrap_content"
        android:orientation="horizontal">

        <RadioButton
            android:id="@+id/radio0"
            android:layout_width="wrap_content"
            android:layout_height="wrap_content"
            android:text="男"
            android:textSize="30sp"
            android:checked="true"/>
        <RadioButton
            android:id="@+id/radio1"
            android:layout_width="wrap_content"
            android:layout_height="wrap_content"
            android:text="女"
            android:textSize="30sp"/>
    </RadioGroup>

    <TextView
        android:id="@+id/button01"
        android:layout_width="wrap_content"
        android:layout_height="wrap_content"
        android:text="提交"
        android:textSize="30sp"/>
</LinearLayout>

android:checked 为指定选中状态,即设定一个默认选择的按钮。
获取单选框组中选中项的值
通常在以下两种情况下获取单选框组中选中项的值。
- 在改变单选框组的值时获取
- 在单击其他按钮时获取
获取单选框组选值的基本步骤如下:
- 找到这个单选框组。通过RadioGroup的id
- 调用setOnCheckedChangeListener方法,根据checkedId来获取被选中的单选按钮。
- 通过getText来获取单选按钮的值
- 进行其他操作
在改变单选框组的值时获取
为了能够清晰展示单选框选择的效果,添加了一个TextView来实时显示单选框获取的值。
修改后的布局管理器如下:
<LinearLayout xmlns:android="http://schemas.android.com/apk/res/android"
    android:orientation="vertical"
    android:layout_width="fill_parent"
    android:layout_height="fill_parent"
    android:id="@+id/layout"
    android:padding="10dp"
    android:gravity="center_horizontal">

    <LinearLayout
        android:layout_width="wrap_content"
        android:layout_height="wrap_content"
        android:orientation="horizontal">
        <TextView
            android:layout_width="wrap_content"
            android:layout_height="wrap_content"
            android:text="性别:"
            android:height="45dp"
            android:textSize="30sp"/>

        <RadioGroup
            android:id="@+id/radioGroup1"
            android:layout_width="wrap_content"
            android:layout_height="wrap_content"
            android:orientation="horizontal">

            <RadioButton
                android:id="@+id/radio0"
                android:layout_width="wrap_content"
                android:layout_height="wrap_content"
                android:text="男"
                android:textSize="30sp"
                android:checked="true"/>
            <RadioButton
                android:id="@+id/radio1"
                android:layout_width="wrap_content"
                android:layout_height="wrap_content"
                android:text="女"
                android:textSize="30sp"/>
        </RadioGroup>

        <TextView
            android:id="@+id/button01"
            android:layout_width="wrap_content"
            android:layout_height="wrap_content"
            android:text="提交"
            android:textSize="30sp"/>
    </LinearLayout>

    <TextView
        android:id="@+id/textshow"
        android:layout_width="wrap_content"
        android:layout_height="wrap_content"
        android:text="单选框选中的值"
        android:textSize="24sp"/>

    <TextView
        android:id="@+id/textshow1"
        android:layout_width="wrap_content"
        android:layout_height="wrap_content"
        android:text="单击提交按钮获得的值"
        android:textSize="24sp"/>
</LinearLayout>

在单选框改变时获取选值需要用到setOnCheckedChangeListener方法。在onCreate中的方法如下:
public class SecondActivity extends AppCompatActivity  {
    @Override
    protected void onCreate(@Nullable Bundle savedInstanceState) {
        super.onCreate(savedInstanceState);
        setContentView(R.layout.activity_second);
        RadioGroup sex = (RadioGroup) findViewById(R.id.radioGroup1);
        sex.setOnCheckedChangeListener(new RadioGroup.OnCheckedChangeListener() {
            @Override
            public void onCheckedChanged(RadioGroup group, int checkedId) {
                RadioButton r = (RadioButton) findViewById(checkedId);
                String str = r.getText().toString();
                TextView textView = (TextView) findViewById(R.id.textshow);
                textView.setText(str);
            }
        });
    }
}
单击其他按钮时获取
要获取单选按钮组中按钮的值,首先要做的就是在被点击的其他按钮的监听事件onClick中获取单选按钮组中选中按钮的id,再获得其值。获得id的过程可以通过for循环遍历所有单选框,根据isChecked()的方法判断按钮是否被选中,当被选中时,通过getText()来获取值。
代码实现如下:
public class SecondActivity extends AppCompatActivity  {
    @Override
    protected void onCreate(@Nullable Bundle savedInstanceState) {
        super.onCreate(savedInstanceState);
        setContentView(R.layout.activity_second);

        //在改变单选框组的值时获取
        final RadioGroup sex = (RadioGroup) findViewById(R.id.radioGroup1);
        sex.setOnCheckedChangeListener(new RadioGroup.OnCheckedChangeListener() {
            @Override
            public void onCheckedChanged(RadioGroup group, int checkedId) {
                RadioButton r = (RadioButton) findViewById(checkedId);
                String str = r.getText().toString();
                TextView textView = (TextView) findViewById(R.id.textshow);
                textView.setText(str);
            }
        });

        //单击其他按钮时获取
        Button button = (Button) findViewById(R.id.button01);
        button.setOnClickListener(new View.OnClickListener() {
            @Override
            public void onClick(View v) {
                String str1;
                for(int i=0;i<sex.getChildCount();i++){
                    RadioButton r = (RadioButton)sex.getChildAt(i);
                    if(r.isChecked()){
                        str1 = r.getText().toString();
                        TextView textView1 = (TextView) findViewById(R.id.textshow1);
                        textView1.setText(str1);
                        break;
                    }
                }
            }
        });
    }
}
复选框
复选框可以进行多项选择,每一个复选框都提供了选中和补选中两种状态。在Android 中,复选框用CheckBox()方法来表示,CheckBox()的子类是,所以可以直接使用Button来实现。
设置复选框
在之前的布局管理器中添加如下代码:
<LinearLayout
        android:layout_width="wrap_content"
        android:layout_height="wrap_content"
        android:orientation="vertical"
        android:background="@color/backLinear">

        <TextView
            android:layout_width="wrap_content"
            android:layout_height="wrap_content"
            android:textSize="24sp"
            android:text="爱好"
            android:width="100dp"
            android:height="50dp"
            android:gravity="center"/>

        <CheckBox
            android:id="@+id/hobby1"
            android:layout_width="wrap_content"
            android:layout_height="wrap_content"
            android:text="音乐"
            android:textSize="24sp"/>

        <CheckBox
            android:id="@+id/hobby2"
            android:layout_width="wrap_content"
            android:layout_height="wrap_content"
            android:text="跑步"
            android:textSize="24sp"/>

        <CheckBox
            android:id="@+id/hobby3"
            android:layout_width="wrap_content"
            android:layout_height="wrap_content"
            android:text="排球"
            android:textSize="24sp"/>

        <CheckBox
            android:id="@+id/hobby4"
            android:layout_width="wrap_content"
            android:layout_height="wrap_content"
            android:text="看书"
            android:textSize="24sp"/>
        <Button
            android:id="@+id/button02"
            android:layout_width="wrap_content"
            android:layout_height="wrap_content"
            android:text="提交"
            android:textSize="24sp"/>
    </LinearLayout>
在Activity中添加如下两种方法。并且在onCreate中调用。
为了不让Activity中的代码看起来很乱,所以写在一个方法里。
 public void checkBox_button(){

        final CheckBox hobby01 = (CheckBox) findViewById(R.id.hobby1);
        final CheckBox hobby02 = (CheckBox) findViewById(R.id.hobby2);
        final CheckBox hobby03 = (CheckBox) findViewById(R.id.hobby3);
        final CheckBox hobby04 = (CheckBox) findViewById(R.id.hobby4);
        Button button = (Button) findViewById(R.id.button02);
        hobby01.setOnCheckedChangeListener(checkBox_listener);
        hobby02.setOnCheckedChangeListener(checkBox_listener);
        hobby03.setOnCheckedChangeListener(checkBox_listener);
        hobby04.setOnCheckedChangeListener(checkBox_listener);

        button.setOnClickListener(new View.OnClickListener() {
            @Override
            public void onClick(View v) {
                String hob = "";
                if(hobby01.isChecked()){
                    hob += hobby01.getText().toString() + " ";
                }
                if(hobby02.isChecked()){
                    hob += hobby02.getText().toString() + " ";
                }
                if(hobby03.isChecked()){
                    hob += hobby03.getText().toString() + " ";
                }
                if(hobby04.isChecked()){
                    hob += hobby04.getText().toString() + " ";
                }
                Toast.makeText(SecondActivity.this,hob,Toast.LENGTH_SHORT).show();
            }
        });
    }
    private CompoundButton.OnCheckedChangeListener checkBox_listener = new CompoundButton.OnCheckedChangeListener() {
        @Override
        public void onCheckedChanged(CompoundButton buttonView, boolean isChecked) {
            if(isChecked){
                Toast.makeText(SecondActivity.this,buttonView.getText().toString(),Toast.LENGTH_SHORT).show();
            }
        }
    };


