做一个天气小程序(界面)————(2020.2.4学习笔记)
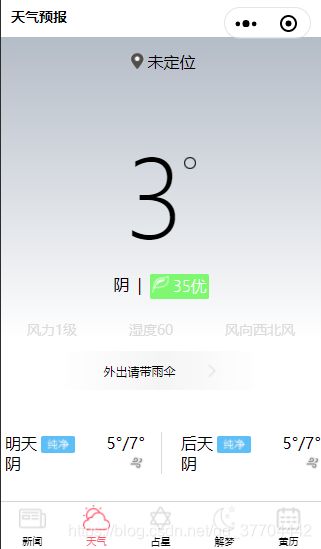
首先放出成果图,代码和图片素材
成果图

图片素材链接 https://pan.baidu.com/s/11Xt38DkO5thlojWm7UFCFA
提取码:t4ov
代码(包含了需要用到的自定义组件的代码)链接 https://pan.baidu.com/s/1GgOOKj-XHSNunUt24Td-jA
提取码:hllr
----------------------------------------手动分割线-------------------------------------------
接下来,具体谈一下实现的思路与过程,以自上而下顺序来看,我们第一个要实现的就是自定义标题栏,详情见我以前的学习笔记(https://blog.csdn.net/qq_37704442/article/details/104127628),所以这里我们就先跳过了,跳过自定义标题栏之后,紧接着来的就是,灰色渐变背景,实现这个渐变背景很简单,可以先创建一个view组件,然后设置组件样式,再给样式设置一个颜色变量,就能让背景颜色随着当前天气变化(代码如下)
wxml中的代码
<view class="Weather_Header" style='background: linear-gradient({{Weather_Style_Header}},#FFFFFF);'>
<view>
wxss中的代码
.Weather_Header{
   display: flex;

   width: 100%;
   flex-direction: column;

}
JS中的代码
const Weather_Style_Header_Type=[
  '#B4BCC7','#8699f6','#f2f894','#f58677'
]//#B4BCC7是浅灰色,#94d3f8是深蓝色,#f2f894是浅黄色,#f58677是浅红色
page({
data{
  Weather_Style_Header:Weather_Style_Header_Type[0],
}
})
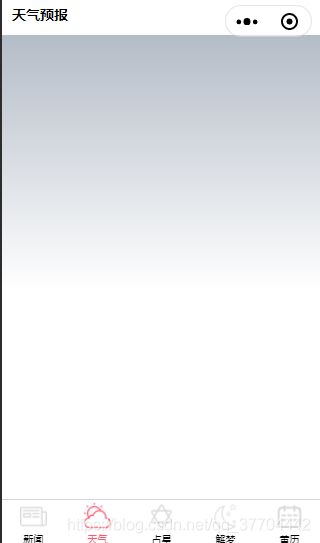
实现完渐变色背景之后,效果如下

白茫茫一片,甚是空虚,所以我们往里写点组件,让这个页面,显得不是那么空,当然,为了后面这些组件能用实际意义,显示数据都是变量,保证组件能实时显示有意义的数据(代码如下)
wxml中的代码
<My_TitleBar Title_Text='天气预报' TitleBar_Height='{{TitleBar_Height}}'>
</My_TitleBar>
<view class="Weather_Header" style='background: linear-gradient({{Weather_Style_Header}},#FFFFFF);'>
<view class="Position_Title">
<image src="/My_Image/Other_Image/Position_Icon.png" ></image>
<text>{{Weather_Title}}</text>
</view>
<view class="Weather_Temperature_Title">
<text>{{Temperature_Title}}</text>
<image src="/My_Image/Other_Image/Circle.png"></image>
</view>
<view class="Weather_Shade_Text">
<text decode="{{true}}">{{Shade_Text}} </text>
<text>|</text>
<view class="Weather_Aqi" style="background: {{Weather_Aqi}}">
<image class="Weather_Aqi_Icon" src="/My_Image/Weather_Image/Aqi_Icon.png"/>
<text>{{Weather_Aqi_Data}}{{Weather_Aqi_Text}}</text>
</view>
</view>
<view class="Weather_OtherData">
<text>风力{{Other_Text_Power}}</text>
<text>湿度{{Other_Text_Humidity}}</text>
<text>风向{{Other_Text_Direct}}</text>
</view>
</view>
JS中的代码
const Weather_Aqi_Type=[
  '#56f6f0','#5bf44b','#f54336','#f6e65e'
]//#56f6f0是蓝色,#5bf44b是绿色,#f54336是红色,#f6e65e是黄色
page({
data{
    Weather_Title:"未定位",
    Temperature_Title:"3",
    Shade_Text:"阴",
    Aqi_Text:"30",
    Other_Text_Humidity:"60",
    Other_Text_Direct:"西北风",
    Other_Text_Power:"1级",
    Weather_Aqi_Text:"优",
    Weather_Aqi_Data:"35",
    Weather_Style_Header:Weather_Style_Header_Type[0],

    Weather_Aqi:Weather_Aqi_Type[1],
    }
    })
wxss中的代码
.Weather_Header{
   display: flex;

   width: 100%;
   flex-direction: column;

}
.Position_Title{
   display: flex;
   flex-direction: row;

   height: 50rpx;
   width: 100%;
   justify-content: center;
   padding-top: 35rpx;
   padding-bottom: 35rpx;

}
.Position_Title image{
   height: 50rpx;
   width: 50rpx;
}
.Position_Title text{
   font-size: 39rpx;
   margin-bottom: 10rpx;
}
.Weather_Temperature_Title
{
   display: flex;
   width: 100%;
   justify-content: center;
   margin-top: 100rpx;
   flex-direction: row;


}
.Weather_Temperature_Title image
{

   height: 30rpx;
   width: 30rpx;
   padding-top: 70rpx;
}
.Weather_Temperature_Title text{
   font-size: 250rpx;
   font-weight: 100;

}
.Weather_Shade_Text{
   display: flex;
   justify-content: center;
   width: 100%;
   align-items: center;
}
.Weather_Aqi{
   display: flex;
  margin-top: 10rpx;
  margin-left: 20rpx;
  border-radius: 5rpx;
  padding: 5rpx;
}
.Weather_Aqi image
{
   height: 40rpx;
   width: 40rpx;
}
.Weather_Aqi text
{
   margin-left: 10rpx;
   font-weight: 100;
   color: white;

}
.Weather_OtherData{
   width: 100%;
   display: flex;
   justify-content: space-around;
   align-items: center;
   margin-top: 50rpx;
}
.Weather_OtherData text{
   color: #dbdbdb;
   font-size: 35rpx;
}
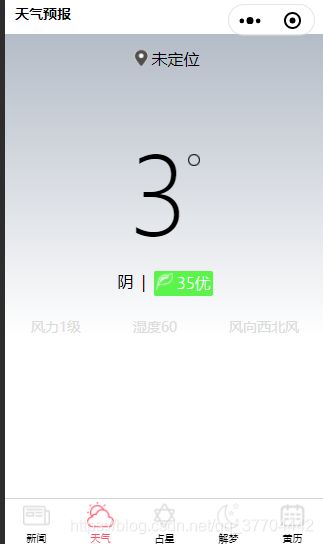
稍微装饰之后,效果图如下

然后我们接下来再写个警示框,关于警示框,如下图

仔细观察,框背景其实是三色渐变,白色-浅灰色-白色,这种渐变可以在组件样式中设置即可,代码如下
wxml中的代码
<view class="Weather_Warning_Block">
   <view class="Weather_Warning">
      <text>{{Weather_Warning_Text}}</text>
      <image src="/My_Image/Weather_Image/Weather_Arrow.png"></image>
   </view>
</view>
JS中的代码
// pages/Page_Weather/Page_Weather.js
const app=getApp()
const Weather_Image_Path="/My_Image/Weather_Image/Weather_State/"
const Weather_Style_Header_Type=[
  '#B4BCC7','#8699f6','#f2f894','#f58677'
]//#B4BCC7是浅灰色,#94d3f8是深蓝色,#f2f894是浅黄色,#f58677是浅红色

const Weather_Aqi_Type=[
  '#56f6f0','#5bf44b','#f54336','#f6e65e'
]//#56f6f0是蓝色,#5bf44b是绿色,#f54336是红色,#f6e65e是黄色
const Weather_Warning_Text_Type=[
  '外出请带雨伞','请注意保暖','请注意散热'
]
Page({

  /**
   * 页面的初始数据
   */
  data: {
    Weather_Image_Src:'/My_Image/Weather_Image/Rain.png',
    Weather_Title:"未定位",
    Temperature_Title:"3",
    Shade_Text:"阴",
    Aqi_Text:"30",
    Other_Text_Humidity:"60",
    Other_Text_Direct:"西北风",
    Other_Text_Power:"1级",
    Weather_Aqi_Text:"优",
    Weather_Aqi_Data:"35",
    Weather_Style_Header:Weather_Style_Header_Type[0],

    Weather_Aqi:Weather_Aqi_Type[1],

    Weather_Warning_Text:Weather_Warning_Text_Type[0]
    }
    })
wxss中的代码
.Weather_Header{
   display: flex;

   width: 100%;
   flex-direction: column;

}
.Position_Title{
   display: flex;
   flex-direction: row;

   height: 50rpx;
   width: 100%;
   justify-content: center;
   padding-top: 35rpx;
   padding-bottom: 35rpx;

}
.Position_Title image{
   height: 50rpx;
   width: 50rpx;
}
.Position_Title text{
   font-size: 39rpx;
   margin-bottom: 10rpx;
}
.Weather_Temperature_Title
{
   display: flex;
   width: 100%;
   justify-content: center;
   margin-top: 100rpx;
   flex-direction: row;


}
.Weather_Temperature_Title image
{

   height: 30rpx;
   width: 30rpx;
   padding-top: 70rpx;
}
.Weather_Temperature_Title text{
   font-size: 250rpx;
   font-weight: 100;

}
.Weather_Shade_Text{
   display: flex;
   justify-content: center;
   width: 100%;
   align-items: center;
}
.Weather_Aqi{
   display: flex;
  margin-top: 10rpx;
  margin-left: 20rpx;
  border-radius: 5rpx;
  padding: 5rpx;
}
.Weather_Aqi image
{
   height: 40rpx;
   width: 40rpx;
}
.Weather_Aqi text
{
   margin-left: 10rpx;
   font-weight: 100;
   color: white;

}
.Weather_OtherData{
   width: 100%;
   display: flex;
   justify-content: space-around;
   align-items: center;
   margin-top: 50rpx;
}
.Weather_OtherData text{
   color: #dbdbdb;
   font-size: 35rpx;
}
.Weather_Warning_Block{
   display: flex;
   justify-content: center;
   margin-top: 30rpx;
   width: 100%;
}
.Weather_Warning{
   display: flex;
   align-items: center;
   justify-content: center;
   background:linear-gradient(to right,#FFFFFF,rgba(241, 241, 241, 0.74),#FFFFFF);
   width: 450rpx;
   height: 65rpx;
   padding: 15rpx;

}
.Weather_Warning text{
  font-size: 30rpx;
}
.Weather_Warning image
{
   margin-left: 70rpx;
  width: 35rpx;
  height: 35rpx;
}
最后,写个自定义的item组件,封装起来,用户显示明后两天的天气(代码如下)
自定义组件wxml中的代码
       <view class="Weather_Section">
          <view class="Weather_Day">
             <view class="day_aqi">
                <text>
                   {{Weather_Aqi_Day_Text}}
                </text>
                <image src="{{Weather_Aqi_Image_Src}}">
                </image>
             </view>
             <text>
             {{Weather_Aqi_Temperature_Text}}
             </text>

          </view>
          <view class="Weather_Clouds">
             <text>{{Weather_Cloundy_Text}}</text>
             <image src="{{Weather_Cloundy_Image_Src}}"></image>
          </view>
       </view>
自定义组件wxss中的代码
/* My_Comment/My_Weather_Item/My_Weather_Item.wxss */
.Weather_Section
{
   display: flex;
    flex-direction: column;

}
.Weather_Day{
   display: flex;
   flex-direction: row;
   justify-content: space-between;
   width: 100%;
}
.day_aqi{
  display: flex;
  flex-direction: row;

  align-items: flex-end;
}
.day_aqi image
{
  width: 80rpx;
  height: 40rpx;
  border-radius: 5rpx;
  margin-left: 10rpx;
}
.day_aqi text{
  margin-left: 10rpx;
}
.Weather_Clouds{
  display: flex;
  flex-direction: row;
  justify-content: space-between;
  width: 100%;
}
.Weather_Clouds text{
  margin-left: 10rpx;
}
.Weather_Clouds image{
  width: 40rpx;
  height: 40rpx;
}
自定义组件JS中的代码
  properties: {
     Weather_Aqi_Image_Src:{
        type:String,
        value:''
     },
     Weather_Aqi_Temperature_Text:{
      type:String,
      value:''
     },
     Weather_Aqi_Day_Text:{
      type:String,
      value:''
     },
     Weather_Cloundy_Image_Src:{
      type:String,
      value:''
     },
     Weather_Cloundy_Text:{
      type:String,
      value:''
     }
  },
然后直接引用封装好的组件即可(代码如下)
JSON中的代码
{
  "usingComponents": {
    "My_TitleBar":"/My_Comment/My_TitleBar/My_TitleBar",
    "My_Weather_Item":"/My_Comment/My_Weather_Item/My_Weather_Item"
  },
  "disableScroll":true
}
wxml中的代码
<view class="Weather_Future_Tail">

     <My_Weather_Item  Weather_Aqi_Day_Text="{{Weather_Aqi_Day_Text_Type[0]}}"
     Weather_Aqi_Image_Src="{{Weather_Section_Aqi_Image_Src}}"
     Weather_Aqi_Temperature_Text="{{Weather_Degree_Tomorrow}}"
     Weather_Cloundy_Text="{{Weather_Clouds_Data_Tomorrow}}"
     Weather_Cloundy_Image_Src="{{Weather_Clouds_Image_Type[0]}}"
     >
     </My_Weather_Item>

   <view class="Weather_SqlitLine">

   </view>
  <My_Weather_Item  Weather_Aqi_Day_Text="{{Weather_Aqi_Day_Text_Type[1]}}"
     Weather_Aqi_Image_Src="{{Weather_Section_Aqi_Image_Src}}"
     Weather_Aqi_Temperature_Text="{{Weather_Degree_Tomorrow}}"
     Weather_Cloundy_Text="{{Weather_Clouds_Data_Tomorrow}}"
     Weather_Cloundy_Image_Src="{{Weather_Clouds_Image_Type[0]}}"
     >
     </My_Weather_Item>
</view>
wxss中的代码
.Weather_SqlitLine{
   width: 3rpx;
   height: 100rpx;
   background:  #dbdbdb;
}
.Weather_Future_Tail{
   display: flex;
   flex-direction: row;
   margin-top: 50rpx;
   justify-content: space-between;
   align-items: flex-end;

}
.Weather_Future_Tail My_Weather_Item{
   width: 45%;
}
这样,天气小程序的界面就大功告成了