Tensorflow - Tutorial (3) : 前馈神经网络(多层感知机)
前馈神经网络
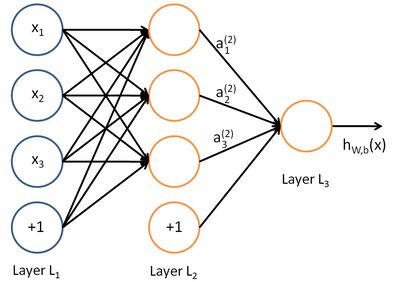
一个简单的3层神经网络模型例子如下,圆圈表示神经网络的输入,“+1”的圆圈被称为偏置节点。神经网络最左边的一层叫做输入层,包含3个输入单元,最右的一层叫做输出层。中间所有节点组成的一层叫做隐藏层,包含3个神经元。 前馈神经网络与反向传播详细内容参考:前馈神经网络与反向传播算法(推导过程)
Feedforward Neural Network手写数字识别
MNIST数据集的格式与数据预处理代码input_data.py的讲解请参考 :Tutorial (2)
本例使用一个三层神经网络,包括输入层,一个隐藏层,输出层. MNIST数据集中图片的大小为28*28,即每张图片可用一个28*28=784的向量表示.网络输入层的维度是784, 隐藏层包含625个激活单元,因此输入层到隐藏层的权重矩阵维度是625*784.隐藏层到输出层的权重矩阵维度是10*625,即网络最后输出一个10维向量,表示模型对图片中数字的预测结果.
实验代码如下:
#!/usr/bin/env python

import tensorflow as tf
import numpy as np
import input_data

#按照高斯分布初始化权重矩阵
def init_weights(shape):
    return tf.Variable(tf.random_normal(shape, stddev=0.01))

#定义神经网络模型
def model(X, w_h, w_o):
    h = tf.nn.sigmoid(tf.matmul(X, w_h)) # 激活函数采用sigmoid函数
    return tf.matmul(h, w_o) # note that we dont take the softmax at the end because our cost fn does that for us


mnist = input_data.read_data_sets("MNIST_data/", one_hot=True)#读取数据
#mnist.train.images是一个55000 * 784维的矩阵, mnist.train.labels是一个55000 * 10维的矩阵
trX, trY, teX, teY = mnist.train.images, mnist.train.labels, mnist.test.images, mnist.test.labels

X = tf.placeholder("float", [None, 784])#创建占位符,在训练时传入图片的向量
Y = tf.placeholder("float", [None, 10])#图像的label用一个10维向量表示

w_h = init_weights([784, 625]) # 输入层到隐藏层的权重矩阵,隐藏层包含625个隐藏单元
w_o = init_weights([625, 10])#隐藏层到输出层的权重矩阵

py_x = model(X, w_h, w_o)

cost = tf.reduce_mean(tf.nn.softmax_cross_entropy_with_logits(py_x, Y)) # 计算py_x与Y的交叉熵
train_op = tf.train.GradientDescentOptimizer(0.05).minimize(cost)  #通过步长为0.05的梯度下降算法求参数
predict_op = tf.argmax(py_x, 1)# 预测阶段,返回py_x中值最大的index作为预测结果

# Launch the graph in a session
with tf.Session() as sess:
    # you need to initialize all variables
    tf.initialize_all_variables().run()

    for i in range(100):
        for start, end in zip(range(0, len(trX), 128), range(128, len(trX)+1, 128)):
            sess.run(train_op, feed_dict={X: trX[start:end], Y: trY[start:end]})
        print(i, np.mean(np.argmax(teY, axis=1) ==
                         sess.run(predict_op, feed_dict={X: teX, Y: teY})))
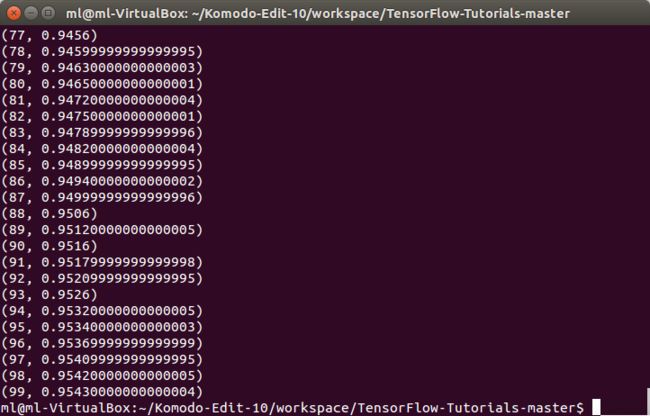
实验代码运行结果如下图所示,经过100轮训练后,模型的预测准确率达到了95.4%,与基于softmax的手写数字识别 相比(91%),有了较大提升


