服务器群集——nginx网站服务控制(手工编译安装nginx、nginx访问状态统计、虚拟主机和访问控制)
nginx服务
- 一 、Nginx服务基础
- 1.1 Nginx概述
- 1.2:编译安装Nginx
- 二 、Nginx的访问状态统计
- 1、启用HTTP_ STUB_ STATUS状态统计模块
- 2、修改nginx.conf配置文件
- 三 、Nginx虛拟主机应用
- 1、Nginx支持的虚拟主机
- 2、通过 "server{}"配置段实现
- 3、实验
- 1、基于域名的虚拟web主机
- 2、基于端口的虚拟web主机
- 3、基于IP的虚拟web主机
- 四 、访问控制
- 4.1 基于授权访问控制
- 4.2 基于客户端访问控制
一 、Nginx服务基础
1.1 Nginx概述
Nginx是一款高性能、轻量级Web服务软件其特点有:
- 稳定性高
- 系统资源消耗低
- 对HTTP并发连接的处理能力高
- 单台物理服务器可支持30 000 ~ 50000个并发请求
- 占用内存少,并发能力强
1.2:编译安装Nginx
1、安装支持软件
[root@localhost ~]# yum -y install gcc gcc-c++ make pcre-devel zlib-devel
2、创建运行用户、组
[root@localhost ~]# useradd -M -s /sbin/nologin nginx  '//-M 不创建家目录'
3、编译安装Nginx,先用xshell把文件拖进去
[root@localhost ~]# tar zxvf nginx-1.12.2.tar.gz
[root@localhost ~]# cd nginx-1.12.0
[root@localhost nginx-1.12.0]# ./configure \
--prefix=/usr/local/nginx \
--user=nginx \
--group=nginx \
--with-http_stub_status_module	'//开启stub_status状态统计模块'
[root@localhost nginx-1.12.0]# make && make install
4、路径优化
[root@localhost nginx-1.12.0]# ln -s /usr/local/nginx/sbin/nginx  /usr/local/sbin	'//nginx命令执行路径优化'
[root@locaThost nginx-1.12.0]# ls -l /usr/local/sbin/nginx
Irwxrwxrwx 1root root27 8月12 18:50 /usr/local/sbin/nginx ->/usr/local/nginx/sbin/nginx
5、检查语法
[root@localhost nginx-1.12.2]# nginx -t
nginx: the configuration file /usr/local/nginx/conf/nginx.conf syntax is ok
nginx: configuration file /usr/local/nginx/conf/nginx.conf test is successful
6、启动、重载配置、停止Nginx
[root@localhost nginx-1.12.2]# nginx
[root@localhost nginx-1.12.2]# netstat -antp | grep nginx
tcp        0      0 0.0.0.0:80              0.0.0.0:*               LISTEN      70833/nginx:
[root@localhost nginx-1.12.2]# netstat -antp | grep nginx
tcp        0      0 0.0.0.0:80              0.0.0.0:*               LISTEN      70833/nginx: master
[root@localhost nginx-1.12.2]# killall -s HUP nginx     //重载nginx命令
[root@localhost nginx-1.12.2]# netstat -antp | grep nginx
tcp        0      0 0.0.0.0:80              0.0.0.0:*               LISTEN      70833/nginx: master
[root@localhost nginx-1.12.2]# killall -s QUIT nginx    //关闭nginx命令
[root@localhost nginx-1.12.2]# netstat -antp | grep nginx
[root@localhost nginx-1.12.2]# nginx
[root@localhost nginx-1.12.2]# netstat -antp | grep nginx
tcp        0      0 0.0.0.0:80              0.0.0.0:*               LISTEN      70961/nginx: master
[root@localhost nginx-1.12.2]# kill -9 70961    //kill杀死进程但是服务杀不死
[root@localhost nginx-1.12.2]# netstat -antp | grep nginx
tcp        0      0 0.0.0.0:80              0.0.0.0:*               LISTEN      70962/nginx: worker
[root@localhost nginx-1.12.2]# pkill nginx        //pkill直接杀死进程树
[root@localhost nginx-1.12.2]# netstat -antp | grep nginx
7、添加nginx系统服务
第一种方法,使用systemctl工具进行管理
[root@localhost ~]# vim /lib/systemd/system/nginx.service		'//添加使用systemctl工具进行管理'
[Unit]
Description=nginx	'//描述'
After=network.target	'//描述服务类别'

[Service]
Type=forking	'//后台运行形势'
PIDFile =/usr/local/nginx/logs/nginx.pid	'//PID文件位置'
ExecStart=/usr/local/nginx/sbin/nginx		'//启动服务'
ExecReload=/usr/bin/kill -S HUP $MAINPID	'//根据PID重载配置'
ExecStop=/usr/bin/kill -S QUIT $MAINPID		'//根据PID终止进程'
PrivateTmp=true

[Install]
WantedBy=multi-user.target
[root@localhost ~]# chmod 754 /lib/systemd/system/nginx.service
第二种方法,添加使用service工具进行管理
[root@localhost ~]# cd /etc/inid.d		'//或者添加使用service工具进行管理'
[root@localhost init.d]# ls
[root@localhost init.d]# vim nginx
#!/bin/bash
# chkconfig: - 99 20
# description: Nginx Service Control Script
PROG="/usr/local/nginx/sbin/nginx"
PIDF="/usr/local/nginx/logs/nginx.pid"
case "$1" in
  start)
   $PROG
   ;;
  stop)
   kill -s QUIT $(cat $PIDF)
   ;;
  restart)
   $0 stop
   $0 start
   ;;
  reload)
   kill -s HUP $(cat $PIDF)
   ;;
  *)
  		echo "Usage: $0 {start|stop|restart|reload}"
  		exit 1
esac
exit 0
[root@localhost init.d]# chmod +x nginx
[root@localhost init.d]# chkconfig --add nginx
[root@localhost init.d]# chkconfig --level 35 nginx on
8、关闭防火墙,开启服务,访问网站
[root@localhost ~]# iptables -F
[root@localhost ~]# setenforce 0
[root@localhost nginx-1.12.2]# systemctl start nginx     //启动服务成功
[root@localhost nginx-1.12.2]# netstat -antp | grep nginx
tcp        0      0 0.0.0.0:80              0.0.0.0:*               LISTEN      71619/nginx: master
二 、Nginx的访问状态统计
1、启用HTTP_ STUB_ STATUS状态统计模块
- 配置编译参数时添加–with-http_ stub_ status_ _module
- nginx -V查看已安装的Nginx是否包含HTTP_ STUB_ STATUS模块
[root@localhost ~]# nginx -V
nginx version: nginx/1.12.0
built by gcc 4.8.5 20150623 (Red Hat 4.8.5-11) (GCC)
configure arguments: --prefix=/usr/local/nginx --user=nginx --group= nginx
--with-http_ stub_ status_ module    //启用HTTP_ STUB_ STATUS状态统计模块
2、修改nginx.conf配置文件
[root@localhost ~]# vim /usr/local/nginx/conf/nginx.conf
http{
	server {
		listen 80;
		server name localhost;
		charset utf-8;
		location / {
			root html;
			index index.html index.php;
        }
		location ~/status {		'//添加此段'
			stub_ status on;
			access_ log off;
        }
    }
}
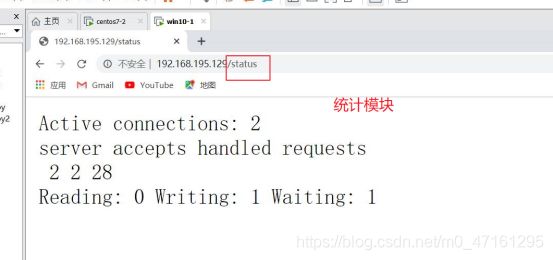
登录浏览器访问 192.168.195.129/status

三 、Nginx虛拟主机应用
1、Nginx支持的虚拟主机
- 基于域名的虚拟主机
- 基于IP的虚拟主机
- 基于端口的虚拟主机
2、通过 "server{}"配置段实现
3、实验
1、基于域名的虚拟web主机
手工编译安装nginx(略;见本文1.2)
[root@localhost nginx]# cd /var/
[root@localhost var]# ls
account  cache  db     games   kerberos  local  log   nis  preserve  spool   tmp
adm      crash  empty  gopher  lib       lock   mail  opt  run       target  yp
[root@localhost var]# mkdir www             //新建目录
[root@localhost var]# cd www/
[root@localhost www]# mkdir benet kgc    //新建主页站点目录
[root@localhost www]# cd benet/
[root@localhost benet]# vim index.html      //新建主页
this is benet web</h1>
[root@localhost benet]# cd ..
[root@localhost www]# cd kgc/
[root@localhost kgc]# vim index.html
this is kgc web</h1>
[root@localhost kgc]# yum -y install tree
[root@localhost kgc]# cd ..
[root@localhost www]# tree ./
./
├── benet
│   └── index.html
└── kgc
    └── index.html
2 directories, 2 files
[root@localhost www]# yum -y install bind
[root@localhost www]# vim /etc/named.conf
options {
        listen-on port 53 { any; };
        allow-query     { any; };
[root@localhost www]# vim /etc/named.rfc1912.zones
zone "kgc.com" IN {
        type master;
        file "kgc.com.zone";
        allow-update { none; };
};
zone "benet.com" IN {
        type master;
        file "benet.com.zone";
        allow-update { none; };
};
[root@localhost www]# cd /var/named/
[root@localhost named]# ls
data  dynamic  named.ca  named.empty  named.localhost  named.loopback  slaves
[root@localhost named]# cp -p named.localhost kgc.com.zone
[root@localhost named]# vim kgc.com.zone
       NS      @
        A       127.0.0.1
www IN  A       192.168.200.90
[root@localhost named]# cp -p kgc.com.zone benet.com.zone
[root@localhost named]# iptables -F
[root@localhost named]# setenforce 0
[root@localhost named]# systemctl start named

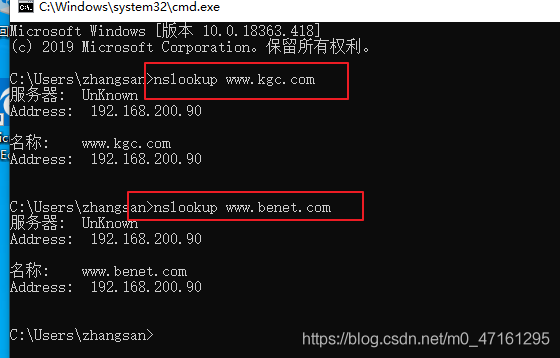
去win10主机查看域名
C:\Users\zhangsan>nslookup www.kgc.com
服务器:  UnKnown
Address:  192.168.200.90
名称:    www.kgc.com
Address:  192.168.200.90
C:\Users\zhangsan>nslookup www.benet.com
服务器:  UnKnown
Address:  192.168.200.90
名称:    www.benet.com
Address:  192.168.200.90
[root@localhost named]# vim /usr/local/nginx/conf/nginx.conf
120     server {
121        server_name  www.kgc.com;
122        location / {
123           root /var/www/kgc;
124           index index.html index.php;
125        }
126      }
127     server {
128        server_name  www.benet.com;
129        location / {
130           root /var/www/benet;
131           index index.html index.php;
132        }
133      }
[root@localhost named]# nginx -t
nginx: the configuration file /usr/local/nginx/conf/nginx.conf syntax is ok
nginx: configuration file /usr/local/nginx/conf/nginx.conf test is successful
[root@localhost named]# service nginx stop
[root@localhost named]# service nginx start
[root@localhost named]# netstat -antp | grep nginx
tcp        0      0 0.0.0.0:80              0.0.0.0:*               LISTEN      72986/nginx: master
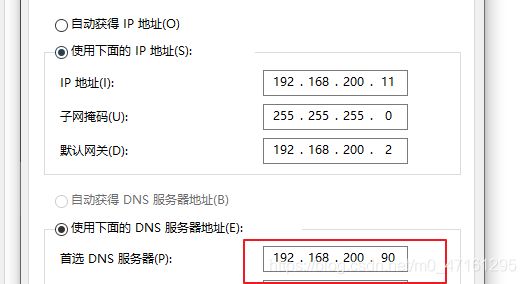
win10把DNS指向192.168.200.90
打开浏览器登录www.kgc.com    www.benet.com
显示出网页内容,试验成功
2、基于端口的虚拟web主机
[root@localhost named]# vim /usr/local/nginx/conf/nginx.conf
server {
         listen 192.168.200.90:1111;
         server_name 192.168.200.90:1111;
    }
    server {
         listen 192.168.200.90:2222;
         server_name 192.168.200.90:2222;
    }
[root@localhost init.d]# service nginx stop
[root@localhost init.d]# service nginx start
[root@localhost init.d]# netstat -antp | grep nginx
tcp        0      0 192.168.200.90:2222     0.0.0.0:*               LISTEN      16376/nginx: master
tcp        0      0 0.0.0.0:80              0.0.0.0:*               LISTEN      16376/nginx: master
tcp        0      0 192.168.200.90:1111     0.0.0.0:*               LISTEN      16376/nginx: master
3、基于IP的虚拟web主机
[root@localhost init.d]# cd /etc/sysconfig/network-scripts/
[root@localhost network-scripts]# cp -p ifcfg-ens33 ifcfg-ens36
[root@localhost network-scripts]# vim ifcfg-ens36
TYPE=Ethernet
PROXY_METHOD=none
BROWSER_ONLY=no
BOOTPROTO=static
DEFROUTE=yes
IPV4_FAILURE_FATAL=no
IPV6INIT=yes
IPV6_AUTOCONF=yes
IPV6_DEFROUTE=yes
IPV6_FAILURE_FATAL=no
IPV6_ADDR_GEN_MODE=stable-privacy
NAME=ens36
DEVICE=ens36
ONBOOT=yes
IPADDR=192.168.200.190
GATEWAY=192.168.200.2
DNS1=8.8.8.8
NETMASK=255.255.255.0
[root@localhost network-scripts]# systemctl restart network
[root@localhost network-scripts]# vim /usr/local/nginx/conf/nginx.conf
 server {
         listen 192.168.200.90:80;
         server_name 192.168.200.90:80;
    }
    server {
         listen 192.168.200.190:80;
         server_name 192.168.200.190:80;
    }
[root@localhost network-scripts]# service nginx stop
[root@localhost network-scripts]# service nginx start
[root@localhost network-scripts]# netstat -antp | grep nginx
tcp        0      0 0.0.0.0:80              0.0.0.0:*               LISTEN      17523/nginx: master
四 、访问控制
4.1 基于授权访问控制
1、生成用户密码认证文件,由于htpasswd工具是Apache自带的工具,所以要安装Apache
[root@localhost ~]# which htpasswd
/usr/bin/which: no htpasswd in (/usr/local/sbin:/usr/local/bin:/usr/sbin:/usr/bin:/root/bin)
[root@localhost ~]# yum -y install httpd
[root@localhost ~]# which htpasswd    //查看htpasswd安装路径
/usr/bin/htpasswd
[root@localhost ~]# htpasswd -c /usr/local/nginx/passwd.db zhangsan     //生成用户密码认证文件
New password:                                   			//创建密码abc123
Re-type new password:
Adding password for user zhangsan
[root@localhost ~]# cat /usr/local/nginx/passwd.db
zhangsan:$apr1$tDJLP4L1$yDB18YGtmar4zjuo.vtOQ1
[root@localhost ~]# chown nginx /usr/local/nginx/passwd.db          //设置属主为nginx
[root@localhost ~]# chmod 400 /usr/local/nginx/conf/nginx.conf      //设置权限,仅nginx可读
[root@localhost ~]# vim /usr/local/nginx/conf/nginx.conf
   server {
        listen       80;
        server_name  localhost;

      location / {
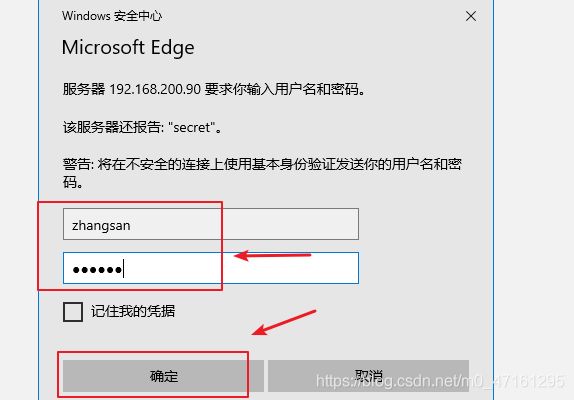
         auth_basic "secret";
        auth_basic_user_file /usr/local/nginx/passwd.db;
        root html;
        index index.html index.html;
}
root@localhost ~]# service nginx start 4.2 基于客户端访问控制
[root@localhost ~]# vim /usr/local/nginx/conf/nginx.conf
       server {
         server_name www.kgc.com;
         location / {
           deny 192.168.200.11;
           allow all;
           root /var/www/kgc;
           index index.html index.php;
         }
    }
[root@localhost ~]# service nginx stop
[root@localhost ~]# service nginx start
[root@localhost ~]# nginx -t
nginx: the configuration file /usr/local/nginx/conf/nginx.conf syntax is ok
nginx: configuration file /usr/local/nginx/conf/nginx.conf test is successful


