WSGI初探及wsgiref简单实现
什么是WSGI?什么是wsgiref?
WSGI(Web Server Common Interface)是专门为Python语言制定的web服务器与应用程序之间的网关接口规范,通俗的来说,只要一个服务器拥有一个实现了WSGI标准规范的模块(例如apache的mod_wsgi模块),那么任意的实现了WSGI规范的应用程序都能与它进行交互。因此,WSGI也主要分为两个程序部分:服务器部分和应用程序部分。
wsgiref则是官方给出的一个实现了WSGI标准用于演示用的简单Python内置库,它实现了一个简单的WSGI Server和WSGI Application(在simple_server模块中),主要分为五个模块:simple_server, util, headers, handlers, validate。
wsgiref源码地址:https://pypi.python.org/pypi/wsgiref
我们先不急着说明WSGI的详细标准部分,我们先看一下如何用wsgiref实现一个WSGI Server与WSGI Application交互的例子。
wsgiref简单实现WSGI Server与WSGI Application
由于simple_server中已经实现了一个简单的WSGI Server和WSGI Application,我们只要直接调用API就可以了。
from wsgiref.simple_server import make_server, demo_app

application = demo_app

server = make_server("127.0.0.1", 8000, application)
#参数分别为服务器的IP地址和端口,以及应用程序。

server.handle_request()
#处理一个request之后立即退出程序
默认的demo_app将会返回Hello World以及环境变量。
接下来我们将定义自己的应用程序。
WSGI对于应用程序有以下标准规定:
1. 应用程序必须是一个可调用的对象,因此,应用程序可以是一个函数,一个类,或者一个重载了__call__的类的实例。
2. 应用程序必须接受两个参数并且要按照位置顺序,分别是environ(环境变量),以及start_response函数(负责将响应的status code,headers写进缓冲区但不返回给客户端)。
3. 应用程序返回的结果必须是一个可迭代的对象。
遵照以上标准,实现的应用程序代码为:
def function_app(environ, start_response):
    status = "200 OK"
    response_headers = [('Content-type', 'text/plain')]
    start_response(status, response_headers)
    return ['Function : My Own Hello World!']

class class_app:
    def __init__(self, environ, start_response):
        self.env = environ
        self.start = start_response

    def __iter__(self):
        status = "200 OK"
        response_headers = [('Content-type', 'text/plain')]
        self.start(status, response_headers)
        yield "Class : My Own Hello World!"
        #使用yield使应用程序返回一个可迭代对象


class instance_app:
    """
    当使用类的实例作为应用程序吧,application = instance_app(), not instance_app
    """
    def __call__(self, environ, start_response):
        status = "200 OK"
        response_headers = [('Content-type', 'text/plain')]
        start_response(status, response_headers)
        return ["Instantiate : My Own Hello World!"]
wsgiref.simple_server 中make_server函数剖析
想必各位对仅仅止步于一个简单的make_server函数的简单调用并不能满足,这个WSGI Server是如何实现的呢?所以接下来我们将会对wsgiref中的make_server函数的实现进行源码分析。
#wsgiref中的make_server实现
def make_server(
    host, port, app, server_class=WSGIServer, handler_class=WSGIRequestHandler
):
    """Create a new WSGI server listening on `host` and `port` for `app`"""
    server = server_class((host, port), handler_class)
    server.set_app(app)
    return server
make_server函数默认使用的服务器类为WSGI Server,调用了构造函数(但是它的构造函数到底藏在哪一层服务器上呢?),相对应的使用WSGIRequestHandler 类作为请求的处理类(这两个类都定义在wsgiref.simple_server模块中),在实例化一个WSGI Server后设置它的application后返回该实例。
WSGI Server类的初始化与继承关系
WSGI Server作为一个服务器,自然免不了要调用socket来建立TCP连接,因此这里的WSGI Server是基于Python的内置网络库BaseHTTPServer.py以及SocketServer.py实现的。
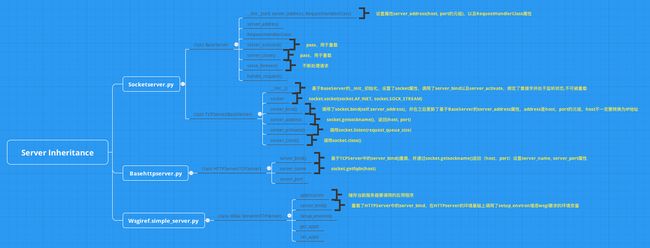
给出继承关系图。

在上述的图中我只是把一个WSGI Server的实例化(即调用它的__init__ 函数)才涉及的属性与方法画出来了,我们可以看到,WSGI Server的初始化是在TCPServer中初始化的,并且进行了TCP连接,HTTPServer以及WSGI Server都是进行了一些简单的封装,还有一些未提及的方法和属性我将会在对handle_request函数的源码分析中提及。
wsgiref.simple_server中handle_request函数剖析
从上面对make_server函数的分析,我们现在已经有一个处于监听状态的服务器实例了,接着我们要让服务器具有处理接受请求的能力,这就是handle_request函数的作用了。
从上一张图中,我们可以知道,handle_request是在BaseServer中实现的。
def handle_request(self):
        """Handle one request, possibly blocking.

        Respects self.timeout.
        """
        # Support people who used socket.settimeout() to escape
        # handle_request before self.timeout was available.
        timeout = self.socket.gettimeout()
        if timeout is None:
            timeout = self.timeout
            #self.timeout是BaseServer中的一个类属性,默认为None
        elif self.timeout is not None:
            timeout = min(timeout, self.timeout)
        fd_sets = _eintr_retry(select.select, [self], [], [], timeout)
        #因为self提供了fileno的接口,所以可以直接作为参数传进去,而不必将套接字传进去,fileno的实现在TCPServer中
        if not fd_sets[0]:
            self.handle_timeout()
            return
        self._handle_request_noblock()
handle_request函数主要用于确认客户端与服务器的socket连接已经建立了起来,并且服务器套接字处于接收状态,确保调用accept函数能够接收到客户端的套接字地址而不是处于阻塞状态。在刚才我们建立的WSGI服务器例子中,默认的socket连接都是阻塞的,因此通过gettimeout()得到的timeout值为None。
接下来我们就将处理EINTR错误,这里用到了IO多路复用技术(select.select)来处理。
def _eintr_retry(func, *args):
    """restart a system call interrupted by EINTR"""
    while True:
        try:
            return func(*args)
        except (OSError, select.error) as e:
            if e.args[0] != errno.EINTR:
                raise
因为我们把timeout设置为None,导致select.select永远不会超时,因此如果一直没有客户端连接服务器,服务器就会阻塞在select函数。当一个EINTR错误提出时,select可以重复调用。
关于使用select解决EINTR错误请参考这里:PEP 475 – Retry system calls failing with EINTR
通过select函数当我们确认已经收到了来自客户端的请求连接,此时调用accept函数不会阻塞时,于是调用handle_request_noblock函数,在函数中再依次调用了verify_request, process_request, finish_request。
def _handle_request_noblock(self):
        """Handle one request, without blocking.

        I assume that select.select has returned that the socket is
        readable before this function was called, so there should be
        no risk of blocking in get_request().
        """
        try:
            request, client_address = self.get_request()
        except socket.error:
            return
        if self.verify_request(request, client_address):
            try:
                self.process_request(request, client_address)
            except:
                self.handle_error(request, client_address)
                self.shutdown_request(request)
get_request其实就是socket.accept(),不过定义在TCPServer中。
    def verify_request(self, request, client_address):
        """Verify the request.  May be overridden.

        Return True if we should proceed with this request.

        """
        return True

    def process_request(self, request, client_address):
        """Call finish_request.

        Overridden by ForkingMixIn and ThreadingMixIn.

        """
        self.finish_request(request, client_address)
        self.shutdown_request(request)

    def finish_request(self, request, client_address):
        """Finish one request by instantiating RequestHandlerClass."""
        self.RequestHandlerClass(request, client_address, self)
可以看见,整个handle_request最终以调用finish_request,实例化了RequestHandlerClass作为结束,给出调用handle_request的流程图。
RequestHandlerClass的初始化和继承关系
和WSGI Server的分析一样,将给出继承关系的图。

RequestHandlerClass主要用于处理请求,生成一些必要的环境参数之后才传给负责发送响应请求的ServerHandler。
ServerHandlerClass的初始化和继承关系

ServerHandler函数主要功能集中在run函数上,同时start_response函数也定义在同一文件中,start_response函数(在application中调用)也必须要按照PEP-333标准定义。
run函数源码
    def run(self, application):
        """Invoke the application"""
        # Note to self: don't move the close()!  Asynchronous servers shouldn't
        # call close() from finish_response(), so if you close() anywhere but
        # the double-error branch here, you'll break asynchronous servers by
        # prematurely closing.  Async servers must return from 'run()' without
        # closing if there might still be output to iterate over.
        try:
            self.setup_environ()
            self.result = application(self.environ, self.start_response)
            self.finish_response()
        except:
            try:
                self.handle_error()
            except:
                # If we get an error handling an error, just give up already!
                self.close()
                raise   # ...and let the actual server figure it out.
最终所有的数据都在finish_response()中写回给客户端。finish_response函数调用了write函数,write函数每次调用时都会检查headers是否已发送,否则先发送headers在发送data。
start_response函数源码
def start_response(self, status, headers,exc_info=None):
        """'start_response()' callable as specified by PEP 333"""

        if exc_info:
            try:
                if self.headers_sent:
                    # Re-raise original exception if headers sent
                    raise exc_info[0], exc_info[1], exc_info[2]
            finally:
                exc_info = None        # avoid dangling circular ref
        elif self.headers is not None:
            raise AssertionError("Headers already set!")

        assert type(status) is StringType,"Status must be a string"
        assert len(status)>=4,"Status must be at least 4 characters"
        assert int(status[:3]),"Status message must begin w/3-digit code"
        assert status[3]==" ", "Status message must have a space after code"
        if __debug__:
            for name,val in headers:
                assert type(name) is StringType,"Header names must be strings"
                assert type(val) is StringType,"Header values must be strings"
                assert not is_hop_by_hop(name),"Hop-by-hop headers not allowed"
        self.status = status
        self.headers = self.headers_class(headers)
        return self.write
start_response函数主要用于检测headers是不是已经发送了,如果发送了必须提出异常,同时检测headers是否有不规范的地方,最后返回一个write函数(用于向套接字相关文件写入数据,PEP要求)。
至此,整个wsgiref的简单调用分析完毕。