subsampling-scale-image-view加载长图源码分析(一)
subsampling-scale-image-view源码分析
- 背景
- 介绍使用
- 源码分析
- 总结
- 参考
背景
对于安卓开发人员,最头疼的问题就是内存问题了,而内存问题又当属bitmap最头疼,虽然说现在市面上已经有越来越多成熟的图片加载框架,像Fresco,Glide,它们也确实帮我更好地管理了图片的内存,生命周期等,但是还是有一个比较棘手的问题,那就是大图长图的加载,动辄750 * 30000的长图,如果一次性不压缩加载出来,内存就暴涨,如下图:
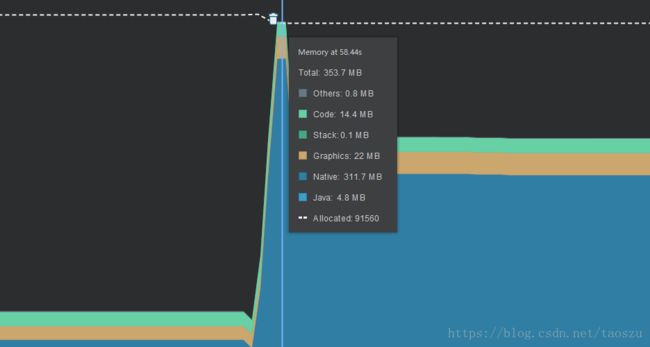
看着这接近90度的走势,吓得我肾上腺也飙升。那既然一次性加载太耗内存,那就局部加载不就等了,系统还真的提供了这样的类,那就是BitmapRegionDecoder,鸿洋大神也写过一篇加载巨图的博客,就是利用了BitmapRegionDecoder,传送门Android 高清加载巨图方案 拒绝压缩图片。但是今天的主角是subsampling-scale-image-view它,它不仅提供了局部加载长图,还提供缩放支持,这是它的github主页,接下来我们就来看看它的用法。
介绍使用
首先是引入依赖
dependencies {
    implementation 'com.davemorrissey.labs:subsampling-scale-image-view:3.10.0'
}
布局文件引入控件
代码调用
image_big.setImage(ImageSource.resource(R.mipmap.ic_long))
拭目以待看看内存占用吧

此时只想发一个表情,666? 太low了,应该是0110 0110 0100
上面就是SubsamplingScaleImageView的用法,用法很简单,接下来我就从入口开始分析它的源码。
源码分析
- setImage
在调用setImage的时候,会创建一个ImageSource的对象,我们先看看这个对象的部分代码
// 缩减之后的部分源码
public final class ImageSource {

    static final String FILE_SCHEME = "file:///";
    static final String ASSET_SCHEME = "file:///android_asset/";

    private final Uri uri;
    private final Bitmap bitmap;
    private final Integer resource;
    private boolean tile;
    private int sWidth;
    private int sHeight;
    private Rect sRegion;
    private boolean cached;

    private ImageSource(int resource) {
        this.bitmap = null;
        this.uri = null;
        this.resource = resource;
        this.tile = true;
    }
 }
这个类有好几个属性, uri bitmap resource这几个就是图片的来源, 还有几个是图片的尺寸,而我们调用的构造方法里面主要是resource和tile这两个属性, tile = true说明支持局部加载属性。
接着我们往下看,setImage方法
        if (imageSource.getBitmap() != null && imageSource.getSRegion() != null) {
            onImageLoaded(Bitmap.createBitmap(imageSource.getBitmap(), imageSource.getSRegion().left, imageSource.getSRegion().top, imageSource.getSRegion().width(), imageSource.getSRegion().height()), ORIENTATION_0, false);
        } else if (imageSource.getBitmap() != null) {
            onImageLoaded(imageSource.getBitmap(), ORIENTATION_0, imageSource.isCached());
        } else {
            sRegion = imageSource.getSRegion();
            uri = imageSource.getUri();
            if (uri == null && imageSource.getResource() != null) {
                uri = Uri.parse(ContentResolver.SCHEME_ANDROID_RESOURCE + "://" + getContext().getPackageName() + "/" + imageSource.getResource());
            }
            if (imageSource.getTile() || sRegion != null) {
                // Load the bitmap using tile decoding.
                TilesInitTask task = new TilesInitTask(this, getContext(), regionDecoderFactory, uri);
                execute(task);
            } else {
                // Load the bitmap as a single image.
                BitmapLoadTask task = new BitmapLoadTask(this, getContext(), bitmapDecoderFactory, uri, false);
                execute(task);
            }
        }
这里主要是根据imagesource的属性进行一些初始化工作,结合上文的构造方法,这里进入了一个初始化任务的调用,即
       TilesInitTask task = new TilesInitTask(this, getContext(), regionDecoderFactory, uri);
        execute(task);
话不多说,我们进入TilesInitTask 一窥究竟。
TilesInitTask 是一个AsyncTask, 主要的代码逻辑如下
     @Override
        protected int[] doInBackground(Void... params) {
            try {
                String sourceUri = source.toString();
                Context context = contextRef.get();
                DecoderFactory decoderFactory = decoderFactoryRef.get();
                SubsamplingScaleImageView view = viewRef.get();
                if (context != null && decoderFactory != null && view != null) {
                    view.debug("TilesInitTask.doInBackground");
                    decoder = decoderFactory.make();
                    Point dimensions = decoder.init(context, source);
                    int sWidth = dimensions.x;
                    int sHeight = dimensions.y;
                    int exifOrientation = view.getExifOrientation(context, sourceUri);
                    if (view.sRegion != null) {
                        view.sRegion.left = Math.max(0, view.sRegion.left);
                        view.sRegion.top = Math.max(0, view.sRegion.top);
                        view.sRegion.right = Math.min(sWidth, view.sRegion.right);
                        view.sRegion.bottom = Math.min(sHeight, view.sRegion.bottom);
                        sWidth = view.sRegion.width();
                        sHeight = view.sRegion.height();
                    }
                    return new int[] { sWidth, sHeight, exifOrientation };
                }
            } catch (Exception e) {
                Log.e(TAG, "Failed to initialise bitmap decoder", e);
                this.exception = e;
            }
            return null;
        }

        @Override
        protected void onPostExecute(int[] xyo) {
            final SubsamplingScaleImageView view = viewRef.get();
            if (view != null) {
                if (decoder != null && xyo != null && xyo.length == 3) {
                    view.onTilesInited(decoder, xyo[0], xyo[1], xyo[2]);
                } else if (exception != null && view.onImageEventListener != null) {
                    view.onImageEventListener.onImageLoadError(exception);
                }
            }
        }
在后台执行的主要事情是调用了解码器decoder的初始化方法,获取图片的宽高信息,然后再回到主线程调用onTilesInited方法通知已经初始化完成。我们先看初始化方法做的事情,先找到解码器,内置的解码器工厂如下,
private DecoderFactory regionDecoderFactory = new CompatDecoderFactory(SkiaImageRegionDecoder.class);
所以我们只需看看SkiaImageRegionDecoder这个decoder既可,查看init方法
    @Override
    @NonNull
    public Point init(Context context, @NonNull Uri uri) throws Exception {
        String uriString = uri.toString();
        if (uriString.startsWith(RESOURCE_PREFIX)) {
            Resources res;
            String packageName = uri.getAuthority();
            if (context.getPackageName().equals(packageName)) {
                res = context.getResources();
            } else {
                PackageManager pm = context.getPackageManager();
                res = pm.getResourcesForApplication(packageName);
            }

            int id = 0;
            List segments = uri.getPathSegments();
            int size = segments.size();
            if (size == 2 && segments.get(0).equals("drawable")) {
                String resName = segments.get(1);
                id = res.getIdentifier(resName, "drawable", packageName);
            } else if (size == 1 && TextUtils.isDigitsOnly(segments.get(0))) {
                try {
                    id = Integer.parseInt(segments.get(0));
                } catch (NumberFormatException ignored) {
                }
            }

            decoder = BitmapRegionDecoder.newInstance(context.getResources().openRawResource(id), false);
        } else if (uriString.startsWith(ASSET_PREFIX)) {
            String assetName = uriString.substring(ASSET_PREFIX.length());
            decoder = BitmapRegionDecoder.newInstance(context.getAssets().open(assetName, AssetManager.ACCESS_RANDOM), false);
        } else if (uriString.startsWith(FILE_PREFIX)) {
            decoder = BitmapRegionDecoder.newInstance(uriString.substring(FILE_PREFIX.length()), false);
        } else {
            InputStream inputStream = null;
            try {
                ContentResolver contentResolver = context.getContentResolver();
                inputStream = contentResolver.openInputStream(uri);
                decoder = BitmapRegionDecoder.newInstance(inputStream, false);
            } finally {
                if (inputStream != null) {
                    try { inputStream.close(); } catch (Exception e) { /* Ignore */ }
                }
            }
        }
        return new Point(decoder.getWidth(), decoder.getHeight());
    }
先是一堆的资源和uri解析判断,这个我们不用管,关键代码是BitmapRegionDecoder.newInstance(inputStream, false); 然后最后返回了decoder解析的宽高信息,BitmapRegionDecoder就是上文提到的部分加载bitmap的类,所以分析到这里我们就知道了,初始化工作就是调用BitmapRegionDecoder获取bitmap宽高。
解析宽高之后,我们再回过头看看初始化完成的回调:
// 代码经过整理 为了更方便看

   // overrides for the dimensions of the generated tiles
    public static final int TILE_SIZE_AUTO = Integer.MAX_VALUE;
    private int maxTileWidth = TILE_SIZE_AUTO;
    private int maxTileHeight = TILE_SIZE_AUTO;

        this.decoder = decoder;
        this.sWidth = sWidth;
        this.sHeight = sHeight;
        this.sOrientation = sOrientation;
        checkReady();
        if (!checkImageLoaded() && maxTileWidth > 0 && maxTileWidth != TILE_SIZE_AUTO && maxTileHeight > 0 && maxTileHeight != TILE_SIZE_AUTO && getWidth() > 0 && getHeight() > 0) {
            initialiseBaseLayer(new Point(maxTileWidth, maxTileHeight));
        }
        invalidate();
        requestLayout();
回调完成主要做了一些赋值操作,还有进行判断是否初始化baseLayer,由于我们事先并没有覆盖尺寸大小,所以直接进入重绘操作。马不停蹄,我们继续看onDraw方法。
- onDraw
由于onDraw方法比较长,我这里做了精简,如下
  protected void onDraw(Canvas canvas) {
        super.onDraw(canvas);
        createPaints();

        // When using tiles, on first render with no tile map ready, initialise it and kick off async base image loading.
        if (tileMap == null && decoder != null) {
            initialiseBaseLayer(getMaxBitmapDimensions(canvas));
        }

        preDraw();

        if (tileMap != null && isBaseLayerReady()) {
            // Optimum sample size for current scale
            int sampleSize = Math.min(fullImageSampleSize, calculateInSampleSize(scale));
            // First check for missing tiles - if there are any we need the base layer underneath to avoid gaps
            boolean hasMissingTiles = false;
            for (Map.Entry> tileMapEntry : tileMap.entrySet()) {
                if (tileMapEntry.getKey() == sampleSize) {
                    for (Tile tile : tileMapEntry.getValue()) {
                        if (tile.visible && (tile.loading || tile.bitmap == null)) {
                            hasMissingTiles = true;
                        }
                    }
                }
            }

            // Render all loaded tiles. LinkedHashMap used for bottom up rendering - lower res tiles underneath.
            for (Map.Entry> tileMapEntry : tileMap.entrySet()) {
                if (tileMapEntry.getKey() == sampleSize || hasMissingTiles) {
                    for (Tile tile : tileMapEntry.getValue()) {
                        sourceToViewRect(tile.sRect, tile.vRect);
                        if (!tile.loading && tile.bitmap != null) {
                            if (tileBgPaint != null) {
                                canvas.drawRect(tile.vRect, tileBgPaint);
                            }
                            if (matrix == null) { matrix = new Matrix(); }
                            matrix.reset();
                            setMatrixArray(srcArray, 0, 0, tile.bitmap.getWidth(), 0, tile.bitmap.getWidth(), tile.bitmap.getHeight(), 0, tile.bitmap.getHeight());
                            matrix.setPolyToPoly(srcArray, 0, dstArray, 0, 4);
                            canvas.drawBitmap(tile.bitmap, matrix, bitmapPaint);

                        }
                }
            }
        } else if (bitmap != null) {

            float xScale = scale, yScale = scale;
            if (bitmapIsPreview) {
                xScale = scale * ((float)sWidth/bitmap.getWidth());
                yScale = scale * ((float)sHeight/bitmap.getHeight());
            }

            if (matrix == null) { matrix = new Matrix(); }
            matrix.reset();
            matrix.postScale(xScale, yScale);
            matrix.postRotate(getRequiredRotation());
            matrix.postTranslate(vTranslate.x, vTranslate.y);
            if (tileBgPaint != null) {
                if (sRect == null) { sRect = new RectF(); }
                sRect.set(0f, 0f, bitmapIsPreview ? bitmap.getWidth() : sWidth, bitmapIsPreview ? bitmap.getHeight() : sHeight);
                matrix.mapRect(sRect);
                canvas.drawRect(sRect, tileBgPaint);
            }
            canvas.drawBitmap(bitmap, matrix, bitmapPaint);

        }
   }
onDraw主要做了几件事,initialiseBaseLayer,设置tileMap,最后就是先优先tileMap进行drawBitmap,再取bitmap绘制,我们先看看initialiseBaseLayer做了什么。
- initialiseBaseLayer
老规矩,先看看代码
    private synchronized void initialiseBaseLayer(@NonNull Point maxTileDimensions) {

        satTemp = new ScaleAndTranslate(0f, new PointF(0, 0));
        fitToBounds(true, satTemp);

        // Load double resolution - next level will be split into four tiles and at the center all four are required,
        // so don't bother with tiling until the next level 16 tiles are needed.
        fullImageSampleSize = calculateInSampleSize(satTemp.scale);
        if (fullImageSampleSize > 1) {
            fullImageSampleSize /= 2;
        }

        if (fullImageSampleSize == 1 && sRegion == null && sWidth() < maxTileDimensions.x && sHeight() < maxTileDimensions.y) {

            // Whole image is required at native resolution, and is smaller than the canvas max bitmap size.
            // Use BitmapDecoder for better image support.
            decoder.recycle();
            decoder = null;
            BitmapLoadTask task = new BitmapLoadTask(this, getContext(), bitmapDecoderFactory, uri, false);
            execute(task);

        } else {

            initialiseTileMap(maxTileDimensions);

            List baseGrid = tileMap.get(fullImageSampleSize);
            for (Tile baseTile : baseGrid) {
                TileLoadTask task = new TileLoadTask(this, decoder, baseTile);
                execute(task);
            }
            refreshRequiredTiles(true);

        }

    }
ScaleAndTranslate是存储了绘制的时候的偏移量和缩放级别,调用fitToBounds其实就是先对基本的偏移位置等设置好,我们先重点关注ScaleAndTranslate的scale,先看看scale的计算,
    private float minScale() {
        int vPadding = getPaddingBottom() + getPaddingTop();
        int hPadding = getPaddingLeft() + getPaddingRight();
        if (minimumScaleType == SCALE_TYPE_CENTER_CROP || minimumScaleType == SCALE_TYPE_START) {
            return Math.max((getWidth() - hPadding) / (float) sWidth(), (getHeight() - vPadding) / (float) sHeight());
        } else if (minimumScaleType == SCALE_TYPE_CUSTOM && minScale > 0) {
            return minScale;
        } else {
            return Math.min((getWidth() - hPadding) / (float) sWidth(), (getHeight() - vPadding) / (float) sHeight());
        }
    }
sWidth,sHeight是刚刚获取的图片大小,getWidth,getHeight是控件的大小,所以scale的值其实就是,控件大小占图片大小的比例,这样一来就可以把图片缩放到合适的比例大小。
计算scale之后,接着是计算bitmap的采样率, 对应代码的fullImageSampleSize,
    private int calculateInSampleSize(float scale) {
        if (minimumTileDpi > 0) {
            DisplayMetrics metrics = getResources().getDisplayMetrics();
            float averageDpi = (metrics.xdpi + metrics.ydpi)/2;
            scale = (minimumTileDpi/averageDpi) * scale;
        }

        int reqWidth = (int)(sWidth() * scale);
        int reqHeight = (int)(sHeight() * scale);

        // Raw height and width of image
        int inSampleSize = 1;
        if (reqWidth == 0 || reqHeight == 0) {
            return 32;
        }

        if (sHeight() > reqHeight || sWidth() > reqWidth) {

            // Calculate ratios of height and width to requested height and width
            final int heightRatio = Math.round((float) sHeight() / (float) reqHeight);
            final int widthRatio = Math.round((float) sWidth() / (float) reqWidth);

            // Choose the smallest ratio as inSampleSize value, this will guarantee
            // a final image with both dimensions larger than or equal to the
            // requested height and width.
            inSampleSize = heightRatio < widthRatio ? heightRatio : widthRatio;
        }

        // We want the actual sample size that will be used, so round down to nearest power of 2.
        int power = 1;
        while (power * 2 < inSampleSize) {
            power = power * 2;
        }

        return power;
    }
参数scale是上文计算得来的,这里会根据设置的目标dpi进行调整,接着再根据图片实际大小与请求绘制的大小比例就得到了相应的采样率,即对bitmap的缩放。
特别地,如果计算得到的fullImageSampleSize 等于1,即图片大小能够显示完全,就会调用BitmapLoadTask 这个任务,我们进去这个任务一窥究竟。
    @Override
        protected Integer doInBackground(Void... params) {
            try {
                String sourceUri = source.toString();
                Context context = contextRef.get();
                DecoderFactory decoderFactory = decoderFactoryRef.get();
                SubsamplingScaleImageView view = viewRef.get();
                if (context != null && decoderFactory != null && view != null) {
                    view.debug("BitmapLoadTask.doInBackground");
                    bitmap = decoderFactory.make().decode(context, source);
                    return view.getExifOrientation(context, sourceUri);
                }
            } catch (Exception e) {
                Log.e(TAG, "Failed to load bitmap", e);
                this.exception = e;
            } catch (OutOfMemoryError e) {
                Log.e(TAG, "Failed to load bitmap - OutOfMemoryError", e);
                this.exception = new RuntimeException(e);
            }
            return null;
        }
和上面提到的TileLoadTask大同小异,这里是调用了解码方法,再看看解码方法
    @Override
    @NonNull
    public Bitmap decode(Context context, @NonNull Uri uri) throws Exception {
        String uriString = uri.toString();
        BitmapFactory.Options options = new BitmapFactory.Options();
        Bitmap bitmap;
        options.inPreferredConfig = bitmapConfig;
        if (uriString.startsWith(RESOURCE_PREFIX)) {
            Resources res;
            String packageName = uri.getAuthority();
            if (context.getPackageName().equals(packageName)) {
                res = context.getResources();
            } else {
                PackageManager pm = context.getPackageManager();
                res = pm.getResourcesForApplication(packageName);
            }

            int id = 0;
            List segments = uri.getPathSegments();
            int size = segments.size();
            if (size == 2 && segments.get(0).equals("drawable")) {
                String resName = segments.get(1);
                id = res.getIdentifier(resName, "drawable", packageName);
            } else if (size == 1 && TextUtils.isDigitsOnly(segments.get(0))) {
                try {
                    id = Integer.parseInt(segments.get(0));
                } catch (NumberFormatException ignored) {
                }
            }

            bitmap = BitmapFactory.decodeResource(context.getResources(), id, options);
        } else if (uriString.startsWith(ASSET_PREFIX)) {
            String assetName = uriString.substring(ASSET_PREFIX.length());
            bitmap = BitmapFactory.decodeStream(context.getAssets().open(assetName), null, options);
        } else if (uriString.startsWith(FILE_PREFIX)) {
            bitmap = BitmapFactory.decodeFile(uriString.substring(FILE_PREFIX.length()), options);
        } else {
            InputStream inputStream = null;
            try {
                ContentResolver contentResolver = context.getContentResolver();
                inputStream = contentResolver.openInputStream(uri);
                bitmap = BitmapFactory.decodeStream(inputStream, null, options);
            } finally {
                if (inputStream != null) {
                    try { inputStream.close(); } catch (Exception e) { /* Ignore */ }
                }
            }
        }
        if (bitmap == null) {
            throw new RuntimeException("Skia image region decoder returned null bitmap - image format may not be supported");
        }
        return bitmap;
    }
调用了BitmapFactory进行解码,之后主线程回调对bitmap进行赋值。 然后重新刷新ui,因为此时bitmap不为null,那么就把解码得到的bitmap进行绘制。
此时,就完成了图片的绘制过程,本篇博客就先到此为止,下一篇博客再对采样率不等于1的情况进行分析。传送门subsampling-scale-image-view加载长图源码分析(二)
总结
本篇博客分析了subsampling-scale-image-view的初始化过程,对图片的缩放控制,以及当图片大小小于等于屏幕时,即采样率等于1时,直接调用BitmapFactory进行解码。
参考
Android 高清加载巨图方案 拒绝压缩图片