iOS小结(五) 结合 Instrument 分析并解决memory issues
memory通常遇到两种问题:
- memory 持续上涨
- memory leak
遇到这些问题,首先是要分析是什么原因导致 memory 上涨, 涨的又是什么?
分析利器:Instrument
对于profile, 之前知道CUDA有自己profile的可视化工具, 而 apple 的 Instrument 是分析 ios 和 mac 程序运行时间和 memory allocation 很有效的工具。
iOS没有自动垃圾回收
[myFraction retain];[myFraction release];how to use instrument
Instrument 有两种打开方式,一种是直接打开录制,另一种是在 xcode 里 debug 过程中跳转,或直接在 xcode 界面中看大概的 memory 和 cpu 占用。
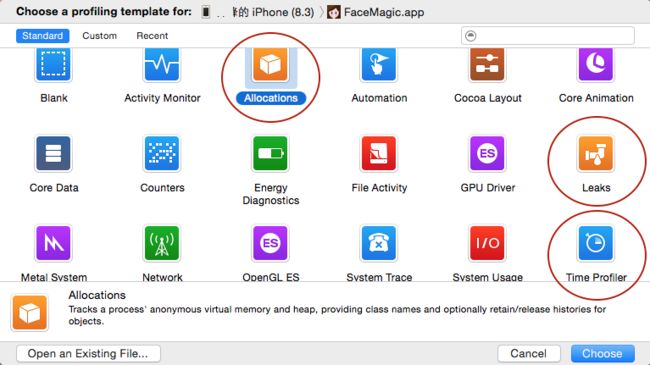
对于第一种,直接在Spotlight里搜Instrument,可以看到Instrument可以分析的东西有很多,其中我们最常用的就是 Allocation, Leak 和 time profile了。Allocation 是分析memory 最准的, Leak 可以看哪里有内存泄漏,而且能看到函数调用关系, time profile 就是看CPU 各进程运行时间了,可以看具体是哪个进程是瓶颈,进而优化程序运行速度。另外GPU Driver如果用了GPU,应该也是很有用的。
下面以Allocation为例,解释如何分析memory issue。 好,点击Allocation 出现了下面的界面:
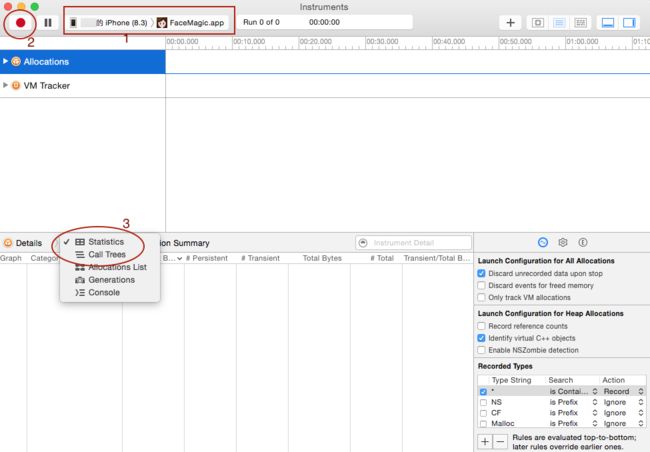
可以用 Instrument 记录下来你的操作过程中内存的分配,从空间和时间两个维度,录制的结果也可以保存成.trace文件,也是用 Instrument 打开。 首先在红框1处选择要监控的硬件对应的程序,点击红框2处的红点开始录制, 这里录制的程序应该是已经下到手机上的,而不是正在debug。开始执行操作吧,哪里有问题就哪里再想办法再现该操作,记得用单一变量法来缩小范围。
录制完毕,怎样分析呢,可以在上半部分的面板拖拽一个范围,也就是监控这段操作过程中,相对增长的内存空间。而有用的数据主要是看 Statistics 和 Call Trees,在上图中用红圈3标识,call trees 是这部分占用的内存的函数调用关系,可以帮助很有用的找到问题的来源,有向右箭头的地方可以展开,有时函数调用的很深,借助方向键很方便。
我这里打开了一个我保存的一个allocation.trace, 通过statistics,就可以看到在这个过程中LoadModel没有释放,再看call Tree,两者结合就能定位。
上面所说的第二种打开方式,是在debug中,程序已经下到手机上之后,点击下图左边这个pool一样的红圈圈出来的图标,就可以看到 CPU 和 memory 都有实时监控,只不过 debug模式可能不是很准,点击右侧界面的Profile in Instrument,就打开了Instrument,memory的监控是跳到 Leak 而不是 Allocation, 写好的程序应该时常有意识测一测,有没有leak, Leak这个入口也可以看allocation, 不过不是完全从程序一开始就监控,基准线低一点。
leak 和 time profile用法类似,time profile测时间,可以比较主进程和其他进程主要是哪个进程里什么操作是瓶颈,进而优化程序。
how to fix
Feature                  | new/delete                     | malloc/free
--------------------------+--------------------------------+-------------------------------
 Memory allocated from    | 'Free Store'                   | 'Heap'
 Returns                  | Fully typed pointer            | void*
 On failure               | Throws (never returns NULL)    | Returns NULL
 Required size            | Calculated by compiler         | Must be specified in bytes
 Handling arrays          | Has an explicit version        | Requires manual calculations
 Reallocating             | Not handled intuitively        | Simple (no copy constructor)
 Call of reverse          | Implementation defined         | No
 Low memory cases         | Can add a new memory allocator | Not handled by user code
 Overridable              | Yes                            | No
Use of (con-)/destructor | Yes | No + (UIImage*) getUIImageFromRGBAs : (ImageBuf*) imgBuf {
CGDataProviderRef providerRef = CGDataProviderCreateWithData(NULL, imgBuf.rawData, imgBuf.height * imgBuf.width * imgBuf.bytesPerPixel, NULL);
CGColorRenderingIntent renderingIntent = kCGRenderingIntentDefault;
CGImageRef imgRef = CGImageCreate(imgBuf.width, imgBuf.height, imgBuf.bitsPerComponent, imgBuf.bitsPerPixel, imgBuf.bytesPerRow, imgBuf.colorSpace, imgBuf.bitmapInfo, providerRef, NULL, NO, renderingIntent);
UIImage* newImg = [UIImage imageWithCGImage: imgRef];
CFRelease(imgRef);
CGDataProviderRelease(providerRef);
return newImg;
}static memory pool
#import "DataPool.h"

@implementation DataPool

static Byte* oriImg;

+ (Byte*) getDataRef  {
          if( oriImg == nil) {
              oriImg = (Byte*) calloc(DataPoolSize, sizeof(Byte));
          }
          return oriImg;
}

@end+ (void) initialize {
oriImg = (Byte*) calloc(DataPoolSize, sizeof(Byte));
}__attribute__((constructor))
static void initialize_memPool() {
oriImg = (Byte*) calloc(DataPoolSize, sizeof(Byte));
}
__attribute__((destructor))
static void destroy_memPool() {
free(oriImg);
oriImg = nil;
}上面都是在obj-c里,静态变量在swift里也是一样,只需要加上static关键字,就可以用类名调用到这个变量了,可以说全局可见。
class AppDelegate: UIResponder, UIApplicationDelegate {

    var window: UIWindow?
    static var referenceImage : [UIImage] = []
    //....
}
讲在后面
    override func didReceiveMemoryWarning() {
        super.didReceiveMemoryWarning()
        // Dispose of any resources that can be recreated.
    }


