PyTorch的基本概念
文章目录
- 1. 初识PyTorch
- 1.1 什么是PyTorch,为什么选择PyTorch
- 1.2 深度学习框架比较
- 1.3 动态图 vs 静态图
- 2. Anaconda的安装
- 3. PyTorch的安装
- 4. PyTorch基本概念
- 5. PyTorch基本实现
- 6. Pytorch功能
- 6.1 GPU加速
- 6.2 自动求导
- 6.3 常用类
- 7. Pytorch实现线性回归
1. 初识PyTorch
1.1 什么是PyTorch,为什么选择PyTorch
讲到PyTorch,其实它是从Torch发展而来的,那我们先讲一下什么是Torch。Torch是一个与Numpy类似的张量(Tensor)操作库,与Numpy不同的是Torch对GPU支持的很好,Lua是Torch的上层包装。由于Lua语言相对比较小众,所以Facebook使用Python语言对Torch的底层进行调用,这也就是现在的Pytorch。Pytorch之所以流行,其中一个原因是Pytorch借鉴了Chainer API的设计规范。
Pytorch的版本迭代:0.1(THNN 后端)->0.4(Variable和Tensor的合并)->1.0(CAFFE2后端)->1.x。其中0.4版本新特性可参考:https://www.jianshu.com/p/85c0671d5193。
PyTorch是一个基于Torch的Python开源机器学习库,用于自然语言处理等应用程序。 它主要由Facebook的人工智能研究小组开发。在Facebook中,使用Pytorch进行科学研究,而使用Caffe2进行产品部署。
PyTorch相比TensorFlow而言,它的设计初衷是简单易用用,所以它是基于动态图进行实现的,从而方便调试。当然,TensorFlow在1.5版的时候就引入了Eager Execution机制实现了动态图,但它还是默认使用静态图。
1.2 深度学习框架比较
下图为各个深度学习框架,具体内容在https://towardsdatascience.com/battle-of-the-deep-learning-frameworks-part-i-cff0e3841750:


综合评价:

Pytorch生态:

1.3 动态图 vs 静态图
简单的来说,静态图相比动态图能够提前对计算图进行优化,而且能够把不需要的中间变量对应的内存进行清除,但是静态图不方便调试(部分中间变量对应的内存已经被清除),具体可参考链接:https://blog.csdn.net/qq_36653505/article/details/87875279


2. Anaconda的安装
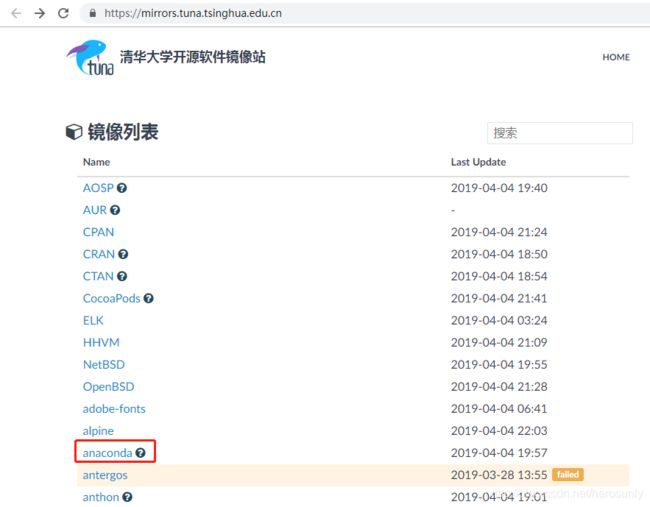
从国外下载Anaconda比较慢,所以选择国内的镜像比较方便,我自己比较常用的是清华镜像站,在浏览器中输入清华大学开源软件镜像站的网址(https://mirrors.tuna.tsinghua.edu.cn )。

点击archive,如下图所示:

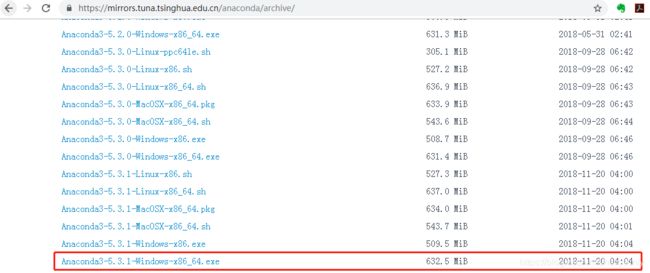
根据自己的操作系统版本,如Windows 64位,可下载图中所示版本:Anaconda3-5.3.1-Windows-x86_64.exe,地址为
https://mirrors.tuna.tsinghua.edu.cn/anaconda/archive/Anaconda3-5.3.1-Windows-x86_64.exe ,可直接复制到迅雷地址进行下载。

3. PyTorch的安装
pip install torchvision
# cpu版本
conda install pytorch-cpu torchvision-cpu -c pytorch
# GPU版
conda install pytorch torchvision cudatoolkit=10.0 -c pytorch
# cudatoolkit后跟着相应的cuda版本
# 目前测试 8.0、9.0、9.1、9.2、10.0都可安装成功
如果进入到Python环境中,并输入import torch,不报错,就说明安装成功了。
4. PyTorch基本概念
可参考我的博客:
https://blog.csdn.net/herosunly/article/details/88892326
https://blog.csdn.net/herosunly/article/details/88915673
5. PyTorch基本实现
任务是通过神经网络完成一个回归问题。其中样本数为64个,输入层为1000维,隐藏层为100,输出层为10维。
num_samples = 64 # N
dim_in, dim_hid, dim_out = 1000, 100, 10  # IN H OUT
x = torch.randn(num_samples, dim_in)  #  N * IN
y = torch.randn(num_samples, dim_out) #  N * OUT

# 提前定义模型
model = torch.nn.Sequential(
    torch.nn.Linear(dim_in, dim_hid, bias = False), #model[0]
    torch.nn.ReLU(),
    torch.nn.Linear(dim_hid, dim_out, bias = False),#model[2]
)

# torch.nn.init.normal_(model[0].weight) #修改一
# torch.nn.init.normal_(model[2].weight)

#提前定义loss函数和优化函数
loss_fun = torch.nn.MSELoss(reduction='sum')
eta = 1e-4 #修改二
optimizer = torch.optim.Adam(model.parameters(), lr=eta)


for i in range(1000):
  #Forward pass
  y_pred = model(x)

  #Loss
  loss = loss_fun(y_pred, y)
  print(it, loss.item())

  optimizer.zero_grad()
  # Backward pass
  loss.backward()

  # update model parameters
  optimizer.step()
具体内容可参考我的博客:https://blog.csdn.net/herosunly/article/details/88949873
6. Pytorch功能
6.1 GPU加速
import torch
import time

print(torch.__version__)
print(torch.cuda.is_available())

a = torch.randn(10000, 1000)
b = torch.randn(1000, 2000)

# cpu
t0 = time.time()
c = torch.matmul(a, b)
t1 = time.time()
print(a.device, t1 - t0, c.norm(2))

#gpu
device = torch.device('cuda')
a = a.to(device)
b = b.to(device)

t0 = time.time()
c = torch.matmul(a, b)
t2 = time.time()
print(a.device, t2 - t0, c.norm(2))

t0 = time.time()
c = torch.matmul(a, b)
t2 = time.time()
print(a.device, t2 - t0, c.norm(2))
6.2 自动求导
import torch
from torch import autograd

x = torch.tensor(1.)
a = torch.tensor(1., requires_grad = True)
b = torch.tensor(2., requires_grad = True)
c = torch.tensor(3., requires_grad = True)

y = a**2 * x + b * x + c

print('before:', a.grad, b.grad, c.grad)        # a, b, c 的梯度
grad = autograd.grad(y, [a, b, c])               # 用自动求导,y 对 a,b,c 进行求导
print('after:',grad[0], grad[1],grad[2])        # a,b,c 的偏微分
6.3 常用类
- 网络层
- nn.Linear
- nn.Conv2d
- nn.LSTM
- 激活函数
- nn.ReLu
- nn.Sigmoid
- 损失函数:
- nn.Softmax
- nn.CrossEntropyLoss
- nn.MSE
7. Pytorch实现线性回归
- 计算总的loss function
#定义一个计算总的error(即总的loss),其中points为一系列的(x,y)的组合:
def compute_error_for_line_given_points(b, w, points):
    total_error = 0.0      				#定义总的loss
    for i in range(0, len(points)):
        x = points[i, 0]  				#取该点的x值
        y = points[i, 1]  				#取该点的y值
        total_error += (y - (w * x + b)) ** 2 		#将每一个点的loss累加
    return total_error / float(len(points))			#对总的error求一个平均,返回总的平均error
- 计算其梯度信息:
#定义一个计算梯度的函数:入口参数:b当前值,W当前值,点集合,学习率
def step_gradient(b_current, w_current, points, learningRate):
    b_gradient = 0
    w_gradient = 0
    N = float(len(points))      #总的数据点的个数
    for i in range(0, len(points)):
        x = points[i, 0]
        y = points[i, 1]
        #∂L/∂b = 2(Wx + b - y),所有梯度累加时除以N,以便结果不用再做平均
        b_gradient += -(2/N) * (y - ((w_current * x) + b_current))
        #∂L/∂W = 2(Wx + b - y)x,所有梯度累加时除以N,以便结果不用再做平均
        w_gradient += -(2/N) * x * (y - ((w_current * x) + b_current))
    new_b = b_current - (learningRate * b_gradient)
    new_W = w_current - (learningRate * w_gradient)
    return [new_b, new_w]
- 循环迭代梯度信息:
#循环迭代W,b,入口参数:(x,y)点集合,初始b,初始W,学习率,迭代次数:
def gradient_descent_runner(points, starting_b, starting_w, learning_rate, num_iterations):
    b = starting_b
    w = starting_w
    for i in range(num_iterations):
        b, w = step_gradient(b, w, np.array(points), learning_rate) 	#np.array(point)为(x,y)的数组
    return [b, w]
- 总函数,先用num随机生成100个点(考虑实际观察带有噪声),100个点为文件data.csv。
def run():
    points = np.genfromtxt("data.csv", delimiter=",")       #取数据
    learning_rate = 0.0001
    initial_b = 0 # initial y-intercept guess
    initial_w = 0 # initial slope guess
    num_iterations = 1000
    print("Starting gradient descent at b = {0}, w = {1}, error = {2}"
          .format(initial_b, initial_w,
                  compute_error_for_line_given_points(initial_b, initial_w, points))
          )
    print("Running...")
    [b, w] = gradient_descent_runner(points, initial_b, initial_w, learning_rate, num_iterations)
    print("After {0} iterations b = {1}, m = {2}, error = {3}".
          format(num_iterations, b, w,
                 compute_error_for_line_given_points(b, w, points))
          )

if __name__ == '__main__':
    run()

