【caffe】图像分割
一、项目介绍
本项目是caffe得图像实践项目。
背景:像素分割技术
技术:caffe的环境配置、源码分析、新数据层的设计、移动端图像分割网络的设计、模型的训练与测试
应用实例:如何应用在直播上。。
二、环境配置
caffe依赖库环境配置,caffe编译,常见问题(ubuntu环境16.04)
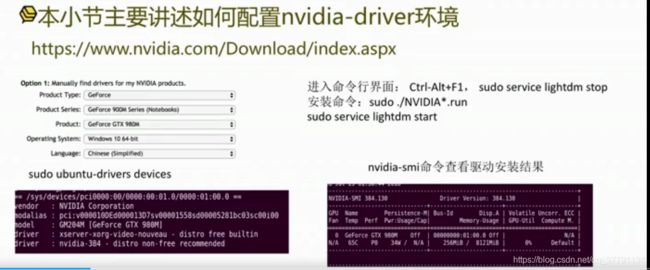
(1)nvidia环境配置:nvidia 的显卡驱动安装与使用
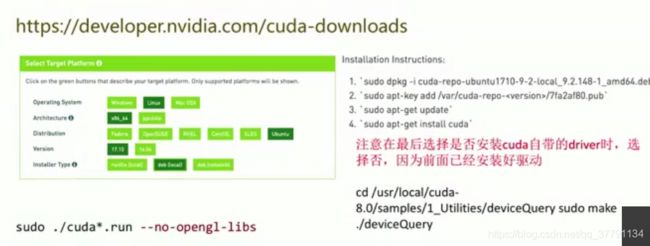
(2)cuda环境配置:cuda的安装
(3)caffe环境配置:caffe编译与参数选择
问题:笔记本双显卡系统,登陆界面无限循环,无法进入桌面。
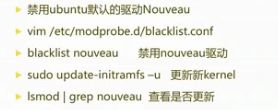
问题:The Nouveau kernel driver iscurrently in use by your system
具体还可以查看:https://gist.github.com/wangruohui/dfo
![]()
- cudu安装:
- caffe 安装
- caffe配置文件解析
USE_CUDNN:=1是否使用cudnn
CPU_ONLY:=1是否编译cpu版
USE_OPENCV:=1 是否使用opencv
OPENCV_VERSION:=3 是否使用opencv3
USE_LEVELDB:=0是否使用LEVELDB输入格式
USE_LMDB:=0 是否使用LMDB输入格式
CUDA_ARCH:= -gencode arch = compute_20,code =sm_20 cuda架构有关,按照caffe文件中的默认提示去修改配置选项就好
CUDA_DIR:=/usr/local/cuda cuda目录:按照过程中会默认创建
BLAS:=atlas(open,mkl) 矩阵加速库的选择
PYTHON_INCLUDE:=
PYTHON_LIB:=
WITH_PYTHON_LAYER:=1 python路径和python接口
INCLUDE_DIRS:=$(PYTHON_INCLUDE)
LIBRARY_DIRS:=$(PYTHON_LIB) 其他依赖库
USE_NCCL:=1 nccl多GPU训练
小结:nvidia-driver,cuda,caffe是递进的依赖关系,后者必须依赖于前者,另外cudnn的安装是可选的。
前面的安装说明只适用于ubuntu系统,一般不顺利的都在nvidia-driver安装中
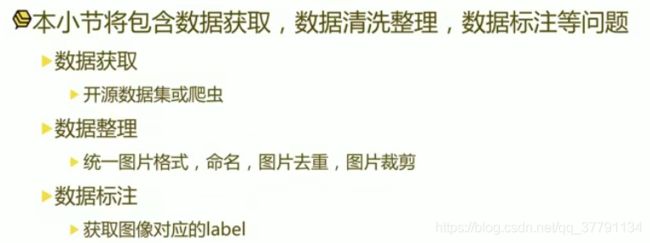
三、数据准备
- 数据获取:
港中文汤晓鸥CelebA数据集。多样性好。适合咱们任务。
爬虫开源项目:百度、必应、google
- 数据处理
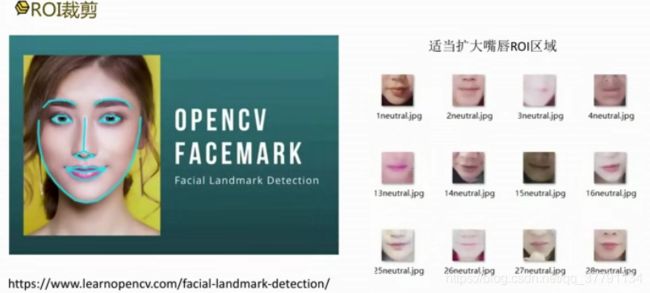
ROI裁剪:
使用某种办法得到嘴唇区域,然后对嘴唇区域裁剪进而进行分割,提高模型抗干扰能力。
opencv 进行关键的检测,裁剪嘴唇区域(正方形)
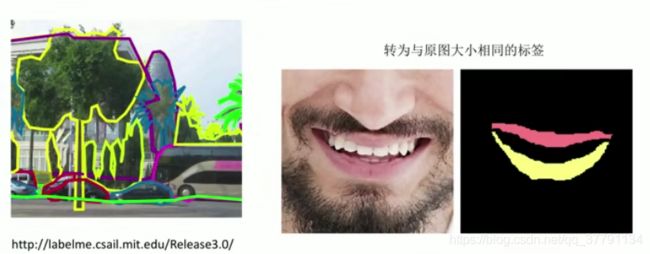
- 使用开源工具labelme标注轮廓
分割任务,还是对像素的分类任务,分为背景,上嘴唇,下嘴唇三类,脚本可以自己写一下?这里是指啥脚本?变为不同的颜色的脚本?
四、caffe的基本使用
- caffe框架特点:
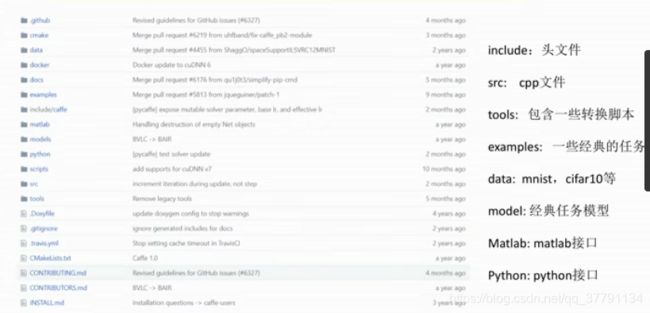
1.caffe以c++/CUDA代码为主,支持命令行、python、Matlab,多机多卡可使用,cpu和GPU通用
2.开发者:Berkeley Aritificial Intelligence Research,贾扬清,Evan Shelhamer
3.支持平台:linux,mac,windiws
4.依赖环境:cuda(加速GPU训练的库),protobuf(序列化文件),opencv(数据读取接口)等
- 笔者为啥喜欢caffe:数据与网络定义,训练测试代码分离
- 四维张量blob(N,C,H,W),N是batch size大小,C是channel,H,W分布图像宽高
- tools:获取数据,减去均值、数据格式的转换、
- caffe网络文件
参数的初始化在训练中是一个比较关键的配置
总结:
- 每一个网络层都用一个layer表示
- 除了输入层没有bottom,输出层没有up,每一层都有bottom和up,串联成网络文件
- 每一种layer,都有layer_param,用于实现一些参数的配置
- 误差的反向传播从loss开始到第一个卷积层。
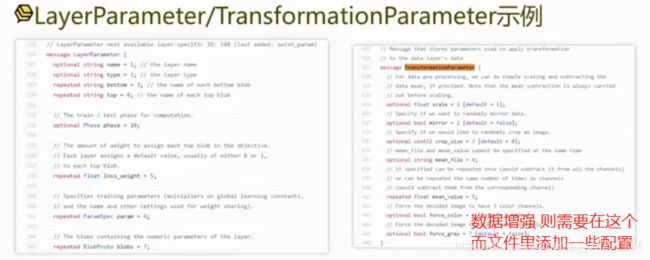
caffe.proto序列化文件:每一个层度有layer_param
root/src/caffe/pro/caffe.proto
使用protobuf工具进行数据序列化存储和解析,实际使用的适合会编译成与所定义的数据结构对应的代码,从而实现数据的读取、解析和存储
例子:LayerParameter/TransformationParameter示例
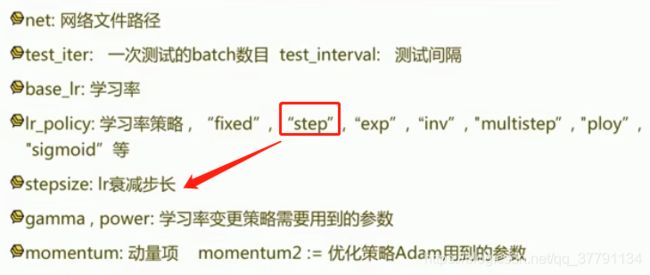
- 训练配置solver.prototxt
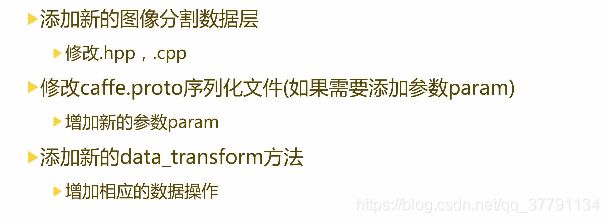
五、caffe添加分割任务网络层
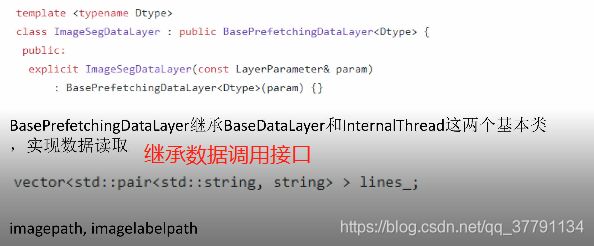
include/caffe/layers/image_seg_data_layer.hpp
image_seg_data_layer.cpp
在数据层的cpp中,最后有两行;
工厂设计模式:
INSTANTIATE_CLASS(ImageDataLayer);
REGISTER_LAYER_CLASS(ImageData);
caffe.proto
在message TransformationParameter添加:
  // Image augmentation
  // Specify the range of scaling factor for doing resizing
  optional float min_scaling_factor = 8 [default = 0.75];
  optional float max_scaling_factor = 9 [default = 1.50];
  // Specify the angle for doing rotation
  optional uint32 max_rotation_angle = 10 [default = 0];
  // Specify the contrast, brightness, smooth and color shift for augmentation
  optional bool contrast_brightness_adjustment = 11 [default = false];
  optional bool smooth_filtering = 12 [default = false];
  optional float min_contrast = 14 [default = 0.8];
  optional float max_contrast = 15 [default = 1.2];
  optional uint32 max_brightness_shift = 16 [default = 5];
  optional float max_smooth = 17 [default = 6];
  optional uint32 max_color_shift = 20 [default = 0];

  // Min side resizing, keep aspect ratio
  optional uint32 min_side_min = 13 [default = 0];
  optional uint32 min_side_max = 21 [default = 0];
  optional uint32 min_side = 22 [default = 0];

  optional float apply_probability = 18 [default = 0.5];
  optional bool debug_params = 19 [default = false];

  optional bool use_deformed_resize = 23 [default = false];
  optional float deformed_resize_th = 24 [default = 2];
  optional uint32 crop_h = 25 [default = 0];
  optional uint32 crop_w = 26 [default = 0];
datatransformer.cpp
举个例子
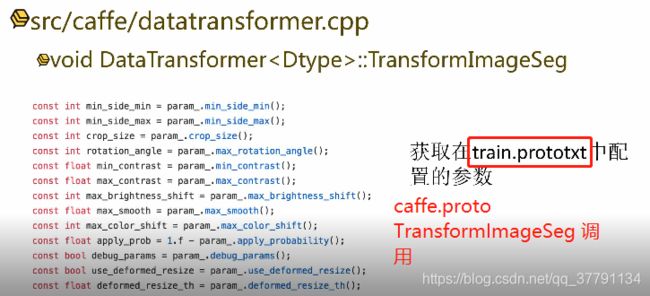
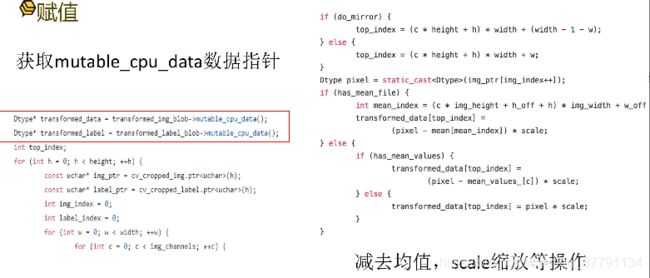
将增强的数据放进现存中,第一步就是,赋值。在data_transformer.cpp中则需要获取mutable_cpu_data数据指针
			Dtype* transformed_data = transformed_img_blob->mutable_cpu_data();
			Dtype* transformed_label = transformed_label_blob->mutable_cpu_data();
			int top_index;
			for (int h = 0; h < height; ++h) {
				const uchar* img_ptr = cv_cropped_img.ptr(h);
				const uchar* label_ptr = cv_cropped_label.ptr(h);
				int img_index = 0;
				int label_index = 0;
				for (int w = 0; w < width; ++w) {
					for (int c = 0; c < img_channels; ++c) {
						if (do_mirror) {
							top_index = (c * height + h) * width + (width - 1 - w);
						} else {
							top_index = (c * height + h) * width + w;
						}
						Dtype pixel = static_cast(img_ptr[img_index++]);
						if (has_mean_file) {
							int mean_index = (c * img_height + h_off + h) * img_width + w_off + w;
							transformed_data[top_index] =
								(pixel - mean[mean_index]) * scale;
						} else {
							if (has_mean_values) {
								transformed_data[top_index] =
									(pixel - mean_values_[c]) * scale;
							} else {
								transformed_data[top_index] = pixel * scale;
							}
						}
					}

					for (int c = 0; c < label_channels; ++c) {
						if (do_mirror) {
							top_index = (c * height + h) * width + (width - 1 - w);
						} else {
							top_index = (c * height + h) * width + w;
						}
						Dtype pixel = static_cast(label_ptr[label_index++]);
						transformed_label[top_index] = (Dtype)pixel * 0.0039;
					}
				}
			}
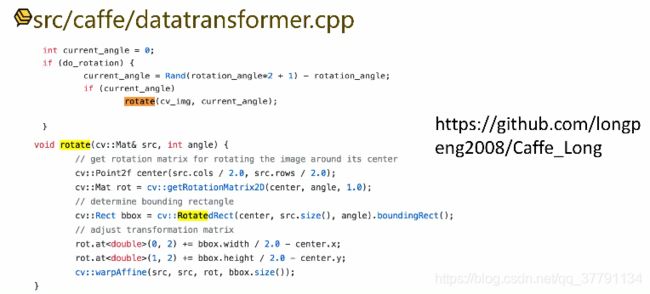
总结:原生的caffe中,仅支持镜像操作和crop操作,为了增加模型的鲁棒性,我们必须自己添加新的图像增强操作,即增加新的分割任务网络层。train.prototxt上定义的训练数据扩增方法设置好,在image_seg_data_layer.hpp ----》 image_seg_data_layer.cpp ----》caffe.proto(定义)------》datatransformer.cpp(操作)
六、关键技术
任务分析:精简任务
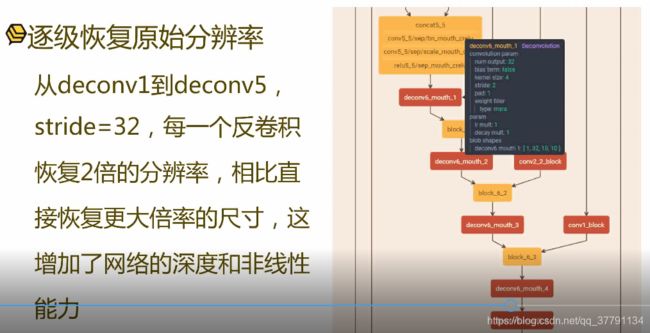
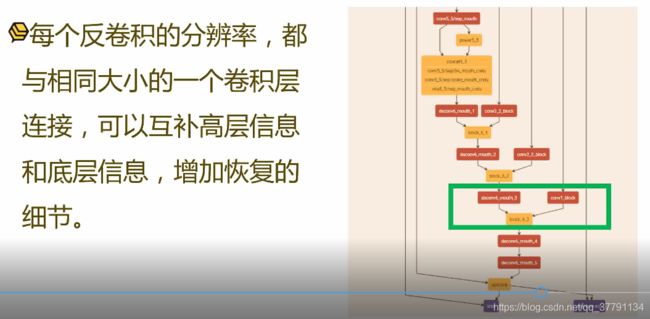
反卷积:图像分割任务的基础结构
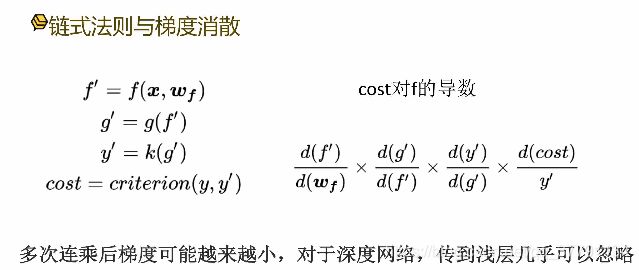
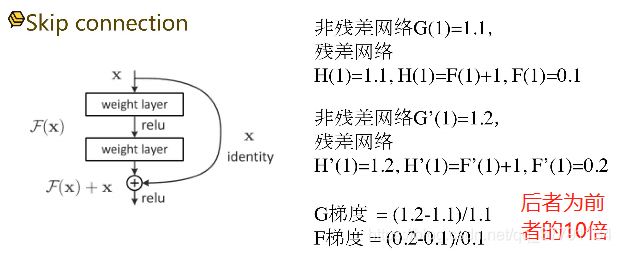
残差连接:提升图像分割任务精度的利器。有效缓解梯度消散问题,融合的细节、底层和高层的知识
- 精简任务:
图像背景复杂,做嘴唇的分割,显然比较困难。故可以做ROI人脸检测到人脸,关键点检测算法检测到嘴唇区域,然后进行分割,这样任务就好简单了一些。
- 反卷积 Deconvolution
卷积的逆过程
输入的每一个像素都会对输出的每一个区域产生作用
ConvolutionLayer: output = (input +2 *pad - kernel_size) /stride +1
(4+2*0-3)/1+1 = 2
DeconvolutionLayer: output = (input -1)*stride + kernel_size -2*pad
(2 -1)*1 + 3 - 2*0 = 4
- Segnet 分割网络
相同分辨率的featuremap 进行连接
- 残差连接
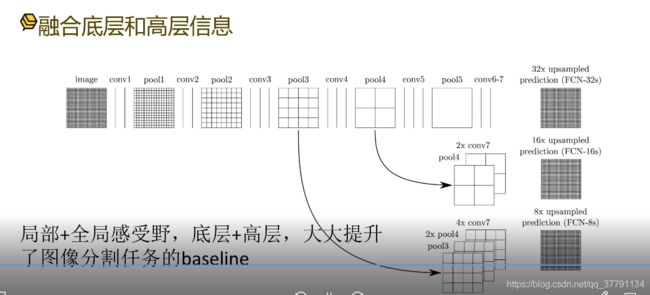
从pool3 到pool4 感受野越来越大,反卷积也是如此。
我们将pool4 和2*conv7的感受野进行融合,就是实现了局部和全局的感受野的融合,好处就是底层信息与高层信息进行融合,比如浅层网络 ,从conv1 到 conv 3从底层信息到高层信息的抽象,越到后面越是如此,在反卷积时,我们将底层的信息也融合进来,这样可以大大提高图像分割任务,尤其是边缘部分大大提高了图像分割任务的baseline。
七、模型选择与设计
设计任务需要的模型结构
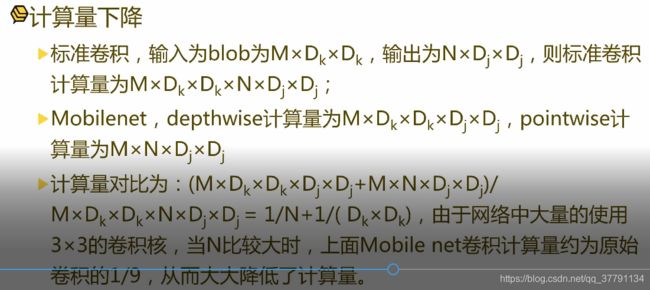
1.基础模型:mobilelnet
2.反卷积与skip连接:具体的设计细节
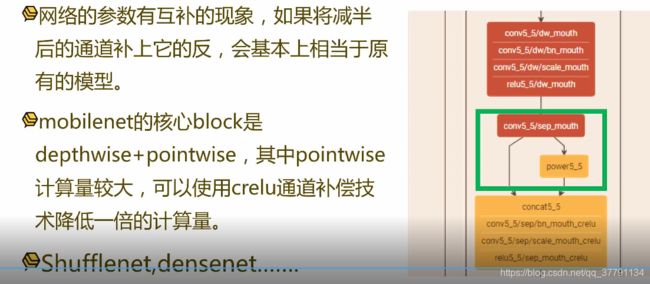
3.模型的压缩技巧:互补卷积等
- 基准模型:mobilenet
优势:
- 反卷积的设计
- 模型设计之skip连接
- 模型设计之crule通道补偿
八、模型训练
- 训练接口:c++接口、单GPU、GTX980
- 训练细节:迁移学习、优化方法等
- 训练结果分析:可视化
- 训练总结
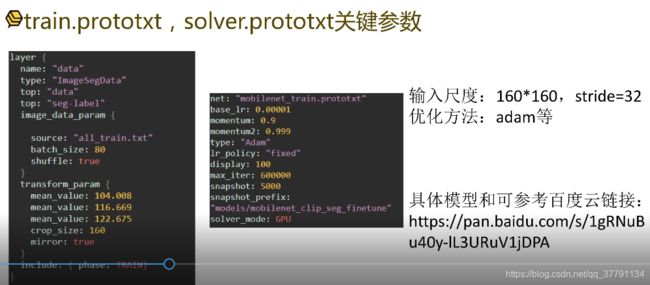
- train.protoxtx,solver.prototxt关键参数
- C++训练接口(实现训练和数据的分离)
SOLVER=./mobilenet_solver.prototxt
WEIGHTS=./mobilnet.caffemodel
caffe/build/tools/caffe train -solver $SOLVER -weights $WEIGHTS -gpu 0 2>&1 | tee log.txt
迁移学习:将一个任务训练好的参数,用于另一个新的任务的参数初始化
- 训练结果可视化
记得保存log,这样才能进行相关分析
- 模型常见问题
不收敛:学习率不合适,数据不好,模型有错等。建议不收敛,首先看数据是否有错,模型输入非常小或者非常大
过拟合:数据太小,模型太小等。训练很好,但是测试非常差,这就是过拟合,对于分类任务,数据太小时尤其会导致过拟合;模型太小,则每个参数都很关键,如果数据又很少的话,那么每个参数去拟合数据分布其中就起到了非常关键的作用,由于其鲁棒性不强,则在测试新的数据时效果就不好了。
- 对于移动端的小模型,那么128或者256 batch_size应该没问题。
- 学习率靠经验
- 抖动的宽度大,可提高下batch_size
- 图三红色是训练 ,绿色是验证集,可见模型过拟合,则第一个思路增加数据,数据越多越拟合真实的分布,则过拟合就越第。第二个针对模型太小,则增加过拟合参数,增加鲁棒性。
九、模型测试
测试的整个流程:
1.准备数据:利用opencv的关键点检测算法剪裁出嘴唇ROI区域
2.inference过程:test.prototxt,python接口使用
3.结果分析:查看结果
- 关键点检测
使用openCV + DLIB求取关键点
利用cascade模型做人脸检测,dlib的模型做关键点检测
ROI获取检测
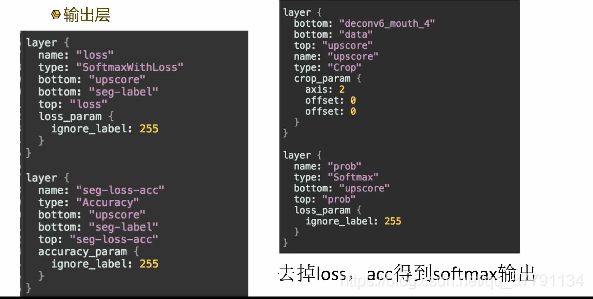
- train.prototxt与test.prototxt
输入层
输出层:
- python接口预测
numpy:h*w*c
caffe:b*c*h*w
- 测试结果:
没有使用跟踪策略,所以较好说明了模型的鲁棒性。

