linux进阶_系统启动与内核管理
由于本章内容过长,有些子章节将另起博客编写。阅读时请注意跳转链接。
本意内容
- Linux组成
- Linux进阶_CentOS系统启动流程
- Linux进阶_systemd详解(CentOS7)
-
- 系统服务(CentOS 6)
- 自定义服务脚本:
- Linux进阶_GRUB详解
-
- 1. grub legacy配置文件
- 2. 制作系统选择菜单图片
- 3. grub加密
- 4. grub命令
- 模拟灾难,删除/boot恢复之——CentOS 6
- 模拟灾难,删除/boot——CentOS 7
- 简单自制linux系统
- 系统目录
-
- /proc目录
- /sys目录
- sysctl命令
- 内核
-
- 编译内核
- 编译内核的其它选项
-
- 卸载内核
- Busybox介绍
-
- Busybox编译安装
- 练习
-
- 练习答案
Linux组成
- Linux: kernel+rootfs
▷kernel: 进程管理、内存管理、网络管理、驱动程序、文件系统、安全功能
▷rootfs: 程序和glibc
▷库:函数集合, function, 调用接口(头文件负责描述)
▷程序:二进制执行文件 - 内核设计流派:
-
单内核(monolithic kernel):Linux
把所有功能集成于同一个程序,分层实现不同功能,系统庞大复杂 -
微内核(micro kernel):Windows, Solaris
每种功能使一个单独子系统实现,将内核功能移到用户空间,性能差 -
也可以内核参数:init=/bin/bash (指定系统先启动/bin/bash)
Linux进阶_CentOS系统启动流程
- 链接跳转:由浅入深_CentOS系统启动流程
Linux进阶_systemd详解(CentOS7)
- 链接跳转:systemd详解(by:CentOS7)
系统服务(CentOS 6)
-
ntsysv:调整当前模式的服务启动项
-
chkconfig(CentOS 6)
chkconfig --list [SERVER] # 查看所有模式的服务启动项
chkconfig --level 345 atd off #设置某模式下的服务的启动与否
chkconfig --add # 添加脚本到“系统服务的运行级信息”
chkconfig --del # 从“系统服务的运行级信息”删除脚本
- chkconfig命令
- 查看服务在所有级别的启动或关闭设定情形:
chkconfig [--list] [name] - 添加服务脚本
chkconfig --add name - 删除服务
chkconfig --del name - 修改指定的链接类型
chkconfig [--level X] name
–level LLLL: 指定要设置的级别;省略时表示2345
- 查看服务在所有级别的启动或关闭设定情形:
[root@CentOS6 boot]$#chkconfig --level 234 atd on
- service 命令
- 服务启动/停止/重启/状态
service name {start|stop|restart|status}
- xinetd管理服务(CentOS 7被systemd代替)
- 瞬态(Transient)服务被xinetd进程所管理,进入的请求首先被xinetd代理
- 配置文件:
/etc/xinetd.conf、/etc/xinetd.d/
自定义服务脚本:
- 脚本定义:
#!/bin/bash
#
# chkconfig: 2345 96 4
# description: test service
#
...
- 存放路径:
/etc/init.d/ - 控制:
service SERVER start或/etc/init.d/testsrv start
-
xinetd管理的服务(CentOS 6)
“代理服务,代理非独立服务” -
systemd(CentOS 7)
同CentOS6上的xinetd
- 开机运行的脚本
(CentOS 6)可以放到:/etc/rc.d/rc*.d/S99local文件下
(CentOS 7)可以放到:/etc/rc.d/rc.local文件下(chmod +x加执行权限)
[root@CentOS6 rc2.d]$cat S99local
#!/bin/sh
#
# This script will be executed *after* all the other init scripts.
# You can put your own initialization stuff in here if you don't
# want to do the full Sys V style init stuff.

touch /var/lock/subsys/local
Linux进阶_GRUB详解
GNU GRUB(简称“GRUB”)是一个来自GNU项目的启动引导程序。GRUB是多启动规范的实现,它允许用户可以在计算机内同时拥有多个操作系统,并在计算机启动时选择希望运行的操作系统。GRUB可用于选择操作系统分区上的不同内核,也可用于向这些内核传递启动参数。
GNU GRUB的前身为Grand Unified Bootloader。它主要用于类Unix系统;同大多Linux发行版一样,GNU系统也采用GNU GRUB作为它的启动器。Solaris从10 1/06版开始在x86系统上也采用GNU GRUB作为启动器。
来自维基百科:GNU GRUB
- GRUB版本:
CentOS6使用的grub 0.97
CentOS7使用的grub 2
1. grub legacy配置文件
- 配置文件:
/boot/grub/grub.conf
#设定默认启动的菜单项;落单项(title)编号从0开始
default=#
#指定菜单项等待选项选择的时长
timeout=#
#菜单背景图片文件路径
splashimage=(hd#,#)/PATH/XPM_FILE
#隐藏菜单
hiddenmenu
#定义菜单项“标题”, 可出现多次
title TITLE
#查找stage2及kernel文件所在设备分区;为grub的根
root (hd#,#)
#启动的内核
kernel /PATH/TO/VMLINUZ_FILE [PARAMETERS]
#内核匹配的ramfs文件
initrd /PATH/TO/INITRAMFS_FILE
#启动选定的内核或操作系统时进行认证(STRING需要用grub-md5-crypt或grub-crypt生成口令)
password [--md5|--encrypted ] STRING
2. 制作系统选择菜单图片
- 准备一张640*480大小的图片
- 进行转换成xpm
[root@CentOS6 grub]$ convert -resize 640x480 -colors 14 win.jpg win.xpm
- 在配置文件
/boot/grub/grub.conf
splashimage=(hd0,0)/grub/splash.xpm.gz
把“splash.xpm.gz”换成“win.xpm”即可
splashimage=(hd0,0)/grub/win.xpm
3. grub加密
- grub加密方法
grub-md5-crypt、grub-crypt
[root@CentOS6 ~]$#grub-md5-crypt
Password:
Retype password:
$1$I7qkP0$tYnBknWpx/lIRcI98mc0P.
- 将口令加在
password --md5或password --encrypted后,然后放在/boot/grub/grub.conf。就可以防止在没有口令验证下进入单用户模式。如下:
[root@CentOS6 ~]$ cat /boot/grub/grub.conf
default=0
timeout=5
password --md5 $1$zs6kP0$7EIBhZNXOOINy1iGD6b/61  #加在这里
splashimage=(hd0,0)/grub/splash.xpm.gz
hiddenmenu
title CentOS 6 (2.6.32-754.el6.x86_64)
        root (hd0,0)
        kernel /vmlinuz-2.6.32-754.el6.x86_64 ro root=UUID=e5a4491f-5c14-4445-a1bc-f183825eedaa rd_NO_LUKS rd_NO_LVM LANG=en_US.UTF-8 rd_NO_MD SYSFONT=latarcyrheb-sun16 crashkernel=auto  KEYBOARDTYPE=pc KEYTABLE=us rd_NO_DM rhgb quiet
        initrd /initramfs-2.6.32-754.el6.x86_64.img
- 破解grub口令:
使用光盘进入救援模式,将/boot/grub/grub.conf的password这行删除即可。 - 破解root口令:
启动系统时,设置其运行级别1(单用户模式) - 进入单用户模式:
(1) 编辑grub菜单(选定要编辑的title,而后使用a 或 e 命令)
(2) 在选定的kernel后附加
1, s, S,single 都可以
(3) 在kernel所在行,键入“b”命令
4. grub命令
help: 获取帮助列表(help KEYWORD: 详细帮助信息)find (hd#,#)/PATH/TO/SOMEFILE:root (hd#,#)kernel /PATH/TO/KERNEL_FILE: 设定本次启动时用到的内核文件;额外还可添加许多内核支持使用的cmdline参数(例如:max_loop=100 selinux=0 init=/path/to/init)initrd /PATH/TO/INITRAMFS_FILE: 设定为选定的内核提供额外文件的ramdiskboot: 引导启动选定的内核- 内核参数文档:
/usr/share/doc/kernel-doc-2.6.32/Documentation/kernel-parameters.txt - 查看内核参数
[root@CentOS6 boot]$ cat /proc/cmdline
ro root=UUID=e5a4491f-5c14-4445-a1bc-f183825eedaa rd_NO_LUKS rd_NO_LVM LANG=en_US.UTF-8 rd_NO_MD SYSFONT=latarcyrheb-sun16   KEYBOARDTYPE=pc KEYTABLE=us rd_NO_DM rhgb quiet
模拟灾难,删除/boot恢复之——CentOS 6
- 链接跳转:模拟灾难,删除/boot恢复之——CentOS 6
CentOS 7往下翻
模拟灾难,删除/boot——CentOS 7
- 链接跳转:模拟灾难,删除/boot——CentOS 7
CentOS 6往上翻
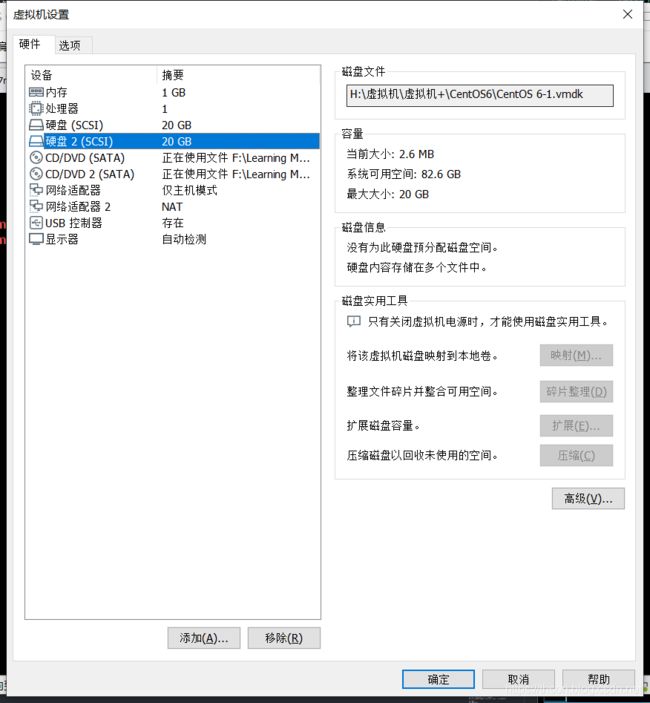
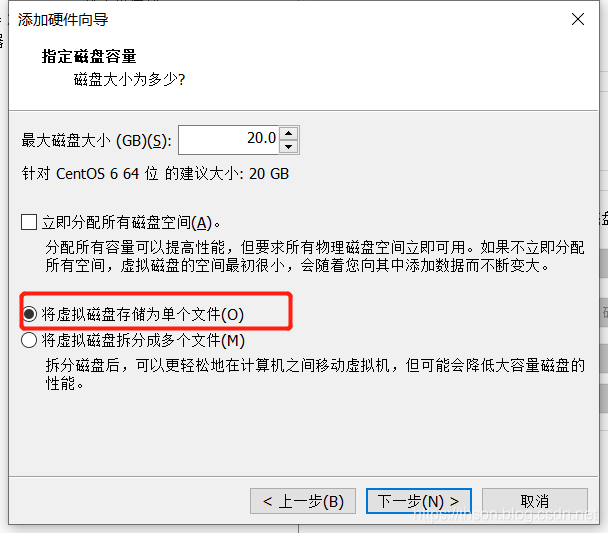
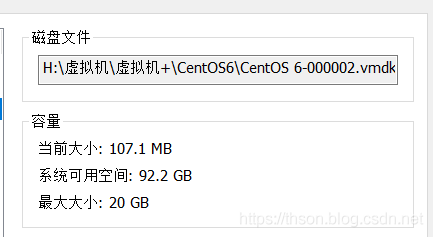
简单自制linux系统
- 要自制Linux系统,就得依赖于现有的Linux系统。
- 创建一块新的硬盘

-
如果添加完后系统无法识别
可以用命令:echo '- - -' > /sys/class/scsi_host/host0/scan
echo '- - -' > /sys/class/scsi_host/host1/scan
echo '- - -' > /sys/class/scsi_host/host2/scan

-
分区并创建文件系统
/dev/sdb1对应/boot
/dev/sdb2对应根/
[root@CentOS6 grub]$ fdisk /dev/sdb
[root@CentOS6 grub]$ lsblk
NAME   MAJ:MIN RM  SIZE RO TYPE MOUNTPOINT
sda      8:0    0   20G  0 disk
├─sda1   8:1    0    1G  0 part /boot
├─sda2   8:2    0  9.8G  0 part /
├─sda3   8:3    0  4.9G  0 part /data
├─sda4   8:4    0    1K  0 part
└─sda5   8:5    0    2G  0 part [SWAP]
sr0     11:0    1  3.7G  0 rom  /media/CentOS_6.10_Final
sr1     11:1    1    2G  0 rom  /mnt/cd2
sdb      8:16   0   20G  0 disk
├─sdb1   8:17   0    1G  0 part
└─sdb2   8:18   0   10G  0 part
- 分区并格式化
[root@CentOS6 grub]$ mkfs.ext4 /dev/sdb1
...
[root@CentOS6 grub]$ mkfs.ext4 /dev/sdb2
...
- 挂载boot
[root@CentOS6 grub]$ mkdir /mnt/boot     #子目录必须为boot
[root@CentOS6 grub]$ mount /dev/sdb1 /mnt/boot
[root@CentOS6 grub]$ df
Filesystem     1K-blocks    Used Available Use% Mounted on
...省略
/dev/sdb1        1010780    1304    956464   1% /mnt/boot
- 安装grub
[root@CentOS6 grub]$ grub-install --root-directory=/mnt /dev/sdb
Probing devices to guess BIOS drives. This may take a long time.
Installation finished. No error reported.
This is the contents of the device map /mnt/boot/grub/device.map.
Check if this is correct or not. If any of the lines is incorrect,
fix it and re-run the script `grub-install`.
(fd0)   /dev/fd0
(hd0)   /dev/sda
(hd1)   /dev/sdb

[root@CentOS6 grub]$ ls /mnt/boot/
grub  lost+found
[root@CentOS6 grub]$ ls /mnt/boot/grub/
device.map     ffs_stage1_5      minix_stage1_5     stage2           xfs_stage1_5
e2fs_stage1_5  iso9660_stage1_5  reiserfs_stage1_5  ufs2_stage1_5
fat_stage1_5   jfs_stage1_5      stage1             vstafs_stage1_5
- 复制内核和initramfs文件
[root@CentOS6 grub]$ cp /boot/vmlinuz-2.6.32-754.el6.x86_64 /mnt/boot/
[root@CentOS6 grub]$ cp /boot/initramfs-2.6.32-754.el6.x86_64.img /mnt/boot
- 建立grub.conf
也可以复制原/boot/grub/grub.conf的文件到新的目录/mnt/boot/grub下
[root@CentOS6 grub]$ vim /mnt/boot/grub/grub.conf
default=0
timeout=5
title CentOS 6
        root (hd0,0)
        kernel /vmlinuz-2.6.32-754.el6.x86_64 ro root=/dev/sda2 selinux=0 init=/bin/bash
        initrd /initramfs-2.6.32-754.el6.x86_64.img
- 创建一级目录
[root@CentOS6 grub]$ mkdir /mnt/sysroot
[root@CentOS6 grub]$ mount /dev/sdb2 /mnt/sysroot/
[root@CentOS6 grub]$ df
Filesystem     1K-blocks    Used Available Use% Mounted on
/dev/sda2        9948012 9744912         0 100% /
tmpfs             501508     224    501284   1% /dev/shm
/dev/sda1         999320   34116    912776   4% /boot
/dev/sda3        4908544   10008   4642536   1% /data
/dev/sr1         2136278 2136278         0 100% /mnt/cd2
/dev/sr0         3897932 3897932         0 100% /media/CentOS_6.10_Final
/dev/sdb1        1010780   30956    926812   4% /mnt/boot
/dev/sdb2       10194708   23064   9647124   1% /mnt/root

[root@CentOS6 grub]$ mkdir –pv /mnt/sysroot/{
     etc,lib,lib64,bin,sbin,tmp,var,usr,sys,proc,opt,home,root,boot,dev,mnt,media}
- 复制bash和相关库文件
复制命令和相关库文件用下面这个脚本,源码如下:
注意/mnt/sysroot这个目录,就是自制系统的根目录
[root@CentOS6 ~]$cat copycmd.sh
#!/bin/bash

ch_root="/mnt/sysroot"

[ ! -d $ch_root ] && mkdir $ch_root

bincopy() {

    if which $1 &>/dev/null; then

        local cmd_path=`which --skip-alias $1`
        local bin_dir=`dirname $cmd_path`
        [ -d ${ch_root}${bin_dir} ] || mkdir -p ${ch_root}${bin_dir}
        [ -f ${ch_root}${cmd_path} ] || cp $cmd_path ${ch_root}${bin_dir}
        return 0
    else
        echo "Command not found."
        return 1
    fi
}

libcopy() {

    local lib_list=$(ldd `which --skip-alias $1` | grep -Eo '/[^[:space:]]+')
    for loop in $lib_list;do
        local lib_dir=`dirname $loop`
        [ -d ${ch_root}${lib_dir} ] || mkdir -p  ${ch_root}${lib_dir}
        [ -f ${ch_root}${loop} ] || cp $loop ${ch_root}${lib_dir}
    done
}


read -p "Please input a command: " command

while [ "$command" != "quit" ];do
    if bincopy $command ;then
        libcopy $command
    fi
    read -p "Please input a command or quit: " command
done
- 复制相关命令及相关库文件
如:ifconfig,insmod,ping,mount,ls,cat,df,lsblk,blkid等 - 将刚才添加的硬盘移动到新的虚拟机就可以使用啦。
系统目录
/proc目录
- 内核把自己内部状态信息及统计信息以及可配置参数通过proc伪文件系统加以输出
- 帮助:man proc
只读:输出信息,不可用vim编辑
可写:可接受用户指定“新值”来实现对内核某功能或特性的配置,可以使用"echo"命令来临时设置参数 - /proc/sys
(1) sysctl命令用于查看或设定此目录中诸多参数
sysctl -w path.to.parameter=VALUE
sysctl -w kernel.hostname=mail.magedu.com
(2) echo命令通过重定向方式也可以修改大多数参数的值
echo “VALUE” > /proc/sys/path/to/parameter
echo “websrv” > /proc/sys/kernel/hostname
/sys目录
sysfs:为用户使用的伪文件系统,输出内核识别出的各硬件设备的相关属性信息,也有内核对硬件特性的设定信息;有些参数是可以修改的,用于调整硬件工作特性
udev通过此路径下输出的信息动态为各设备创建所需要设备文件,udev是运行用户空间程序
专用工具:udevadmin, hotplug
udev为设备创建设备文件时,会读取其事先定义好的规则文件,一般在/etc/udev/rules.d及/usr/lib/udev/rules.d目录下
sysctl命令
- 在运行时配置内核参数,管理着
/proc/sys/目录下的配置文件,使得/proc/sys的配置可以被保存 - 被修改的配置文件:
/etc/sysctl.conf
(1) 设置某参数
sysctl -w parameter=VALUE
(2) 通过读取配置文件设置参数
sysctl -p [/path/to/conf_file]
(3) 查看所有参数
sysctl -a - 常用的几个参数对应:
net.ipv4.ip_forward ==> /proc/sys/net/ipv4/ip_forward
net.ipv4.icmp_echo_ignore_all ==> /proc/sys/net/ipv4/icpm_echo_ignore_all
内核
-
单内核体系设计,但充分借鉴了微内核设计体系的优点,为内核引入模块化机制
-
内核组成部分:
- kernel:内核核心,一般为bzImage,通常在/boot目录下(名称为vmlinuz-VERSION-RELEASE)
- 内核模块一般放置于
/lib/modules/VERSION-RELEASE/ - 内核配置文件:
/boot/config
m:模块
y:启用
is not set:未启用
-
uname命令:
打印系统信息
uname [OPTION]...
| [OPTION] | 意义 |
|---|---|
-n |
显示节点名称 |
-r |
显示VERSION-RELEASE |
-a |
显示所有信息 |
内核模块命令
-
lsmod命令
显示由核心已经装载的内核模块
显示的内容来自于:/proc/modules文件 -
modinfo命令
显示模块的详细描述信息
modinfo [ -k kernel ] [ modulename|filename... ]
| [OPTION] | 意义 |
|---|---|
| -n | 只显示模块文件路径 |
| -p | 显示模块参数 |
| -a | 作者 |
| -d | 描述 |
示例:
lsmod |grep xfs
modinfo xfs
- modprobe命令
装载或卸载内核模块
`modprobe [ -C config-file ] [ modulename ] [ module parame-ters... ]`
`modprobe [ -r ] modulename…`
配置文件:/etc/modprobe.conf, /etc/modprobe.d/*.conf
-
depmod命令
内核模块依赖关系文件及系统信息映射文件的生成工具
装载或卸载内核模块: -
insmod命令
指定模块文件,不自动解决依赖模块
insmod [ filename ] [ module options... ]
insmod `modinfo –n exportfs`
lnsmod `modinfo –n xfs`
- rmmod命令
卸载模块
rmmod [ modulename ]
rmmod xfs
rmmod exportfs
编译内核
(1) 准备好开发环境
(2) 获取目标主机上硬件设备的相关信息
(3) 获取目标主机系统功能的相关信息
例如:需要启用相应的文件系统
(4) 获取内核源代码包(www.kernel.org)
#下载内核文件
[root@localhost ~]$ wget https://cdn.kernel.org/pub/linux/kernel/v5.x/linux-5.1.10.tar.xz

#解压
[root@localhost ~]$ tar xf linux-5.1.10.tar.xz

#进入文件夹
[root@localhost /data]$ cd linux-5.1.10

#安装所需要的依赖包
[root@localhost linux-5.1.10]$ yum -y install ncurses-devel openssl-devel elfutils-libelf-devel flex bison

#生成配置文件
[root@localhost linux-5.1.10]$ make menuconfig
菜单方式:
[ ]: N  不选择
[M]: M  模块化
[*]: Y  编译到内核

#make,全编译`-j 2`是2线程模式
make -j 2

#在`/lib/modules`下生成modules文件
make modules_install

#make安装
make install
编译内核的其它选项
- 配置内核选项
支持“更新”模式进行配置:make help
(a)make config:基于命令行以遍历的方式配置内核中可配置的每个选项
(b)make menuconfig:基于curses的文本窗口界面
©make gconfig:基于GTK (GNOME)环境窗口界面
(d)make xconfig:基于QT(KDE)环境的窗口界面 - 支持“全新配置”模式进行配置
(a)make defconfig:基于内核为目标平台提供的“默认”配置进行配置
(b)make allyesconfig: 所有选项均回答为“yes“
©make allnoconfig: 所有选项均回答为“no“ - 编译选择
- 全编译:
make [-j #] - 编译内核的一部分功能:
(a) 只编译某子目录中的相关代码
cd /usr/src/linux
make dir/
(b) 只编译一个特定的模块
cd /usr/src/linux
make dir/file.ko
©示例:只为e1000编译驱动:
make drivers/net/ethernet/intel/e1000/e1000.ko
- 全编译:
- 如何交叉编译内核:
(a)编译的目标平台与当前平台不相同
make ARCH=arch_name
(b)要获取特定目标平台的使用帮助
make ARCH=arch_name help
©示例:make ARCH=arm help
- 注意:在已经执行过编译操作的内核源码树做重新编译,需要事先清理操作:
make clean:清理大多数编译生成的文件,但会保留config文件等
make mrproper: 清理所有编译生成的文件、config及某些备份文件
make distclean:mrproper、清理patches以及编辑器备份文件
卸载内核
- 删除/lib/modules/目录下不需要的内核库文件
- 删除/usr/src/linux/目录下不需要的内核源码
- 删除/boot目录下启动的内核和内核映像文件
- 更改grub的配置文件,删除不需要的内核启动列表
Busybox介绍
Busybox 最初是由 Bruce Perens 在 1996 年为 Debian GNU/Linux 安装盘编写的。其目标是在一张软盘(存储空间只有1.4-1.7MB)上创建一个可引导的 GNU/Linux 系统,可以用作安装盘和急救盘
Busybox 是一个开源项目,遵循GPL v2协议。Busybox将众多的UNIX命令集合进一个很小的可执行程序中,可以用来替代GNU fileutils、shellutils等工具集。Busybox中各种命令与相应的GNU工具相比,所能提供的选项比较少,但是也足够一般的应用了。Busybox主要用于嵌入式系统
Busybox 是一个集成了三百多个最常用Linux命令和工具的软件。BusyBox 包含了一些简单的工具,例如ls、cat和echo等等,还包含了一些更大、更复杂的工具,例grep、find、mount以及telnet。有些人将 BusyBox 称为 Linux 工具里的瑞士军刀。简单的说BusyBox就好像是个大工具箱,它集成压缩了 Linux 的许多工具和命令,也包含了 Android 系统的自带的shell
官方网站:https://busybox.net/
- 定制小型的Linux操作系统:linux内核+busybox
Busybox编译安装
- 编译Busybox,安装过程:
busybox 的编译过程与Linux内核的编译类似
[root@localhost ~]$ yum install gcc gcc-c++ glibc glibc-devel pcre pcre-devel openssl openssl-devel systemd-devel zlib-devel libmcrypt-devel glibc-static ncurses-devel

[root@localhost ~]$ wget https://busybox.net/downloads/busybox-1.30.1.tar.bz2

[root@localhost ~]$ cd busybox-1.31.0

[root@localhost ~]$ make menuconfig     #Busybox Settings -->Build Options -->[*] Build BusyBox as a static binary (no shared libs)

[root@localhost ~]$ make -j 8      #如果出错,执行make clean后,重新执行上面命令

[root@localhost ~]$ mkdir /mnt/sysroot/
[root@localhost ~]$ cp -a _install/* /mnt/sysroot/
- busybox的使用有三种方式:
(1)busybox后直接跟命令,如 busybox ls
(2)直接将busybox重命名,如 cp busybox tar
(3)创建符号链接,如 ln -s busybox rm (推荐) - busybox提供自动方法:busybox编译成功后,执行make install,则会产生一个_install目录,其中包含了busybox及每个命令的软链接
练习
- 破解root口令,并为grub设置保护功能
- 破坏本机grub stage1,而后在救援模式下修复之
- 删除vmlinuz和initramfs文件后无法启动,两种方法恢复之
- 增加新硬盘,在其上制作能单独运行kernel和bash的系统
- 在U盘上定制linux和busybox,使其可启动系统,并具有网络功能
- 删除/etc/fstab和/boot目录的所有文件,并恢复之
- 编译安装kernel,启用支持ntfs文件系统功能
- 为编译安装的httpd服务,实现service unit文件
- 破解centos7 口令
- 修改默认的启动内核为新编译内核
- 启动时临时禁用SELinux
- 启动时进入emergency模式
- 卸载编译安装的新内核
练习答案
- CentOS6破解root口令,并为grub设置保护功能
(1)重启,按a键,编辑内核
(2)在quiet后追加 1,回车启动到单用户模式
(3)不会密码就可以直接进入,进入系统后赶紧修改密码吧 - 破坏本机grub stage1,而后在救援模式下修复之
- 删除vmlinuz和initramfs文件后无法启动,两种方法恢复之
(1)重新安装内核:`rpm -ivh --force /YOURCD/Package/kernel-*.rpm
(2)复制光盘下的vmlinuz和initramfs到/boot下即可 - 增加新硬盘,在其上制作能单独运行kernel和bash的系统
答案在文中——简单自制linux系统 - 在U盘上定制linux和busybox,使其可启动系统,并具有网络功能
- 删除/etc/fstab和/boot目录的所有文件,并恢复之
CentOS 7:https://thson.blog.csdn.net/article/details/92764021
CentOS 6:https://thson.blog.csdn.net/article/details/92760614 - 编译安装kernel,启用支持ntfs文件系统功能
答案在文中——内核 - 为编译安装的httpd服务,实现service unit文件
- 破解centos7 口令
(1)重启,按e编辑内核参数
(2)在linux16后面追加:rd.break,按Ctrl+x
(3)命令:
mount -o remount,rw /sysroot
chroot /sysroot
passwd root
touch /.autorelabel
sync
exit
reboot - 修改默认的启动内核为新编译内核
修改/boot/grub/grub.conf文件的default=1 - 启动时临时禁用SELinux
内核参数追加:selinux=0 - 启动时进入emergency模式
- 卸载编译安装的新内核
答案在文中——内核