Gradle学习笔记2————Groovy基础语法
Gradle学习笔记2————Groovy基础语法
文章目录
- Gradle学习笔记2————Groovy基础语法
-
-
- 一.Groovy简介
-
- 1.Groovy简介
- 2.Groovy环境
- 二.Groovy和Java的差异
-
- 1.默认导入部分包
- 2. 方法重载
- 3.初始化数组
- 4.变量作用域
- 5.Lambda 表达式和方法引用操作符
- 6.String
- 7.基本变量
- 8.额外关键字
- 9. 其他细节差异
- 三.Groovy基础语法
-
- 1.和java相似点
- 2.变量
- 3.String
- 4.数据结构
- 四.Groovy闭包
-
- 1.闭包的基本语法
- 2.this / owner / delegate
- 3.授权策略
- 五.Groovy面向对象
-
- 1.基础概念
- 2.Groovy中的变量和作用域
- 3.元编程(groovy运行时方法调用)
- 六.Groovy文件操作
-
- 1.文件操作
- 2.操作Json
- 3.操作xml
- 七.参考资料
-
一.Groovy简介
1.Groovy简介
Groovy 是一种与 Java 语法兼容的 Java 平台面向对象程序设计语言。它既是一种静态语言,也是一种动态语言,具有与 Python、 Ruby 和 Smalltalk 类似的特性。它既可以作为 Java 平台的编程语言,也可以作为 Java 平台的脚本语言,被编译成 Java 虚拟机字节码,并且可以与其他 Java 代码和库无缝地互操作。
但相比Java语言,他支持动态类型,闭包等高级特性。同时支持面向过程编程。
所以从某种程度上来说,掌握Java语言之后,学习Groovy之后是非常轻松的一件事。
如果英文非常好,推荐直接阅读Groovy官网文档进行学习,可以更快,更容易的上手。
[官方文档]Groovy学习指南
2.Groovy环境
作为一个Android开发者,不需要下载太多的Groovy环境和ide,可以使用Android Studio作为开发工具。具体配置方法如下:
Android Studio 中如何运行 groovy 程序
如果嫌上述方法麻烦,更推荐可以通过task来运行Groovy语法
在根目录下的build.gradle 添加下面代码
task demo(){

    println "hello groovy"
}
在命令行输入命令(mac)
./gradlew demo
二.Groovy和Java的差异
Groovy和Java很像,但相比java,groovy又做了很多新特性,让我们一起看下
1.默认导入部分包
在Groovy中这些包和类都是默认导入的,也就是说你使用显式的 import 语句来使用它们
- java.io.*
- java.lang.*
- java.math.BigDecimal
- java.math.BigInteger
- java.net.*
- java.util.*
- groovy.lang.*
- groovy.util.*
2. 方法重载
在 Groovy 中,运行时选择将要调用的方法,即为运行时分派方法。这意味着将根据运行时参数的类型来选择该方法。在 Java 中,情况正好相反: 方法是在编译时根据声明的类型选择的。
int method(String arg) {

    return 1;
}
int method(Object arg) {

    return 2;
}
Object o = "Object";
int result = method(o);
在java中,它将走方法2,即返回2,因为编译是o是object类型,所以调用2
但在groovy中,它将调用方法1,因为在运行时,o实际是string类,所以会调用1
3.初始化数组
在java中数组初始化格式如下:
int[] array = {
     1, 2, 3};
int[] array2 = new int[] {
     4, 5, 6};
但在groovy中,因为{}被由于闭包语法,所以不能使用{}来进行数组初始化,groovy中数组初始化歌声如下
int[] array = [1, 2, 3]
但对于 Groovy 3 + ,你可以选择使用 Java 的数组初始化 语法:
def array2 = new int[] {
     1, 2, 3}
4.变量作用域
在groocy中,字段省略修饰符,不会导致类似java中的 package-private 字段:
class Person {

    String name
}
相反,它用于创建一个属性,即一个私有字段、一个有 getter 和setter方法的字段。
如果需要,可以通过使用@packagescope 注释来创建一个 package-private 字段
class Person {

    @PackageScope String name
}
5.Lambda 表达式和方法引用操作符
Java8 + 支持 lambda 表达式和方法引用操作符
Runnable run = () -> System.out.println("Run");  // Java
list.forEach(System.out::println);
Groovy3及以上版本也支持 Parrot 解析器中的这些特性。在 Groovy 的早期版本中,可以使用闭包来代替
Runnable run = {
      println 'run' }
list.each {
      println it } // or list.each(this.&println)
6.String
Groovy 中的单引号文本用于 String,双引号结果用可能是String 或 GString,具体取决于文本中是否存在插值。($)
assert 'c'.getClass()==String
assert "c".getClass()==String
assert "c${1}".getClass() in GString
在Groovy中双引号字符串被解释为 GString 值,如果使用 Groovy 和 Java 编译器编译包含美元字符的 String literal 类,Groovy 可能会因编译错误而失败,或者产生略有不同的代码。
7.基本变量
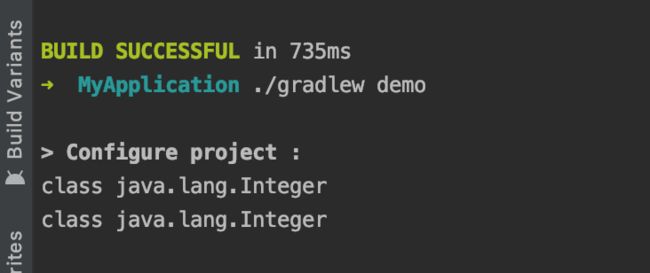
Groovy 使用对象处理所有事情,所以它自动包装所有对基本变量的引用。下面是一个使用 int 的例子
	int x = 666
    def y = 777
    println x.class
    println y.class
8.额外关键字
groovy中有许多与 Java 相同的关键字,Groovy 3也有与 Java 相同的 var 保留类型。此外,Groovy 还有以下关键字:
- as
- def
- in
- trait
- it
9. 其他细节差异
- 在 Groovy 中,== 相当于 Java 的 equals,,如果需要比较两个对象是否是同一个,需要使用 .is()
- 每行代码不用加分号,Groovy 中函数调用的时候还可以不加括号。
- 对于每一个 field,Groovy 都会⾃动创建其与之对应的 getter 与 setter 方法,从外部可以直接调用它,并且 在使⽤ object.fieldA 来获取值或者使用 object.fieldA = value 来赋值的时候,实际上会自动转而调⽤ object.getFieldA() 和 object.setFieldA(value) 方法
- 函数定义时,参数的类型也可以不指定。
- Groovy 中函数的返回值也可以是无类型的,并且无返回类型的函数,其内部都是按返回 Object 类型来处理的
- 当前函数如果没有使用 return 关键字返回值,则会默认返回 null,但此时必须使用 def 关键字
- 在 Groovy 中,所有的 Class 类型,都可以省略 .class
- Groovy 支持 ** 次方运算符
- 使用 assert 来设置断言,当断言的条件为 false 时,程序将会抛出异常。
- 可以使用 Number 类去替代 float、double 等类型
- switch 方法可以同时支持更多的参数类型。
- 可以通过?.来判断非空
三.Groovy基础语法
1.和java相似点
- 注释格式,多了一个#注释
- 变量命名,标识符和java相同
- 大多数运算符相同,多了次方运算符,重载运算符等
- 面向对象相关内容,和java基本相同
- 条件逻辑语法大部分相同,不过switch case比java有所增强,支持传入对象
- 循环逻辑大部分相同,引入for(i in 0…9) / for(i in list) / for(i in map)
2.变量
变量类型
和java一样变量分为基本类型 和 对象类型,基本类型和Java保持一致,有8种基本类型:byte,short,int,long,float,double,char,boolean。对象类型包括String以及自定义对象等。但事实上,groovy中的基本类型,最后都会被groovy编译器装箱成对象类型,也就是说,groovy中是不存在基本类型的。这一点我们在上面和java的差异第7点也有提过
变量定义
groovy中变量类型的定义可以跟Java保持一致,使用强类型定义,也可以使用 def 关键字进行弱类型定义
两者使用时机
- 若变量仅在自己定义的内部模块(或者自己定义的类或方法中)使用,并且只有自己在使用,可以采用 def 关键字进行弱类型定义
- 若变量是由外部传入,或者是提供给外部调用的某个方法的参数,则建议使用强类型进行定义
两这区别:
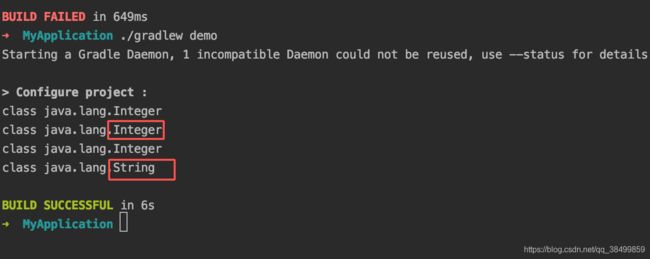
- 强类型定义不可以切换他的类型
- 弱类型定义可以切换它的类型
    int x = 666
    def y = 777
    println x.class
    println y.class

    x = "str"
    y = "str"
    println x.class
    println y.class
3.String
在Groovy中,字符串有三种形式,其区别如下:
- 单引号:使用单引号定义的字符串,支持+号操作符拼接,特殊字符用’'转义,同java双引号字符串
- 双引号:使用双引号定义的字符串,支持$直接引用变量
def x = 11
def y = "x = $x" //输出x = 11
println y
- 三引号:使用三引号定义的字符串,可以保留字符串格式
def text = '''line one // 输出结果:line one
line two               //         line two
line three            //          line three
'''
String类型:
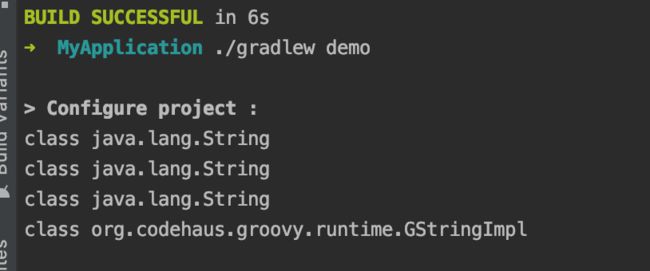
在groovy中,string分为两种类型:
- String:单引号,无$符合双引号,三引号定义的字符串,这个和java中的一样
- GString:有$符号的双引号定义的字符串,被成为可扩展字符串,其实现类为GStringImpl
    def x = 'StringX'
    def y = "StringY"
    def z = '"StringZ"'
    def j = "string:$y"
    println x.class
    println y.class
    println z.class
    println j.class
4.数据结构
a.list
groovy对应java中的list接口,实现类默认情况下是 ArrayList,除非您决定另外指定,list变量由[]定义,其元素可以是任何对象
list常用的api
- 排序
 	def sortList = [6, -3, 9, 2, -7, 1, 5]
 	Collections.sort(sortList)
	 println sortList.toListString() // 输出:[-7, -3, 1, 2, 5, 6, 9]
	 // 按照绝对值大小进行排序
	 Comparator cm = {
      a, b ->
  	 	a == b ? 0 : Math.abs(a) < Math.abs(b) ? -1 : 1
	 }
	 Collections.sort(sortList, cm)
	 println sortList.toListString() // 输出:[1, 2, -3, 5, 6, -7, 9]
- 添加
	def list = [1, 2, 3, 4, 5]
	list.add(6)
	println list.toListString() // 输出:[1, 2, 3, 4, 5, 6]
	list.leftShift(7)
	println list.toListString() // 输出:[1, 2, 3, 4, 5, 6, 7]
	list << 8
	println list.toListString() // 输出:[1, 2, 3, 4, 5, 6, 7, 8]
	def plusList = list + 9
	println plusList.toListString() // 输出:[1, 2, 3, 4, 5, 6, 7, 8, 9]
- 删除
	def testList = [9, 8, 7, 6, 5, 4, 3, 2, 1]
    testList.remove(7) // 删除下标为7的元素
    println testList.toString() // 输出:[9, 8, 7, 6, 5, 4, 3, 1]
    testList.remove((Object) 6) // 删除列表中值为6的元素
    println testList.toString() // 输出:[9, 8, 7, 5, 4, 3, 1]
    testList.removeAt(3)// 删除下标为3的元素
    println testList.toString() // 输出:[9, 8, 7, 4, 3, 1]
    testList.removeAll {
      return it % 2 == 0} // 删除列表中的所有偶数
    println testList.toListString() // 输出:[9, 7, 3, 1]
    def minusList = testList - [7, 9] // 删除列表中 7 和 9 这两个元素
    println minusList.toListString() // 输出:[3, 1]
- 查找
    def findList = [6, -3, 9, 2, -7, 1, 5]
    def result = findList.find {
      return it % 2 == 0 }
    println result // 输出:6

    def resultAll = findList.findAll {
      return it % 2 != 0 } // 查找所有满足条件的元素
    println resultAll.toListString() // 输出:[-3, 9, -7, 1, 5]


    def resultAny = findList.any {
      return it % 2 != 0 }// 查找列表中是否有满足条件的元素
    println resultAny // 输出:true


    def resultEvery = findList.every {
      return it % 2 == 0 } // 查找列表中是否所有元素都满足条件
    println resultEvery // 输出:false

    // 查找最小值
    println findList.min() // 输出:-7
    // 查找最大值
    println findList.max() // 输出:9
    // 查找绝对值最小值
    println findList.min {
      return Math.abs(it) } // 输出:1
    // 查找绝对值最大值
    println findList.max {
      return Math.abs(it) } // 输出:9
    // 统计偶数个数
    println findList.count {
      return it % 2 == 0 } // 输出:2
b.map
map对应java中的map借口,其底层对应 Java 中的 LinkedHashMap。
Map 变量由[:]定义,冒号左边是 key,右边是 Value。key 必须是字符串,value 可以是任何对象。另外,key 可以用 ‘’ 或 “” 包起来,也可以不用引号包起来
常用api
- 存取
    def colors = ['red': 'ff0000', 'green': '00ff00', 'blue': '0000ff']
    // 索引方式
    println colors['red'] // 输出:ff0000
    println colors.green // 输出:00ff00
    // 默认是LinkedHashMap类型
    println colors.getClass() // 输出:class java.util.LinkedHashMap
    // 添加元素,若map中有key为yellow的元素,则更新,若没有,则添加
    colors.yellow = 'ffff00'
    println colors.toMapString() // 输出:[red:ff0000, green:00ff00, blue:0000ff, yellow:ffff00]
    // 添加不同类型的元素到map中
    colors.complex = ['a': 1, 'b': 2]
    println colors.toMapString() // 输出:[red:ff0000, green:00ff00, blue:0000ff, yellow:ffff00, complex:[a:1, b:2]]
- 遍历
	 def students = [1: ['number': '0001', 'name': 'bob', 'score': 55, 'sex': 'male'], 2: ['number': '0002', 'name': 'paul', 'score': 63, 'sex': 'female'], 3: ['number': '0003', 'name': 'charles', 'score': 72, 'sex': 'male'], 4: ['number': '0004', 'name': 'tom', 'score': 67, 'sex': 'female']]
    students.each {
      student -> println "the key is: ${student.key}, the value is: ${student.value}" }
    // 输出结果:
    //the key is: 1, the value is: [number:0001, name:bob, score:55, sex:male]
    //the key is: 2, the value is: [number:0002, name:paul, score:63, sex:female]
    //the key is: 3, the value is: [number:0003, name:charles, score:72, sex:male]
    //the key is: 4, the value is: [number:0004, name:tom, score:67, sex:female]

	students.each {
      key, value -> println "the key is: ${key}, the value is: ${value}" }
    // 输出结果:
    // the key is: 1, the value is: [number:0001, name:bob, score:55, sex:male]
    // the key is: 2, the value is: [number:0002, name:paul, score:63, sex:female]
    // the key is: 3, the value is: [number:0003, name:charles, score:72, sex:male]
    // the key is: 4, the value is: [number:0004, name:tom, score:67, sex:female]
c.Range
表示范围,它其实是 List 的一种拓展。其由 begin 值 + 两个点 + end 值表示。如果不想包含最后一个元素,则 begin 值 + 两个点 + < + end 表示。我们可以通过 aRange.from 与 aRange.to 来获对应的边界元素。示例如下
- 1…9
- 1…<9
四.Groovy闭包
1.闭包的基本语法
a.定义
groovy中的必包本质是一个开放的匿名代码块,可以接受参数,有返回值。有点类似于c语言中的函数指针。下面是闭包定义格式
{ [closureParameters -> ] statements } ,closureParameters可以是0-n个的参数列表
下面是示例
	{
      item++ }
	{
      -> item++ }
	{
      reader ->
    	def line = reader.readLine()
    	line.trim()
	}
b.闭包对象
闭包是groovy.lang.Closure该类的一个实例,尽管是代码块,但它仍可以像其他任何变量一样分配给变量或字段.
    def listener = {
      e -> println "Clicked on $e.source" }
    println listener.class // 输出class build_b4sfh2n8k6b76tlp9j0uez9ba$_run_closure3$_closure5

    def a = listener
    println a.class// 输出class build_b4sfh2n8k6b76tlp9j0uez9ba$_run_closure3$_closure5
c.闭包的调用
闭包的调用有两种形式
- 直接通过()调用
- 通过.call()调用
    def code = {
      123}
    assert code
    assert code.call()

    def isEven = {
      it%2 == 0 }
    assert isEven(3) == false
    assert isEven.call(2) == true
2.this / owner / delegate
授权策略是不同于java lambda 表达式的一个概念,在理解这个策略前,首先得立即理解闭包中定义三个东西
- this: 对应于定义闭包的封闭类
- owner:对应于定义闭包的封闭对象,该对象可以是类,也可以是闭包
- delegate:对应于第三方对象默认等于owner,也可以指定
三者区别
//groovy代码在test.groovy文件里
def A = {

    println "A this:" + this //输出:Athis:Test@510f3d34
    println "A owner" + owner//输出:A ownerTest@510f3d34
    println "A delegate:" + delegate//输出:A delegate:Test@510f3d34
}
A.call()
def C = {

    def B = {

        println "B this:" + this//输出:B this:Test@510f3d34
        println "B owner" + owner//输出:B ownerTest$_run_closure2@24313fcc
        println "B delegate:" + delegate//输出:B delegate:Test$_run_closure2@24313fcc
    }
    B.call()
}
C.call()
指定delegate
 def C = {

    def B = {

        println "B this:" + this//输出:B this:Test@510f3d34
        println "B owner" + owner//输出:B ownerTest$_run_closure2@24313fcc
        println "B delegate:" + delegate//输出:B delegate:123
    }
    B.delegate = "123"
    B.call()
}
C.call()
3.授权策略
让我们来看下面一段代码
class Person {

    String name
}
def p = new Person(name:'Igor')
def cl = {
      name.toUpperCase() }
cl.delegate = p
assert cl() == 'IGOR'
这段代码能够工作的原因是,name 属性将在委托对象上去寻找!这是解析闭包内部的属性或方法调用的一种非常强大的方法。不需要设置明确的委托。闭包本身没有定义时,他就会去寻找delegate对象上是否有。
实际上,闭包定义了很多授权策略
- Closure.OWNER_FIRST:是默认策略,如果在 owner上存在一个属性/方法,那么将对所有者调用它。如果没有,则使用delegate 。
- Closure.DELEGATE_FIRST 反转逻辑: 先使用 delegate,然后再使用owner
- Closure.OWNER_ONLY:将只解析的owner属性/方法查找,delegate将被忽略。
- Closure.DELEGATE_ONLY:将只解析delegate上的属性/方法查找, owner将被忽略。
- Closure.TO_SELF:解析不会针对delegate或owner,而只针对闭包类本身
下面对比Closure.OWNER_FIRST或者Delegate _ FIRST两者区别
class A {

    String M = "this is A"
}

class B {

    String M = "this is B"
    def p = {
      println M }
}
def a = new A()
def b = new B()
b.p() //输出:this is B
b.p.delegate = a
b.p() //输出:this is B


class A {

    String M = "this is A"
}

class B {

    String M = "this is B"
    def p = {
      println M }
}
def a = new A()
def b = new B()
b.p.resolveStrategy = Closure.DELEGATE_FIRST // 更换策略
b.p() //输出:this is B
b.p.delegate = a
b.p() //输出:this is A
五.Groovy面向对象
1.基础概念
在groovy中会有Class, Interface, Trait, Enum, Annotation这几种类型,可以看到,除了Trait,其他类型都是在Java中已有的,事实上,在Java中已有的这几种类型的定义和用法,跟Java是没有什么太大的区别的,所以在这里就不再做过多的介绍。
重点来说一下Trait这种类型,这种类型跟Interface类似,不同点在于,Trait类中声明的方法,允许有空实现。对于继承Trait类的子类必须要实现的方法,需要加上abstract关键字。
2.Groovy中的变量和作用域
对于每一个对于每一个 Groovy 脚本来说,它都会生成一个 static void main 函数,main 函数中会调用一个 run 函数,脚本中的所有代码则包含在 run 函数之中。我们可以通过如下的 groovyc 命令用于将编译得到的 class 文件拷贝到 classes 文件夹下
// groovyc 是 groovy 的编译命令,-d classes 用于将编译得到的 class 文件拷贝到 classes 文件夹 下
groovyc -d classes test.groovy
当我们在 Groovy 脚本中定义一个变量时,由于它实际上是在 run 函数中创建的,所以脚本中的其它方法或其他脚本是无法访问它的。这个时候,我们需要使用 @Field 将当前变量标记为成员变量,其示例代码如下所示:
import groovy.transform.Field;

@Field author = JsonChao
3.元编程(groovy运行时方法调用)
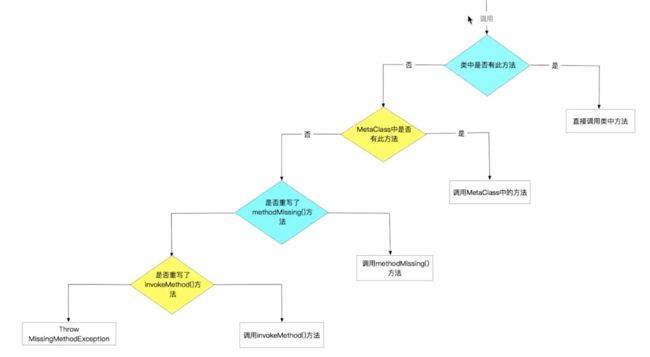
groovy运行时,逻辑处理如下:

下面我们通过一些代码来验证一下上面的流程图
class Student {

    String name
    float weight
}

Student student = new Student(name: 'lucky', weight: 66)
student.study()
上面的代码运行后,因为没有找到study()方法,最终抛出MissingMethodException
class Student {

    String name
    float weight

    def invokeMethod(String name, Object args) {

        return  "method --- ${name}, params --- ${args}"
    }
}

Student student = new Student(name: 'lucky', weight: 66)
println student.study()
我们在中Student类加上 invokeMethod 方法,继续运行上述代码,发现没有再抛异常,而是在控制台中打印出:method — bark, params — []。这说明若我们在groovy中调用了一个类中没有声明过的方法,而这个类复写了 invokeMethod 方法,那么编译器最终会去调用这个 invokeMethod 方法。
class Student {

    String name
    float weight

    def invokeMethod(String name, Object args) {

        return  "method --- ${name}, params --- ${args}"
    }

    def methodMissing(String name, Object args) {

        return "the method ${name} is missing"
    }
}

Student student = new Student(name: 'lucky', weight: 66)
println student.study()
我们在Student中复写 methodMissing 方法,执行程序后发现,程序又再一次的优先调用了 methodMissing 方法, 控制台输出:the method bark is missing。
class Student {

    String name
    float weight

    def invokeMethod(String name, Object args) {

        return "method --- ${name}, params --- ${args}"
    }

    def methodMissing(String name, Object args) {

        return "the method ${name} is missing"
    }
}

Student.metaClass.height = 175
Student.metaClass.study = {
      "学习" }
Student student = new Student(name: 'lucky', weight: 66)
println student.study() + "  身高"+student.height //输出:学习  身高175
我们通过metaClass给Student动态添加了一个属性和一个方法,可以发现,程序优先执行了动态添加的study()方法
六.Groovy文件操作
1.文件操作
在java中,我们通过数据流的方式操作文件,在groovy中也可以使用,同时groovy中提供了更加强大便捷的API让我们更加易于操作文件。
a.文件读取
- file.eachLine读取当前行
- file.getText获取文本内容
- file.withReader
- 使用java数据流
	// 读取文件
   def file = new File('test.txt')
   file.eachLine {

       println it // 输出:hello world!
   }
   def text = file.getText()
   println text  // 输出:hello world!

   // 读取文件的一部分
   def reader = file.withReader {
       reader ->
       char[] buffer = new char[3]
       reader.read(buffer)
       return buffer
   }
   println reader // 输出:hel
b.文件读取
- 这里面就是java数据流的api
下面以文件copy为例
// 实现文件拷贝
def copy(String sourcePath, String destPath) {

   try {

       def destFile = new File(destPath)
       if (!destFile.exists()) {

           destFile.createNewFile()
       }
       def sourceFile = new File(sourcePath)
       sourceFile.withReader {
      reader ->
           def lines = reader.readLines()
           destFile.withWriter {
      writer ->
               lines.each {
      line ->
                   writer.append(line + "\r\n")
               }
           }
       }
       return true
   } catch(Exception e) {

       e.printStackTrace()
   }
   return false
}
c.对象的文件读写
- withObjectOutputStream保存
- withObjectInputStream读取
代码示例
// 存储对象到文件中
def saveObject(Object object, String path) {

    try {

        def destFile = new File(path)
        if (!destFile.exists()) {

            destFile.createNewFile()
        }
        destFile.withObjectOutputStream {
      out ->
            out.writeObject(object)
        }
        return true
    } catch(Exception e) {

        e.printStackTrace()
    }
    return false
}

// 从文件中读取对象
def readObject(String path) {

    def obj = null
    try {

        def file = new File(path)
        if (file == null || !file.exists()) return null
        file.withObjectInputStream {
      input ->
            obj = input.readObject()
        }
    } catch(Exception e) {


    }
    return obj
}
2.操作Json
json和object转化可以使用Gson,fastjson等第三方解析库,groovy也给我们提供了一套非常强大的解析库
1.object转化为json
- JsonOutput.toJson
import groovy.json.JsonOutput
class Person {

    String name
    int age
}
def list = [
        new Person(name: 'zlove', age: 16),
        new Person(name: 'paul', age: 13)
]
def json = JsonOutput.toJson list
println json // 输出:[{"age":16,"name":"zlove"},{"age":13,"name":"paul"}]
println JsonOutput.prettyPrint(json)
// 输出:[
//    {

//        "age": 16,
//        "name": "zlove"
//    },
//    {

//        "age": 13,
//        "name": "paul"
//    }
//  ]
2.Json转化为object
- jsonSlurper.parseText
import groovy.json.JsonSlurper

class Person {

    String name
    int age
}
def json = "[{\"age\":16,\"name\":\"zlove\"},{\"age\":13,\"name\":\"paul\"}]"
def jsonSlurper = new JsonSlurper()
def list = jsonSlurper.parseText(json) as ArrayList<Person>
println list[0].name // 输出:zlove
3.操作xml
a.解析xml
- XmlParser() :xml构造器
读取xml节点
final String xml = '''


      War, Thriller
      DVD
      2003
      PG
      10
      Talk about a US-Japan war


      Anime, Science Fiction
      DVD
      1989
      R
      8
      A schientific fiction


      Comedy
      VHS
      1987
      PG
      2
      Viewable boredom


'''
def doc = new XmlParser().parseText(xml);


println "${doc.movie[0].type[0].text()}" //输出:War, Thriller
println "${doc.movie[1].format[0].text()}"//输出:DVD
println "${doc.movie[2].year[0].text()}"//输出:1987
println "${doc.movie[0].rating[0].text()}"//输出:PG
查询xml节点:
def doc = new XmlParser().parseText(xml);

doc.movie.each {

    bk ->
        def year = bk.year[0].text()
        if (year == "1987") {

            println bk['@title'] //输出 Ishtar
        }

}
b.生成xml文件
- MarkupBuilder()
// 生成xml格式的数据
def sw = new StringWriter()
def xmlBuilder = new MarkupBuilder(sw) // 生成xml数据的核心类
xmlBuilder.languages(type: 'current', count: '3', mainstream: 'true') {
language(flavor: 'static', version: '1.5', 'Java')
language(flavor: 'dynamic', version: '1.6.0', 'Groovy')
language(flavor: 'dynamic', version: '1.9', 'JavaScript')
}
println sw
//输出:
//Java
// Groovy
// JavaScript
//
c.对象转xml
def sw = new StringWriter()
def xmlBuilder = new MarkupBuilder(sw) // 生成xml数据的核心类
def languages = new Languages()
xmlBuilder.languages(type: languages.type, count: languages.count, mainstream: languages.mainstream) {

    languages.langs.each {
      lang ->
        language(flavor: lang.flavor, version: lang.version, lang.value)
    }
}
println sw

class Languages {

    String type = 'current'
    int count = 3
    boolean mainstream = true
    def langs = [
            new Language(flavor: 'static', version: '1.5', value: 'Java'),
            new Language(flavor: 'dynamic', version: '1.6', value: 'Groovy'),
            new Language(flavor: 'dynamic', version: '1.9', value: 'JavaScript')
    ]
}

class Language {

    String flavor
    String version
    String value
}
七.参考资料
深度探索 Gradle 自动化构建技术(二、Groovy 筑基篇)
[官方文档]Groovy教程
wc3 groovy课程


