GAN(生成对抗网络)的模型构建【tensorflow-2.1.0】
目录
- 前言
- 环境
-
- 运行环境
- 第三方库
- GAN简介
- GAN简化模型的构建
- DCGAN模型构建
- SSGAN模型构建
- CGAN模型构建
- 结语
前言
GAN(生成对抗网络),在我的理解中是一种拟合已有数据分布,同时强化对已有分布与拟合分布之间判别能力的技术,其通过生成器(拟合已有分布)与判别器(区分真假分布)之间的相互对抗来达到这一目的。本文将利用python下的tensorflow,以mnist手写数字数据集作为训练集,从最简单的GAN模型入手,逐步修改模型成为为DCGAN(深度卷积生成对抗网络)、SSGAN(半监督学习生成对抗网络)、CGAN(条件生成对抗网络),领略GAN中蕴含的思想。阅读本文时需要注意的是,本文掺杂了个人的一些理解,如有错误请务必指正,同时也欢迎感兴趣的人能够一起交流讨论;另外在设计网络模型时借鉴的是这些GAN的思想,或许网络模型本身并不完全符合其要求;最后,这里的模型并不能保证训练过程始终朝着正确的方向优化,特别地,如DCGAN、SSGAN、CGAN在经过一定次数的迭代后,模型会逐渐发生退化,生成不真实样本,目前原因不明。
环境
运行环境
jupyter notebook
第三方库
| 库名 | 版本 |
|---|---|
| tensorflow-gpu | 2.1.0 |
| numpy | 1.17.2 |
| matplotlib | 3.1.1 |
P. S: 目前某些版本的tensorflow2.0在模型fit时存在内存泄漏问题,即使在是tensorflow2.1,我发现使用数据生成器进行fit也存在着内存泄漏。
GAN简介
GAN可以看成是一个框架,它包含一个生成器模型(generator)和辨别器模型(discriminator)。在GAN中生成器负责造假,即通过模型输入(一般会使用随机数据)生成能够媲美真实数据的输出;而辨别器负责防伪,即在能够辨别出真实数据为真的情况下,识别出生成器的输出为假。在这样两种互相矛盾的模型的对抗下,生成器的输出越来越能够以假乱真,而辨别器则越来越精明,能以细微的差别识别真伪,换句话说就是辨别器会越来越敏感。以上是我个人的理解,仅供参考。
为了能够达到生成器与辨别器对抗的目的,需要有与这两个模型契合的loss表达式,具体如下
L D ( x , z ) = − log ( D ( x ) ) − log ( 1 − D ( G ( z ) ) ) L_D(x,z)=-\log(\mathrm{D}(x))-\log(1-\mathrm{D}(\mathrm{G}(z))) LD(x,z)=−log(D(x))−log(1−D(G(z)))
L G ( z ) = − log ( D ( G ( z ) ) ) L_G(z)=-\log(\mathrm{D}(\mathrm{G}(z))) LG(z)=−log(D(G(z)))
其中, L D L_D LD代表辨别器的loss函数, x x x为真实数据, D ( x ) \mathrm{D}(x) D(x)代表辨别器识别输入 x x x为真的概率, z z z为随机数据输入, G ( z ) \mathrm{G}(z) G(z)代表生成器的输出的假数据, L G L_G LG代表生成器的loss函数。
我们希望能够同时最小化上面的两个loss函数,要想最小化 L D L_D LD,就得让 D ( x ) \mathrm{D}(x) D(x)接近于1,而 D ( G ( z ) ) \mathrm{D}(\mathrm{G}(z)) D(G(z))接近于0;最小化 L G L_G LG则须让 D ( G ( z ) ) \mathrm{D}(\mathrm{G}(z)) D(G(z))接近于1。这两个loss函数中最小化 D ( G ( z ) ) \mathrm{D}(\mathrm{G}(z)) D(G(z))与最大化 D ( G ( z ) ) \mathrm{D}(\mathrm{G}(z)) D(G(z))看似互相矛盾,但实际在更新模型时所做的操作是不同的, L D L_D LD只用于更新判别器的参数,而 L G L_G LG只用于更新生成器的参数。
GAN简化模型的构建
在大致了解了GAN需要做的事之后,我们可以开始来尝试构建一个简易的GAN模型了,在此之前,先导入所有可能需要用到的第三方库:
from IPython.display import clear_output # jupyter清屏函数
import matplotlib.pyplot as plt
import numpy as np
import random
import tensorflow as tf
import tensorflow.keras as keras
from tensorflow.keras import Model
from tensorflow.keras import Sequential
import tensorflow.keras.backend as K
from tensorflow.keras.datasets import mnist
from tensorflow.keras.layers import *
from tensorflow.keras.optimizers import Adam
然后我们导入需要用到的mnist数据,代码如下
(train_x, train_y), (test_x, test_y) = mnist.load_data()
train_x = train_x.reshape([-1, 28 * 28]) / 255 # flatten后归一化
之后构建一个简化的生成器和判别器1,并自定义loss:
### 生成器
generator = Sequential([
    Dense(128, activation='relu', input_shape=[100]),
    Dense(28 * 28, activation='sigmoid')
])

### 判别器
discriminator = Sequential([
    Dense(128, activation='relu', input_shape=[28 * 28]),
    Dense(1, activation='sigmoid')
])

g_sample_input = Input([100]) # 生成器输入
x_input = Input([28 * 28]) # 真实数据输入

### 裁剪概率到区间[1e-6, 1]内,并求其log,避免log后为inf,K.stop_gradient表示训练时不对其求梯度
log_clip = Lambda(lambda x: K.log(K.clip(K.stop_gradient(x), 1e-6, 1) - K.stop_gradient(x) + x))

g = discriminator(generator(g_sample_input)) # 假数据

### 判别器loss
d_loss = (
    - log_clip(discriminator(x_input))
    - log_clip(1.0 - g)
)

fit_discriminator = Model(inputs=[x_input, g_sample_input], outputs=d_loss) # 训练discriminator所用模型
fit_discriminator.add_loss(d_loss) # 添加自定义loss

### 在调用compile之前置generator.trainable为False,调用compile后的模型训练时不更新generator的参数
generator.trainable = False
fit_discriminator.compile(optimizer=Adam(0.001))
generator.trainable = True

### 生成器loss
g_loss = (
    - log_clip(g)
)

fit_generator = Model(inputs=g_sample_input, outputs=g_loss) # 训练generator所用模型
fit_generator.add_loss(g_loss)

### 生成器训练时不更新discriminator的参数
discriminator.trainable = False
fit_generator.compile(optimizer=Adam(0.001))
discriminator.trainable = True
接下来就可以开始训练了,代码如下
batch_size = 64
for i in range(20000):
    if i % 100 == 0:
        clear_output()
        plt.imshow(generator.predict(np.random.uniform(-1, 1, [1, 100]))[0].reshape([28, 28]), cmap='gray')
        plt.show()
    print(i)
    x = train_x[random.sample(range(len(train_x)), batch_size)] # 随机选取batch_size个真样本
    g_sample = np.random.uniform(-1, 1, [batch_size, 100]) # 生成batch_size个随机数据输入
    fit_discriminator.fit([K.constant(x), K.constant(g_sample)]) # 训练辨别器,多输入需传入一个包含多个tensor的列表,此处用K.constant代替
    fit_generator.fit(g_sample) # 训练生成器
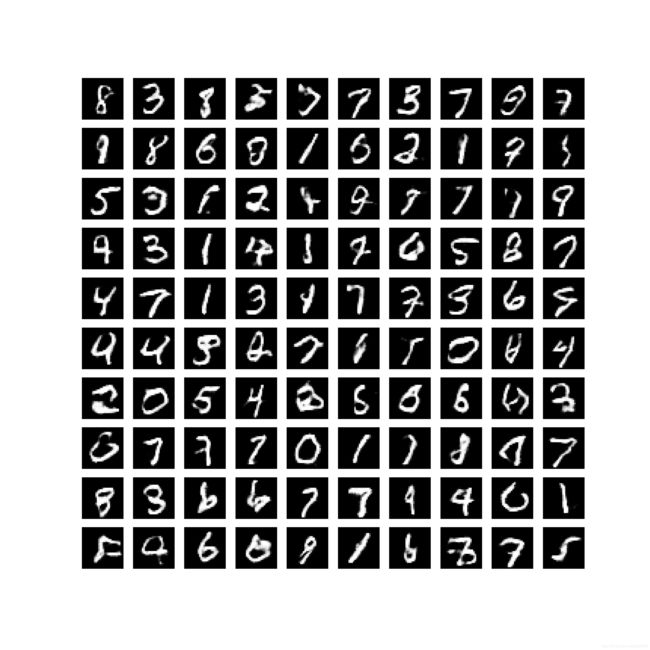
经过20000次迭代后,利用一下代码随机生成100张图片:
fig, axes = plt.subplots(10, 10, figsize=(10, 10))
for i in range(10):
    for j in range(10):
        axes[i, j].imshow(generator.predict(np.random.uniform(-1, 1, [1, 100]))[0].reshape([28, 28]), cmap='gray')
        axes[i, j].axis(False)
plt.show()
DCGAN模型构建
DCGAN就如其名,在网络中使用了卷积操作,与上面GAN模型的区别在于,DCGAN的生成器使用了上采样与反卷积的操作,与此相应地,判别器使用了卷积与下采样操作。这里借鉴DCGAN的思想,将上面GAN的代码作如下更改
### 生成器
generator = Sequential([
    Dense(128, activation='relu', input_shape=[100]),
    Dense(28 * 28, activation='sigmoid')
])

### 判别器
discriminator = Sequential([
    Dense(128, activation='relu', input_shape=[28 * 28]),
    Dense(1, activation='sigmoid')
])
改为
### 生成器 generator = Sequential([ Dense(7 * 7 * 64, input_shape=[100]), BatchNormalization(), LeakyReLU(), Reshape([7, 7, 64]), UpSampling2D([2, 2]), Conv2DTranspose(64, [3, 3], padding='same'), BatchNormalization(), LeakyReLU(), UpSampling2D([2, 2]), Conv2DTranspose(1, [3, 3], padding='same', activation='sigmoid') ]) ### 判别器 discriminator = Sequential([ Conv2D(64, [3, 3], padding='same', input_shape=[28, 28, 1]), BatchNormalization(), LeakyReLU(), MaxPool2D([2, 2]), Conv2D(64, [3, 3], padding='same'), BatchNormalization(), LeakyReLU(), MaxPool2D([2, 2]), Flatten(), Dense(128), BatchNormalization(), LeakyReLU(), Dense(1, activation='sigmoid') ])generator.trainable = False fit_discriminator.compile(optimizer=Adam(0.001)) generator.trainable = True改为
generator.trainable = False for layer in generator.layers: if isinstance(layer, BatchNormalization): # 设置BatchNormalization为训练模式 layer.trainable = True fit_discriminator.compile(optimizer=Adam(0.001)) generator.trainable = Truediscriminator.trainable = False fit_generator.compile(optimizer=Adam(0.001)) discriminator.trainable = True改为
discriminator.trainable = False
for layer in discriminator.layers:
    if isinstance(layer, BatchNormalization):  # 设置BatchNormalization为训练模式
        layer.trainable = True
fit_generator.compile(optimizer=Adam(0.001))
discriminator.trainable = True
在生成器与判别器中,我们将原本的激活器ReLU替换为LeakyReLU,并在激活器之前加上了BatchNormalization层,这一层在这里的作用是稳定模型训练。
在这里有一个地方需要注意一下,BatchNormalization层存在两种模式,一种是训练模式,另一种是非训练模式2。训练模式中的BatchNormalization会对同一批次的数据使用其均值和方差进行规范化,而在非训练模式中的则会使用滑动均值和方差作批规范化。在model.compile时BatchNormalization的trainable为True的模型进行 model.fit 操作,或者直接调用 BatchNormalization()(x, training=True) 时都处于训练模式。为了避免因BatchNormalization所处模式差异而导致的模型训练紊乱,设置某一模型的trainable为False后还需手动置这一模型中的BatchNormalization层的trainable为True。
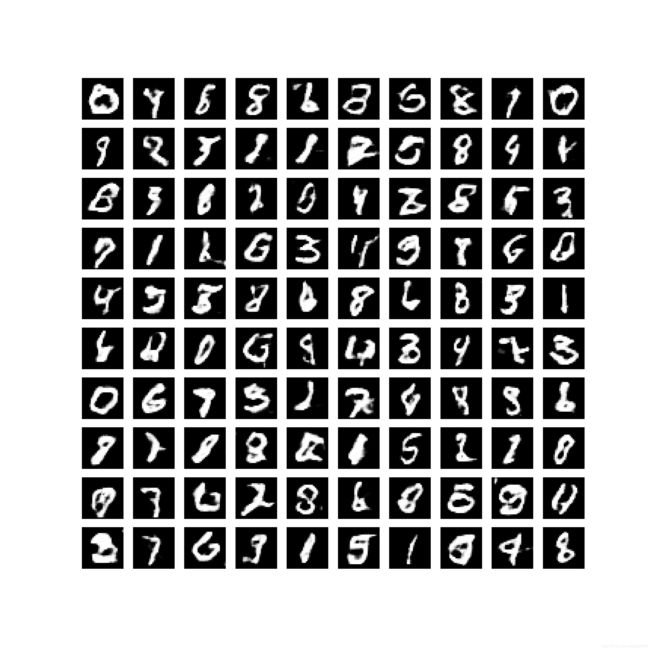
经过10000次迭代训练之后,随机生成手写数字的效果如下
SSGAN模型构建
DCGAN只能区分出真伪样本,却不能区分真样本之间不同类别,针对这个问题,SSGAN将判别器的输出结果修改为各分类的概率,类别数为真样本的类别和自成一类的假样本,这样一来判别器既要与生成器对抗,又要能够正确分类真样本,那么就需要有一个相适应的loss,具体SSGAN的loss如下
L D ( x , y t r u e , z ) = − log ( 1 − P { y = n ∣ x } ) − log ( P { y = n ∣ G ( z ) } ) − log ( P { y = y t r u e ∣ x } ) L_D(x,y_{true},z)=-\log(1-\mathrm{P}\{y=n|x\})-\log(\mathrm{P}\{y=n|\mathrm{G}(z)\})-\log(\mathrm{P}\{y=y_{true}|x\}) LD(x,ytrue,z)=−log(1−P{ y=n∣x})−log(P{ y=n∣G(z)})−log(P{ y=ytrue∣x})
L G ( z ) = log ( P { y = n ∣ G ( z ) } ) L_G(z)=\log(\mathrm{P}\{y=n|\mathrm{G}(z)\}) LG(z)=log(P{ y=n∣G(z)})
其中 y t r u e y_{true} ytrue代表真样本的类别, n n n为类别数( 0 0 0到 n − 1 n-1 n−1为真实样本类别, n n n代表假样本), P { y = n ∣ x } \mathrm{P}\{y=n|x\} P{ y=n∣x}代表在输入样本 x x x的情况下输出标签为 n n n的概率。
SSGAN的构建代码如下
### 生成器
generator = Sequential([
    Dense(7 * 7 * 64, input_shape=[100]),
    BatchNormalization(),
    LeakyReLU(),
    Reshape([7, 7, 64]),
    UpSampling2D([2, 2]),
    Conv2DTranspose(64, [3, 3], padding='same'),
    BatchNormalization(),
    LeakyReLU(),
    UpSampling2D([2, 2]),
    Conv2DTranspose(1, [3, 3], padding='same', activation='sigmoid')
])

### 判别器
discriminator = Sequential([
    Conv2D(64, [3, 3], padding='same', input_shape=[28, 28, 1]),
    BatchNormalization(),
    LeakyReLU(),
    MaxPool2D([2, 2]),
    Conv2D(64, [3, 3], padding='same'),
    BatchNormalization(),
    LeakyReLU(),
    MaxPool2D([2, 2]),
    Flatten(),
    Dense(128),
    BatchNormalization(),
    LeakyReLU(),
    Dense(11, activation='softmax')
])

g_sample_input = Input([100]) # 生成器输入
x_input = Input([28, 28, 1]) # 真实样本输入
label_input = Input([], dtype='int32') # 真实样本标签输入

### 裁剪概率到区间[1e-3, 1]内,并求其log,避免log后为inf,K.stop_gradient表示训练时不对其求梯度
log_clip = Lambda(lambda x: K.log(K.clip(K.stop_gradient(x), 1e-3, 1) - K.stop_gradient(x) + x))

g_prob = discriminator(generator(g_sample_input)) # 判别器识别假样本的输出
d_prob = discriminator(x_input) # 判别器识别真样本的输出
index = K.stack([K.arange(0, K.shape(d_prob)[0]), label_input], axis=1) # 用于索引d_prob正确标签概率值

### 判别器loss
d_loss = (
    - log_clip(1.0 - d_prob[:, -1])
    - log_clip(g_prob[:, -1])
    - log_clip(tf.gather_nd(d_prob, index)) # 真实样本正确标签概率值对数
)

fit_discriminator = Model(inputs=[g_sample_input, x_input, label_input], outputs=d_loss)
fit_discriminator.add_loss(d_loss) # 添加自定义loss
generator.trainable = False
for layer in generator.layers:
    if isinstance(layer, BatchNormalization): # 设置BatchNormalization为训练模式
        layer.trainable = True
fit_discriminator.compile(optimizer=Adam(0.001))
generator.trainable = True

### 生成器loss
g_loss = (
    log_clip(g_prob[:, -1])
)

fit_generator = Model(inputs=g_sample_input, outputs=g_loss) # 训练discriminator所用模型
fit_generator.add_loss(g_loss) # 添加自定义loss

### 生成器训练时不更新discriminator的参数
discriminator.trainable = False
for layer in discriminator.layers:
    if isinstance(layer, BatchNormalization): # 设置BatchNormalization为训练模式
        layer.trainable = True
fit_generator.compile(optimizer=Adam(0.001))
discriminator.trainable = True
之后可以开始进行训练,训练代码如下
for i in range(10000):
    if i % 100 == 0:
        clear_output()
        plt.imshow(generator.predict(np.random.uniform(-1, 1, [1, 100]))[0].reshape([28, 28]), cmap='gray')
        plt.show()
    print(i)
    index = random.sample(range(len(train_x)), batch_size)
    label = train_y[index]
    x = train_x[index]
    g_sample = np.random.uniform(-1, 1, [batch_size, 100])
    fit_discriminator.fit([K.constant(g_sample), K.constant(x), K.constant(label)])
    fit_generator.fit(g_sample)
CGAN模型构建
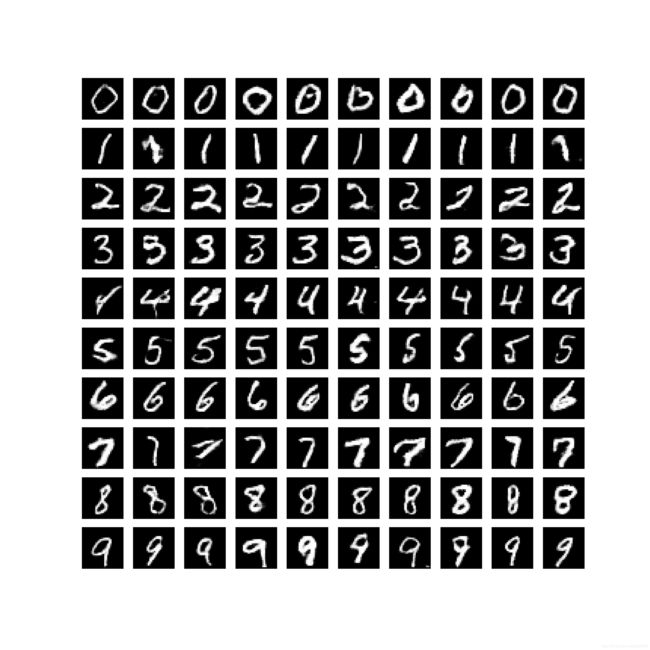
以上这些GAN中的生成器只能随机生成手写数字,CGAN则新增了条件输入用于控制生成的数字,这样一来,生成器除了要达到混淆真假的目的,还得能够正确生成符合相应条件的输出,CGAN的loss如下
L D ( x , y t r u e , z , g t r u e ) = − log ( P { y = y t r u e ∣ x } ) − log ( P { y = g t r u e ∣ G ( z ) } ) L_D(x,y_{true},z,g_{true})=-\log(\mathrm{P}\{y=y_{true}|x\})-\log(\mathrm{P}\{y=g_{true}|\mathrm{G}(z)\}) LD(x,ytrue,z,gtrue)=−log(P{ y=ytrue∣x})−log(P{ y=gtrue∣G(z)})
L G ( z , g t r u e ) = − log ( P { y = g t r u e ∣ G ( z ) } ) L_G(z, g_{true})=-\log(\mathrm{P}\{y=g_{true}|\mathrm{G}(z)\}) LG(z,gtrue)=−log(P{ y=gtrue∣G(z)})
其中 g t r u e g_{true} gtrue为需要生成的数字类别。
CGAN的模型构建代码如下
### 生成器
g_sequential = Sequential([
    Dense(7 * 7 * 64, input_shape=[100 + 10]),
    BatchNormalization(),
    LeakyReLU(),
    Reshape([7, 7, 64]),
    UpSampling2D([2, 2]),
    Conv2DTranspose(64, [3, 3], padding='same'),
    BatchNormalization(),
    LeakyReLU(),
    UpSampling2D([2, 2]),
    Conv2DTranspose(1, [3, 3], padding='same', activation='sigmoid')
])

### 判别器
discriminator = Sequential([
    Conv2D(64, [3, 3], padding='same', input_shape=[28, 28, 1]),
    BatchNormalization(),
    LeakyReLU(),
    MaxPool2D([2, 2]),
    Conv2D(64, [3, 3], padding='same'),
    BatchNormalization(),
    LeakyReLU(),
    MaxPool2D([2, 2]),
    Flatten(),
    Dense(128),
    BatchNormalization(),
    LeakyReLU(),
    Dense(11, activation='softmax')
])

g_sample_input = Input([100]) # 生成器输入
g_label_input = Input([], dtype='int32') # 指定标签输入
x_input = Input([28, 28, 1]) # 真实样本输入
x_label_input = Input([], dtype='int32') # 真实样本标签输入

condition_g_sample_input = K.concatenate([g_sample_input, K.one_hot(g_label_input, 10)]) # 合并随机数据输入与指定标签独热码

g_output = g_sequential(condition_g_sample_input) # 生成器输出
generator = Model(inputs=[g_sample_input, g_label_input], outputs=g_output) #生成器模型

### 裁剪概率到区间[1e-3, 1]内,并求其log,避免log后为inf,K.stop_gradient表示训练时不对其求梯度
log_clip = Lambda(lambda x: K.log(K.clip(K.stop_gradient(x), 1e-3, 1) - K.stop_gradient(x) + x))

g_prob = discriminator(generator([g_sample_input, g_label_input])) # 判别器识别假样本的输出
g_index = K.stack([K.arange(0, K.shape(g_prob)[0]), g_label_input], axis=1) # 用于索引g_prob指定标签概率值

d_prob = discriminator(x_input) # 判别器识别真实样本的输出
x_index = K.stack([K.arange(0, K.shape(d_prob)[0]), x_label_input], axis=1) # 用于索引d_prob正确标签概率值


d_loss = (
    - log_clip(tf.gather_nd(d_prob, x_index)) # log(真实样本正确标签概率值)
    - log_clip(1.0 - tf.gather_nd(g_prob, g_index))  # log(1-假样本指定标签的概率值)
)

fit_discriminator = Model(inputs=[g_sample_input, g_label_input, x_input, x_label_input], outputs=d_loss)
fit_discriminator.add_loss(d_loss) # 添加自定义loss
generator.trainable = False
for layer in generator.layers:
    if isinstance(layer, BatchNormalization): # 设置BatchNormalization为训练模式
        layer.trainable = True
fit_discriminator.compile(optimizer=Adam(0.001))
generator.trainable = True


g_loss = (
    -log_clip(tf.gather_nd(g_prob, g_index)) # log(假样本指定标签的概率值)
)


fit_generator = Model(inputs=[g_sample_input, g_label_input], outputs=g_loss)
fit_generator.add_loss(g_loss) # 添加自定义loss

### 生成器训练时不更新discriminator的参数
discriminator.trainable = False
for layer in discriminator.layers:
    if isinstance(layer, BatchNormalization): # 设置BatchNormalization为训练模式
        layer.trainable = True
fit_generator.compile(optimizer=Adam(0.001))
discriminator.trainable = True
接下来可以开始训练模型,训练代码如下
for i in range(10000):
    if i % 10 == 0:
        clear_output()
        plt.imshow(generator.predict([K.constant(np.random.uniform(-1, 1, [1, 100])), K.constant([i % 10])])[0].reshape([28, 28]), cmap='gray')
        plt.title(str(i % 10))
        plt.show()
    print(i)
    index = random.sample(range(len(train_x)), batch_size)
    x_label = train_y[index]
    x = train_x[index]
    g_sample = np.random.uniform(-1, 1, [batch_size, 100])
    g_label = np.random.randint(0, 10, [batch_size])

    fit_discriminator.fit([K.constant(g_sample), K.constant(g_label), K.constant(x), K.constant(x_label)])
    fit_generator.fit([K.constant(g_sample), K.constant(g_label)])
结语
以上模型除了简化的GAN外无不依赖BatchNormalization才能保证前期稳定的训练,且在我这里都有模型退化的问题,主要是生成器退化的问题。直到我遇到了WGAN3,才发现不借助BatchNormalization,训练也可以如此顺利,遗憾的是在我这里其收敛过程缓慢,且生成的图片不真实。虽然这里的模型还存在问题,但足以揭示其内在的思想,要想有个稳定的训练过程,推荐了解一下WGAN。
此处模型结构参考《GAN:实战生成对抗网络》中 2.2 GAN的实现 ↩︎
BatchNormalization层的参数trainable与实例被调用时传参training的细节: https://tensorflow.google.cn/api_docs/python/tf/keras/layers/BatchNormalization ↩︎
WGAN参考https://zhuanlan.zhihu.com/p/25071913 ↩︎


