opencv(c++)图像处理(imgproc模块)
参考:
1、https://docs.opencv.org/3.2.0/
2、https://github.com/opencv/opencv/
Image Processing (imgproc module)
图像平滑
在本教程中,您将学习如何使用OpenCV函数应用各种线性滤镜来平滑图像,例如:
- cv::blur
- cv::GaussianBlur
- cv::medianBlur
- cv::bilateralFilter
理论
- 平滑,也称为模糊,是一个简单的,常用的图像处理操作。
- 做平滑有很多原因。 在本教程中,我们将着重于平滑以减少噪音(其他用途将在以下教程中看到)。
- 要执行平滑操作,我们将对图像应用滤镜。 最常见的滤波器类型是线性的,其中输出像素值(即 g(i,j) )被确定为输入像素值(即 f(i+k,j+l) )的加权和:
g(i,j) = ∑k,lf(i+k,j+l)h(k,l)
h(k,l) 称为内核,它不过是滤波器的系数。
可以将滤波器可视化为在图像上滑动的系数窗口。 - 有很多类型的过滤器,在这里我们会提到最常用的:
Normalized Box Filter
- 这个过滤器是最简单的! 每个输出像素是其内核邻居的平均值(它们全部以相等的权重作出贡献)
- 内核如下:
K = 1Kwidth⋅Kheight ⎡⎣⎢⎢⎢⎢⎢⎢11..111..111..1...............11111⎤⎦⎥⎥⎥⎥⎥⎥
Gaussian Filter
- 可能是最有用的过滤器(尽管不是最快的)。 高斯滤波是通过将输入数组中的每个点与高斯内核进行卷积然后将它们相加以产生输出数组来完成的。
- 为了使图像更清晰,记得一维高斯内核是怎样的?
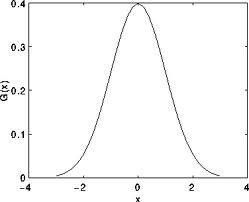
假设图像是1D,您可以注意到位于中间的像素将具有最大的权重。 其邻居的权重随着它们与中心像素之间的空间距离的增加而减小。
请记住,二维高斯可以表示为:
Median Filter
中值滤波器贯穿信号的每个元素(在这种情况下是图像),并用每个像素的相邻像素的中值(位于评估像素周围的正方形邻域)替换。
Bilateral Filter(双边滤波器)
- 到目前为止,我们已经解释了一些滤波器,其主要目标是平滑输入图像。 但是,有时滤波器不仅会消除噪声,还会消除边缘。
为了避免这种情况(至少在某种程度上),我们可以使用双边滤波器。 - 以与高斯滤波器类似的方式,双边滤波器也考虑具有分配给它们中的每一个的权重的相邻像素。
这些权重有两个分量,第一个是高斯滤波器使用的相同的权重。 第二个分量考虑了相邻像素和评估像素之间的强度差异。 - 有关更详细的解释,你可以检查这个链接
代码
- 这个程序做什么?
- 加载图像
- 应用4种不同类型的过滤器(理论解释),并顺序显示过滤图像
- 可下载的代码:点击这里
#include "opencv2/imgproc.hpp"
#include "opencv2/imgcodecs.hpp"
#include "opencv2/highgui.hpp"
using namespace std;
using namespace cv;
int DELAY_CAPTION = 1500;
int DELAY_BLUR = 100;
int MAX_KERNEL_LENGTH = 31;
Mat src; Mat dst;
char window_name[] = "Smoothing Demo";
int display_caption( const char* caption );
int display_dst( int delay );
int main( void )
{
  namedWindow( window_name, WINDOW_AUTOSIZE );
  src = imread( "../data/lena.jpg", IMREAD_COLOR );
  if( display_caption( "Original Image" ) != 0 ) { return 0; }
  dst = src.clone();
  if( display_dst( DELAY_CAPTION ) != 0 ) { return 0; }
  if( display_caption( "Homogeneous Blur" ) != 0 ) { return 0; }
  for ( int i = 1; i < MAX_KERNEL_LENGTH; i = i + 2 )
      { blur( src, dst, Size( i, i ), Point(-1,-1) );
        if( display_dst( DELAY_BLUR ) != 0 ) { return 0; } }
  if( display_caption( "Gaussian Blur" ) != 0 ) { return 0; }
  for ( int i = 1; i < MAX_KERNEL_LENGTH; i = i + 2 )
      { GaussianBlur( src, dst, Size( i, i ), 0, 0 );
        if( display_dst( DELAY_BLUR ) != 0 ) { return 0; } }
  if( display_caption( "Median Blur" ) != 0 ) { return 0; }
  for ( int i = 1; i < MAX_KERNEL_LENGTH; i = i + 2 )
      { medianBlur ( src, dst, i );
        if( display_dst( DELAY_BLUR ) != 0 ) { return 0; } }
  if( display_caption( "Bilateral Blur" ) != 0 ) { return 0; }
  for ( int i = 1; i < MAX_KERNEL_LENGTH; i = i + 2 )
      { bilateralFilter ( src, dst, i, i*2, i/2 );
        if( display_dst( DELAY_BLUR ) != 0 ) { return 0; } }
  display_caption( "End: Press a key!" );
  waitKey(0);
  return 0;
}
int display_caption( const char* caption )
{
  dst = Mat::zeros( src.size(), src.type() );
  putText( dst, caption,
           Point( src.cols/4, src.rows/2),
           FONT_HERSHEY_COMPLEX, 1, Scalar(255, 255, 255) );
  imshow( window_name, dst );
  int c = waitKey( DELAY_CAPTION );
  if( c >= 0 ) { return -1; }
  return 0;
}
int display_dst( int delay )
{
  imshow( window_name, dst );
  int c = waitKey ( delay );
  if( c >= 0 ) { return -1; }
  return 0;
}
说明
1、让我们来看看只涉及平滑过程的OpenCV函数,因为现在已经知道了其余部分。
2、Normalized Block Filter:
OpenCV提供cv :: blur函数来执行此滤镜的平滑处理。
 for ( int i = 1; i < MAX_KERNEL_LENGTH; i = i + 2 )
      { blur( src, dst, Size( i, i ), Point(-1,-1) );
        if( display_dst( DELAY_BLUR ) != 0 ) { return 0; } }
我们指定了4个参数(更多细节,请参考参考资料):
- src:源图像
- dst:目标图像
- Size(w,h):定义要使用的内核的大小(宽度为w像素,高度为h像素)
- Point(-1,-1):表示锚点(评估像素)相对于邻域的位置。 如果有一个负值,那么内核的中心被认为是定位点。
3、Gaussian Filter:
它由cv :: GaussianBlur函数执行:
for ( int i = 1; i < MAX_KERNEL_LENGTH; i = i + 2 )
      { GaussianBlur( src, dst, Size( i, i ), 0, 0 );
        if( display_dst( DELAY_BLUR ) != 0 ) { return 0; } }
这里我们使用4个参数(更多细节,请查看OpenCV参考):
- src:源图像
- dst:目标图像
- Size(w,h):要使用的内核的大小(要考虑的邻居)。 w和h必须是奇数和正数,否则将使用 σx 和 σy 参数计算thi大小。
- σx :x中的标准差。 写0意味着 σx 是使用内核大小计算的。
- σy :y的标准差。 写0意味着使用内核大小来计算 σy 。
4、Median Filter:
这个过滤器是由cv :: medianBlur函数提供的:
 for ( int i = 1; i < MAX_KERNEL_LENGTH; i = i + 2 )
      { medianBlur ( src, dst, i );
        if( display_dst( DELAY_BLUR ) != 0 ) { return 0; } }
我们使用三个参数:
- src:源图像
- dst:目标图像必须与src相同
- i:内核的大小(只有一个,因为我们使用一个正方形的窗口)。 一定是奇怪的。
5、Bilateral Filter
由OpenCV提供的函数cv :: bilateralFilter
for ( int i = 1; i < MAX_KERNEL_LENGTH; i = i + 2 )
      { bilateralFilter ( src, dst, i, i*2, i/2 );
        if( display_dst( DELAY_BLUR ) != 0 ) { return 0; } }
我们使用5个参数:
- src:源图像
- dst:目标图像
- d:每个像素邻域的直径。
- σColor :颜色空间中的标准偏差。
- σSpace :坐标空间中的标准偏差(以像素为单位)
腐蚀和扩张
应用两个非常常见的形态学算子:膨胀和侵蚀。 为此,您将使用以下OpenCV函数:
- cv::erode
- cv::dilate
形态学操作
- 总之:一组基于形状处理图像的操作。 形态学操作将结构元素应用于输入图像并生成输出图像。
- 最基本的形态学操作是两个:侵蚀和膨胀。 它们具有广泛的用途,即:
- 消除噪音
- 分离各个元素并将不同的元素连接在一个图像中。
- 在图像中查找强度颠簸或孔洞
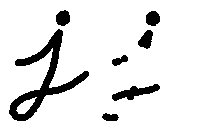
- 我们将简要解释膨胀和侵蚀,以下面的图片为例:

Dilation(膨胀)
- 这个操作包括将图像 A 与一些内核( B )进行卷积,该内核可以具有任何形状或大小,通常是正方形或圆形。
- 内核 B 有一个定义的锚点,通常是内核的中心。
- 随着核 B 在图像上被扫描,我们计算被 B 重叠的最大像素值,并用该最大值替换锚点位置中的图像像素。
正如你可以推论的,这个最大化的操作会导致图像中明亮的区域“增长”(因此名称扩大)。 以上面的图像为例。 应用dilation 我们可以得到:
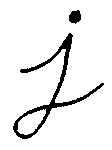
背景(明亮)在信件的黑色区域扩张。
为了更好地把握这个想法,避免可能的混淆,在这个又一个例子中,我们倒置了原来的图像,比如白色的对象现在是这个字母。 我们用尺寸为3×3的矩形结构元素进行了两次扩张。

左图:原始图像倒置,右图:扩张图
扩张使物体在白色更大。
Erosion(腐蚀)
- 这个操作是dilation(扩张)的姊妹。 这样做是为了计算内核区域的局部最小值。
- 当核 B 在图像上被扫描时,我们计算被 B 重叠的最小像素值,并用该最小值替换锚点下的图像像素。
- 按照扩张的例子,我们可以将腐蚀算子应用于原始图像(如上所示)。 在下面的结果中可以看到图像的明亮区域(背景,显然)变薄,而黑暗区域(“写入”)变得更大。

以相同的方式,在倒置的原始图像上进行侵蚀操作所得到的对应图像(具有尺寸为3×3的矩形结构元素的两次侵蚀):

左图:原始图像倒置,右图:腐蚀结果
侵蚀使物体变白。
代码
本教程代码的显示如下。 您也可以从这里下载
#include "opencv2/imgproc.hpp"
#include "opencv2/imgcodecs.hpp"
#include "opencv2/highgui.hpp"
using namespace cv;
Mat src, erosion_dst, dilation_dst;
int erosion_elem = 0;
int erosion_size = 0;
int dilation_elem = 0;
int dilation_size = 0;
int const max_elem = 2;
int const max_kernel_size = 21;
void Erosion( int, void* );
void Dilation( int, void* );
int main( int, char** argv )
{
  src = imread( argv[1], IMREAD_COLOR );
  if( src.empty() )
    { return -1; }
  namedWindow( "Erosion Demo", WINDOW_AUTOSIZE );
  namedWindow( "Dilation Demo", WINDOW_AUTOSIZE );
  moveWindow( "Dilation Demo", src.cols, 0 );
  createTrackbar( "Element:\n 0: Rect \n 1: Cross \n 2: Ellipse", "Erosion Demo",
          &erosion_elem, max_elem,
          Erosion );
  createTrackbar( "Kernel size:\n 2n +1", "Erosion Demo",
          &erosion_size, max_kernel_size,
          Erosion );
  createTrackbar( "Element:\n 0: Rect \n 1: Cross \n 2: Ellipse", "Dilation Demo",
          &dilation_elem, max_elem,
          Dilation );
  createTrackbar( "Kernel size:\n 2n +1", "Dilation Demo",
          &dilation_size, max_kernel_size,
          Dilation );
  Erosion( 0, 0 );
  Dilation( 0, 0 );
  waitKey(0);
  return 0;
}
void Erosion( int, void* )
{
  int erosion_type = 0;
  if( erosion_elem == 0 ){ erosion_type = MORPH_RECT; }
  else if( erosion_elem == 1 ){ erosion_type = MORPH_CROSS; }
  else if( erosion_elem == 2) { erosion_type = MORPH_ELLIPSE; }
  Mat element = getStructuringElement( erosion_type,
                       Size( 2*erosion_size + 1, 2*erosion_size+1 ),
                       Point( erosion_size, erosion_size ) );
  erode( src, erosion_dst, element );
  imshow( "Erosion Demo", erosion_dst );
}
void Dilation( int, void* )
{
  int dilation_type = 0;
  if( dilation_elem == 0 ){ dilation_type = MORPH_RECT; }
  else if( dilation_elem == 1 ){ dilation_type = MORPH_CROSS; }
  else if( dilation_elem == 2) { dilation_type = MORPH_ELLIPSE; }
  Mat element = getStructuringElement( dilation_type,
                       Size( 2*dilation_size + 1, 2*dilation_size+1 ),
                       Point( dilation_size, dilation_size ) );
  dilate( src, dilation_dst, element );
  imshow( "Dilation Demo", dilation_dst );
}
说明
1、所显示的大部分内容都是由您所知(如果您有任何疑问,请参阅前几节中的教程)。 我们来看看程序的一般结构:
- 加载图像(可以是BGR或灰度)
- 创建两个窗口(一个用于扩展输出,另一个用于侵蚀)
- 为每个操作创建一组两个TrackBar:
- 第一个轨迹条“元素”返回erosion_elem或dilation_elem
- 第二个trackbar“Kernel size”返回erosion_size或者dilation_size进行相应的操作。
- 每当我们移动任何滑块,用户的功能Erosion或Dilation将被调用,它将根据当前的轨迹栏值更新输出图像。
我们来分析这两个函数:
2、erosion:
void Erosion( int, void* )
{
  int erosion_type = 0;
  if( erosion_elem == 0 ){ erosion_type = MORPH_RECT; }
  else if( erosion_elem == 1 ){ erosion_type = MORPH_CROSS; }
  else if( erosion_elem == 2) { erosion_type = MORPH_ELLIPSE; }
  Mat element = getStructuringElement( erosion_type,
                       Size( 2*erosion_size + 1, 2*erosion_size+1 ),
                       Point( erosion_size, erosion_size ) );
  erode( src, erosion_dst, element );
  imshow( "Erosion Demo", erosion_dst );
}- 执行侵蚀操作的功能是cv :: erode。 我们可以看到,它有三个参数:
- src:源图片
- erosion_dst:输出图像
- element:这是我们将用来执行操作的内核。 如果我们不指定,默认是一个简单的3x3矩阵。 否则,我们可以指定它的形状。为此,我们需要使用函数cv :: getStructuringElement:
 Mat element = getStructuringElement( erosion_type,
                       Size( 2*erosion_size + 1, 2*erosion_size+1 ),
                       Point( erosion_size, erosion_size ) );
我们可以为我们的内核选择三种形状的任何一种:
- 矩形框:MORPH_RECT
- 十字架:MORPH_CROSS
- 椭圆形:MORPH_ELLIPSE
然后,我们只需要指定我们的内核和定位点的大小。 如果未指定,则假定位于中心。
就这些。 我们准备好进行我们形象的侵蚀。
此外,还有另一个参数,可以让您一次执行多个腐蚀(迭代)。 不过,我们并没有在这个简单的教程中使用它。 您可以查看参考资料了解更多详情。
3、dilation:
代码如下。 正如你所看到的,它与侵蚀代码片段完全相似。 在这里我们也可以选择定义我们的内核,它的锚点和要使用的操作符的大小。
void Dilation( int, void* )
{
  int dilation_type = 0;
  if( dilation_elem == 0 ){ dilation_type = MORPH_RECT; }
  else if( dilation_elem == 1 ){ dilation_type = MORPH_CROSS; }
  else if( dilation_elem == 2) { dilation_type = MORPH_ELLIPSE; }
  Mat element = getStructuringElement( dilation_type,
                       Size( 2*dilation_size + 1, 2*dilation_size+1 ),
                       Point( dilation_size, dilation_size ) );
  dilate( src, dilation_dst, element );
  imshow( "Dilation Demo", dilation_dst );
}
更多的形态转换
在本教程中,您将学习如何:
- 使用OpenCV函数cv :: morphologyEx来应用形态转换,如:
- Opening
- Closing
- Morphological Gradient(形态梯度)
- Top Hat
- Black Hat
理论
在之前的教程中,我们介绍了两个基本的形态学操作:
- Erosion
- Dilation.
基于这两个,我们可以对我们的图像进行更复杂的转换。 这里我们简要地讨论OpenCV提供的5个操作:
Opening
- 它是通过图像的侵蚀和扩张而获得的。
dst = open(src,element) = dilate(erode(src,element)) - 用于去除小物体(假定物体在黑暗的前景中是明亮的)
- 例如,看看下面的例子。 左边的图像是原图,右边的图像是应用opening变换后的结果。 我们可以观察到,信件角落的小空间消失。
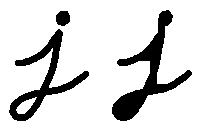
为了清楚起见,我们在同一原始图像上进行了开放操作(7×7矩形结构化元素),但是如白色的对象现在是字母。
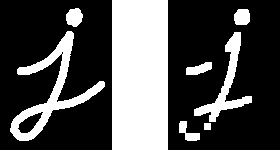
左侧图像:原始图像倒置,右侧图像:opening操作结果
Closing
在倒像上,我们进行了Closing操作(7x7矩形结构元素):

左图:原始图像反转,右图:closing 结果
Morphological Gradient(形态梯度)
- 这是一个图像的膨胀和侵蚀之间的差异。
dst = morphgrad(src,element) = dilate(src,element)−erode(src,element) - 查找对象的轮廓很有用,如下所示:

Top Hat
Black Hat
代码
本教程代码的显示如下。 您也可以从这里下载
#include "opencv2/imgproc.hpp"
#include "opencv2/imgcodecs.hpp"
#include "opencv2/highgui.hpp"
using namespace cv;
Mat src, dst;
int morph_elem = 0;
int morph_size = 0;
int morph_operator = 0;
int const max_operator = 4;
int const max_elem = 2;
int const max_kernel_size = 21;
const char* window_name = "Morphology Transformations Demo";
void Morphology_Operations( int, void* );
int main( int, char** argv )
{
  src = imread( argv[1], IMREAD_COLOR ); // Load an image
  if( src.empty() )
    { return -1; }
  namedWindow( window_name, WINDOW_AUTOSIZE ); // Create window
  createTrackbar("Operator:\n 0: Opening - 1: Closing  \n 2: Gradient - 3: Top Hat \n 4: Black Hat", window_name, &morph_operator, max_operator, Morphology_Operations );
  createTrackbar( "Element:\n 0: Rect - 1: Cross - 2: Ellipse", window_name,
                  &morph_elem, max_elem,
                  Morphology_Operations );
  createTrackbar( "Kernel size:\n 2n +1", window_name,
                  &morph_size, max_kernel_size,
                  Morphology_Operations );
  Morphology_Operations( 0, 0 );
  waitKey(0);
  return 0;
}
void Morphology_Operations( int, void* )
{
  // Since MORPH_X : 2,3,4,5 and 6
  int operation = morph_operator + 2;
  Mat element = getStructuringElement( morph_elem, Size( 2*morph_size + 1, 2*morph_size+1 ), Point( morph_size, morph_size ) );
  morphologyEx( src, dst, operation, element );
  imshow( window_name, dst );
}
说明
1、我们来看看程序的一般结构:
- 加载图像
- 创建一个窗口来显示形态操作的结果
- 为用户创建三个TrackBar来输入参数:
- 第一个trackbar运算符返回使用形态运算的类型(morph_operator)。
createTrackbar("Operator:\n 0: Opening - 1: Closing \n 2: Gradient - 3: Top Hat \n 4: Black Hat", window_name, &morph_operator, max_operator, Morphology_Operations );- 第二个trackbar元素返回morph_elem,它表示我们的内核是什么样的结构:
createTrackbar( "Element:\n 0: Rect - 1: Cross - 2: Ellipse", window_name,
                  &morph_elem, max_elem,
Morphology_Operations );- 最终的trackbar Kernel Size返回要使用的内核大小(morph_size)
 createTrackbar( "Kernel size:\n 2n +1", window_name,
                  &morph_size, max_kernel_size,
Morphology_Operations );- 每当我们移动任何滑块,用户的函数Morphology_Operations将被调用来实现一个新的形态学操作,它将根据当前的轨迹栏值更新输出图像。
void Morphology_Operations( int, void* )
{
  // Since MORPH_X : 2,3,4,5 and 6
  int operation = morph_operator + 2;
  Mat element = getStructuringElement( morph_elem, Size( 2*morph_size + 1, 2*morph_size+1 ), Point( morph_size, morph_size ) );
  morphologyEx( src, dst, operation, element );
  imshow( window_name, dst );
}
我们可以观察到执行形态转换的关键功能是cv :: morphologyEx。 在这个例子中,我们使用了四个参数(剩下的就是默认值):
- 源文件(输入)图像
- dst:输出图像
- 操作:要进行的形态转换的种类。 请注意,我们有5个选择:
- Opening: MORPH_OPEN : 2
- Closing: MORPH_CLOSE: 3
- Gradient: MORPH_GRADIENT: 4
- Top Hat: MORPH_TOPHAT: 5
- Black Hat: MORPH_BLACKHAT: 6
正如你所看到的值的范围从<2-6>,这就是为什么我们添加(+2)到由Trackbar输入的值:
int operation = morph_operator + 2;- element: 要使用的内核。 我们使用函数cv ::getStructuringElement来定义我们自己的结构。
通过形态操作提取水平线和垂直线
应用两个非常常见的形态算子(即膨胀和侵蚀),创建自定义内核,以便在水平和垂直轴上提取直线。 为此,您将使用以下OpenCV函数:
- cv::erode
- cv::dilate
- cv::getStructuringElement
在一个例子中,您的目标是从音乐表中提取音乐表。
理论
形态学操作
形态学是一组图像处理操作,其基于也称为内核的预定义的结构元素来处理图像。 输出图像中的每个像素的值基于输入图像中的对应像素与其邻域的比较。 通过选择内核的大小和形状,可以构建对输入图像的特定形状敏感的形态学操作。
两个最基本的形态学操作是扩张和侵蚀。 膨胀将像素添加到图像中对象的边界,而侵蚀则完全相反。 添加或去除的像素数量分别取决于用于处理图像的结构元素的大小和形状。 一般来说,这两个行动遵循的规则如下:
膨胀:输出像素的值是落在结构元素大小和形状内的所有像素的最大值。 例如,在二进制图像中,如果输入图像中落在内核范围内的任何像素被设置为值1,则输出图像的对应像素也将被设置为1。 后者适用于任何类型的图像(例如灰度,bgr等)。
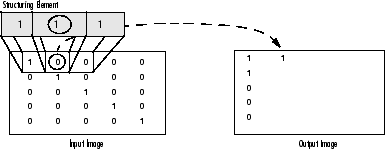
二值图像上的膨胀
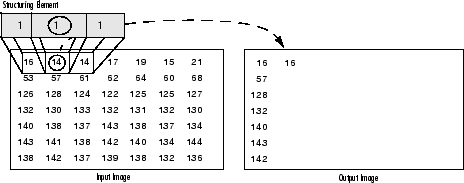
灰度图像上的扩张侵蚀:反之亦然适用于侵蚀操作。 输出像素的值是落在结构化元素的大小和形状内的所有像素的最小值。 看看下面的例子:
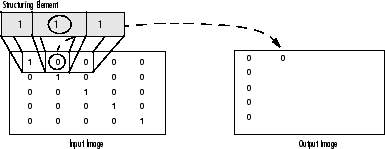
腐蚀二值图像
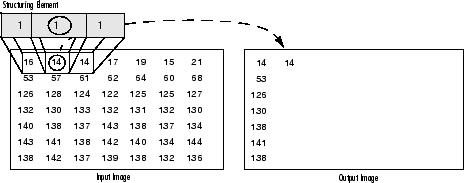
在灰度图像上的腐蚀
结构元素
如上所述以及通常在任何形态学操作中所看到的,用于探测输入图像的结构化元素是最重要的部分。
结构化元素是由0和1组成的矩阵,可以有任意的形状和大小。 通常比正在处理的图像小得多,而值为1的像素定义邻域。 结构化元素的中心像素,称为原点,标识感兴趣的像素 - 正在处理的像素。
例如,以下示出了7×7尺寸的菱形结构元件。
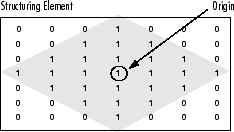
一个菱形结构元素及其起源
结构化元素可以具有许多常见形状,例如线条,菱形,圆盘,周期线以及圆和大小。 您通常会选择与要在输入图像中处理/提取的对象大小和形状相同的结构元素。 例如,要查找图像中的线条,请创建一个线性结构化元素,稍后将会看到。
代码
本教程代码的显示如下。 您也可以从这里下载。
#include 说明/结果
1、加载源图像并检查是否没有任何问题,然后显示它:
 // Load the image
    Mat src = imread(argv[1]);
    // Check if image is loaded fine
    if(!src.data)
        cerr << "Problem loading image!!!" << endl;
    // Show source image
    imshow("src", src);
2、然后将图像转换为灰度,如果它不是灰度的:
 // Transform source image to gray if it is not
    Mat gray;
    if (src.channels() == 3)
    {
        cvtColor(src, gray, CV_BGR2GRAY);
    }
    else
    {
        gray = src;
    }
    // Show gray image
    imshow("gray", gray);
3、之后将灰度图像转换为二进制。 注意〜符号表示我们使用它的逆(即bitwise_not)版本:
 // Apply adaptiveThreshold at the bitwise_not of gray, notice the ~ symbol
    Mat bw;
    adaptiveThreshold(~gray, bw, 255, CV_ADAPTIVE_THRESH_MEAN_C, THRESH_BINARY, 15, -2);
    // Show binary image
    imshow("binary", bw);
4、现在我们准备应用形态学操作来提取水平线和垂直线,从而将音乐表与音乐片断分开,但是首先让我们初始化我们将使用的输出图像:
  // Create the images that will use to extract the horizontal and vertical lines
    Mat horizontal = bw.clone();
    Mat vertical = bw.clone();
5、正如我们在理论中指定的那样,为了提取我们想要的对象,我们需要创建相应的结构元素。 由于这里我们想要提取水平线,为此目的的相应结构元素将具有以下形状:
并在源代码中由以下代码片段表示:
 // Specify size on horizontal axis
    int horizontalsize = horizontal.cols / 30;
    // Create structure element for extracting horizontal lines through morphology operations
    Mat horizontalStructure = getStructuringElement(MORPH_RECT, Size(horizontalsize,1));
    // Apply morphology operations
    erode(horizontal, horizontal, horizontalStructure, Point(-1, -1));
    dilate(horizontal, horizontal, horizontalStructure, Point(-1, -1));
    // Show extracted horizontal lines
    imshow("horizontal", horizontal);
6、垂直线也是如此,具有相应的结构元素:

并再次表示如下:
// Specify size on vertical axis
    int verticalsize = vertical.rows / 30;
    // Create structure element for extracting vertical lines through morphology operations
    Mat verticalStructure = getStructuringElement(MORPH_RECT, Size( 1,verticalsize));
    // Apply morphology operations
    erode(vertical, vertical, verticalStructure, Point(-1, -1));
    dilate(vertical, vertical, verticalStructure, Point(-1, -1));
    // Show extracted vertical lines
    imshow("vertical", vertical);
7、正如你所看到的,我们快到了。 但是,在这一点上你会注意到音符的边缘有些粗糙。 出于这个原因,我们需要改进边缘以获得更平滑的结果:
 // Inverse vertical image
    bitwise_not(vertical, vertical);
    imshow("vertical_bit", vertical);
    // Extract edges and smooth image according to the logic
    // 1. extract edges
    // 2. dilate(edges)
    // 3. src.copyTo(smooth)
    // 4. blur smooth img
    // 5. smooth.copyTo(src, edges)
    // Step 1
    Mat edges;
    adaptiveThreshold(vertical, edges, 255, CV_ADAPTIVE_THRESH_MEAN_C, THRESH_BINARY, 3, -2);
    imshow("edges", edges);
    // Step 2
    Mat kernel = Mat::ones(2, 2, CV_8UC1);
    dilate(edges, edges, kernel);
    imshow("dilate", edges);
    // Step 3
    Mat smooth;
    vertical.copyTo(smooth);
    // Step 4
    blur(smooth, smooth, Size(2, 2));
    // Step 5
    smooth.copyTo(vertical, edges);
    // Show final result
    imshow("smooth", vertical);
图像金字塔
使用OpenCV函数cv :: pyrUp和cv :: pyrDown下采样或上采样给定的图像。
理论
- 通常我们需要转换图像的大小。 为此,有两种可能的选择:
- 放大图像(放大)或
- 缩小尺寸(缩小)。
- 尽管在OpenCV中有一个几何变换函数 - 在图像(cv ::
resize,我们将在后面的教程中显示)中改变图像大小,本节我们首先分析图像金字塔的使用,它被广泛应用于 大量的视觉应用。
图像金字塔
- 图像金字塔是图像的集合 - 全部来源于单个原始图像 - 连续降采样,直到达到某个所需的停止点。
- 有两种常见的图像金字塔:
- 高斯金字塔:用于降采样图像
- 拉普拉斯金字塔(Laplacian pyramid):用于从金字塔中较低的图像重建上采样图像(分辨率较低)
- 在本教程中,我们将使用高斯金字塔。
高斯金字塔
- 想象一下,金字塔是层越高,层的尺度越小。
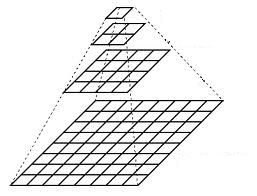
- 每一层从下到上编号,所以层 (i+1) (表示为 Gi+1 小于层 i ( Gi ))。
要生成高斯金字塔中的图层 (i+1) ,我们执行以下操作:
用高斯内核卷积 Gi :
116 ⎡⎣⎢⎢⎢⎢⎢⎢1464141624164624362464162416414641⎤⎦⎥⎥⎥⎥⎥⎥ 删除偶数行和列。
- 你可以很容易地注意到,由此产生的图像将是其前任面积的四分之一。 在输入图像 G0 (原始图像)上迭代这个过程产生整个金字塔。
- 上面的过程对于缩减图像是有用的。 如果我们想使它变大,怎么办?:用零填充的列(0)
- 首先,在每个维度上将图像扩大到原来的两倍,以新的偶数行和
- 用上面显示的相同内核(乘以4)执行卷积以近似“缺失像素”的值
- 这两个过程(如上面解释的下采样和上采样)由OpenCV函数cv :: pyrUp和cv ::pyrDown实现,我们将在下面的代码中看到:
| 当我们缩小图像的大小时,实际上是丢失了图像的信息。 |
代码
#include "opencv2/imgproc.hpp"
#include "opencv2/imgcodecs.hpp"
#include "opencv2/highgui.hpp"
using namespace cv;
Mat src, dst, tmp;
const char* window_name = "Pyramids Demo";
int main( void )
{
  printf( "\n Zoom In-Out demo  \n " );
  printf( "------------------ \n" );
  printf( " * [u] -> Zoom in  \n" );
  printf( " * [d] -> Zoom out \n" );
  printf( " * [ESC] -> Close program \n \n" );
  src = imread( "../data/chicky_512.png" ); // Loads the test image
  if( src.empty() )
    { printf(" No data! -- Exiting the program \n");
      return -1; }
  tmp = src;
  dst = tmp;
  imshow( window_name, dst );
  for(;;)
  {
    char c = (char)waitKey(0);
    if( c == 27 )
      { break; }
    if( c == 'u' )
      { pyrUp( tmp, dst, Size( tmp.cols*2, tmp.rows*2 ) );
        printf( "** Zoom In: Image x 2 \n" );
      }
    else if( c == 'd' )
      { pyrDown( tmp, dst, Size( tmp.cols/2, tmp.rows/2 ) );
        printf( "** Zoom Out: Image / 2 \n" );
      }
    imshow( window_name, dst );
    tmp = dst;
   }
   return 0;
}
说明
我们来看看程序的一般结构:
- 加载一个图像(在这种情况下,它是在程序中定义的,用户不必将其作为参数输入)
  src = imread( "../data/chicky_512.png" ); // Loads the test image
  if( src.empty() )
    { printf(" No data! -- Exiting the program \n");
return -1; }- 创建一个Mat对象来存储操作的结果(dst)和一个保存临时结果(tmp)。
Mat src, dst, tmp;
/* ... */
tmp = src;
dst = tmp;- 创建一个窗口来显示结果
imshow( window_name, dst );- 执行无限循环等待用户输入。
for(;;)
  {
    char c = (char)waitKey(0);
    if( c == 27 )
      { break; }
    if( c == 'u' )
      { pyrUp( tmp, dst, Size( tmp.cols*2, tmp.rows*2 ) );
        printf( "** Zoom In: Image x 2 \n" );
      }
    else if( c == 'd' )
      { pyrDown( tmp, dst, Size( tmp.cols/2, tmp.rows/2 ) );
        printf( "** Zoom Out: Image / 2 \n" );
      }
    imshow( window_name, dst );
    tmp = dst;
   }
我们的程序退出,如果用户按ESC键。 另外还有两个选择:
- 执行上采样(按’u’后)
if( c == 'u' )
      { pyrUp( tmp, dst, Size( tmp.cols*2, tmp.rows*2 ) );
        printf( "** Zoom In: Image x 2 \n" );
      }
我们使用函数cv :: pyrUp有三个参数:
- tmp:当前图像,用src原始图像初始化。
- dst:目标图像(在屏幕上显示,据说是输入图像的两倍)
- Size(tmp.cols 2,tmp.rows * 2)*:目标大小。 由于我们正在upsample,cv :: pyrUp预计比输入图像(在这种情况下tmp)大一倍。
- 执行下采样(按’d’后)
 else if( c == 'd' )
      { pyrDown( tmp, dst, Size( tmp.cols/2, tmp.rows/2 ) );
        printf( "** Zoom Out: Image / 2 \n" );
      }
与cv :: pyrUp类似,我们使用函数cv :: pyrDown,它有三个参数:
- tmp:当前图像,用src原始图像初始化。
- dst:目标图像(在屏幕上显示,应该是输入图像的一半)
- size(tmp.cols / 2,tmp.rows / 2):目标大小。 由于我们正在采样,cv ::pyrDown预计输入图像大小的一半(在这种情况下tmp)。
- 请注意,输入图像可以分为两个因子(在两个维度上)是很重要的。 否则,将显示一个错误。
- 最后,我们用显示的当前图像更新输入图像tmp,以便后续操作。
tmp = dst;基本阈值操作
使用OpenCV函数cv :: threshold执行基本的阈值操作
阈值?
- 最简单的分割方法
- 应用示例:分离出与我们想要分析的对象相对应的图像区域。 这种分离是基于对象像素和背景像素之间的强度变化。
- 为了区分我们感兴趣的像素(其最终将被拒绝),我们执行每个像素强度值相对于阈值(根据要解决的问题确定)的比较。
- 一旦我们正确分离了重要的像素,我们可以设置一个确定的值来识别它们(即我们可以给它们赋值0(黑色),255(白色)或任何适合您需要的值)。
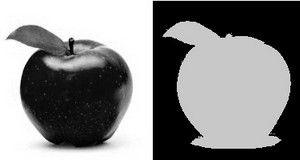
阈值的类型
- OpenCV提供函数cv :: threshold来执行阈值操作。
- 用这个函数可以实现5种阈值操作。 我们将在下面的小节中解释它们。
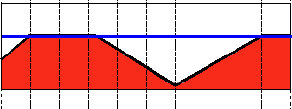
- 为了说明这些阈值过程是如何工作的,让我们考虑一下我们有一个像素强度值为src(x,y)的源图像。 下面的情节描述了这一点。水平的蓝线表示thresh(固定)。
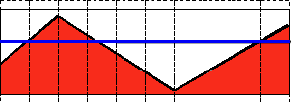
Threshold Binary(二进制阈值)
阈值二进制,倒置
Truncate(截断)
阈值为零
阈值为零,倒置
代码
#include "opencv2/imgproc.hpp"
#include "opencv2/imgcodecs.hpp"
#include "opencv2/highgui.hpp"
using namespace cv;
int threshold_value = 0;
int threshold_type = 3;
int const max_value = 255;
int const max_type = 4;
int const max_BINARY_value = 255;
Mat src, src_gray, dst;
const char* window_name = "Threshold Demo";
const char* trackbar_type = "Type: \n 0: Binary \n 1: Binary Inverted \n 2: Truncate \n 3: To Zero \n 4: To Zero Inverted";
const char* trackbar_value = "Value";
void Threshold_Demo( int, void* );
int main( int, char** argv )
{
  src = imread( argv[1], IMREAD_COLOR ); // Load an image
  if( src.empty() )
    { return -1; }
  cvtColor( src, src_gray, COLOR_BGR2GRAY ); // Convert the image to Gray
  namedWindow( window_name, WINDOW_AUTOSIZE ); // Create a window to display results
  createTrackbar( trackbar_type,
                  window_name, &threshold_type,
                  max_type, Threshold_Demo ); // Create Trackbar to choose type of Threshold
  createTrackbar( trackbar_value,
                  window_name, &threshold_value,
                  max_value, Threshold_Demo ); // Create Trackbar to choose Threshold value
  Threshold_Demo( 0, 0 ); // Call the function to initialize
  for(;;)
    {
      char c = (char)waitKey( 20 );
      if( c == 27 )
    { break; }
    }
}
void Threshold_Demo( int, void* )
{
  /* 0: Binary
     1: Binary Inverted
     2: Threshold Truncated
     3: Threshold to Zero
     4: Threshold to Zero Inverted
   */
  threshold( src_gray, dst, threshold_value, max_BINARY_value,threshold_type );
  imshow( window_name, dst );
}
说明
1、我们来看看程序的一般结构:
- 加载图像。 如果是BGR,我们将其转换为灰度。 为此,请记住,我们可以使用函数cv :: cvtColor:
src = imread( argv[1], IMREAD_COLOR ); // Load an image
  if( src.empty() )
    { return -1; }
cvtColor( src, src_gray, COLOR_BGR2GRAY ); // Convert the image to Gray- 创建一个窗口来显示结果
namedWindow( window_name, WINDOW_AUTOSIZE ); // Create a window to display results- 为用户创建2个轨道条以输入用户输入:
- 阈值类型:二进制,归零等…
- 阈值
createTrackbar( trackbar_type,
                  window_name, &threshold_type,
                  max_type, Threshold_Demo ); // Create Trackbar to choose type of Threshold
  createTrackbar( trackbar_value,
                  window_name, &threshold_value,
max_value, Threshold_Demo ); // Create Trackbar to choose Threshold value- 等到用户输入阈值,阈值类型(或直到程序退出)
- 每当用户更改任何TrackBar的值时,都会调用Threshold_Demo函数:
void Threshold_Demo( int, void* )
{
  /* 0: Binary
     1: Binary Inverted
     2: Threshold Truncated
     3: Threshold to Zero
     4: Threshold to Zero Inverted
   */
  threshold( src_gray, dst, threshold_value, max_BINARY_value,threshold_type );
  imshow( window_name, dst );
}
正如你所看到的,函数cv :: threshold被调用。 我们给5个参数:
- src_gray:我们的输入图像
- dst:目标(输出)图像
- threshold_value:进行阈值操作的阈值
- max_BINARY_value:与二进制阈值操作一起使用的值(设置所选像素)
- threshold_type:5个阈值操作之一。 它们列在上面的函数的注释部分。
