基于netty+websocket实现门户游客实时统计功能
基于netty+websocket实现门户游客实时统计功能
基本需求
商城门户页面需要实时展示游客访问的数量,商城后台页面需要实时游客访问量、登录用户数量,以及下订单用户数量。
技术选型
1.首先实时推送信息到前端,我们第一反应就是使用webscoket。那么什么是websocket呢?
WebScoket简述
WebSocket是一种在单个TCP连接上进行全双工通信的协议。
WebSocket使得客户端和服务器之间的数据交换变得更加简单,允许服务端主动向客户端推送数据。在WebSocket API中,浏览器和服务器只需要完成一次握手,两者之间就直接可以创建持久性的连接,并进行双向数据传输。
websocket协议本身是构建在http协议之上的升级协议,客户端首先向服务器端去建立连接,这个连接本身就是http协议只是在头信息中包含了一些websocket协议的相关信息,一旦http连接建立之后,服务器端读到这些websocket协议的相关信息就将此协议升级成websocket协议。websocket协议也可以应用在非浏览器应用,只需要引入相关的websocket库就可以了.
Websocket使用ws或wss的统一资源标志符,类似于HTTPS,其中wss表示在TLS之上的Websocket.
2.springboot支持原生的websocket开发,关于是否使用原生websocket进行开发,需要根据自身的需求进行合理选择,这里我选择使用了netty作为websocket容器进行集成开发。主要原因是:netty相对于springboot默认配置的tomcat并发高、传输快、封装好。当然这里并不是说netty一定是优于tomcat的,笔者这里是为了避免提高并发等而修改tomcat的配置,而选择了开箱即用的netty框架。关于netty和tomcat的比较,网上的的说法很多,总结如下:
Netty和Tomcat的区别
Netty和Tomcat最大的区别就在于通信协议,Tomcat是基于Http协议的,他的实质是一个基于http协议的web容器,但是Netty不一样,他能通过编程自定义各种协议,因为netty能够通过codec自己来编码/解码字节流,完成类似redis访问的功能,这就是netty和tomcat最大的不同。
3.在选择了netty+websocket的技术栈后,我们来看看如何实现。目前主流的实现方式有2种:
-
1 SpringBoot2+Netty+WebSocket 自主控制实现NettyServer来进行webscoket信息传输,这种模式比较适合特殊的协议及传递参数的场景,可以定制化传输模式。这里比较推荐一篇博客: https://blog.csdn.net/moshowgame/article/details/91552993
-
2 使用开源框架netty-websocket-spring-boot-starter,这种模式适合比较常规的传输形式,使用配置及标签的形式快速的搭建后台往前端传输信息的环境。笔者这次的需求比较简单,故选取这种方式进行开发。框架的官方文档:https://github.com/YeautyYE/netty-websocket-spring-boot-starter/blob/master/README.md
快速开始
1.引入maven依赖
            org.yeauty
            netty-websocket-spring-boot-starter
            0.9.5
2.新建一个门户项目的websocket
在开启ws链接时,记录同一IP的链接为一次访问次数,并记录在缓存中(正式环境中可存入Redis缓存,后作为访问日志持久化到数据库)。链接断开时,将缓存中的Session记录移出。
@Slf4j
@ServerEndpoint(path = "/portalWs",port = "8189")
public class PortalWebSocketServer {

    //缓存游客的map,正式环境建议替换为Redis
    public static ConcurrentHashMap touristsMap = new ConcurrentHashMap<>();
    public static ConcurrentHashMap clientToChannelMap = new ConcurrentHashMap<>();
    @Autowired
    private DataHandler dataHandler;

    /**
    * 连接建立时触发
    */
    @OnOpen
    public void onOpen(Session session, HttpHeaders headers, @RequestParam String req, @RequestParam MultiValueMap reqMap, @PathVariable String arg, @PathVariable Map pathMap){
        SocketAddress socketAddress = session.remoteAddress();
        String clientIP = socketAddress != null ? socketAddress.toString().replace("/","").split(":")[0] : "";
        //记录游客访问记录
        touristsMap.put(clientIP, clientIP);
        //记录游客ws的session记录
        clientToChannelMap.put(clientIP,session);
        //同时推送门户和后台的消息
        sendMessage();
        log.info("Tourists join, the tourists IP is: " + clientIP);
    }

    /**
    * 连接关闭时触发
    */
    @OnClose
    public void onClose(Session session) throws IOException {
        SocketAddress socketAddress = session.remoteAddress();
        String clientIP = socketAddress != null ? socketAddress.toString().replace("/","").split(":")[0] : "";
        if (StringUtils.isNoneBlank(clientIP) && touristsMap.containsKey(clientIP)){
            //移除需要推送到门户的游客ws连接
            touristsMap.remove(clientIP);
            //更新并推送门户和后台的消息
            sendMessage();
        }
        log.info("one connection closed");
    }

    /**
    * 前端发送信息的回复
    */
    @OnMessage
    public void onMessage(String message) {
        if (!CollectionUtils.isEmpty(clientToChannelMap)){
            Iterator> entries = clientToChannelMap.entrySet().iterator();
            while (entries.hasNext()) {
                Map.Entry entry = entries.next();
                try {
                    sendMessage(entry.getValue(), message);
                } catch(Exception e){
                    log.error("send message failed! Exception: {}", e.getMessage());
                }
            }
        }
    }

    @OnError
    public void onError(Session session, Throwable throwable) {
        log.error("connection err: {}", throwable.getMessage());
    }

    /**
     * 发送消息方法
     * @param session 客户端与socket建立的会话
     * @param message 消息
     * @throws IOException
     */
    public void sendMessage(Session session, String message) throws IOException{
        if(session != null){
            session.sendText(message);
        }
    }

    private void sendMessage(){
        //通知游客数量减少
        if (!CollectionUtils.isEmpty(clientToChannelMap)){
            Iterator> entries = clientToChannelMap.entrySet().iterator();
            while (entries.hasNext()) {
                Map.Entry entry = entries.next();
                try {
                    sendMessage(entry.getValue(), JSON.toJSONString(dataHandler.handlerTouristMessage()));
                } catch(Exception e){
                    log.error("send tourist message failed! Exception: {}", e.getMessage());
                }
            }
        }
        //通知后台管理人员数量减少
        if (!CollectionUtils.isEmpty(WebSocketServer.userToChannelMap)){
            Iterator> entries = WebSocketServer.userToChannelMap.entrySet().iterator();
            while (entries.hasNext()) {
                Map.Entry entry = entries.next();
                try {
                    sendMessage(entry.getValue(), JSON.toJSONString(dataHandler.handlerUserMessage()));
                } catch(Exception e){
                    log.error("send user message failed! Exception: {}", e.getMessage());
                }
            }
        }

    }

}
2.新建一个后台项目的websocket
类比门户websocket服务端,建立后台websocket的服务端,记录和推送后台展示的信息。
@Slf4j
@ServerEndpoint(path = "/ws",port = "8188")
public class WebSocketServer {

    //根据IP或者用户名缓存ws连接
    public static ConcurrentHashMap userToChannelMap = new ConcurrentHashMap<>();

    @Autowired
    private DataHandler dataHandler;

    @OnOpen
    public void onOpen(Session session, HttpHeaders headers, @RequestParam String req, @RequestParam MultiValueMap reqMap, @PathVariable String arg, @PathVariable Map pathMap){
        SocketAddress socketAddress = session.remoteAddress();
        String clientIP = socketAddress != null ? socketAddress.toString().replace("/","").split(":")[0] : "";
        userToChannelMap.put(clientIP, session);
        session.sendText(JSON.toJSONString(dataHandler.handlerUserMessage()));
    }

    @OnMessage
    public void onMessage(String message) {
        if (!CollectionUtils.isEmpty(userToChannelMap)){
            Iterator> entries = userToChannelMap.entrySet().iterator();
            while (entries.hasNext()) {
                Map.Entry entry = entries.next();
                try {
                    sendMessage(entry.getValue(), message);
                } catch(Exception e){
                    log.error("send message failed! Exception: {}", e.getMessage());
                }
            }
        }
    }

    @OnClose
    public void onClose(Session session) throws IOException {
        SocketAddress socketAddress = session.remoteAddress();
        String clientIP = socketAddress != null ? socketAddress.toString().replace("/","").split(":")[0] : "";
        if (StringUtils.isNoneBlank(clientIP)){
            userToChannelMap.remove(clientIP);
        }
        log.info("one connection closed");
    }

    @OnError
    public void onError(Session session, Throwable throwable) {
        log.error("connection err: {}", throwable.getMessage());
    }

    /**
     * 发送消息方法
     * @param session 客户端与socket建立的会话
     * @param message 消息
     * @throws IOException
     */
    public void sendMessage(Session session, String message) throws IOException{
        if(session != null){
            session.sendText(message);
        }
    }

    public void sendInfo(String userName, String message) {
        if(userToChannelMap.get(userName) != null){
            userToChannelMap.get(userName).sendText(message);
        }
    }

}
3.建立一个定时任务实时推送
除开连接的时刻,还需要将实时信息同步推送到前端页面展示,这里使用了定时任务框架Quartz,后续根据需求可以更换为分布式调度系统如:xxl-job等。
@Configuration
@EnableScheduling
public class WebSocketTask {

    @Resource
    private WebSocketServer webSocketServer;
    @Autowired
    private DataHandler dataHandler;

    @Scheduled(cron = "0/1 * * * * ?")
    private void configureTasks() {
        webSocketServer.onMessage(JSON.toJSONString(dataHandler.handlerUserMessage()));
    }
}
4.自定义一个推送标签
如果使用定时任务进行信息推送,在没有游客访问或用户登录时,会推送大量无用信息,造成不必要的网络开销,故现在修改为用户登录或用户下订单时织入一个AOP,推送实时信息到前端展示。
首先自定义一个标签:
@Documented
@Retention(RetentionPolicy.RUNTIME)
@Target({ElementType.METHOD, ElementType.TYPE})
public @interface SendWebSocket {
    String value() default "SendWebSocket";
}
在标签中处理发送信息的业务:
/**
 * 基于需要触发websocket自动推送的AOP标签,可用于登录或者订单业务时统计数量
 */

@Component
@Aspect
public class SendWebSocketAspect {

    @Resource
    private WebSocketServer webSocketServer;
    @Autowired
    private DataHandler dataHandler;

    @Pointcut("@annotation(com.zhangyang.websocket.aop.SendWebSocket)")
    public void cut() { }

    @AfterReturning(value = "cut()", returning="returnValue")
    public void record(JoinPoint joinPoint, Object returnValue) {
        webSocketServer.onMessage(JSON.toJSONString(dataHandler.handlerUserMessage()));
    }
}
在需要触发消息推送的业务代码上打上标签即可。
5.新建一个websocke的客户端用于测试
My WebSocket
Welcome
6.消息体及Controller触发
主题代码如上所示,如需对消息体进行处理,以及Controller触发触发,可以参考Demo代码,连接:
https://download.csdn.net/download/alanzy123/13092362。因为公司检测,代码后续会上传到github上。
效果展示
1.首先打开后台展示页面:

2.再打开门户展示页面模仿游客登录:

3.切换到后台展示页面,验证是否刷新信息
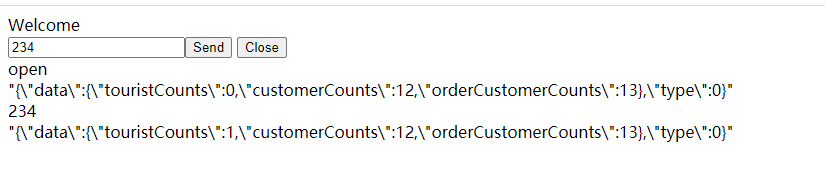
可以看到后端自动刷新了门户的游客访问记录,至此,我们的需求全部实现。
后记
针对于其他的单端点demo,多端点服务需要注意:
- 在快速启动的基础上,在多个需要成为端点的类上使用@ServerEndpoint、@Component注解即可
- 可通过ServerEndpointExporter.getInetSocketAddressSet()获取所有端点的地址
- 当地址不同时(即host不同或port不同),使用不同的ServerBootstrap实例
- 当地址相同,路径(path)不同时,使用同一个ServerBootstrap实例
- 当多个端点服务的port为0时,将使用同一个随机的端口号
- 当多个端点的port和path相同时,host不能设为"0.0.0.0",因为"0.0.0.0"意味着绑定所有的host
增加Nginx对ws进行反向代理的配置
1.增加nginx配置
#http模块下加入
map $http_upgrade $connection_upgrade {
       default upgrade;
       ''   close;
        }
=================================================================

server {
        listen 8081;

        location /websocket {
           proxy_pass http://xxx.xxx.xxx.xxx:8188/ws;
           proxy_http_version 1.1;
           #该指令设置与upstream server的连接超时时间,有必要记住,这个超时不能超过75秒
           proxy_connect_timeout 60s;
           #该指令设置与代理服务器的读超时时间。它决定了nginx会等待多长时间来获得请求的响应。这个时间不是获得整个response的时间,而是两次reading操作的时间
           proxy_read_timeout 3600s;
           #这个指定设置了发送请求给upstream服务器的超时时间。超时设置不是为了整个发送期间,而是在两次write操作期间。如果超时后,upstream没有收到新的数据,nginx会关闭连接
           proxy_send_timeout 60s;
           proxy_set_header  X-Real-IP  $remote_addr;
           add_header Access-Control-Allow-Origin*;
           proxy_set_header Upgrade websocket;
           proxy_set_header Connection Upgrade;
           proxy_set_header Host $host;
           proxy_set_header X-Real-IP $remote_addr;
           #通过nginx转发后游客IP会被统一代理,故需要在header中加入客户真实的IP来统计
           proxy_set_header X-Forwarded-For $proxy_add_x_forwarded_for;
        }
   }
2.修改根据游客IP来统计游客数的统计代码
private static final String NGINX_URL = "X-Forwarded-For";


@OnOpen
    public void onOpen(Session session, HttpHeaders headers, @RequestParam String req, @RequestParam MultiValueMap reqMap, @PathVariable String arg, @PathVariable Map pathMap){
        SocketAddress socketAddress = session.remoteAddress();
        String clientIP = socketAddress != null ? socketAddress.toString().replace("/","").split(":")[0] : "";
        //增加nginx反向代理后获取客户端真实IP的逻辑
        List> entries = headers.entries();
        for (Map.Entry entry : entries) {
            if(entry.getKey().equals(NGINX_URL)){
                clientIP = StringUtils.isNotBlank(entry.getValue()) ? entry.getValue().split(":")[0] : entry.getValue() ;
             }
        }
        //记录游客访问记录
        touristsMap.put(clientIP, clientIP);
        //记录游客ws的session记录
        clientToChannelMap.put(clientIP,session);
        //同时推送门户和后台的消息
        sendMessage();
        log.info("Tourists join, the tourists IP is: " + clientIP);
    }
3.踩坑记录
- 对于要经过nginx代理的ws,注意防火墙通过端口放行
- 针对于不同的网络环境,X-Forwarded-For获得的IP可能带端口号,注意截取
- 以上是通过超时时间来延长ws连接的超时时间,建议使用前端心跳包的形式来维持连接