从零开始搭建一个博客 部署上线 自定义域名 vuepress+github+vercel
全局安装VuePress
npm install -g vuepress
创建项目文件夹
mkdir vuepreeeBlogDemo
cd vuepreeeBlogDemo
npm init -y
新建文件,构成目录结构如下:
vuepressBlogDemo
├─── docs
│   ├── README.md
│   └── .vuepress
│       ├── public
│       └── config.js
└── package.json
文件内容编写
config.js:
module.exports = {
  title: 'Lynn\'s blog',
  description: '我的个人网站',
  head: [ // 注入到当前页面的 HTML  中的标签
    ['link', { rel: 'icon', href: '/logo.jpg' }], // 增加一个自定义的 favicon(网页标签的图标)
  ],
  base: '/', // 这是部署到github相关的配置
  markdown: {
    lineNumbers: false // 代码块显示行号
  },
  themeConfig: {
    nav:[ // 导航栏配置
      {text: '前端基础', link: '/accumulate/' },
      {text: '算法题库', link: '/algorithm/'},
      {text: '微博', link: 'https://baidu.com'}
    ],
    sidebar: 'auto', // 侧边栏配置
    sidebarDepth: 2, // 侧边栏显示2级
  }
};
图片存放在docs/.vuepress/public/logo.jpg下,直接使用‘/’可以引入
package.json:
"scripts": {
  "dev": "vuepress dev docs",
  "build": "vuepress build docs"
}
部署上线
- 方式1:买个服务器,阿里云,腾讯云。。。
- 方式2:Github Pages:Github 提供的、用于搭建个人网站的静态站点托管服务。
新建仓库一
USERNAME.github.io
- USERNAME 应该为github账户的用户名
- 不用克隆到本地
新建仓库二
- 自定义名称
- 克隆到本地
- 此仓库是用来开发博客,以后只需更改这个项目
- 新建deploy.sh文件
#!/usr/bin/env sh

# 确保脚本抛出遇到的错误
set -e

# 生成静态文件
npm run build

# 进入生成的文件夹
cd docs/.vuepress/dist

# 如果是发布到自定义域名
# echo 'www.yourwebsite.com' > CNAME

git init
git add -A
git commit -m 'deploy'

# 如果你想要部署到 https://USERNAME.github.io
git push -f [email protected]:CathleenLynn/CathleenLynn.github.io.git master

# 如果发布到 https://USERNAME.github.io/  REPO=github上的项目
# git push -f [email protected]:USERNAME/.git master:gh-pages

cd -
- 修改USERNAME
# 如果你想要部署到 https://USERNAME.github.io
git push -f [email protected]:CathleenLynn/CathleenLynn.github.io.git master
仓库一负责显示网站内容,我们不需要改动它;日常开发和新增内容,都在仓库二中,并通过 npm run deploy 命令,将代码发布到仓库一。
- 在package.json中添加:
"scripts": {
  "deploy": "bash deploy.sh"
}
关联两个仓库
npm run deploy
发布到自己的域名
1.域名解析

2.在github仓库一USERNAME.github.io 中找到
Settings > Custom domain
把域名填进去save即可
美化-添加插件
参考:
VuePress博客美化之reco主题考
vuepress reco主题优化与修改
.vuepress/config.js中:
plugins:[...添加内容...]
1.看板娘
[
      //先安装在配置, npm install @vuepress-reco/vuepress-plugin-kan-ban-niang --save
      "@vuepress-reco/vuepress-plugin-kan-ban-niang",
      {
        theme: ['blackCat', 'whiteCat', 'haru1', 'haru2', 'haruto', 'koharu', 'izumi', 'shizuku', 'wanko', 'miku', 'z16'],
        clean: false,
        messages: {
          welcome: '我是lookroot欢迎你的关注 ',
          home: '心里的花,我想要带你回家。',
          theme: '好吧,希望你能喜欢我的其他小伙伴。',
          close: '再见哦'
        },
        width: 240,
        height: 352
      }
    ],
2.彩带背景
[
      //彩带背景 先安装在配置, npm install vuepress-plugin-ribbon --save
      "ribbon",
      {
        size: 90,     // width of the ribbon, default: 90
        opacity: 0.8, // opacity of the ribbon, default: 0.3
        zIndex: -1    // z-index property of the background, default: -1
      }
    ],
3.鼠标点击特效
[
      //鼠标点击特效 先安装在配置, npm install vuepress-plugin-cursor-effects --save
      "cursor-effects",
      {
        size: 3,                    // size of the particle, default: 2
        shape: ['circle'],  // shape of the particle, default: 'star'
        zIndex: 999999999           // z-index property of the canvas, default: 999999999
      }
    ],
4.动态标题
[
      //动态标题 先安装在配置, npm install vuepress-plugin-dynamic-title --save
      "dynamic-title",
      {
        showIcon: "/logo.png",
        showText: "(/≧▽≦/)你来啦!",
        hideIcon: "/failure.ico",
        hideText: "(●—●)喔哟,崩溃啦!",
        recoverTime: 2000
      }
    ],
5.音乐播放器
3种音乐插件:
- bgm-player,一款简洁易用的音乐插件,优势是好看,其他一无是处了
- music-bar,一个程序猿自己开发的插件,除本地,网络音频之外还支持从平台歌单获取链接(目前仅支持网易云音乐),缺点是丑了点,支持一下这位老哥
- meting,在hexo上就一直用的插件,功能强大,配置丰富,目前应该最大强大的音乐插件了,我用的就是这个,强推,还支持在markdown中直接插入
安装:yarn add vuepress-plugin-meting
['meting', {
      // metingApi: "https://meting.sigure.xyz/api/music",
      meting: {
        // 网易
        server: "netease",
        // 读取歌单
        type: "playlist",
        mid: "13529775",
      },
      // 不配置该项的话不会出现全局播放器
      aplayer: {
        // 吸底模式
        fixed: true,
        mini: true,
        // 自动播放
        autoplay: true,
        // 歌曲栏折叠
        listFolded:true,
        // 颜色
        theme: '#f9bcdd',
        // 播放顺序为随机
        order: 'random',
        // 初始音量
        volume: 0.1,
        // 关闭歌词显示
        lrcType: 0
      },
      mobile :{
        // 手机端去掉cover图
        cover: false,
      }
    }]
其中type和mid是音乐来源
6.图片放大
[
      //图片放大插件 先安装在配置, npm install @vuepress\plugin-medium-zoom --save
      '@vuepress\plugin-medium-zoom', {
        selector: '.page img',
        delay: 1000,
        options: {
          margin: 24,
          background: 'rgba(25,18,25,0.9)',
          scrollOffset: 40
        }
      }
    ]
7.复制代码弹窗插件
["vuepress-plugin-nuggets-style-copy", {
      copyText: "复制代码",  //vuepress复制粘贴提示插件P 先安装在配置 npm install vuepress-plugin-nuggets-style-copy --save
      tip: {
        content: "复制成功!"
      }
    }]
8.加密功能
点击进入官网了解:
vuepress-theme-reco加密功能
1.项目加密
// .vuepress/config.js

module.exports = {
  theme: 'reco',
  themeConfig: {
    // 密钥
    keyPage: {
      keys: ['32位的 md5 加密密文'], // 1.3.0 版本后需要设置为密文
      color: '#42b983', // 登录页动画球的颜色
      lineColor: '#42b983' // 登录页动画线的颜色
    }
  }
}
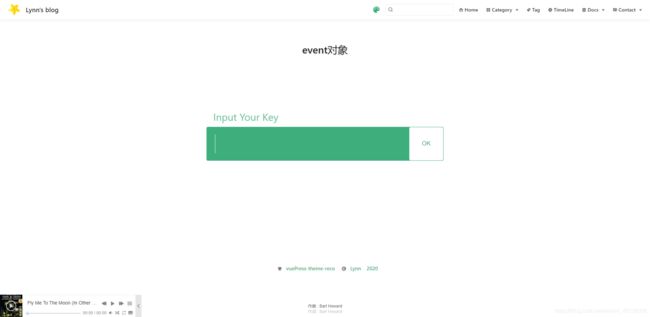
keys的32位的 md5 加密密文可以在官网进行转换。
如图所示,输入密码才可以进入博客浏览:
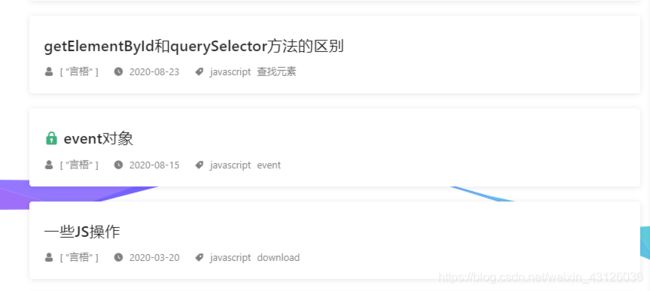
2.文章加密
如果项目是公开的,而某些文章可能需要加密,需要在 frontmatter 以数组的格式设置 keys,可以设置多个密码,数组的值必须是字符串。
---
title: event对象
date: 2020-08-15
tags:
 -  javascript
 -  event
categories:
 -  JavaScript
author:
 -  言梧
keys:
 - '32位的 md5 加密密文'
---
如图所示:
加密页的遗留问题: 从某篇单独加密的文章直接进入另一篇文章时(比如导航栏)加密无法隐藏
9.评论插件
刚开始采用的评论插件vuepress-plugin-comment:
[
    'vuepress-plugin-comment',   //评论插件,写在这里样式丑
    {
        choosen: 'valine',
        // options选项中的所有参数,会传给Valine的配置
        options: {
            el: '#valine-vuepress-comment',
            appId: '***',
            appKey: '***'
        }
    }
]
但是写在插件中,页面很丑。
后来参考官网(https://vuepress-theme-reco.recoluan.com/views/1.x/valine.html)
主题内置评论插件 @vuepress-reco/vuepress-plugin-comments,可以根据自己的喜好选择Valine或者Vssue
在这里我选择了Valine:
module.exports = {
  theme: 'reco',
  themeConfig: {
    valineConfig: {
      appId: '...',// your appId
      appKey: '...', // your appKey
    }
  }
}
其中appId、appKey是需要在leancloud注册获取的。
评论的头像可以在gravatar里设置。
最后就是这样子的:
但是,加入插件后,页面加载速度超级慢
vercel就登场啦
vercel的加入
参考:https://blog.csdn.net/qq_19363379/article/details/108119140
1.注册vercel
注意:
vercel不支持QQ邮箱。由于我的github是用QQ邮箱的,所以在Github-Setting -> Emails里添加了新的邮箱并进行主邮箱的更换。
之后就可以直接登录vercel啦
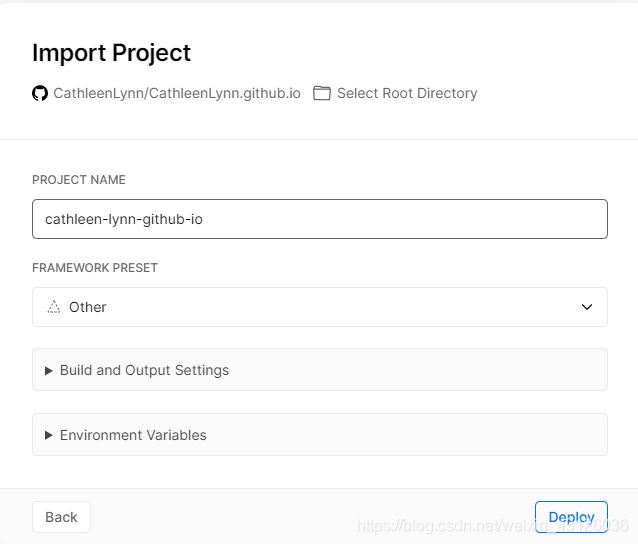
2.引入仓库与项目
选择github后,输入用来存放网站的GitHub Repo的地址,

Repository的URL是github仓库的https地址,不要弄错
然后点Continue,他会让你选择包含source code的文件:

(PS:如果是第一次使用Vercel的话,上面两步里会弹出在GitHub中安装vercel的许可,同意即可)


