写在前面
一直在写springCloud项目,每次都是新建项目然后从零开始写配置,现在写一个尽量通用的项目,方便后续搭建框架的时候直接拿过去使用。
- 需要搭建的组件(模块)有:
eureka(认证),zuul(网关),auth(认证),config(配置中心),user(用户),order(订单),pay(支付),feign... - 这边主要想涉及到的框架技术有:springcloud,springboot2,oauth2,springSecurity,liquibase,lcn(5.0.2),mybatisplus,logback,redis,mysql,swagger2,poi
- 需要搭建、支持的技术
github,jenkins(自动发布),maven私服,nginx,redis,mysql5.7,jdk1.8,swagger2,rabbitmq
一 需要搭建的组件
需要搭建的组件主要有7个模块(feign会集成到具体模块),这边我回详细记录eureka,zuul,auth,config,user.因为前四者是springCloud的配置。需要详细介绍,而具体的业务逻辑代码会在具体模块,这里我将以user模块为例子详细介绍.
- eureka
我们知道,在为服务里面,所有模块需要被注册到一个注册中心,持续的向注册中心发送心跳以保证连接的存活。而springcloud的注册中心有consul和eureka,这里我选用的是eureka.
eureka的代码很简单,只需要在配置文件里面配置好注册地址与密码(可不设置,生产上强烈建议设置),并标识好自己不向自己注册,不被自己发现即可。
maven坐标:
        org.springframework.boot
        spring-boot-starter-web


        org.springframework.cloud
        spring-cloud-starter-netflix-eureka-server


        org.springframework.boot
        spring-boot-starter-test
        test
主类,不用做任何配置
@SpringBootApplication
@EnableEurekaServer
public class CrawlerEurekaApplication {

    public static void main(String[] args) {
        SpringApplication.run(CrawlerEurekaApplication.class, args);
    }
}
yml配置文件:
spring:
  application:
    name: crawler-eureka

server:
  host: http://localhost
  port: 9990
eureka:
  client:
    fetch-registry: false
    register-with-eureka: false
    service-url:
      defaultZone: ${server.host}:${server.port}/eureka/
  instance:
    prefer-ip-address: true
- zuul
上面我们把注册中心搭建好了,访问localhost:9990就可以看到eureka的控制台。但是我们看不到一个服务注册上去了。现在我们搭建一个网关,因为在实际项目中,我们会有很多个微服务模块,而服务器只会向外暴露一个端口,其他的通过相对路径转发。这样也是为了安全和方便管理,有点nginx的感觉。
网关的配置也不复杂:pom坐标:
            org.springframework.boot
            spring-boot-starter-web


            org.springframework.boot
            spring-boot-starter-test
            test


            org.springframework.cloud
            spring-cloud-starter-netflix-eureka-client


            org.springframework.cloud
            spring-cloud-starter-netflix-zuul


                org.springframework.cloud
                spring-cloud-dependencies
                ${spring-cloud.version}
                pom
                import
主类除了标识为eureka-client,还标识是网关
@SpringBootApplication
@EnableEurekaClient
@EnableZuulProxy
public class CrawlerZuulApplication {
    public static void main(String[] args) {
        SpringApplication.run(CrawlerZuulApplication.class, args);
    }
}
yml配置
server:
  port: 9996
spring:
  application:
    name: crawler-zuul
  redis:
    host: localhost
    port: 6379
    password: 123456

zuul:
  routes:
    feign-auth:
      path: /auth/**
      serviceId: crawler-auth
      strip-prefix: true
      custom-sensitive-headers: true
    feign-user:
      path: /user/**
      serviceId: crawler-goddess
      sensitiveHeaders:

eureka:
  client:
    serviceUrl:
      defaultZone: http://localhost:9990/eureka/
  instance:
    prefer-ip-address: true

logging:
  level:
    ROOT: info
    org.springframework.web: info

ribbon:
  ReadTimeout: 6000000
  SocketTimeout: 6000000
hystrix:
  command:
    default:
      execution:
        isolation:
          thread:
            timeoutInMilliseconds: 600000
启动项目,再次打开localhost:9990可以发现多了一个crawler-zuul
-
auth
auth模块主要是供其他模块接口进入时提供认证。这里使用的是oauth2.3.3和springSecurity5.1.5(security5与之前的版本略有区别,接下来会介绍到)
pom:cn.iamcrawler crawler_common 1.0.1 org.springframework.boot spring-boot-starter-test test org.springframework.cloud spring-cloud-starter-netflix-eureka-client 2.1.0.RELEASE org.springframework.cloud spring-cloud-starter-openfeign 2.1.0.RELEASE org.projectlombok lombok true org.springframework.boot spring-boot-starter-actuator org.springframework.cloud spring-cloud-starter-security spring-security-oauth2 org.springframework.security.oauth org.springframework.security.oauth spring-security-oauth2 2.3.3.RELEASE yml:
 server:
     port: 9992
 spring:
     datasource:
       url: jdbc:mysql://www.iamcrawler.cn:3306/goddess?characterEncoding=utf8&useUnicode=true&useSSL=false&serverTimezone=UTC
       username: root
       password: 123456
       driver-class-name:  com.mysql.jdbc.Driver
     redis:
       host: www.iamcrawler.cn
       port: 6379
       password:
       database: 0
     application:
       name: crawler-auth
   eureka:
     client:
       service-url:
         defaultZone: http://localhost:9990/eureka/
   management:
     endpoints:
       web:
         exposure:
           include: health,info,loggers
下面介绍一下主要的两个配置类(sercurity+oauth2)和重写的userDetailService,一般其他人的教程里会把oauth2的配置又分为资源服务器和认证服务器两个,我这里写在同一个配置里面了,道理都是一样的。
    /**
     * Created by liuliang
     * on 2019/6/19
     */

@Configuration
@EnableWebSecurity
//开启权限认证
@EnableGlobalMethodSecurity(prePostEnabled = true)
public class SecurityConfiguration extends WebSecurityConfigurerAdapter {

    @Autowired
    private DomainUserDetailsService userDetailsService;

    @Autowired
    public void configureGlobal(AuthenticationManagerBuilder auth) throws Exception {
        auth.userDetailsService(userDetailsService);
    }

    @Bean
    public PasswordEncoder passwordEncoder() {
        return new PasswordEncoder() {
            @Override
            public String encode(CharSequence charSequence) {
                return charSequence.toString();
            }

            @Override
            public boolean matches(CharSequence charSequence, String s) {
                return Objects.equals(charSequence.toString(),s);
            }
        };
    }

    /**
     * 这一步的配置是必不可少的,否则SpringBoot会自动配置一个AuthenticationManager,覆盖掉内存中的用户
     */
    @Bean
    @Override
    public AuthenticationManager authenticationManagerBean() throws Exception {
        AuthenticationManager manager = super.authenticationManagerBean();
        return manager;
    }

    @Override
    protected void configure(HttpSecurity http) throws Exception {
        http.csrf().disable();
        http
                .requestMatchers().anyRequest()
                .and()
                .authorizeRequests()
                .antMatchers("/oauth/*").permitAll()
        ;
    }
}

----------------类分割线----------------------------


/**
 * Created by liuliang
 * on 2019/6/19
 */

@Configuration
public class OAuth2ServerConfig {

    private static final String DEMO_RESOURCE_ID = "text";

    @Configuration
    @EnableResourceServer
    protected static class ResourceServerConfiguration extends ResourceServerConfigurerAdapter {

        @Override
        public void configure(ResourceServerSecurityConfigurer resources) {
            resources.resourceId(DEMO_RESOURCE_ID).stateless(true);
        }

        @Override
        public void configure(HttpSecurity http) throws Exception {
            http.headers().frameOptions().disable();
            http
                    .sessionManagement().sessionCreationPolicy(SessionCreationPolicy.IF_REQUIRED)
                    .and()
                    .authorizeRequests()
                    .antMatchers("/loggers/**").permitAll()
                    .and()
                    .authorizeRequests()
                    .antMatchers("/templates/**").permitAll()
            ;

        }
    }


    @Configuration
    @EnableAuthorizationServer
    protected static class AuthorizationServerConfiguration extends AuthorizationServerConfigurerAdapter {

        @Autowired
        AuthenticationManager authenticationManager;
        @Autowired
        RedisConnectionFactory redisConnectionFactory;


        @Override
        public void configure(ClientDetailsServiceConfigurer clients) throws Exception {
            //配置两个客户端,一个用于password认证一个用于client认证
            clients.inMemory().withClient("client_1")
                    .resourceIds(DEMO_RESOURCE_ID)
                    .authorizedGrantTypes("client_credentials", "refresh_token")
                    .scopes("select")
                    .authorities("client")
                    .secret("{noop}1234567")
                    .and().withClient("client_2")
                    .resourceIds(DEMO_RESOURCE_ID)
                    .authorizedGrantTypes("password", "refresh_token")
                    .scopes("select")
                    .authorities("client")
                    .secret("{noop}1234567");
        }

        @Override
        public void configure(AuthorizationServerEndpointsConfigurer endpoints) throws Exception {
            endpoints
                    .tokenStore(new RedisTokenStore(redisConnectionFactory))
                    .authenticationManager(authenticationManager);
        }

        @Override
        public void configure(AuthorizationServerSecurityConfigurer oauthServer) throws Exception {
            //允许表单认证
            oauthServer.allowFormAuthenticationForClients();
        }

    }

}

----------------类分割线----------------------------

  /**
 * Created by liuliang
 * on 2019/6/18
 */
@Component
@Slf4j
public class DomainUserDetailsService implements UserDetailsService {

    @Resource
    private GoddessUserService userService ;

    @Override
    public UserDetails loadUserByUsername(String s) throws UsernameNotFoundException {
        GoddessUser goddessUser = userService.getOne(new QueryWrapper().eq("user_name", s));
        log.info("user:"+goddessUser.getUsername()+" login success!");
        return goddessUser;
    }
}
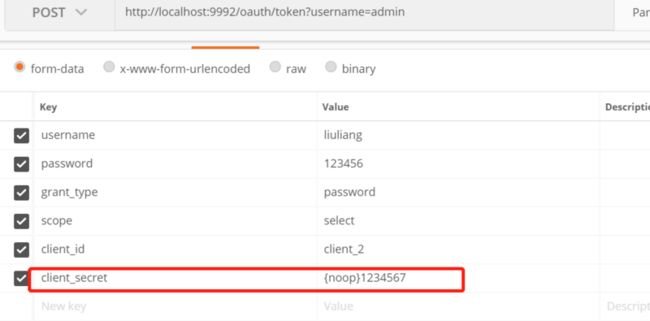
到这里主要的配置就写完了,但是这脸我想多说明几句。因为之前使用的是springboot1.5.9版本+springSecurity4的版本集成oauth2,现在这次版本升级,使用的是springboot2.1.3+springSecurity5。在代码没有任何变化的时候,获取token总是会抛出各种认证失败的问题,比如“Encoded password does not look like BCrypt”,“id is null”等问题,百度很久都说明原因,说security5添加了密码加密,但是解答的部分都很水,最后我通过debug源码的方式,发现有一个client_secret 的始终为空,原来需要在请求的时候,将这个绑定进去:如下截图
这个需要与OAuth2ServerConfig类配置文件里面认证服务类AuthorizationServerConfiguration 的 clients.inMemory()... .secret("{noop}1234567")对应,他是从client这里取的。
ps:我这里为了测试简单,没有将密码加密,即使用的是{noop}模式,建议生产上改一下,加密会比较安全...
好了,现在访问如上截图的接口,会返回如下:
{
    "access_token": "1c72d16d-0647-4b57-b63a-eb4e4a197804",
    "token_type": "bearer",
    "refresh_token": "09eddee3-5ce9-4904-8c23-acfe738579c9",
    "expires_in": 43198,
    "scope": "select"
}
至此,auth模块发布成功
- config
待写
(这个模块等我把后续文章写完了,回过头来补起来。下一篇文章主要介绍user模块框架涉及以及涉及的主要技术点)
