封装Vue组件库
组件库介绍
组件开发方式CDD
- 自下而上
- 从组件级别开始,到页面级别结束
- 好处:
- 组件在最大程度上被重用
- 并行开发
- 可视化测试、
处理组件便捷情况
- $attrs 把父组件中非prop属性绑定到内部组件。注:如果是class和style属性的话还是会绑定到子组件最外层标签上的。
- $listeners 把父组件中的DOM对象的原生事件绑定到内部组件
- $root 获取根实例
- $parent 获取父组件实例
- $children 获取子组件实例
- provide/inject 依赖注入。注:inject进来的数据是非响应式的
快速原型开发
- VueCLI中提供了一个插件可以进行原型快速开发
- 需要先额外安装一个全局的扩展:
npm install -g @vue/cli-service-global、 - 使用vue serve快速查看组件的运行效果
组件开发
组件分类
- 第三方组件
- 基础组件
- 业务组件
表单组件开发
Form-test.vue
	<template>
	  <lg-form class="form" ref="form" :model="user" :rules="rules">
	    <lg-form-item label="用户名" prop="username">
	      <!-- <lg-input v-model="user.username"></lg-input> -->
	      <lg-input :value="user.username" @input="user.username=$event" placeholder="请输入用户名"></lg-input>
	    </lg-form-item>
	    <lg-form-item label="密码" prop="password">
	      <lg-input type="password" v-model="user.password"></lg-input>
	    </lg-form-item>
	    <lg-form-item>
	      <lg-button type="primary" @click="login">登 录</lg-button>
	    </lg-form-item>
	  </lg-form>
	</template>

	<script>
	import LgForm from './form/Form'
	import LgFormItem from './form/FormItem'
	import LgInput from './form/Input'
	import LgButton from './form/Button'
	export default {

	  components: {

	    LgForm,
	    LgFormItem,
	    LgInput,
	    LgButton
	  },
	  data () {

	    return {

	      user: {

	        username: '',
	        password: ''
	      },
	      rules: {

	        username: [
	          {

	            required: true,
	            message: '请输入用户名'
	          }
	        ],
	        password: [
	          {

	            required: true,
	            message: '请输入密码'
	          },
	          {

	            min: 6,
	            max: 12,
	            message: '请输入6-12位密码'
	          }
	        ]
	      }
	    }
	  },
	  methods: {

	    login () {

	      console.log('button')
	      this.$refs.form.validate(valid => {

	        if (valid) {

	          alert('验证成功')
	        } else {

	          alert('验证失败')
	          return false
	        }
	      })
	    }
	  }
	}
	</script>

	<style>
	  .form {

	    width: 30%;
	    margin: 150px auto;
	  }
	</style>
form/Form.vue
<template>
  <div>
    <form>
      <slot></slot>
    </form>
  </div>
</template>

<script>
export default {

  name: 'LgForm',
  provide () {

    return {

      form: this
    }
  },
  props: {

    model: {

      type: Object
    },
    rules: {

      type: Object
    }
  },
  methods: {

    validate (cb) {

      const tasks = this.$children
      .filter(child => child.prop)
      .map(child => child.validate())

      Promise.all(tasks)
      .then(() => cb(true))
      .catch(() => cb(false))
    }
  }
}
</script>

<style>

</style>
form/FormItem.vue
<template>
  <div>
    <label :for="prop">{
     {
     label}}</label>
    <div>
      <slot></slot>
      <p v-if="errMessage">{
     {
     errMessage}}</p>
    </div>
  </div>
</template>

<script>
import AsyncValidator from 'async-validator'
export default {

  name: 'LgFormItem',
  inject: ['form'],
  props: {

    label: {

      type: String
    },
    prop: {

      type: String
    }
  },
  mounted () {

    this.$on('validator', () => {

      this.validate()
    })
  },
  data () {

    return {

      errMessage: ''
    }
  },
  methods: {

    validate () {

      if (!this.prop) return
      const value = this.form.model[this.prop]
      const rules = this.form.rules[this.prop]
      const descriptor = {
      [this.props]: rules }
      const validator = new AsyncValidator(descriptor)
      return validator.validate({
      [this.prop]: value }, errors => {

        if (errors) {

          this.errMessage = errors[0].message
        } else {

          this.errMessage = ''
        }
      })
    }
  }
}
</script>

<style>

</style>
form/Button.vue
<template>
  <div>
    <button @click="handleClick">
      <slot></slot>
    </button>
  </div>
</template>

<script>
export default {

  name: 'LgFButton',
  methods: {

    handleClick (event) {

      this.$emit('click', event)
      event.preventDefault()
    }
  }
}
</script>

<style>

</style>
form/Input.vue
<template>
  <div>
    <input v-bind="$attrs" :type="type" :value="value" @input="handleInput">
  </div>
</template>

<script>
export default {

  name: 'LgInput',
  inheritAttrs: false,
  props: {

    value: {

      type: String
    },
    type: {

      type: String,
      default: 'text'
    }
  },
  methods: {

    handleInput (event) {

      this.$emit('input', event.target.value)
      const findParent = parent => {

        while (parent) {

          if (parent.$options.name === 'LgFormItem') {

            break
          }
          parent = parent.$parent
        }
        return parent
      }
      const parent = findParent(this.$parent)
      if (parent) {

        parent.$emit('validator')
      }
    }
  }
}
</script>

<style>

</style>
Monorepo
两种项目的组织方式
- Multirepo(Multiple Repository) 每一个包对应一个项目
- Monorepo(Monolithic Repository) 一个项目仓库中管理多个模块/包
Monorepo结构
Storybook
- 可视化的组件展示平台
- 在隔离的开发环境中,以交互的方式展示组件
- 独立开发组件
安装
- npx -p @storybook/cli sb init --type vue
- yarn add vue 使用yarn来安装依赖,因为后面会用到yarn的工作区
- yarn add vue-loader vue-template-compiler --dev
- 自动安装完成之后,执行yarn storybook启动项目
- 还可以执行yarn build storybook进行打包,生成storybook-static静态文件目录
workspaces
可以把每个组件中重复的依赖安装到根目录下,如果有不同的依赖或者依赖的版本不同,就单独安装到该组件下
- 开启yarn 的工作区
"private": true, "workspaces": [ "./packages/*" ] - yarn workspaces 使用
- 给工作区根目录安装开发依赖: yarn add jest -D -W
- 给指定的工作区安装依赖: yarn workspace lg-button add lodash@4
- 给所有的工作区安装依赖: yarn install
lerna
- Lerna 是一个优化使用git和npm管理多包仓库的工作流工具
- 用于管理具有多个包的JavaScript项目
- 它可以一键把代码提交到Git和npm仓库
Lerna使用
- 全局安装:yarn global add lerna
- 初始化:lerna init
- 在package.json中scripts里增加: “lerna”: “lerna publish”
- 使用npm whoami查看当前登录npm的用户名
- 使用npm config get registry 查看npm镜像源
- 发现是淘宝镜像,那要改回来:
- npm config set registry http://registry.npmjs.org/
- 执行yarn lerna。去npm上查看有没有发布成功
- 发布:lerna publish
Vue组件的单元测试
组件单元测试的好处
- 提供描述组件行为的文档
- 节省手动测试的时间
- 减少研发新特性时产生的bug
- 改进设计
- 促进重构
安装依赖
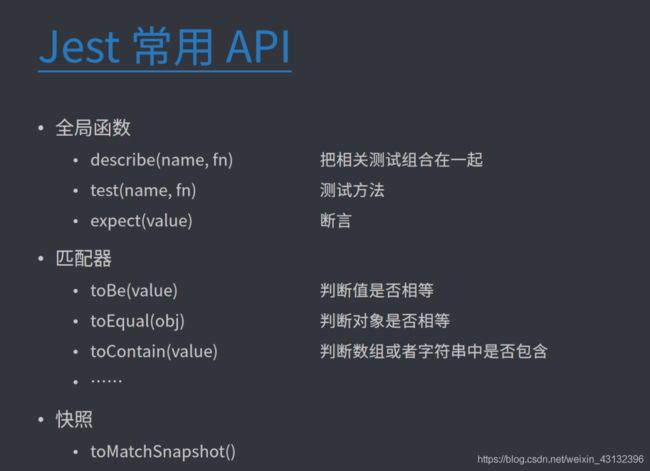
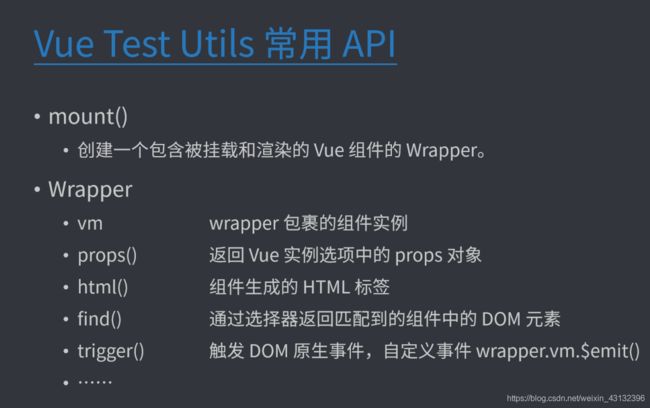
- Vue Test Utils
- Jest
- vue-jest
- babel-jest
yarn add jest @vue/test-utils vue-jest babel-jest -D -W- -D是开发依赖,-W是安装在项目根目录下
package.json
"scripts": {

  "test": "jest"
}
Jest配置文件 jest.config.js
module.exports = {

  "testMatch": ["**/__tests__/**/*.[jt]s?(x)"],
  "moduleFileExtensions": [
    "js",
    "json",
    // 告诉Jest处理`*.vue`文件
    "vue"
  ],
  "transform": {

    // 用`vue-jest`处理`*.vue`文件
    ".*\\.(vue)$": "vue-jest",
    // 用`babel-jest`处理js
    ".*\\.(js)$": "babel-jest"
  }
}
Babel配置文件 babel.config.js
module.exports = {

  presets: [
    [
      '@babel/preset-env'
    ]
  ]
}
Babel桥接 yarn add babel-core@bridge -D -W
Vue组件单元测试–Jest


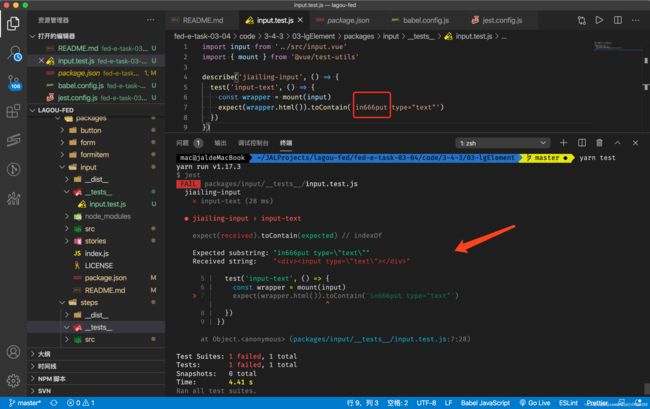
执行yarn test进行测试


生成快照

生成的快照会存到同级目录的__snapshots__/input.test.js.snap文件中

执行yarn test -u可以把快照文件删掉重新生成一个快照
Rollup打包
- Rollup是一个模块打包器
- Rollup支持Tree-Shaking
- 打包的结果比Webpack要小
- 开发框架/组件库的时候使用Rollup更合适
安装依赖
- Rollup
- rollup-plugin-terser
- rollup-plugin-terser
- Vue-template-compiler
yarn add rollup rollup-plugin-terser [email protected] vue-template-compiler -D -W- rollup.config.js 写在每个组件的目录下
然后在每个组件的package.json中配置脚本命令"build": “rollup -c”import { terser } from 'rollup-plugin-terser' import vue from 'rollup-plugin-vue' module.exports = [ { input: 'index.js', output: [ { file: 'dist/index.js', format: 'es' } ], plugins: [ vue({ css: true, compileTemplate: true }), terser() ] } ]
在根目录下配置统一打包yarn workspace je-button run build
根目录创建rollup.config.jsyarn add @rollup/plugin-json rollup-plugin-postcss @rollup/plugin-node-resolve -D -W
在package.json中配置脚本命令"build": “rollup -c”import fs from 'fs' import path from 'path' import json from '@rollup/plugin-json' import vue from 'rollup-plugin-vue' import postcss from 'rollup-plugin-postcss' import { terser } from 'rollup-plugin-terser' import { nodeResolve } from '@rollup/plugin-node-resolve' const isDev = process.env.NODE_ENV !== 'production' // 公共插件配置 const plugins = [ vue({ css: true, compileTemplate: true }), json(), nodeResolve(), postcss({ // 把css插入到style中 // inject: true, // 把css放到和js同一级目录 extract: true }) ] // 如果不是开发环境,开启压缩 isDev || plugins.push(terser()) // pacakges 文件夹路径 const root = path.resolve(__dirname, 'packages') module.exports = fs.readdirSync(root) // 过滤,只保留文件夹 .filter(item => fs.statSync(path.resolve(root, item)).isDirectory()) // 为每一个文件夹创建对应额配置 .map(item => { const pkg = require(path.resolve(root, item, 'package.json')) return { input: path.resolve(root, item, 'index.js'), output: [ { exports: 'auto', file: path.resolve(root, item, pkg.main),// 读取package.json中的main属性 format: 'cjs' }, { exports: 'auto', file: path.resolve(root, item, pkg.module), // 读取package.json中的module属性 format: 'es' } ], plugins: plugins } })
在每个组件的package.json里配置main和module属性
执行yarn build"main": "dist/cjs/index.js", "module": "dist/es/index.js",设置环境变量
安装cross-env,可以跨平台配置环境变量
修改package.json中的打包命令yarn add cross-env -D -W
执行yarn build:prod生成的代码是压缩过的"build:prod": "cross-env NODE_ENV=production rollup -c", "build:dev": "cross-env NODE_ENV=development rollup -c"
执行yarn build:dev生成的代码是没有压缩过的清理
在package.json中配置命令"clean": “lerna clean”。 可以删除组件中的node_modules
安装rimraf,来删除指定的目录,distyarn add rimraf -D -W
