数据驱动的意义
数据驱动,指在自动化测试中处理测试数据的方式。通常测试数据与功能函数分离,存储在功能函数的外部位置。在自动化测试运行时,数据驱动框架会读取数据源中的数据,把数据作为参数传递到功能函数中,并会根据数据的条数多次运行同一个功能函数。数据驱动的数据源可以是函数外的数据集合、CSV 文件、Excel 表格、TXT 文件,以及数据库等。如果没有数据驱动我们想对一个方法Add(),进行三组数据的测试{1,2 },{0,2},{0,3},那么我们需要写三个测试方法;而通过数据驱动只需要写一个测试方法,然后通过循环读取测试数据的方式就能完成对三组数据的测试。数据驱动在测试框架中都是通过对测试数据的参数化来实现,本文会详细讲解测试驱动在junit4测试框架中的应用。
Junit4中数据驱动基础实现
代码如下:
import java.util.Arrays;
import java.util.Collection;
import org.junit.Assert;
import org.junit.Test;
import org.junit.runner.RunWith;
import org.junit.runners.Parameterized;
import org.junit.runners.Parameterized.Parameters;
//@RunWith表示测试用例将会以参数化的形式执行
@RunWith(Parameterized.class)
public class ParaDemo {
private int input1;
private int input2;
private int expected;
@Parameters
//方法prepareData()中包括需要参数化的数据,示例中有三组数据,每组数据有三个值
public static Collection prepareData(){
Object [][]object= {{1,2,3},{0,2,2},{0,3,3}};
return Arrays.asList(object);
}
//构造方法中的参数与prepareData()中的数据是一一对应的,以第一组数据{1,2,3}为例:
1对应input1,2对应input2,3对应expected
public ParaDemo(int input1,int input2,int expected){
this.input1 =input1;
this.input2 =input2;
this.expected =expected;
}
@Test
//测试用例中把测试数据进行了参数化
public void testAdd(){
int result=this.input1+this.input2;
Assert.assertEquals(this.expected,result);
}
}
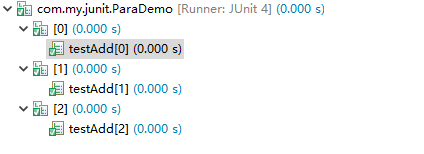
运行测试用例,可以看到同一个测试用例被prepareData()中赋值的三组测试数据执行,如下图所示:
测试数据与不同测试用例关联
假设想增加一个testSubstract()测试方法,然后使得testAdd()和testSubstract()分别用各自的参数化测试数据该如何实现呢?思路如下:
1.两个方法设计到不同的测试类中。(这里不做讨论)
2.增加标签对用例数据进行标识。使用枚举类实现enum Type {SUBSTRACT, ADD};执行用例时,根据标签判定用例是否需要执行。通过org.jnit.Assume.assumeTrue来进行判定
具体代码实现如下:
import static org.junit.Assert.assertEquals;
import java.util.Arrays;
import java.util.Collection;
import org.junit.Assume;
import org.junit.Test;
import org.junit.runner.RunWith;
import org.junit.runners.Parameterized;
import org.junit.runners.Parameterized.Parameters;
@RunWith(Parameterized.class)
public class ParaJunit4Demo {
enum Type {SUBSTRACT,ADD};
@Parameters
public static Collection data(){
return Arrays.asList(newObject[][] {
{Type.SUBSTRACT, 3, 2, 1},
{Type.SUBSTRACT, 4, 2, 2},
{Type.SUBSTRACT, 4, 2, 2},
{Type.ADD, 3, 2, 5},
{Type.ADD, 3, 2, 5},
});
}
private Type type;
private int a, b, expected;
public ParaJunit4Demo(Typetype,int a,int b,int expected){
this.type =type;
this.a=a;this.b=b;this.expected=expected;
}
@Test
public void testAdd(){
Assume.assumeTrue(type == Type.ADD);
assertEquals(this.expected,this.a+this.b);
}
@Test
public void testSubstract(){
Assume.assumeTrue(type == Type.SUBSTRACT);
assertEquals(this.expected,this.a-this.b);
}
}
上面的例子是testAdd()和testSubstract()拥有相同的测试参数个数(都是3个),如果在增加一个测试用例testOthers(),而它只需要两个测试参数,又该如何实现呢?
尝试方法一:直接设置参数数据为{Type.OTHERS, 3,3},代码如下:
public static Collection data(){
return Arrays.asList(newObject[][] {
{Type.SUBSTRACT, 3, 2, 1},
{Type.SUBSTRACT, 4, 2, 2},
{Type.SUBSTRACT, 4, 2, 2},
{Type.ADD, 3, 2, 5},
{Type.ADD, 3, 2, 5},
{Type.OTHERS, 3,3}
});
}
用例设置如下:
@Test
public voidtestOthers(){
Assume.assumeTrue(type == Type.OTHERS);
assertEquals(this.a,this.b);
}
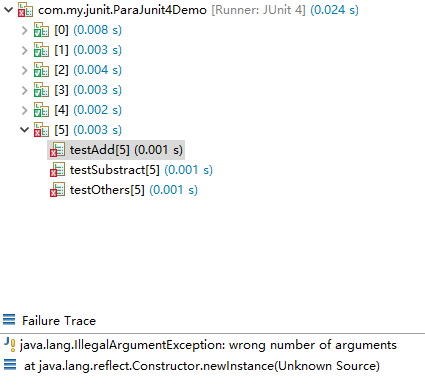
运行代码,提示参数个数错误
尝试方法二:尝试添加一个构造方法,代码如下:
public ParaJunit4Demo(Typetype,int a,int b){
this.type =type;
this.a=a;
this.b=b;
}
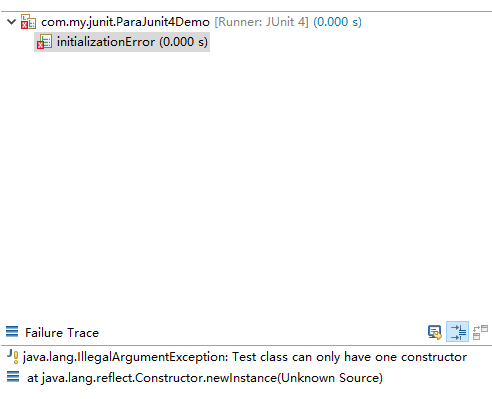
运行代码,提示只能有一个构造方法的错误
尝试方法三:添加一组数据,将最后一个数据设置为3,3,0
public static Collection
return Arrays.asList(new Object[][] {
{Type.SUBSTRACT, 3, 2, 1},
{Type.SUBSTRACT, 4, 2, 2},
{Type.SUBSTRACT, 4, 2, 2},
{Type.ADD, 3, 2, 5},
{Type.ADD, 3, 2, 5},
{Type.OTHERS, 3,3,0}
});
}
运行测试,测试通过。
由此可见,想要实现拥有不同测试参数个数的测试用例的参数化,需要使参数个数统一,参数少的用例,需要添加参数进行占位(是否被使用无所谓),实例中,通过添加0来实现参数个数统一,{Type.OTHERS, 3,3,0}
总结
有人会说在junit5或者TestNG中都可以很方便地实现该功能(后面会接受TestNG参数化技术),有必要搞得这么麻烦吗?大家说得没错,在这里我只是给大家展示一个解决问题的思路而已,好多测试同学不知道通过代码怎样解决问题!其实最简单有效的就是完善目前架构中的功能,遇到问题不要置之不理,觉得架构不提供,我们就没有必要再继续深入了,我们应该好好想一想通过编码能否解决问题,多动手多思考,慢慢的编码能力就会提升了!


