Redhat_rhel8.0_FTP服务配置
Redhat_rhel8.0_FTP服务配置详细
一、FTP协议的任务是从一台计算机将文件传送到另一台计算机,它与这两台计算机所处的位置、联接的方式、甚至是是否使用相同的操作系统无关。FTP标准命令TCP端口号为21,Port方式数据端口为20。
1.1、vsftpd程序提供的FTP服务可选认证方式,分别为: 1、匿名用户 2、本地用户 3、虚拟用户
1.2、匿名用户:任何人无需验证口令即可登录FTP服务端 (不安全)
1.3、本地用户:创建独立的FTP账号、密码信息(基本安全)
1.4、虚拟用户:创建独立的FTP账号资料,最安全的方式。
二、搭建方式:
2.1、准备两台linux、前提是完成网络和YUM源的配置,在我博客其他文章有所写到,欢迎观看。
2.2、 FTP服务器Server Redhat_rhel8.0 10.5.100.125
2.3、 FTP客户端Client Redhat_rhel8.0 10.5.100.126
三、安装vsftpd服务
3.1、在FTP服务器端与FTP客户端安装vsftpd
[root@localhost ~]# yum install vsftpd.x86_64 ftp.x86_64 -y
备注:
主程序:/usr/sbin/vsftpd
用户禁止登陆列表:/etc/vsftpd/ftpusers //黑名单 /etc/vsftpd/user_list //白名单
主配置文件:/etc/vsftpd/vsftpd.conf
四、配置匿名访问模式
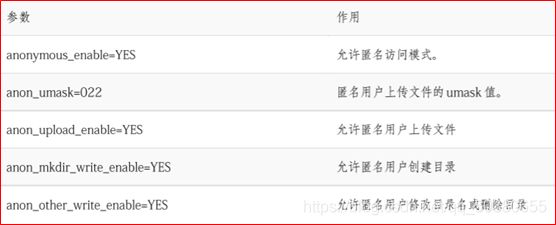
4.1、FTP匿名模式是比较不安全的服务模式,尤其在真实的工作环境中,千万不要存放敏感数据,以免泄露。
在服务器端编辑配置文件Server
[root@localhost vsftpd]# vim /etc/vsftpd/vsftpd.conf //在FTP服务端编辑配置文件
备注:编辑配置文件时,建议备份一次。
4.2、关闭SELINUX属于内核的安全服务会阻止外部访问(server与Client都关闭)
[root@localhost vsftpd]# vim /etc/sysconfig/selinux
修改:SELINUX=disable
4.3、关闭防火墙(server与Client都关闭)
[root@localhost vsftpd]# systemctl stop firewalld //关闭服务:
[root@localhost vsftpd]# systemctl disable firewalld //关闭开机启动:
4.4、重启vsftp服务(server与Client都关闭)
[root@localhost vsftpd]# systemctl restart vsftpd.service
[root@localhost vsftpd]# systemctl enable vsftpd
4.5、赋予权限(server与Client都赋予权限)
[root@localhost ~]# chown o+w /var/ftp/pub/
4.6、在客户端命令行尝试登录FTP服务
[root@localhost ~]# ftp 10.5.100.125
Connected to 10.5.100.125 (10.5.100.125).
220 (vsFTPd 3.0.3)
Name (10.5.100.125:root): anonymous
331 Please specify the password.
Password: //直接回车,不用打密码
230 Login successful.
Remote system type is UNIX.
Using binary mode to transfer files.
ftp> ls
227 Entering Passive Mode (10,5,100,125,97,90).
150 Here comes the directory listing.
drwxr-xrwx 4 777 0 27 Dec 29 14:55 pub
226 Directory send OK.
ftp> cd pub
250 Directory successfully changed.
ftp> mkdir file
257 “/pub/file” created
ftp> ls
227 Entering Passive Mode (10,5,100,125,252,193).
150 Here comes the directory listing.
drwxr-xr-x 2 14 50 6 Dec 29 15:24 file
226 Directory send OK.
五、配置本地用户访问模式
5.1、本地模式确实要比匿名访问模式更加安全。
5.2、在服务器端编辑配置文件Server
[root@localhost vsftpd]# vim /etc/vsftpd/vsftpd.conf //在FTP服务端编辑配置文件
5.2、关闭SELINUX属于内核的安全服务会阻止外部访问(server与Client都关闭)
[root@localhost vsftpd]# vim /etc/sysconfig/selinux
修改:SELINUX=disable
5.3、关闭防火墙(server与Client都关闭)
[root@localhost vsftpd]# systemctl stop firewalld //关闭服务:
[root@localhost vsftpd]# systemctl disable firewalld //关闭开机启动:
5.4、重启vsftp服务(server与Client都关闭)
[root@localhost vsftpd]# systemctl restart vsftpd.service
[root@localhost vsftpd]# systemctl enable vsftpd
5.5、赋予权限(server与Client都赋予权限)
[root@localhost ~]# chown o+w /var/ftp/pub/
5.6、创建普通用户
[root@localhost ~]# useradd linux_qinjie
[root@localhost ~]# passwd linux_qinjie
5.7、在客户端命令行尝试登录FTP服务
[root@localhost ~]# ftp 10.5.100.125
Connected to 10.5.100.125 (10.5.100.125).
220 (vsFTPd 3.0.3)
Name (10.5.100.125:root): linux_qinjie
331 Please specify the password.
Password:
230 Login successful.
Remote system type is UNIX.
Using binary mode to transfer files.
ftp> ls
227 Entering Passive Mode (10,5,100,125,57,230).
150 Here comes the directory listing.
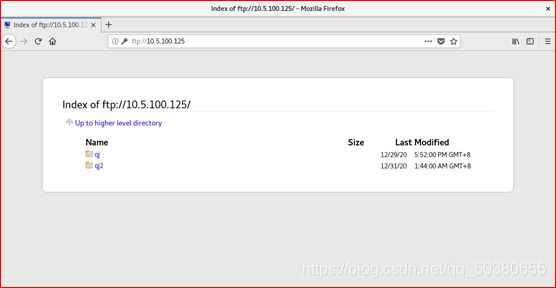
drwxr-xr-x 2 1002 1002 6 Dec 29 17:52 qj
226 Directory send OK.
ftp> mkdir qj2
257 “/home/linux_qinjie/qj2” created
ftp> ls
227 Entering Passive Mode (10,5,100,125,133,70).
150 Here comes the directory listing.
drwxr-xr-x 2 1002 1002 6 Dec 29 17:52 qj
drwxr-xr-x 2 1002 1002 6 Dec 31 01:44 qj2
226 Directory send OK.
六、配置虚拟用户FTP服务
6.1、虚拟用户模式账号口令都不是真实系统存在的,所以只要配置妥当虚拟用户模式会比本地用户模式更加安全。
6.2、建立虚拟用户FTP用户数据库文件
[root@wh-pc-yanyr ~]# cd /etc/vsftpd/
[root@wh-pc-yanyr vsftpd]# vim vuser.list
//写入:单数行为账号、双数行为密码
qinjie01
pa11word
qinjie02
pa22word
6.3、使用db_load命令对HASH算法生成FTP用户数据库文件vuser.db
[root@wh-pc-yanyr vsftpd]# db_load -T -t hash -f vuser.list vuser.db
6.4、查看数据库类型以及赋予权限(FTP数据库内容很敏感,所以权限给小一点。)
[root@wh-pc-yanyr vsftpd]# file vuser.db
vuser.db: , created: Thu Jan 1 00:34:08 1970
[root@wh-pc-yanyr vsftpd]# chmod 600 vuser.db
6.5、删除原始的账号和密码文件
[root@wh-pc-yanyr vsftpd]# rm -f vuser.list
6.6、创建FTP根目录以及虚拟用户映射的系统用户
[root@wh-pc-yanyr ~]# useradd -d /var/ftproot -s /sbin/nologin virtual
6.7、查看家目录,并赋予权限
[root@wh-pc-yanyr ~]# ls -ld /var/ftproot/
[root@wh-pc-yanyr ~]# chmod -Rf 755 /var/ftproot/
6.8、建立支持虚拟用户的PAM认证文件
[root@wh-pc-yanyr ~]# vim /etc/pam.d/vsftpd.vu
//参数db用于指向刚刚生成的vuser.db文件、但不要写后缀。
//写入以下配置信息:
6.9、在vsftpd.conf文件中添加支持配置
[root@wh-pc-yanyr ~]# vim /etc/vsftpd/vsftpd.conf


6.10、为虚拟用户设置不同的权限
//现在不论是qinjie1还是qinjie2账号,他们的权限都是相同的,默认不能上传、创建、修改文件,如果希望qinjie1管理FTP内资料,就需要让FTP程序支持独立的用户权限配置文件。
//指定独立的权限配置文件存放目录
[root@wh-pc-yanyr ~]# vim /etc/vsftpd/vsftpd.conf
添加: user_config_dir=/etc/vsftpd/vusers_dir
6.11、切换进入到该目录中,并创建qinjie1配置文件
[root@wh-pc-yanyr ~]# mkdir /etc/vsftpd/vuser_dir/
[root@wh-pc-yanyr ~]# cd /etc/vsftpd/vuser_dir/
[root@wh-pc-yanyr vuser_dir]# touch qinjie1
6.12、指定空白的qinjie1用户的具体权限
6.13、重启vsftp服务,验证试验效果
[root@wh-pc-yanyr ~]# systemctl restart vsftpd.service
[root@wh-pc-yanyr ~]# systemctl enable vsftpd
6.14、SELINUX属于内核的安全服务会阻止外部访问(server与Client都关闭)
[root@localhost vsftpd]# vim /etc/sysconfig/selinux
修改:SELINUX=disabled
6.15、关闭防火墙(server与Client都关闭)
[root@localhost vsftpd]# systemctl stop firewalld //关闭服务:
[root@localhost vsftpd]# systemctl disable firewalld //关闭开机启动:
6.16、登录验证效果
[root@wh-pc-yanyr ~]# ftp 10.5.100.125
Connected to 10.5.100.125 (10.5.100.125).
220 (vsFTPd 3.0.3)
Name (10.5.100.125:root): blackshield
331 Please specify the password.
Password:
230 Login successful.
Remote system type is UNIX.
Using binary mode to transfer files.
ftp>
登录成功!
至此虚拟访问模式成功!


