这是ggplot2可视化专题的第二个实例操作
【ggplot2的基本思路见前文总论】:基于ggplot2的RNA-seq转录组可视化:总述和分文目录
【ggplot2绘图具体策略第一篇】:测序结果概览:基因表达量rank瀑布图,高密度表达相关性散点图,注释特定基因及errorbar的表达相关性散点图绘制
【ggplot2绘图具体策略第三篇】:配对样本基因表达趋势:优化前后的散点连线图+拼图绘制
在我们获得转录组的测序结果并进行数据处理-差异分析一整套流程后,我们不仅关注整个转录组的表达趋势,还包括了特定基因在不同处理组/特征间的表达情况。这时依旧是各类ggplot2统计图的主场。
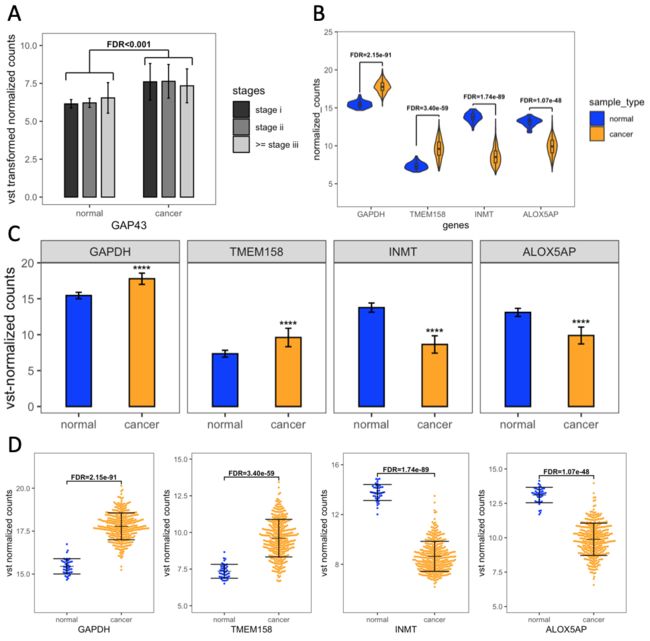
本文将要介绍的图表类型展示如下:包括分组小提琴图(B)、分组(A)/分面柱状图(C)、单基因蜂群点图拼图(D)。想必大家都知道这些图表在生物医学文献中半壁江山的地位。用R-ggplot2来绘制它们,简单明了美观,也不需要对数据进行跨平台保存读取,可谓方便。
我们依旧使用通过第一、二篇介绍的整合好并差异分析过的TCGA白种人LUSC肺鳞癌mRNA-seq转录组表达数据。
数据获取
基于第一篇文章从TCGA数据库下载并整合清洗高通量肿瘤表达谱-临床性状数据,我们下载并清洗TCGA数据库中white人种的LUSC肺鳞癌mRNA-seq转录组counts数据和FPKM数据。
随后根据第二篇文章TCGA数据整合后进行DESeq2差异表达分析和基于R的多种可视化对counts数据进行了基于DESeq2的差异分析。
现在假设我们已经获得:
(样本1到344为cancer,345到386为normal)
(1)resSigAll: the subset object generated by DESeq2 containing info about all differentially expressed genes.
(2)clinical_trait: the data frame containing submitter_id and tumor_stage of selected TCGA LUSC samples. It will be used for grouping.
(3)condition_table: the data frame defining the sample_type and recording the TCGA_IDs and submitter_id of each TCGA sample. It will be used for grouping.
(4)expr_vst: vst transformed normalized counts matrix of genes and samples generated by DESeq2. It is the raw material of downstream visualization.
需要R包
ggplot2 (作图),reshape2包 (对数据框格式进行转制),ggsignif (统计学注释包),ggbeeswarm (蜂群图作图包),customLayout,和gridExtra(用于ggplot2对象拼图)。
install.packages('ggplot2')
install.packages('reshape2')
install.packages('ggsignif')
install.packages('ggbeeswarm')
install.packages('customLayout')
install.packages('gridExtra')
library('ggplot2')
library('reshape2')
library('ggsignif')
library('ggbeeswarm')
library('customLayout')
library('gridExtra')
1. 分组柱状图
假设现在我们关注一个目的基因在normal和cancer组间的表达分布,且希望看到每组内不同LUSC tumor stages间该基因的表达变化情况。(因为normal组也是来自于患者的癌旁组织,所以也可以分组)
则绘图需要:
(1)normal/cancer分组以及组内tumor stage亚组(x轴分组依据)
(2)亚组的vst counts均值(y轴,因为作柱状图,不需要每个散点的信息)
(3)亚组的vst counts标准差(errorbar)
我们随机从差异基因中选取一个基因作为可视化对象。自定义函数,输入stage i/stageii/>= stage iii可通过clinical_trait和condition_table dataframe分别匹配相应的normal和cancer样本,并分别计算均值和标准差。最后汇总得到
set.seed(10)
gene_chosen <- sample(resSigAll@rownames,1)
gene_counts_all <- expr_vst[gene_chosen,]
mean_sd_by_clinical <- function(input_stage){
  if(input_stage == '>= stage iii'){
    samples_indices <- clinical_trait$submitter_id[grep(clinical_trait$tumor_stage, pattern = 'stage iii[ab]?|stage iv')]
  } else {
    samples_indices <- clinical_trait$submitter_id[grep(clinical_trait$tumor_stage, pattern = paste0(input_stage, '[ab]?$'))]
  }
  normal_samples <- condition_table[condition_table$submitter_id %in% samples_indices & condition_table$sample_type == 'normal','TCGA_IDs']
  cancer_samples <- condition_table[condition_table$submitter_id %in% samples_indices & condition_table$sample_type == 'cancer','TCGA_IDs']
  data.frame('sample_type'=c('normal','cancer'), 'stages'=c(rep(input_stage,2)),
             'means'=c(mean(gene_counts_all[normal_samples]), mean(gene_counts_all[cancer_samples])),
             'sds'=c(sd(gene_counts_all[normal_samples]), sd(gene_counts_all[cancer_samples])))
}
mean_sd_table_by_clinical <- do.call(rbind, lapply(c('stage i', 'stage ii', '>= stage iii'), mean_sd_by_clinical))
mean_sd_table_by_clinical$sample_type <- factor(mean_sd_table_by_clinical$sample_type,
                                                levels = c('normal','cancer'), ordered = T)
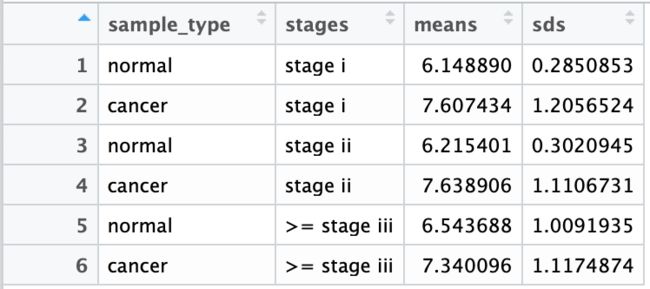
整理得到的数据框如下:
然后进行统计显著性框的标注。这里打算用geom_segment进行线条绘制,所以每个统一方向的线条都需要注明x/y轴的起点和终点坐标。
注:这里s指start,e指end,l指left,r指right,h指horizontal,u指upper,uh指upper horizontal。为了画出显著性注释框,这里将左竖线、右竖线、封顶横线、组间竖线分别用同一函数绘制,最后组间封顶横线用一函数绘制。
annotation_table <- data.frame('xsl'=c(0.7, 1.7), 'xel'=c(0.7, 1.7), 'ysl'=c(7.7, 8.7), 'yel'=c(8.2, 9.2),
                               'xsr'=c(1.3, 2.3), 'xer'=c(1.3, 2.3), 'ysr'=c(7.7, 8.7), 'yer'=c(8.2, 9.2),
                               'xsh'=c(0.7, 1.7), 'xeh'=c(1.3, 2.3), 'ysh'=c(8.2, 9.2), 'yeh'=c(8.2, 9.2),
                               'xsu'=c(1, 2), 'xeu'=c(1, 2), 'ysu'=c(8.2, 9.2), 'yeu'=c(9.7, 9.7))
annotation_table2 <- data.frame('xsuh'=1 ,'xeuh'=2, 'ysuh'=9.7, 'yeuh'=9.7)
接下来就是ggplot2绘图:
◈ 将整理的mean_sd_table_by_clinical传入ggplot函数,以主要分组依据normal/cancer为x轴,y为counts均数,【fill填色依据为组内亚组tumor_stage】。
◈ geom_col函数绘制柱状图,组内亚组的柱间间距为0.7 (position),柱宽为0.5 (width),柱的边框为黑色 (color) 【fill是填充颜色,color是点/线颜色】,边框为实线 (linetype = 1)。
◈ 手动设置亚组的填充颜色。
◈ 设置误差棒的位置 (x继承ggplot分组位置,需补充指定ymax, ymin),顶端横线宽度 (width),和亚组的位置 (position: 注意与主绘图函数的间隔保持一致即可)。
◈ 不继承主参数,进行注释框的绘制 (geom_segment()),以及进行单独一行FDR值的注释 (annotate())。
◈ 设定y轴显示范围、坐标轴小标题和主题。
stage_expr <- ggplot(mean_sd_table_by_clinical, aes(x=sample_type, y=means, fill=stages))+
  geom_col(position = position_dodge(width = 0.7), width = 0.5, color='black', linetype=1)+
  scale_fill_manual(values = c('stage i'='gray20', 'stage ii'='gray50', '>= stage iii'='gray80'))+
  geom_errorbar(aes(ymin=means-sds, ymax=means+sds), width=0.1, position = position_dodge(width = 0.7), size=0.5)+
  geom_segment(inherit.aes = F, data = annotation_table, aes(x=xsl,xend=xel,y=ysl,yend=yel))+
  geom_segment(inherit.aes = F, data = annotation_table, aes(x=xsr,xend=xer,y=ysr,yend=yer))+
  geom_segment(inherit.aes = F, data = annotation_table, aes(x=xsh,xend=xeh,y=ysh,yend=yeh))+
  geom_segment(inherit.aes = F, data = annotation_table, aes(x=xsu,xend=xeu,y=ysu,yend=yeu))+
  geom_segment(inherit.aes = F, data = annotation_table2, aes(x=xsuh,xend=xeuh,y=ysuh,yend=yeuh))+
  annotate('text', label='FDR<0.001', color='black', x=1.5, y=10.1, fontface='bold', size=3)+
  ylim(0,10.3)+xlab(gene_chosen)+ylab('vst transformed normalized counts')+
  theme_bw()+
  theme(panel.grid = element_line(color = 'white'))
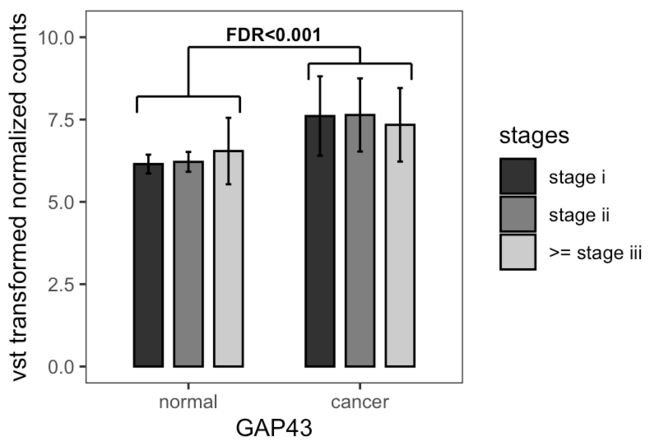
stage_expr
即可得到图片。注明:这里只是教学显著性注释框画法,并未分亚组分别进行假设检验。
2. 分组小提琴图
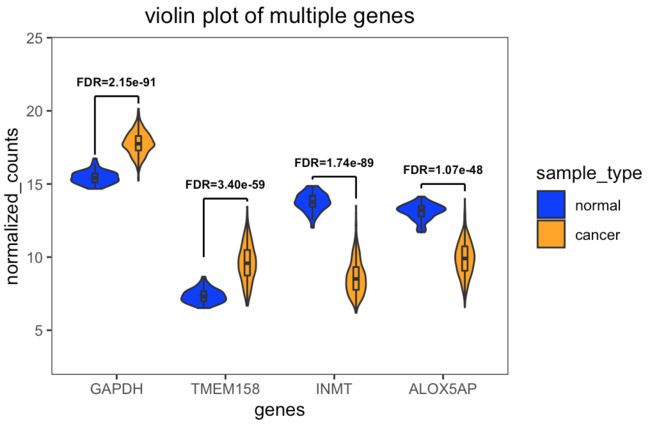
我们可能同时关注多个基因,想要同时展示它们在组间的表达情况。此时也可以类似地,将多个基因作为主要分组,而将sample_type作为fill填色依据的组内亚组,合并在一个panel进行展示。
则绘图需要:
(1)基因分组和每个基因组内的normal/cancer亚组(x轴分组和fill填色依据)
(2)每个样本相应基因的表达值(这里是vst counts)(y轴)
注:需注意不同绘图类型要求的数据形式。如作柱状图只需要每个亚组的均值,而散点图、小提琴图等需要亚组内所有样本的表达值(要进行密度展示)。又如手动绘制errorbar需提前准备每组的sd值,而绘制箱线图时不需提供分位数,ggplot2会使用输入表达数据自动计算并绘图。
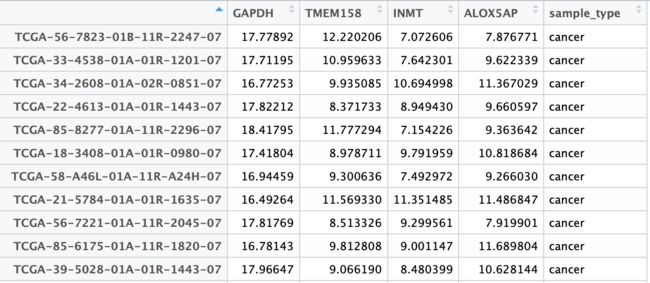
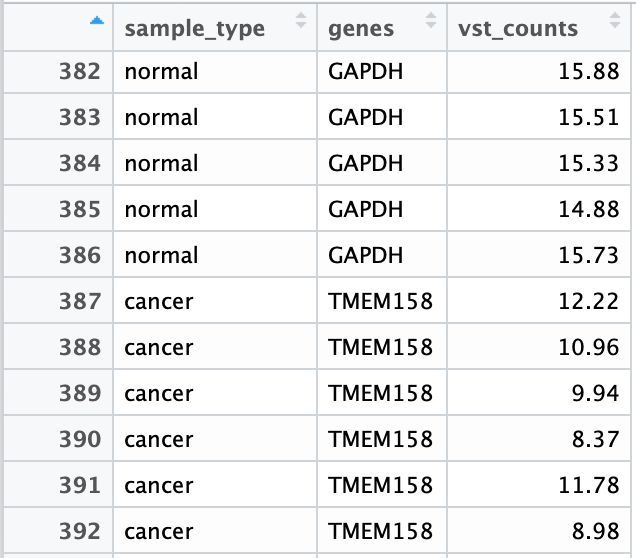
这里在所有差异基因中随机选取4个基因进行展示。首先依附于expr_vst原本的数据形式整理成宽形式表格,即每个基因的表达值占据一列,并另有sample_type列进行normal/cancer分组:
使用reshape2包的melt函数将数据整理成长形式,此时主分组和亚组信息就可以直接分别从genes和sample_type列传递给ggplot了。
然后将主分组genes进行factor化排序。
set.seed(29)
for_multigroup_vis <- t(expr_vst[sample(resSigAll@rownames, 4),])
for_multigroup_vis <- data.frame(for_multigroup_vis, 'sample_type'=condition_table$sample_type, stringsAsFactors = F)
melted_var_table <- reshape2::melt(for_multigroup_vis, id.vars='sample_type',
                                   variable.name='genes', value.name='vst_counts')
#tell ggplot2 the order of graphing within each gene group.
melted_var_table$sample_type <- factor(melted_var_table$sample_type, levels = c('normal','cancer'), ordered = T)
和前面的示例相同,建立坐标表以使用geom_segment函数绘制各组的统计显著性框,并建立坐标和标签表以使用geom_text函数添加各组FDR文字注释。
FDR_text_table <- data.frame('gene'=as.character(unique(melted_var_table$genes)),'start'=c(0.8,1.8,2.8,3.8), 'end'=c(1.19, 2.19,3.19,4.19),
                                'height'=c(22,15,16.5,16), annotations=c('FDR=2.15e-91','FDR=3.40e-59','FDR=1.74e-89','FDR=1.07e-48'))
segment_table <- data.frame('xsl'=c(0.8,1.8,2.8,3.8), 'xel'=c(0.8,1.8,2.8,3.8), 'ysl'=c(17,10,15.3,14.7), 'yel'=c(21,14,15.5,15),
                            'xsr'=c(1.2,2.2,3.2,4.2), 'xer'=c(1.2,2.2,3.2,4.2), 'ysr'=c(20.5,13.8,14,14.5), 'yer'=c(21,14,15.5,15),
                            'xsh'=c(0.8,1.8,2.8,3.8), 'xeh'=c(1.2,2.2,3.2,4.2), 'ysh'=c(21,14,15.5,15), 'yeh'=c(21,14,15.5,15))
ggplot2绘图的思路基本相同,不再详细描述。值得注意的点是:
◈ 此次映射数据时以genes为x轴主分组,sample_type为fill填色亚分组,每个样本的vst_counts映射至y轴。
◈ 使用geom_violin()绘制小提琴图,position参数设置主组内亚组间距离,使用scale设置组间面积恒定 'area'。(或设置为width/count,分别表示每组有相同的最大小提琴宽度和宽度与观察值数成比例)
#draw the plot.
multiple_vio <- ggplot(melted_var_table, aes(x=genes, y=vst_counts, fill=sample_type))+
  geom_violin(position = position_dodge(width=0.8), scale = 'area')+
  geom_boxplot(position = position_dodge(width = 0.8),
               outlier.size = 0, width = 0.1, show.legend = FALSE)+
  scale_fill_manual(values = c('cancer'='orange','normal'='blue'))+
  geom_text(inherit.aes = F,data = FDR_text_table, aes(x=gene, y=height, label=annotations), size=2.5, fontface='bold')+
  geom_segment(inherit.aes = F,data=segment_table,aes(x=xsl,xend=xel,y=ysl,yend=yel))+
  geom_segment(inherit.aes = F,data=segment_table,aes(x=xsr,xend=xer,y=ysr,yend=yer))+
  geom_segment(inherit.aes = F,data=segment_table,aes(x=xsh,xend=xeh,y=ysh,yend=yeh))+
  theme_bw()+theme(panel.grid = element_line(colour = 'white'), plot.title = element_text(hjust = 0.5))+
  ylab('normalized_counts')+xlab('genes')+ylim(3,24)+
  ggtitle('violin plot of multiple genes')
multiple_vio
获得图形为:
3. 分面柱状图
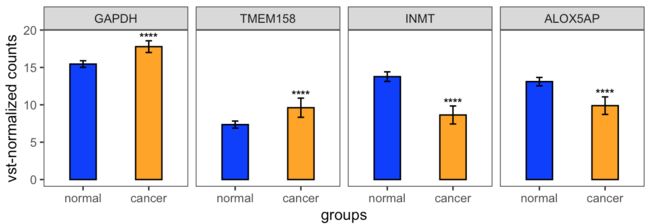
上述两个图片的策略均是二次分组,x映射主分组,fill映射亚组。另一种策略是使用ggplot2的facet.grid()函数进行分面展示,即每个主分组获得一个panel分别可视化。
则绘图需要:
(1)同时含有基因和normal/cancer信息的独立分组(x轴分组依据)
(2)每个组隶属的基因信息(x轴分面)
(3)每个组隶属的样本类型(fill填充依据)
(4)每个组的表达值均数(y轴)
(5)每个组的表达值标准差(errorbar)
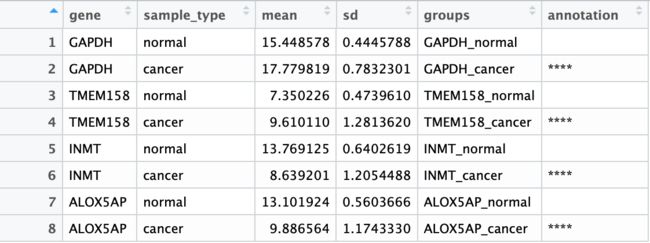
整理数据,沿用之前随机选取的4个基因并整理成长格式的表达data frame。自建函数,向量化批量计算每个基因-每种样本类型独立组的表达平均值和标准差。以”gene_sample_type“的格式标记为8个独立组,并添加annotation列便于geom_text的注释。最后将独立分组因子化用于手动排序,人工将同一个基因的normal/cancer组相邻放置。
#draw the graphs by facet.
melted_var_table2 <- melted_var_table
#calculate the mean and sd of each group.
mean_sd <- lapply(as.character(unique(melted_var_table2$genes)), function(x){
  mean_normal <- mean(melted_var_table2$vst_counts[melted_var_table2$genes == x & melted_var_table2$sample_type == 'normal'])
  mean_cancer <- mean(melted_var_table2$vst_counts[melted_var_table2$genes == x & melted_var_table2$sample_type == 'cancer'])
  sd_normal <- sd(melted_var_table2$vst_counts[melted_var_table2$genes == x & melted_var_table2$sample_type == 'normal'])
  sd_cancer <- sd(melted_var_table2$vst_counts[melted_var_table2$genes == x & melted_var_table2$sample_type == 'cancer'])
  data.frame('gene'= c(x,x), 'sample_type'=c('normal','cancer'),
             'mean'=c(mean_normal, mean_cancer), 'sd'=c(sd_normal, sd_cancer))})
mean_sd <- do.call(rbind, mean_sd)
mean_sd_annotation <- data.frame(mean_sd, 'groups'=paste(mean_sd$gene, mean_sd$sample_type, sep = '_'),
                                 'annotation'= rep(c('','****')), stringsAsFactors = F)
mean_sd_annotation$groups <- factor(mean_sd_annotation$groups, levels = unique(mean_sd_annotation$groups),
                                   ordered = T)
整理好的数据框为如下,含gene分类,sample_type分类,将两列字符串粘贴在一起而形成的独立组信息,每组的mean/sd值,以及每个组对应的annotation信息:
ggplot2绘图:值得注意的点是:
◈ ggplot函数x轴映射groups,即各个独立组。fill以sample_type分别配色。
◈ geom_text补充文字的y轴位置,即y=mean+sd+0.5。
◈ 使用facet_grid()函数,以输入数据框的gene列按行分面 (~gene),每个分面只保留有数据的x轴部分 (scale='free')。
p <- ggplot(mean_sd_annotation, aes(x=groups, y=mean, fill=sample_type))+
  geom_col(width=0.4, linetype=1, color='black')+
  geom_errorbar(aes(ymin=mean-sd, ymax=mean+sd), width=0.1)+
  geom_text(aes(y=mean+sd+0.5,label=annotation), size = 3, fontface='bold')+
  scale_fill_manual(values=c('normal'='blue', 'cancer'='orange'))+
  facet_grid(~gene, scales='free')+
  scale_x_discrete(label=c('normal','cancer'))+
  ylab('vst-normalized counts')+xlab('groups')+
  theme_bw()+theme(panel.grid = element_line(colour = 'white'), legend.position = 'none')
p
获得图形如下:
注:使用facet.grid函数时需要注意各个函数间需要有统一的映射数据。比如:本例如果使用geom_violin(),则需输入所有样本的表达值而不是均值,这会使得文字注释的变量长度与输入数据框长度不一而无法合并到一个数据框中共同传入ggplot()。若geom_text不继承全局参数,会导致facet.grid认为每个分面在x轴的每个分组上均有数据,导致布局混乱。
总之,分facet这个方法是比较局限的。
4. 拼接多个单基因蜂群图
如果我想使用更多样性的可视化方法呢?比如在样本例数较多时使用蜂群图而不是较为死板的柱状图?
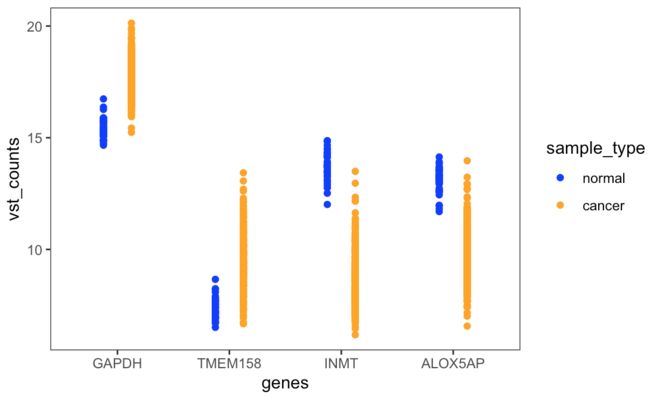
R中有beeswarm包,加载后使用geom_beeswarm()函数可实现本功能。但由于未知的原因,它和geom_jitter()都不能像geom_violin()一样进行二次分组,如果采取第二种作图策略直接设置ggplot(data, aes(x=gene, y=vst_counts, color=sample_type)),他们仅表现为geom_point即可完成的单纯散点图。这不是我们想要的效果。如下图:
所以这里我使用产生多个单基因一次分组的蜂群散点图,并用拼图包将所有单图拼接。
绘图需要:
(1)各基因的sample_type (x轴);
(2)各组内样本的表达值 (这里是vst-counts) (y轴);
(3)各组的平均值和标准差 (自制mean±sd errorbar)。
首先整理数据框,获得各样本的gene,sample_type,vst_counts数据框,各组的均值、标准差数据框,和各基因组间显著性标记数据框。
#draw the bee plot of the same data by another manner (by joining graphs together).
melted_var_table3 <- melted_var_table
#we should manually tell the ggplot2 how we oder the x axis by transforming groups into factors.
melted_var_table3$sample_type <- factor(melted_var_table3$sample_type,
                                        levels = c('normal','cancer'), ordered = T)
#calculate the mean and sd of each group.
mean_sd <- lapply(as.character(unique(melted_var_table3$genes)), function(x){
  mean_normal <- mean(melted_var_table3$vst_counts[melted_var_table3$genes == x & melted_var_table3$sample_type == 'normal'])
  mean_cancer <- mean(melted_var_table3$vst_counts[melted_var_table3$genes == x & melted_var_table3$sample_type == 'cancer'])
  sd_normal <- sd(melted_var_table3$vst_counts[melted_var_table3$genes == x & melted_var_table3$sample_type == 'normal'])
  sd_cancer <- sd(melted_var_table3$vst_counts[melted_var_table3$genes == x & melted_var_table3$sample_type == 'cancer'])
  data.frame('gene'= c(x,x), 'sample_type'=c('normal','cancer'),
             'mean'=c(mean_normal, mean_cancer), 'sd'=c(sd_normal, sd_cancer))})
mean_sd <- do.call(rbind, mean_sd)
#we have gotten the FDRs from the object of DE analysis before.
annotation_FDR <- data.frame('gene'=as.character(unique(melted_var_table$genes)),
                             'annotations'=c('FDR=2.15e-91','FDR=3.40e-59','FDR=1.74e-89','FDR=1.07e-48'))
ggplot2作图。由于拼图R包customLayout拼图的输入对象是多个ggplot2绘图对象的list,因此这里创建一个自定义ggplot2绘图function,之后配合lapply函数建立多个单基因蜂群图的list。
几个注意点:
◈ geom_beeswarm()绘制蜂群点图,cex设置点之间的排列距离,priority设置一个组中点的排列方式。
◈ 使用geom_point(),以均值标准差数据框作为输入,标记每个组的平均值,设置shape为3即加号 (+),方便与errorbar融合在一起。
◈ 使用geom_errorbar(),以均值标准差数据框作为输入,绘制sd值errorbar,在图中与均值的+号融合形成三分errorbar形状。
◈ 使用一个新的R包ggsignif进行统计学注释。geom_signif()仍继承全局参数,comparisons输入所有进行比较的组间名称的list (list(c('group1', 'group2'), c('group3', 'group4'), ...)) ,annotations参数则是按comparisons参数中输入比较组的顺序添加文字注释。本包只能进行一次分组的比较,而不能进行由fill/color划分的亚组间的比较注释。
◈ 为了防止不同基因间y轴区间差异过大,使用ylim()设置每个图的y轴作图区间仅分布在本基因样本最小表达值-1.5,到最大表达值+1.5之间。
multi_bee_plot <- function(gene_for_vis){
  library(ggplot2)
  library(ggbeeswarm)
  library(ggsignif)
  ggplot(melted_var_table3[melted_var_table3$genes == gene_for_vis,], aes(x=sample_type, y=vst_counts, color=sample_type))+
  geom_beeswarm(cex = 1.5, size=0.5, priority = 'ascending')+ #priority=none/random/ascending/descending
  geom_point(inherit.aes = F, data=mean_sd[mean_sd$gene == gene_for_vis,],
             aes(x=sample_type, y=mean), shape=3, color='black', size=5)+
  geom_errorbar(inherit.aes = F, data=mean_sd[mean_sd$gene == gene_for_vis,],
                aes(x=sample_type, ymin=mean-sd, ymax=mean+sd), width=0.5, size=0.5)+
  scale_x_discrete(labels=c('normal','cancer'))+
  scale_color_manual(values=c('normal'='blue','cancer'='orange'))+
  geom_signif(comparisons = list(c('normal','cancer')), annotations = annotation_FDR$annotations[annotation_FDR$gene == gene_for_vis],
              color='black', size = 0.5, textsize=3, fontface='bold')+
  xlab(gene_for_vis)+ylab('vst normalized counts')+
  ylim(min(melted_var_table3[melted_var_table3$genes == gene_for_vis,'vst_counts'])-1.5,
       max(melted_var_table3[melted_var_table3$genes == gene_for_vis,'vst_counts'])+1.5)+
  theme_bw()+
  theme(panel.grid = element_line(color = 'white'), legend.position = 'none')
}
使用拼图R包customLayout进行拼图。
思路是用lay_new函数创建新画布,建立matrix,用其中的行、列、和数字分别代表画布中容纳图片的行、列数和图片排列的顺序。
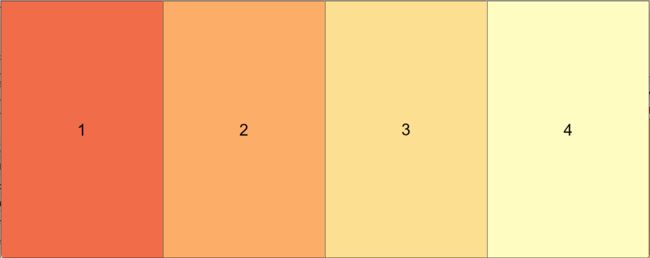
lay <- lay_new(mat=matrix(1:4, ncol = 4), widths=c(2,2,2,2),heights = 1)
lay_show(lay)
lay_show函数用于展示创建的画布:
lapply函数创建绘图对象list,并用lay_grid函数进行拼图输出。
multiple_beeswarm <- lapply(as.character(unique(melted_var_table2$genes)), multi_bee_plot)
lay_grid(grobs = multiple_beeswarm, lay = lay)
获得如下组图:
一共四种解决方案,希望本文能对大家有所帮助!
喜欢的朋友就学起来,点个赞吧!
