更好的阅读体验>>
要想在同一页面上排列多个ggplot2图形,基本的R函数par() 和 layout()是无效的。解决方案之一是使用 gridExtra包中的一些函数来排版多个图形:
-
grid.arrange(),arrangeGrob()函数可以用来在同一页面排版多个图形; -
marrangeGrob()函数可以用于在多个页面排版多个图形。
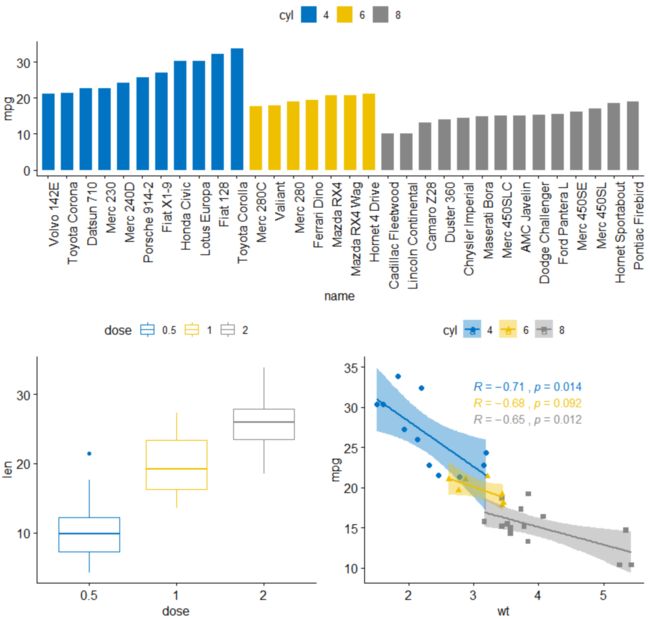
但是,这几个函数并不能按照图形轴线排列整齐,只能是按图形原样依次排列(如下图所示)。如果想多个图按照轴线对齐排列,可以使用cowplot包中的plot_grid()函数。但是,cowplot 包并不包含在多个页面排列多个图形的功能。因此,解决方案就是使用ggpubr包中的ggarrange()函数来实现该功能,此外,该函数还可以为多个图形创建统一的图例。
下面将介绍如何使用 ggpubr, cowplot 和 gridExtra包在同一页面和多个页面上排列多个图形以及如何输出图形到文件中。
ggpubr包的安装可以参考这篇文章-->>ggpubr:快速绘制用于发表的图形。
加载数据
数据:ToothGrowth 和mtcars数据集。
# ToothGrowth
data("ToothGrowth")
head(ToothGrowth)

##    len supp dose
## 1  4.2   VC  0.5
## 2 11.5   VC  0.5
## 3  7.3   VC  0.5
## 4  5.8   VC  0.5
## 5  6.4   VC  0.5
## 6 10.0   VC  0.5
# mtcars
data("mtcars")
mtcars$name <- rownames(mtcars)
mtcars$cyl <- as.factor(mtcars$cyl)
head(mtcars[, c("name", "wt", "mpg", "cyl")])

##                                name   wt  mpg cyl
## Mazda RX4                 Mazda RX4 2.62 21.0   6
## Mazda RX4 Wag         Mazda RX4 Wag 2.88 21.0   6
## Datsun 710               Datsun 710 2.32 22.8   4
## Hornet 4 Drive       Hornet 4 Drive 3.21 21.4   6
## Hornet Sportabout Hornet Sportabout 3.44 18.7   8
## Valiant                     Valiant 3.46 18.1   6
绘制图形
绘制4个不同的图形:
- 使用ToothGrowth 数据集绘制一个箱线图和点图;
- 使用mtcars数据集绘制一个条形图和散点图;
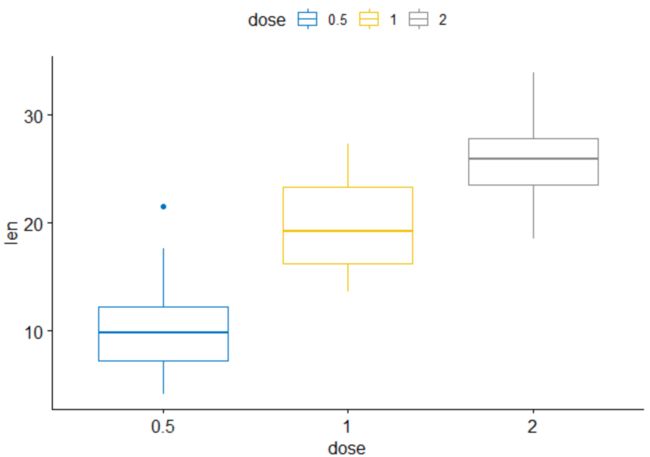
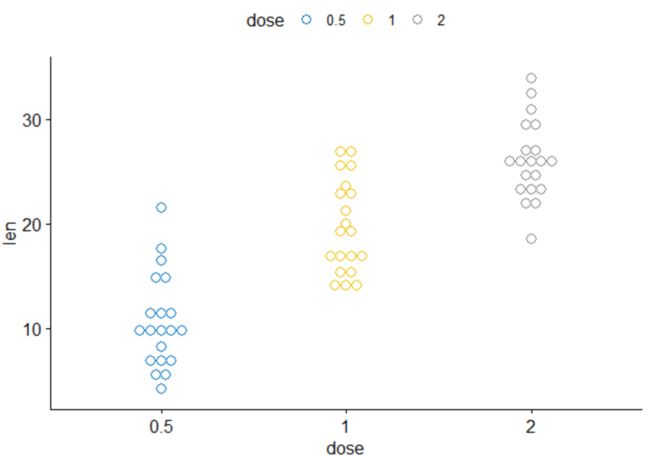
绘制箱线图和点图:
# Box plot (bp)
bxp <- ggboxplot(ToothGrowth, x = "dose", y = "len",
                 color = "dose", palette = "jco")
bxp
# Dot plot (dp)
dp <- ggdotplot(ToothGrowth, x = "dose", y = "len",
                 color = "dose", palette = "jco", binwidth = 1)
dp
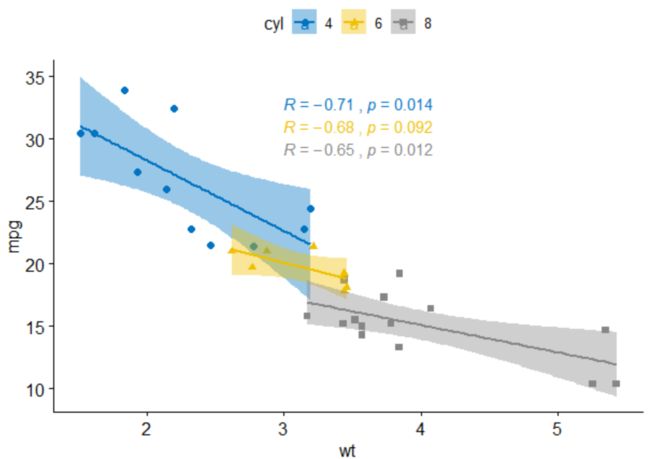
绘制条形图和散点图:
# Bar plot (bp)
bp <- ggbarplot(mtcars, x = "name", y = "mpg",
          fill = "cyl",               # 根据cyl类型填充颜色
          color = "white",            # 将条形边框颜色设为白色
          palette = "jco",            # jco 调色板
          sort.val = "asc",           # 按升序排序
          sort.by.groups = TRUE,      # 分组排序
          x.text.angle = 90           # 垂直旋转x轴文本
          )
bp + font("x.text", size = 8)
# Scatter plots (sp)
sp <- ggscatter(mtcars, x = "wt", y = "mpg",
                add = "reg.line",               # 添加回归线
                conf.int = TRUE,                # 添加置信区间
                color = "cyl", palette = "jco", # 根据cyl填充颜色
                shape = "cyl"                   # 根据cyl类型设置点形状
                )+
  stat_cor(aes(color = cyl), label.x = 3)       # 添加相关系数
sp
排版多个图形
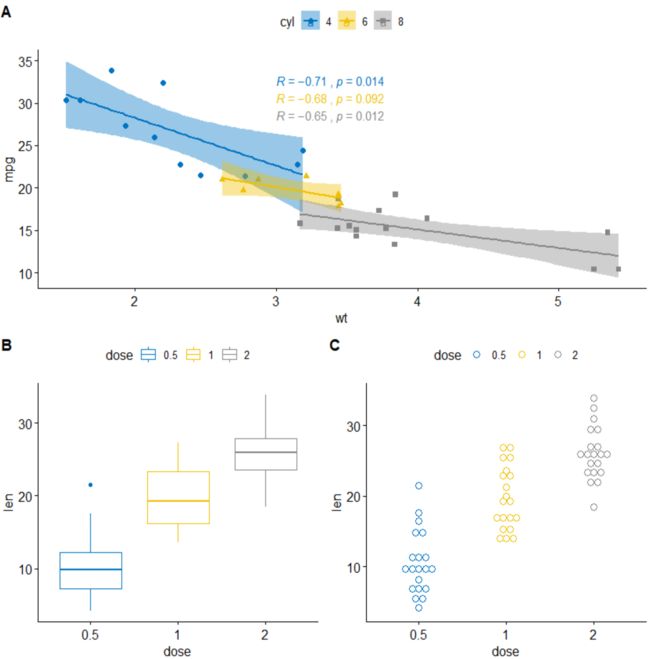
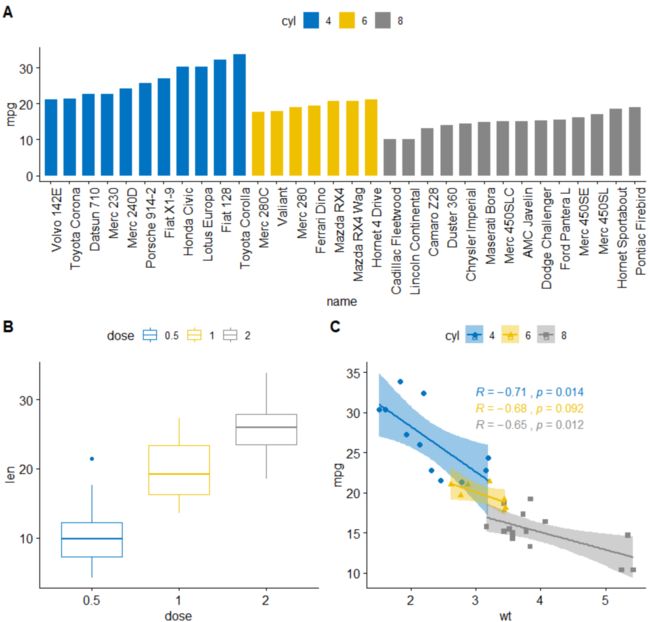
使用ggpubr包中的ggarrange()函数来排版多个图形:
ggarrange(bxp, dp, bp + rremove("x.text"),
          labels = c("A", "B", "C"),
          ncol = 2, nrow = 2)
或者,也可以使用cowplot包中的plot_grid()函数:
library("cowplot")
plot_grid(bxp, dp, bp + rremove("x.text"),
          labels = c("A", "B", "C"),
          ncol = 2, nrow = 2)
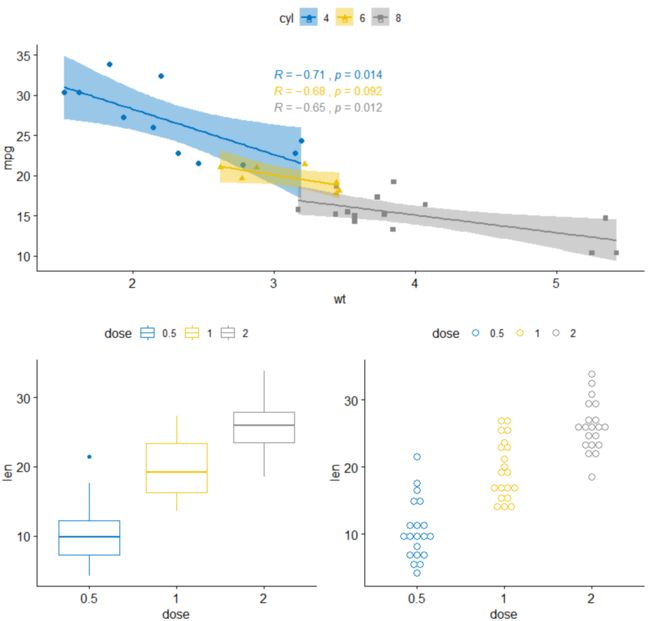
或者,也可以使用gridExtra包中的grid.arrange() 函数:
library("gridExtra")
grid.arrange(bxp, dp, bp + rremove("x.text"),
             ncol = 2, nrow = 2)
注释排版的图形
使用 annotate_figure()函数:
figure <- ggarrange(sp, bp + font("x.text", size = 10),
                    ncol = 1, nrow = 2)
annotate_figure(figure,
                top = text_grob("Visualizing mpg", color = "red", face = "bold", size = 14),
                bottom = text_grob("Data source: \n mtcars data set", color = "blue",
                                   hjust = 1, x = 1, face = "italic", size = 10),
                left = text_grob("Figure arranged using ggpubr", color = "green", rot = 90),
                right = "I'm done, thanks :-)!",
                fig.lab = "Figure 1", fig.lab.face = "bold"
                )
对齐绘图区
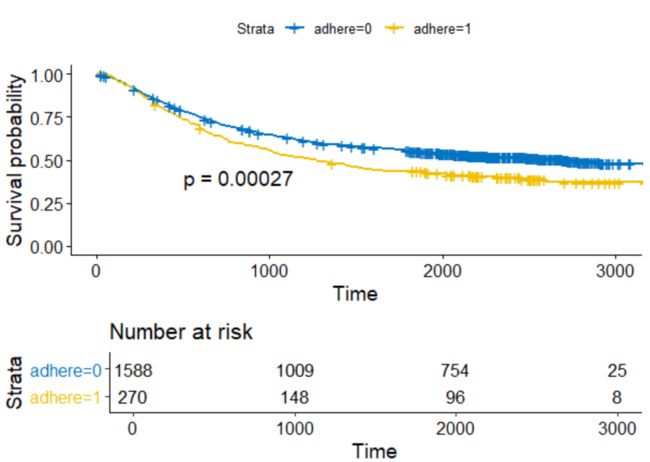
例如,当需要将风险表放在生存曲线下方时,便需要将两个图形的绘图区对齐。
# 拟合生存曲线
install.packages("survminer")
library(survival)
fit <- survfit( Surv(time, status) ~ adhere, data = colon )
# 绘制生存曲线
library(survminer)
ggsurv <- ggsurvplot(fit, data = colon,
                     palette = "jco",                              # jco palette
                     pval = TRUE, pval.coord = c(500, 0.4),        # Add p-value
                     risk.table = TRUE                            # Add risk table
                     )
names(ggsurv)
ggsurv 是一个包含以下两个部分的列表:
- plot:生存曲线
- table:风险表图
绘制生存曲线和风险表:
ggarrange(ggsurv$plot, ggsurv$table, heights = c(2, 1),
          ncol = 1, nrow = 2)
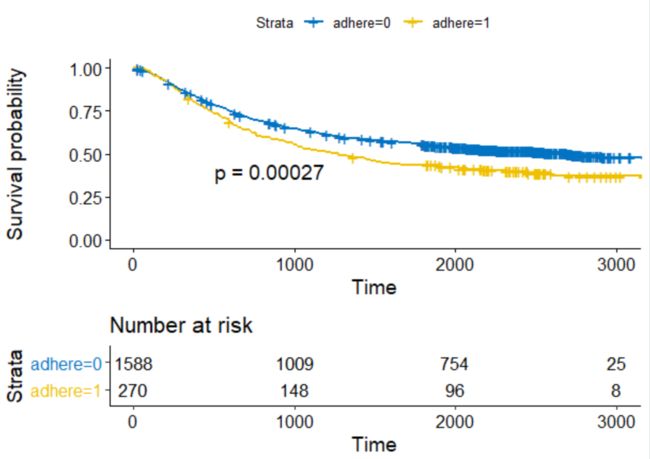
对齐纵坐标轴:
ggarrange(ggsurv$plot, ggsurv$table, heights = c(2, 1),
          ncol = 1, nrow = 2, align = "v")
更改图形的行列跨度
使用ggpubr包
使用嵌套的ggarrange() 函数:
ggarrange(sp,                                                 # 第一行为散点图
          ggarrange(bxp, dp, ncol = 2, labels = c("B", "C")), # 第二行为箱线图和点图
          nrow = 2,
          labels = "A"                                        # 散点图的标签
          )
使用cowplot包
使用函数ggdraw() + draw_plot() + draw_plot_label()可以将图形放置在特定位置。
用ggdraw()函数创建一个空画布:
ggdraw()
画布中的坐标位置:
draw_plot(),将图形放置在画布的某个位置:
draw_plot(plot, x = 0, y = 0, width = 1, height = 1)
- plot:ggplot2图形或gtable
- x, y: 图形要放置的位置
- width, height: 图形的宽度和高度
draw_plot_label(),在图的左上角添加图标签:
draw_plot_label(label, x = 0, y = 1, size = 16, ...)
- label: 要绘制的标签向量
- x, y: 标签的位置
- size: 标签字体大小
排版多个图形:
library("cowplot")
ggdraw() +
  draw_plot(bxp, x = 0, y = .5, width = .5, height = .5) +
  draw_plot(dp, x = .5, y = .5, width = .5, height = .5) +
  draw_plot(bp, x = 0, y = 0, width = 1, height = 0.5) +
  draw_plot_label(label = c("A", "B", "C"), size = 15,
                  x = c(0, 0.5, 0), y = c(1, 1, 0.5))
使用gridExtra 包
使用arrangeGrop()函数可以修改图形的行列跨度:
library("gridExtra")
grid.arrange(sp,                             # 第一行为跨两列的图形
             arrangeGrob(bxp, dp, ncol = 2), # 第二行为两个图形
             nrow = 2)                       # 行数
也可以使用函数
grid.arrange()中的参数
layout_matrix来创建复杂的布局:
grid.arrange(bp,                                    # 跨两列的图形
             bxp, sp,                               # 箱线图和散点图
             ncol = 2, nrow = 2,
             layout_matrix = rbind(c(1,1), c(2,3)))
使用cowplot包中的
draw_plot_label()函数注释图形:
library("gridExtra")
library("cowplot")
# 排版图形
# 生成 gtable (gt)
gt <- arrangeGrob(bp,                               # 跨两列的条形图
             bxp, sp,                               # 箱线图和散点图
             ncol = 2, nrow = 2,
             layout_matrix = rbind(c(1,1), c(2,3)))
# Add labels to the arranged plots
p <- as_ggplot(gt) +                                # 将gt转换为ggplot
  draw_plot_label(label = c("A", "B", "C"), size = 15,
                  x = c(0, 0, 0.5), y = c(1, 0.5, 0.5)) # 添加标签
p
函数
arrangeGrob()与grid.arrange()的主要区别在于grid.arrange()会自动输出排版好的图形。如果要对图形进行注释,最好使用arrangeGrob()。
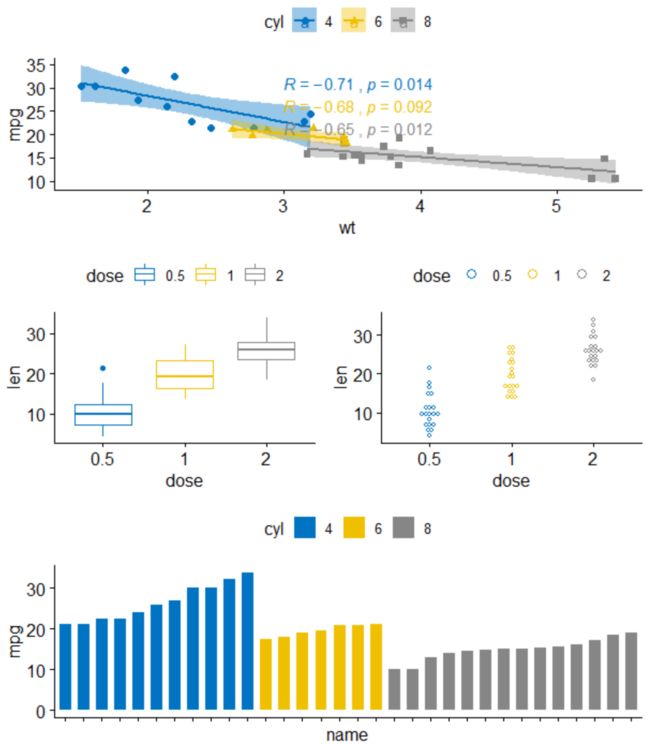
使用grid 包
可以使用grid 包中的grid.layout()函数来创建复杂的布局。另外,它还提供了函数viewport()来定义布局上的区域或视图。函数print()用于将图放置在指定区域中。
一般步骤如下:
- 绘制图形:p1, p2, p3, ...
- 使用
grid.newpage()函数移至网格布局上的新页面 - 创建一个2 x 2的布局
- 定义网格视图
- 将图形输出到视图上
library(grid)
# 转移至新页面
grid.newpage()
# 创建3行2列的布局
pushViewport(viewport(layout = grid.layout(nrow = 3, ncol = 2)))
# 用于在布局上定义区域的帮助函数
define_region <- function(row, col){
  viewport(layout.pos.row = row, layout.pos.col = col)
}
# 排版图形
print(sp, vp = define_region(row = 1, col = 1:2))   # 跨两列
print(bxp, vp = define_region(row = 2, col = 1))
print(dp, vp = define_region(row = 2, col = 2))
print(bp + rremove("x.text"), vp = define_region(row = 3, col = 1:2))
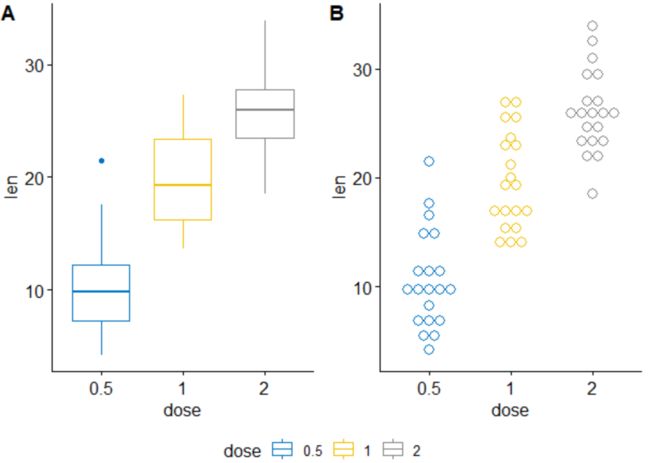
通用图例
要将通用图例放在组合图的边缘,可以将ggarrange()函数与以下参数一起使用:
- common.legend = TRUE: 将通用图例放在页边
- legend: 指定图例位置
ggarrange(bxp, dp, labels = c("A", "B"),
          common.legend = TRUE, legend = "bottom")
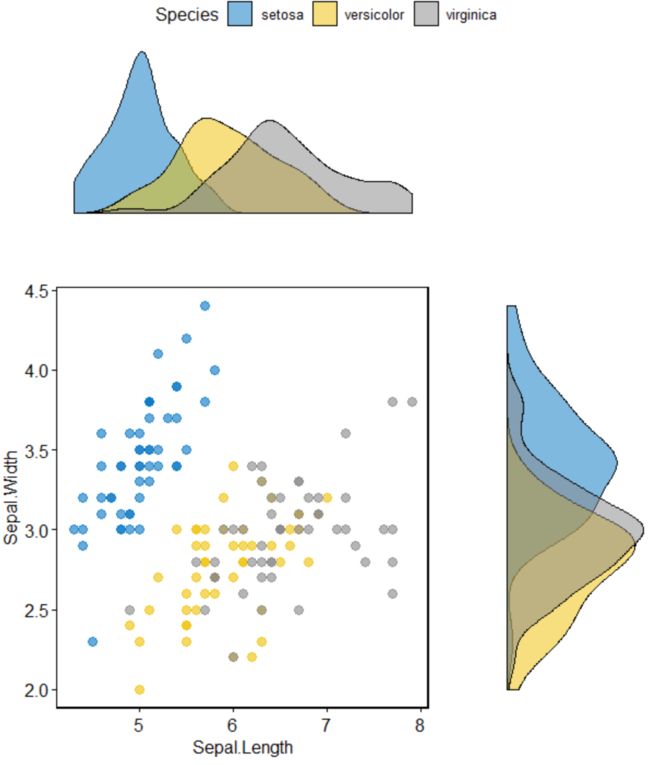
具有边际密度图的散点图
# 根据 "Species"类型着色的散点图
sp <- ggscatter(iris, x = "Sepal.Length", y = "Sepal.Width",
                color = "Species", palette = "jco",
                size = 3, alpha = 0.6)+
  border()
# 绘制x和y的边际密度图
xplot <- ggdensity(iris, "Sepal.Length", fill = "Species",
                   palette = "jco")
yplot <- ggdensity(iris, "Sepal.Width", fill = "Species",
                   palette = "jco")+
  rotate()
# 对边际密度图使用clean主题
yplot <- yplot + clean_theme()
xplot <- xplot + clean_theme()
# 图形排版
ggarrange(xplot, NULL, sp, yplot,
          ncol = 2, nrow = 2,  align = "hv",
          widths = c(2, 1), heights = c(1, 2),
          common.legend = TRUE)
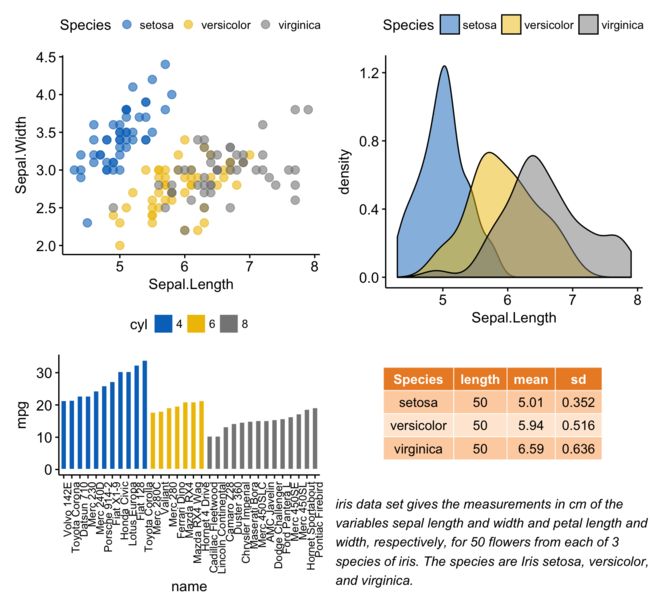
混排表格,文字和图形
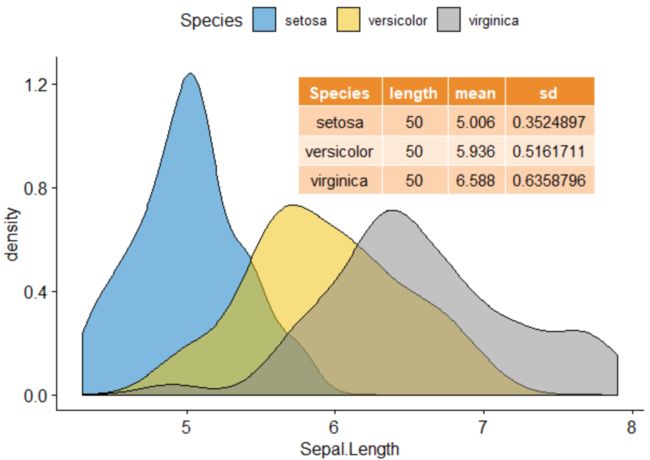
下面将展示如何使用iris 数据集在图表旁边添加文本和表格。
首先绘制下面几个图形:
- 变量“ Sepal.Length”的密度图。R函数:
ggdensity() - Sepal.Length变量的统计表。R函数:
desc_statby()和ggtexttable() - 文本。R函数:
ggparagraph()
最后使用ggarrange()函数进行排版。
# Density plot of "Sepal.Length"
density.p <- ggdensity(iris, x = "Sepal.Length",
                       fill = "Species", palette = "jco")
# Draw the summary table of Sepal.Length
# Compute descriptive statistics by groups
stable <- desc_statby(iris, measure.var = "Sepal.Length",
                      grps = "Species")
stable <- stable[, c("Species", "length", "mean", "sd")]
# Summary table plot, medium orange theme
stable.p <- ggtexttable(stable, rows = NULL,
                        theme = ttheme("mOrange"))
# Draw text
text <- paste("iris data set gives the measurements in cm",
              "of the variables sepal length and width",
              "and petal length and width, respectively,",
              "for 50 flowers from each of 3 species of iris.",
             "The species are Iris setosa, versicolor, and virginica.", sep = " ")
text.p <- ggparagraph(text = text, face = "italic", size = 11, color = "black")
# Arrange the plots on the same page
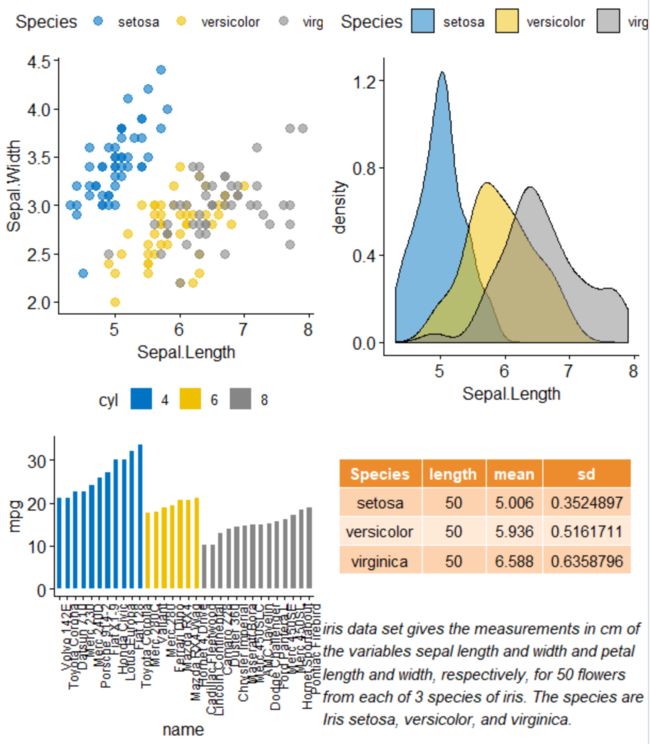
ggarrange(density.p, stable.p, text.p,
          ncol = 1, nrow = 3,
          heights = c(1, 0.5, 0.3))
在ggplot图中插入图形元素
ggplot2中的annotation_custom()函数可用于在ggplot的绘图区域内添加表,图形或其他基于网格的元素。其基本格式为:
annotation_custom(grob, xmin, xmax, ymin, ymax)
- grob: 要插入的外部图形元素
- xmin, xmax : 数据坐标中的水平位置
- ymin, ymax : 数据坐标中的垂直位置
将表格插入ggplot图中
density.p + annotation_custom(ggplotGrob(stable.p),
                              xmin = 5.5, ymin = 0.7,
                              xmax = 8)
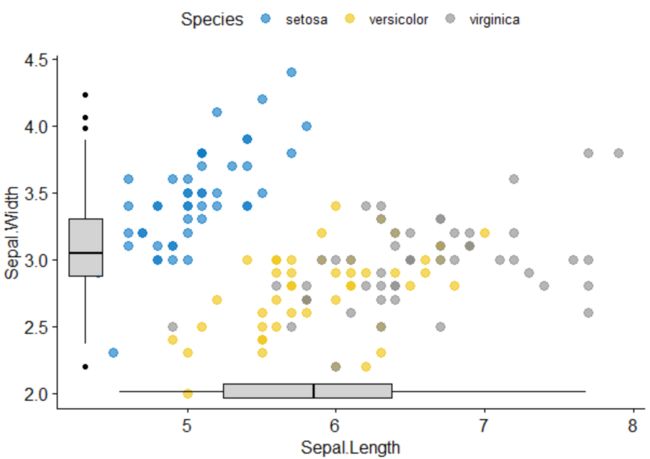
将箱线图插入ggplot图中
# Scatter plot colored by groups ("Species")
sp <- ggscatter(iris, x = "Sepal.Length", y = "Sepal.Width",
                color = "Species", palette = "jco",
                size = 3, alpha = 0.6)
# Create box plots of x/y variables
# Box plot of the x variable
xbp <- ggboxplot(iris$Sepal.Length, width = 0.3, fill = "lightgray") +
  rotate() +
  theme_transparent()
# Box plot of the y variable
ybp <- ggboxplot(iris$Sepal.Width, width = 0.3, fill = "lightgray") +
  theme_transparent()
# Create the external graphical objects
# called a "grop" in Grid terminology
xbp_grob <- ggplotGrob(xbp)
ybp_grob <- ggplotGrob(ybp)
# Place box plots inside the scatter plot
xmin <- min(iris$Sepal.Length); xmax <- max(iris$Sepal.Length)
ymin <- min(iris$Sepal.Width); ymax <- max(iris$Sepal.Width)
yoffset <- (1/15)*ymax; xoffset <- (1/15)*xmax
# Insert xbp_grob inside the scatter plot
sp + annotation_custom(grob = xbp_grob, xmin = xmin, xmax = xmax,
                       ymin = ymin-yoffset, ymax = ymin+yoffset) +
  # Insert ybp_grob inside the scatter plot
  annotation_custom(grob = ybp_grob,
                       xmin = xmin-xoffset, xmax = xmin+xoffset,
                       ymin = ymin, ymax = ymax)
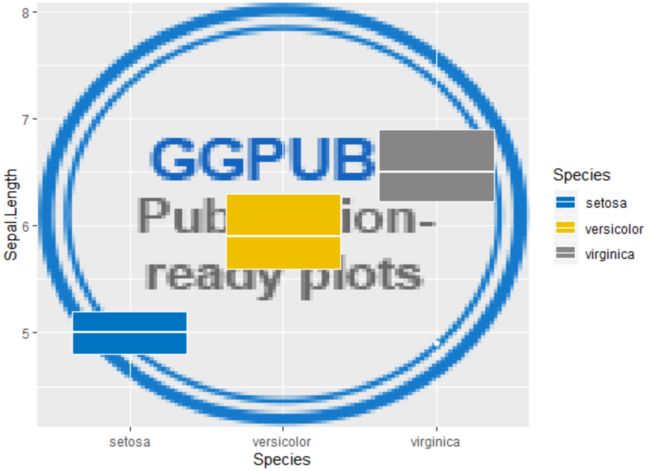
将背景图插入ggplot图中
导入背景图。根据背景图的格式,可以使用jpeg 包中的函数readJPEG()或png包中的函数readPNG()。
# 导入背景图
install.packages("png")
library(png)
img.file <- download.file("http://www.sthda.com/english/sthda-upload/images/ggpubr/ggpubr.png", destfile ="ggpubr.png", mode = 'wb')
img <- png::readPNG('ggpubr.png')
将ggplot与背景图合并:
library(ggplot2)
library(ggpubr)
ggplot(iris, aes(Species, Sepal.Length))+
  background_image(img)+
  geom_boxplot(aes(fill = Species), color = "white")+
  fill_palette("jco")
使用alpha参数修改箱线图的透明度:
library(ggplot2)
library(ggpubr)
ggplot(iris, aes(Species, Sepal.Length))+
  background_image(img)+
  geom_boxplot(aes(fill = Species), color = "white", alpha = 0.5)+
  fill_palette("jco")
将法国地图作为另一个图形的背景图:
mypngfile <- download.file("https://upload.wikimedia.org/wikipedia/commons/thumb/e/e4/France_Flag_Map.svg/612px-France_Flag_Map.svg.png",
                           destfile = "france.png", mode = 'wb')
img <- png::readPNG('france.png')
ggplot(iris, aes(x = Sepal.Length, y = Sepal.Width)) +
  background_image(img)+
  geom_point(aes(color = Species), alpha = 0.6, size = 5)+
  color_palette("jco")+
  theme(legend.position = "top")
多页图形的排版
如果图形数量很多,就需要将其放置在多个页面上了,而ggarrange()函数便可以实现这种功能。当指定了nrow和 ncol之后,ggarrange()函数便可以自动计算排版所有图形所需的页数。
# 两页的列表,每页两个图
multi.page <- ggarrange(bxp, dp, bp, sp,
                        nrow = 1, ncol = 2)
# 查看每个页面
multi.page[[1]]
multi.page[[2]]
也可以使用ggexport()函数到处为文件:
ggexport(multi.page, filename = "multi.page.ggplot2.pdf")
PDF file: multi.page.ggplot2.pdf
也可以使用marrangeGrob()函数实现多页输出。
library(gridExtra)
res <- marrangeGrob(list(bxp, dp, bp, sp), nrow = 1, ncol = 2)
# 输出为pdf文件
ggexport(res, filename = "multi.page.ggplot2.pdf")
res
使用ggarrange()的嵌套布局
p1 <- ggarrange(sp, bp + font("x.text", size = 9),
                ncol = 1, nrow = 2)
p2 <- ggarrange(density.p, stable.p, text.p,
                ncol = 1, nrow = 3,
                heights = c(1, 0.5, 0.3))
ggarrange(p1, p2, ncol = 2, nrow = 1)
导出图形
使用函数ggexport()。
首先绘制四个图形:
plots <- ggboxplot(iris, x = "Species",
                   y = c("Sepal.Length", "Sepal.Width", "Petal.Length", "Petal.Width"),
                   color = "Species", palette = "jco"
                   )
plots[[1]]
plots[[2]]
然后,可以将单个图形导出到文件(pdf,eps或png),导出时还可以进行排版。
将单个图导出到pdf文件(每页一个图):
ggexport(plotlist = plots, filename = "test.pdf")
排版并导出:
ggexport(plotlist = plots, filename = "test.pdf",
         nrow = 2, ncol = 1)
参考
- ggplot2 - Easy Way to Mix Multiple Graphs on The Same Page
