本文主要从IO模型、Netty逻辑架构、Netty各组件的设计与应用为主导,由简-难-细展开来介绍,其中包括IO模型以及BIO、NIO、AIO;
逻辑架构主要是如何分层、各层如何协作以及如何达到高性能、高可靠性等;组件主要介绍Buffer、Channel、ChannelPipeling、ChannelHandler、EvnetLoop等,最后从源码的角度分析客户端、服务端如何实现以及二者通讯中编解码、读写半包等
- 参考资料
[1]李林锋《Netty权威指南》 第2版
[2] Netty官网
一、IO模型
-
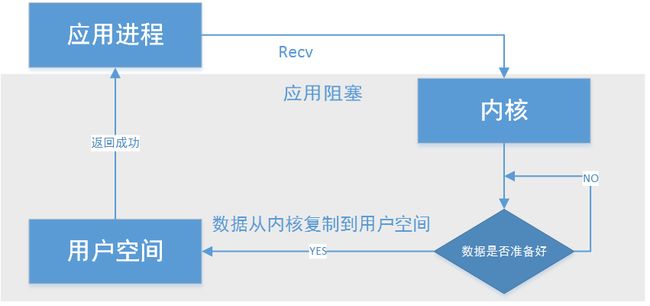
阻塞IO模型
应用进程空间触发内核调用,数据包准备直到复制到用户空间或异常发生,此期间应用进程处于等待阻塞状态,被称为阻塞模型
-
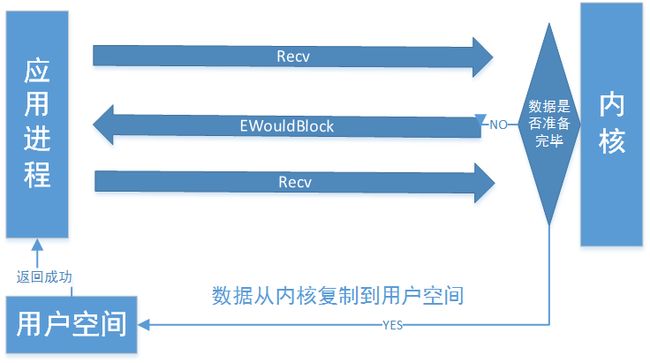
非阻塞IO模型
从应用层到内核,若该缓存区没有数据,立即返回EWouldBlock异常,通常进行轮询,反复Recv,直到数据准备完成,与阻塞的区别:无数据的情况下,是否立即返回
-
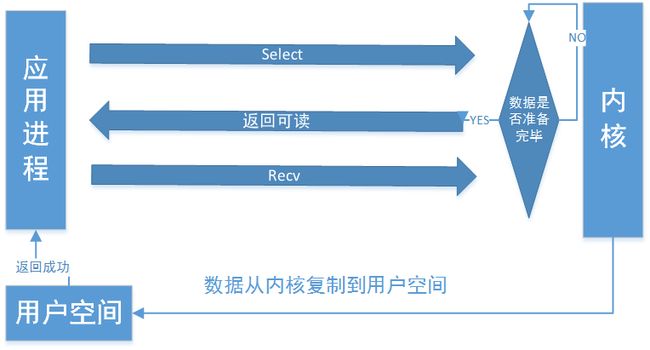
IO多路复用模型
应用进程通过Select将一个或多个FD(File Description)阻塞,select/poll是顺序扫描FD数据是否就绪,Select能持有的FD有限;epoll中FD受限于操作系统的最大文件句柄数,其通过事件驱动替代顺序扫描,只关心活跃的FD,当FD就绪,回调rallBack,性能更好,同时epoll通过内核与用户空间mmap使用同一块内存来实现的,此期间Select与数据复制都会阻塞应用线程
-
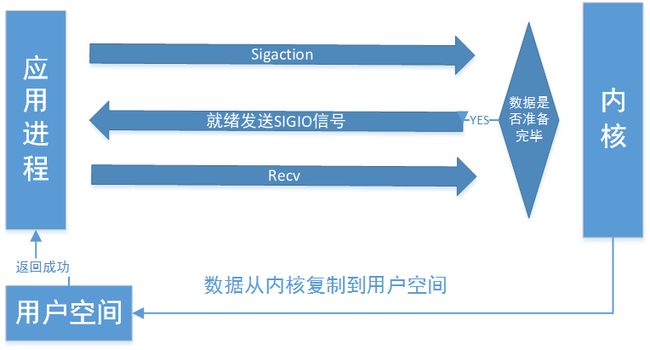
信号驱动IO模型
该模型与复用模型类似,通过信号驱动与通知完成数据准备就绪的判别,同时此过程非阻塞,这是和复用模型的区别
-
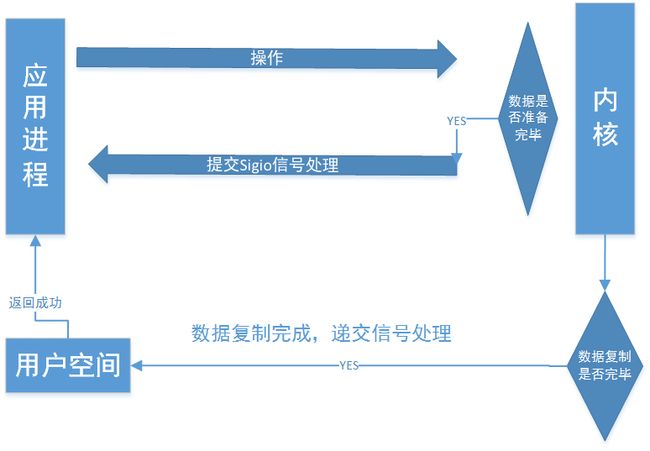
异步IO模型
该模型与信号驱动类似,触发内核某个操作,数据准备就绪,复制完成后,通知应用程序,与信号驱动的区别在于是否已经完成数据复制后通知
-
BIO
-
同步
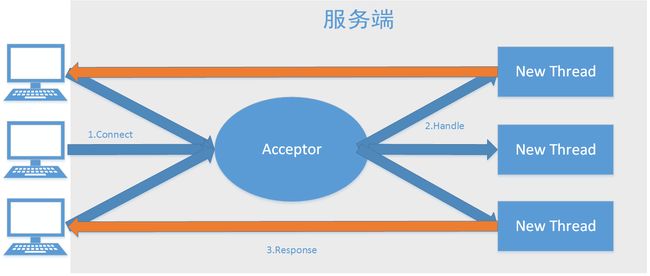
由独立的Acceptor线程负责监听客户端连接,然后为每个连接创建新的线程,处理完成后返回给客户端,最大的问题就是缺乏弹性伸缩能力,当客户并突增后,服务器线程膨胀,性能会下降,线程堆栈溢出、新建线程失败等问题,最后导致系统宕机。
-
伪异步
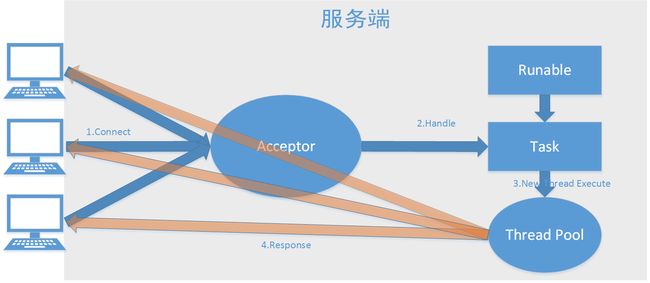
通过将客户端Socket封装成Task,投递到线程池,通过线程对Socket做统一控制,解决了线程突增问题,但是由于底层通信还是同步阻塞模型,没有从根本解决问题,当所有可用线程被阻塞,后续Socket进入队列,队列满后,新请求甚至被直接拒绝掉,大量响应超时,导致客户端认为服务器瘫痪
-
-
NIO
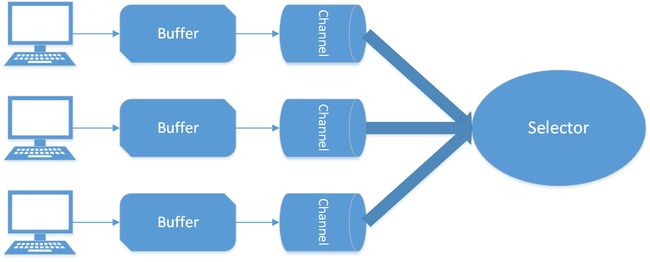
NIO有三大核心类,Buffer、Channel、Selector,Buffer与Channel一一对应,Channel与Selector是多对一。Channel注册到Selector,Selector轮询就绪的Key,根据事件在Channel间切换,异步读取消息到Buffer,通过解码处理,最后可以发送消息Buffer到SocketChannel,通过Selector事件,通知事件注册Key处理消息,Socket连接以及读写都是异步的,同时Selector通过epool实现,所以非常适合做高性能、高负载的网络服务器
AIO
使用Proactor模式,通过Future、CompletionHandler实现异步操作结果以及通知的实现,不需要通过多路复用即可实现异步读写,从而简化编程模型,由于不是本文主要内容,所以不仔细分析-
零拷贝
从操作系统层面讲,数据不经过CPU拷贝从一个内从区域到另一个内存区域,内核缓冲区没有产生重复数据-
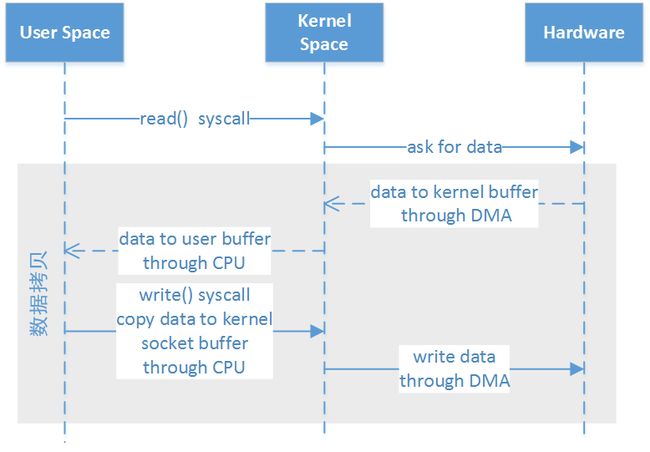
传统IO
经过四次内存拷贝,四次上下文形态的切换
- JVM发起read,OS切换到内核态(第一次状态切换),数据从Hardware通过DMA拷贝到Kernel(第一次拷贝)
- OS切换到用户态(第二次状态切换),将数据从kernel通过CPU拷贝到User(第二次拷贝)
- JVM发write,OS切换形态到内核态(第三次状态切换),将数据拷贝到Kernel(第三次拷贝),然后切换到用户态(第四次状态切换)数据拷贝到Hardware(第四次拷贝)
-
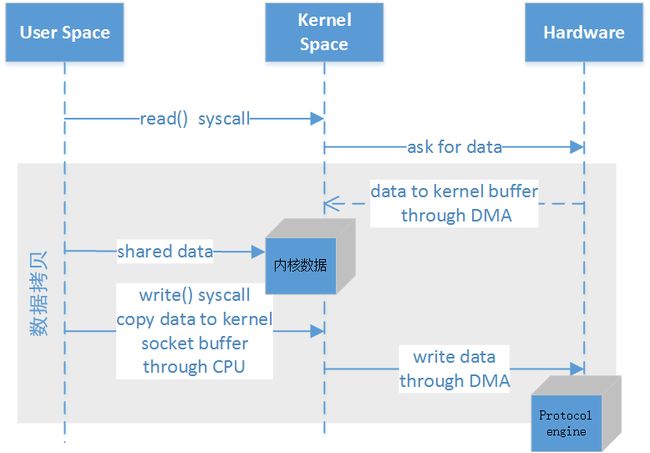
Mmap优化
三次内存拷贝,四次上下文形态的切换
整个数据流与传统IO相似,区别在于节省了第二次拷贝,内核缓冲数据可以与用户共享。 -
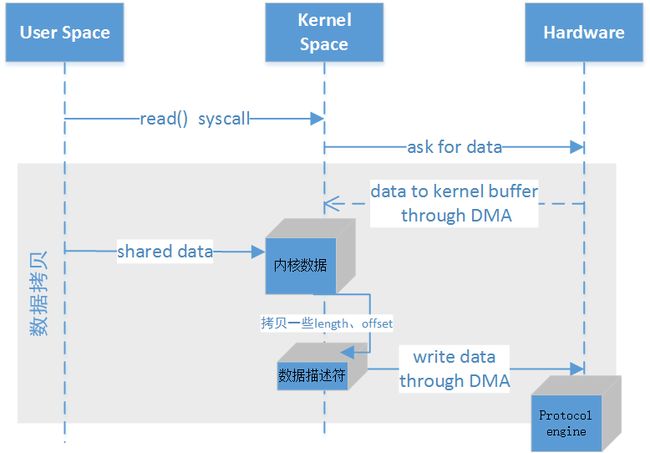
SendFile
带有DMA收集拷贝功能的SendFile是俩次拷贝,俩次内核的切换
- OS切换内核态,Hardware拷贝数据到Kernel
- Kernel拷贝Length、Offset到 Kernel(不计做数据拷贝)
- 传统I/O用户空间缓存了数据,所以应用程序可以对数据进行修改
- 通过Length、Offset直接将Kernel数据拷贝到协议引擎
- Java NIO中transferTo实现了该功能
-
二、Netty概述
Netty是在NIO问题众多的情况下应声而来,基于NIO提供了异步非阻塞、事件驱动的网络应用程序框架与工具
- NIO存在的问题
- 类库、API复杂,依赖额技能:多线程
- 可靠性能力的补齐,工作量和难度都很大:断连重连、网络闪断、读写半包、失败缓存、网络拥堵、异常码流的处理
- Netty应声而来
1. API简单、开发门槛低
2. 功能强大,预置多种编解码,支持多种主流协议
3. 定制能力强,通过ChannelHandler,对通信框架灵活扩展
3. 性能高、成熟、稳定,社区活跃
三、Netty架构设计
-
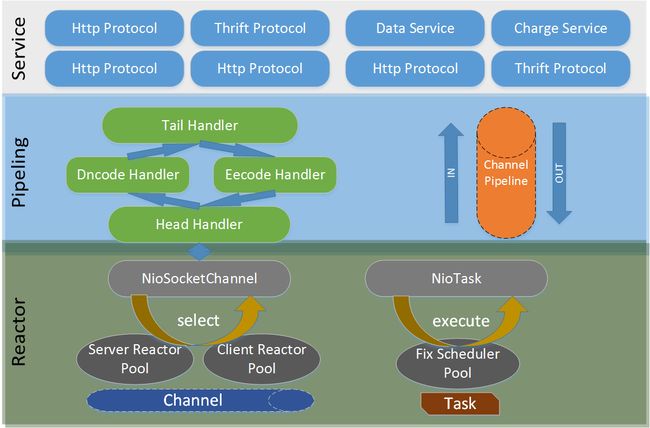
架构模型
整体采用三层网络架构进行设计开发,实现了NIO架构各层之间的解耦,便于上层协议栈的开发与逻辑的定制;Reactor层作为通信调度,PipeLine层拦截监听事件,Service ChannelHandler 用于扩展与业务逻辑的编排,下面详细介绍各层职责
- Reactor通信调度
主要负责网络的连接以及读写操作,将网络层的数据读取到内存缓存区中,然后触发各种网络事件,例如:连接创建、连接激活、读写事件等,同时将事件回调到Pipeline中,由PipeLine做后续处理 - PipeLine职责链
复制事件在职责链中的有序传播,同时负责动动态的编排,选择监听和处理自己感兴趣的事件,可以拦截处理与向前\后传播事件,通常不同Handler节点功能不同,例如编解码Handler,负责消息协议转化,这样上层只需要关心业务逻辑,不需要感知底层的协议、线程模型的差异,实现了架构的分层隔离 - Service Handler 业务处理
可以分为俩类,一类是纯粹的业务逻辑处理,另一类就是其他应用层的协议插件,用于特定协议相关的会话和链路管理
- Reactor通信调度
-
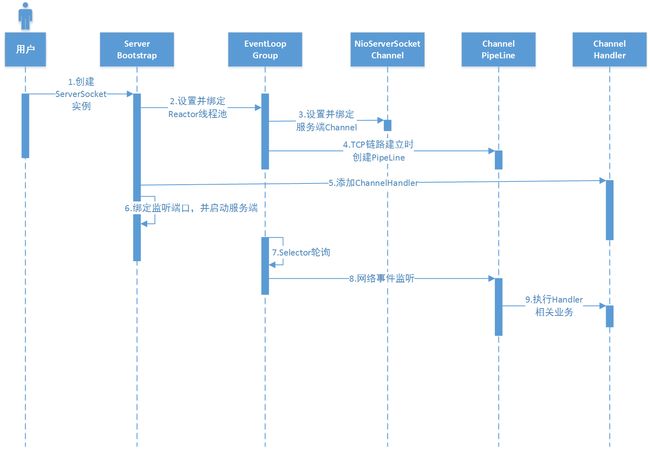
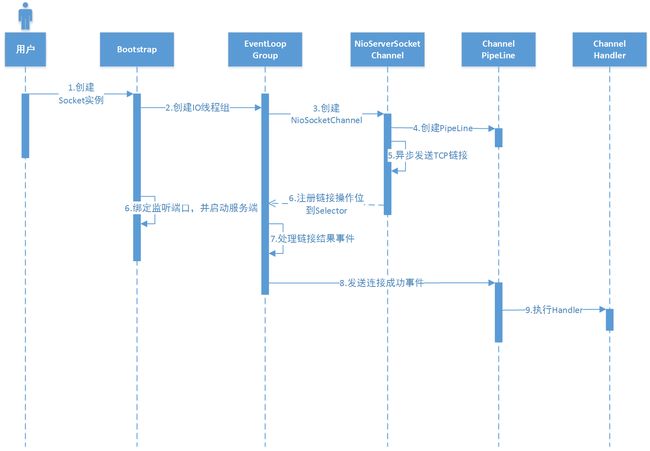
服务端 & 客户端 创建过程时序
-
服务端
-
客户端
-
-
线程控制
由于Netty采用异步通信模型,一个IO线程并发处理多个客户端连接读写,IO多路复用 + 池化技术其实就是Reactor的基本设计思想,Reactor单独运行在一个线程,负责监听与分发事件,分发给适当的程序来处理IO事件,通过Handler实际处理相关事件,那么线程模型到底是什么样,下面详细讲解-
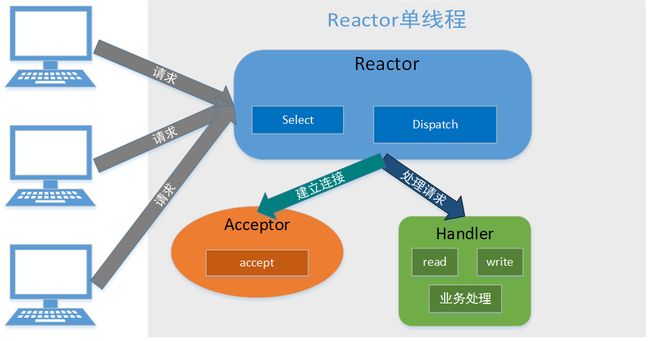
单Reactor单线程模型
- 典型的IO多路复用通过一个线程阻塞多路连接请求,Reactor通过select监听客户端事件,收到后通过Dispatch进行分发事件;
- 如果是连接事件,交由Acceptor进行连接处理,创建Handler完成后续处理;
- 如果非连接请求,分发到相应的handler处理,完成read -> 业务处理 - > send 过程处理
优点:模型简单,无多线程,不存在进程通讯、资源竞争问题
缺点:性能问题:单线程无法发挥多核优势,同时处理Handler业务会阻塞线程,导致客户端连接超时,往往超时会重试,加重服务端压力,恶性循环;可靠性问题:线程意外停止或进入死循环会导致整个系统不可用
使用于客户端数据量有限,业务响应迅速的应用 -
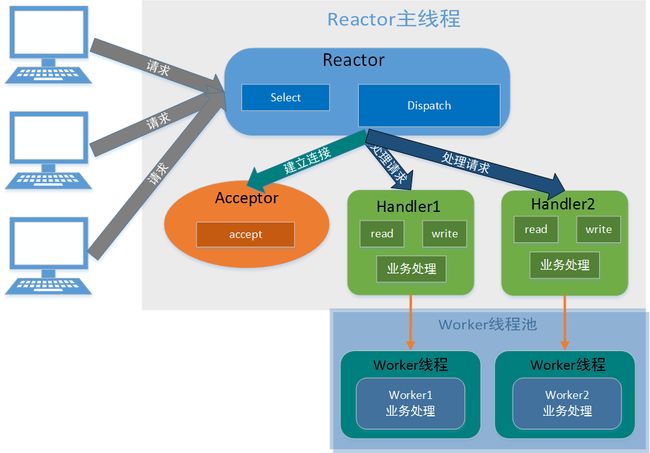
单Reactor多线程模型
- Reactor启动单线程监听客户端事件,通过Dispatch分发事件
- 连接事件交由Acceptor进行连接处理,创建Handler完成后续处理
- 非连接事件,由Reactor分发到相应的Handler处理
- handler只负责响应事件,read读取数据后,分发到worker线程池中做业务处理
优点:发挥多核的处理能力
缺点:单Reactor线程处理所有监听事件,在高并发情况下会成为瓶颈,同时多线程共享和访问数据比较复杂 -
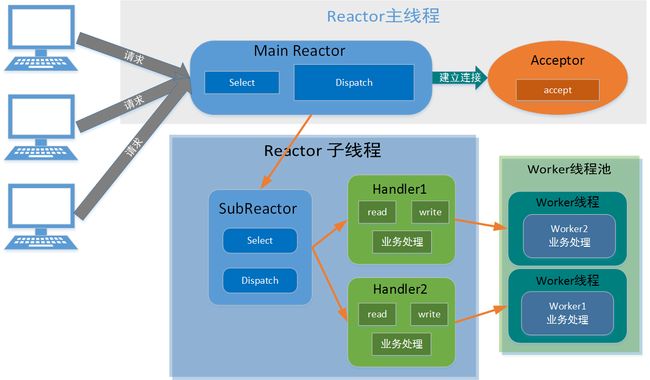
Reactor主从多线程模型
- Reactor主线程通过select监听连接事件,收到连接通知Acceptor处理连接事件
- 连接建立后主线程分配给Reactor子线程,创建Handler进行各种事件处理
- 有事件发生,SubReactor调用相应的Handler,handler通过read后将数据分发给worker线程去处理
- 一个MainReactor可以对应多个SubReactor
优点:主从线程数据交互简单,职责明确,主线程负责接收连接,从线程负责后续业务处理,同时无需返回
缺点:编程难度较大-
Netty线程模型
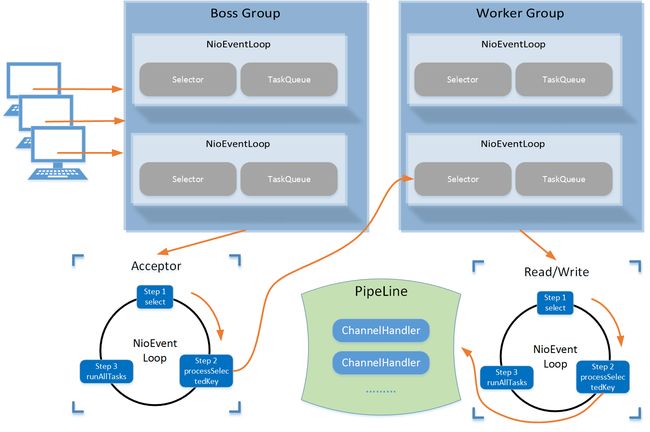
该模式可以通过参数配置,支持以上三种Reactor线程模型
- 抽象出俩个线程池,Boss Group 负责客户端连接请求,Worker Group负责网络的读写,二者皆为NioEventLoopGroup,表示事件循环组,每一循环为NioEventLoop
- NioEventLoop表示一个不断循环处理任务的线程,内置Selector监听绑定在其上面的Socket通讯事件
- 每个Boss NioEventLoop包含三个步骤
- 轮询监听accept事件
- 处理accept事件,与client建立连接,生成NioSocketChannel,并将其注册到Worker NioEventLoop中的Selector
- 处理任务队列任务
- 每个Worker NioEventLoop循环执行步骤
- 轮询监听read、write事件
- 在对应的NioSocketChannel处理read、write事件
- 处理任务队列任务
- 每个Worker NioEventLoop处理业务会通过PipeLine,其中内置了很多处理器,支持业务处理
-
-
Handler调用机制
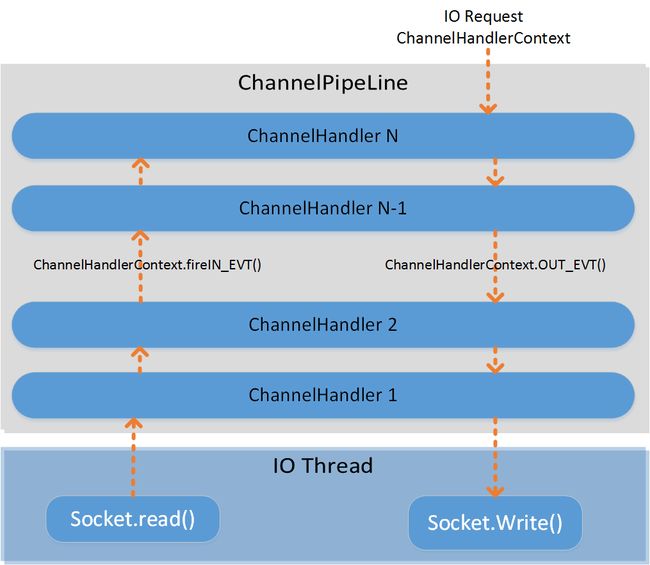
在Netty架构设计中,Handler充当了处理入栈和出栈的数据处理逻辑的容器,实现相应接口(ChannelInBoundHandler)重写相应方法就可以接收入栈事件和数据,将数据进行逻辑处理;向客户端发送响应时,可用从InBound中冲刷数据,ChannelOutBoundHandler原理相同,处理出栈数据;其中入栈是相对PipeLine来说的,PipeLine中以LinkedList线程存储Handler,从Socket中read数据到Pipeline进行处理称为入栈,Handler执行顺序为HeadHandler -> TailHandler,反之write到Socket称为出栈,执行顺序TailHandler - > HeadHandler
- 编解码与协议开发
当Netty接收和发送消息时,就会发生一次数据转换,根据入栈和出栈分别进行解码和编码,Netty自身提供了一系列编解码器,都会实现ChannelInBoundHandler、ChannelOutBoundHandler接口并在channelRead中接收数据,进行数据的编解码,数据处理后会转发到写一个Handler;由于TCP是 “流” 协议,也就是传输的数据是没有界限的,所以导致在业务层面讲不能确定每次发送是一条完整数据,这就是TPC粘包、拆包问题- TCP粘包、拆包问题
底层TCP无法理解上层业务数据,所以导致底层无法保证数据包不被拆分和重组,所以这个问题只能通过上层协议栈设计去解决,根据业界与主流协议的解决方案,可以总结为以下几种- 消息定长
- 在包尾添加特殊字符进行分割,比如:回车
- 将消息分为消息头、消息体,消息头保存消息长度
- 更复杂的应用层协议
- 消息序列化
当进行远程跨进程调用时,需要将被传输的Java对象编码为字节数组或ByteBuffer对象,目标系统需要将接收到的数据进行相应解码为Java对象,其中最常见的就是Java的序列化,实现Serializable接口Java序列化
序列化目的:网络传输(本文重点)、对象持久化;
序列化是Java编码中的一种,由于其种种缺陷,衍生出多种编
解码技术与框架
缺陷:无法跨语言、序列化后的体积较大、性能低Protobuf
是一种与语言无关、平台无关、性能高、扩展性好的数据序列化方法,可以用于数据传输协议以及数据存储,可类比于XML但是比XML更小、更快、更简单,通过数据描述文件和代码生成机制实现以上特点-
Thrift
Thrift是一种接口描述语言和二进制通讯协议,它被用来定义和创建跨语言的服务。它被当作一个远程过程调用(RPC)框架来使用,是由Facebook为“大规模跨语言服务开发”而开发的。——来源:百度百科
-
Mershalling
是一个Java对象序列话的API包,修正了JDK自带序列化的诸多问题,在兼容Serializable的同时,新增可调参数与附加特性- 可插拔的类解析器,提供更加便捷的定制策略,
- 可插拔的对象替换技术
- 无需实现指定接口
- 通过缓冲提高性能
- TCP粘包、拆包问题
- 如何达到架构质量指标
-
高性能
性能是设计出来的,而不是测试出来的
影响网络通信性能多,主要从传输、协议、进程三个方面看,选取怎么样内存模型、采用怎么样的通信协议、线程模型如何选择,下面详细介绍Netty在这些方面是如何做的
- 采用异步非阻塞的IO类库,基于Reactor模式实现,平滑的处理客户端线性增长;通过NioEventLoop聚合异步多路复用Selector,并发处理成百上千个SocketChannel的读写,极大提升性能、弹性伸缩能力;
- 网络传输缓冲区使用 直接内存,避免内存复制,提高IO读写性能;
通过三种方面体现零拷贝:- Netty的读写采用DirectBuffer堆外内存直接内存,相比于堆内存要讲堆内存缓存区数据拷贝到直接内存, 不需要进行字节缓冲区的二次拷贝
- 通过实现CompositeByteBuf,将多个ByteBuf分装成一个ByteBuf,对外提供统一ByteBuf接口,实际就是一个装饰器,将多个ByteBuf组合成一个集合,这样避免了内存拷贝;
- 文件传输中通过transferTo方法直接文件发送到目标Channel中, 不需要进行循环拷贝(底层SendFile)
- 支持通过内存池的方式循环利用ByteBuffer,避免频繁创建、销毁Buffer对象造成的性能开销;虽然JVM虚拟机与JIT及时编辑编译的发展,对象的分配和回收是个非常轻量级的工作,但是对于缓冲区的情况稍有不同,缓冲区操作频繁,同时还是堆外内存,这样分配和回收对象就会稍有耗时。为了尽量重用缓冲区,Netty提供了基于内存池的缓冲区重用机制,通过启动辅助类中配置相关参数,事项差异化定制;
PooledByteBufAllocator.DEFAULT.directBuffer(1024) - 可配置的IO线程数、TCP参数等,为不同的应用场景提供定制化的调优参数;通过辅助类的参数配置,可以使Nettry支持任意一种Reactor线程模型,支持不同的业务场景,同时合理地设置TCP参数满足不同的用户场景
- 采用环形数组缓冲区实现无锁化并发编程,替代传统的线程安全容器以及锁;在数据读写时,采用循环数数组缓冲区如ChannelOutBoundBuffer,每次写入通道,然后弹出,直到无内容
- 合理地使用线程安全容器、原子类等,提高系统的并发处理能力;volatile的大量、正确使用;CAS和原子类的广泛使用;线程安全容器的使用;读写锁提高并发性能
- 关键资源使用单线程串行化,避免多线程并发访问带来的锁竞争和额外的CPU资源消耗问题;表面上串行化设计似乎CPU利用率不高,并发程度不够,但是通过Worker NioEventLoop的线程池的参数,可以同时启动多个串行化的线程并行运行,这种局部无锁化的穿串行线程设计相比一个队列,多个工作线程性能更优
- 通过引用计数器及时的释放不在应用的对象,细粒度的内存管理降低GC的频率,
AbstractReferenceCountedByteBuf
-
可靠性
作为高性能的异步通讯框架,架构的可靠性是重要硬性指标- 链路有效性检测
基于长连接带来诸多便利,但链路的有效性没有保证,Netty可以通过心跳周期性的检测,在系统空闲无业务时可以识别网络闪断、网络单通等网络异常进行自动关闭、重连,使系统空闲与高峰能顺利过度;同时业务消息可以充当链路检测,心跳只需要系统空闲时发送;
心跳机制:Ping - Pong 、Ping - Ping
Netty提供相关类库:io.netty.handler.timout.*,进行空闲检测,主要监听读空闲、写空闲、读写空闲事件,自定义逻辑代码实现协议层的心跳检测 - 内存保护机制
通过对象引用计数器对Bytebuf等内置对象进行细粒度的内存申请与释放,对非法的对象引用做检测与保护,通过内存池对ByteBuf重用、分配机制(预分配、协议定长)、设置内充容量上限(链路总数、单个缓冲区大小、消息长度) - 优雅停机
基于JVM发送退出信号量,Netty对所有涉及资源释放、回收的地方,都采用了优雅退出的方式,也就是退出前释放相关模块资源占用、将缓冲区的消息处理完成、待刷新数据持久化到硬盘或数据库,所有处理执行完毕后退出
- 链路有效性检测
可定制
主要体现在Pipelin的职责链设计,便于业务逻辑的定制化;基于接口开发;提供大量工厂类、配置化辅助类,可以按照业务需求进行配置、创建对象;可扩展
很方便的进行应用层协议定制扩展
-
四、核心组件工作原理及源码解析
以下所有源码分析基于Netty 4.1版本
-
Buffer(以ByteBuffer为主)
- 工作原理
- NIO原生ByteBuffer
- 核心属性
// Invariants: mark <= position <= limit <= capacity private int mark = -1; -- 标记 private int position = 0; -- 位置,操作指针 private int limit; -- 操作极限点 private int capacity; -- 容量 - 核心方法
public final int capacity( ) --返回此缓冲区的容量
public final int position( ) --返回此缓冲区的位置
public final Buffer mark( ) --在此缓冲区的位置设置标记
public final Buffer reset( ) --将此缓冲区的位置重置为以前标记的位置
public final Buffer clear( ) --清除此缓冲区, 即将各个标记恢复到初始值
public final Buffer flip( ) --反转此缓冲区
public final Buffer rewind( ) --重绕此缓冲区
public final int remaining( ) --返回当前位置与限制之间的元素数
public final boolean hasRemaining( ) --当前位置和限制之间是否有元素
public abstract boolean isReadOnly( ) --是否为只读缓冲区
public abstract boolean hasArray(); --是否具有可访问的底层实现数组
public abstract Object array(); --底层实现数组
public abstract int arrayOffset(); --底层实现数组中第一个元素的偏移量
public abstract boolean isDirect(); --是否为直接缓冲区
public static ByteBuffer allocateDirect(int capacity) --创建直接缓冲区
public static ByteBuffer allocate(int capacity) --创建堆内存缓存区
public abstract byte get( ); --position位置开始向后遍历
public abstract ByteBuffer put (byte b); --position位置追加
- 核心属性
- JDK原生
java.nio.ByteBuffer中长度固定,由于只有一个位置标识指针,每次读写需要flip()等操作进行指正切换,API有限,高级功能需要自己去实现;基于以上问题,Netty提供了自己的Buffer实现,主要采用俩中策略 ①参考JDK实现,处理缺陷、扩展功能;②采用Facade模式,聚合并包装JDK原生Buffer -
ByteBuf通过readerIndex & writerIndex俩个指针完成缓冲区的读写避免flip,通过扩容解决定容问题
- Netty中ByteBuf核心属性 & 方法
- 属性
static final ResourceLeakDetectorleakDetector =ResourceLeakDetectorFactory.instance().newResourceLeakDetector(ByteBuf.class); --记录处理内存泄露Buf /**0 <= readerIndex <= writerIndex <= maxCapacity**/ int readerIndex; --读索引 int writerIndex; --写索引 private int markedReaderIndex; --du索引标记 private int markedWriterIndex; --写索引标记 private int maxCapacity; --最大容量 - 方法
public byte readByte()--读
public ByteBuf writeByte()  --写
public ByteBuf discardReadBytes()  --释放discard区域数据(重用)
public ByteBuf clear() --读写索引复位
public ByteBuf markXXX() -- 标记
public ByteBuf resetXXX() -- 复位标记
public ByteBuf slice() --可读缓存区
- 属性
- 内存池原理
为了集中管理内存,预先分配一大块连续内存的分配与释放,同时由于频繁调用系统来申请内存从而提高性能大大提升,Netty中PoolArena是由多个Chunk组成的大块内存区域,每个Chunk是由多个Page组成,PoolChunk主要用来组织管理多个Page的内存分配和释放,其中的Page被构建成二叉树,内存选择是对树的深度优先遍历,但是同层随机选择,如果分配内存小于page,PoolSubpage会分成相等的块,分多大是由第一次申请决定的,后面所有的申请都按这个来,无论是Chunk还是Page都是通过状态位来标识是否可用 - 相关类
- ByteBufHolder:对ByteBuf的一层封装,便于协议携带数据在消息体中
- ByteBufAllocator:Buf分配器,上面源码涉及到,主要分池与非池的Buf的分配;
- ByteBufUtil : ByteBuf工具类
- NIO原生ByteBuffer
- 源码解析
-
继承关系
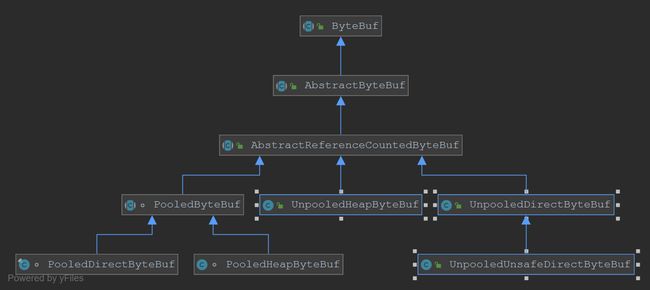
以上是ByteBuf主要功能类图,从内存分配来看,分为堆内存、直接内存,二者的区别前面已经提过,无非就是分配&回收、复制方面各有利弊,所以读写缓冲使用直接内存,编解码使用堆内存,使系能到达最优;从内存的回收来看,可以分为池化与普通Buf,池化可以重用内存,提升效率,降低GC消耗,但是在维护管理更加复杂;Netty提供以上策略,共开发者选择。
-
读取Buf(AbstractByteBuf.java)
public byte readByte() { checkReadableBytes0(1); //校验是否可读(一个字节) int i = readerIndex; //从当前可读位置开始 byte b = _getByte(i);// 由于子类不同的技术实现,所以由子类实现 readerIndex = i + 1; //位置后移 return b; } private void checkReadableBytes0(int minimumReadableBytes) { ensureAccessible(); //访问确认 if (checkBounds && readerIndex > writerIndex - minimumReadableBytes) {//是否存在可读数据() throw new IndexOutOfBoundsException(String.format( "readerIndex(%d) + length(%d) exceeds writerIndex(%d): %s", readerIndex, minimumReadableBytes, writerIndex, this)); } } /** * release前都要校验 * 是否可访问 * isAccessible() --return refCnt() != 0 //是否存在引用 * 这里对refCnt做一个说明:初始化对象时会置为1,release会置为0, * 当对象不可达后,由于JVM在不知道Netty后续操作,所以可能会释放掉对象, * 这样release就没法执行,没有归还资源到内存池中,导致后续内存泄漏, * 这里会使用leakDetector 解决该问题 */ protected final void ensureAccessible() { if (checkAccessible && !isAccessible()) { //checkAccessible 配置项,() : throw new IllegalReferenceCountException(0); } } -
写Buf(AbstractByteBuf.java)
public ByteBuf writeByte(int value) { ensureWritable0(1); _setByte(writerIndex++, value); return this; } final void ensureWritable0(int minWritableBytes) { final int writerIndex = writerIndex(); final int targetCapacity = writerIndex + minWritableBytes; //写入所需容量 if (targetCapacity <= capacity()) {//小于当前容量 ensureAccessible(); return; //允许写入 } if (checkBounds && targetCapacity > maxCapacity) { //目标所需容量大于最大容量 抛出OutOfBoundException ensureAccessible(); throw new IndexOutOfBoundsException(String.format( "writerIndex(%d) + minWritableBytes(%d) exceeds maxCapacity(%d): %s", writerIndex, minWritableBytes, maxCapacity, this)); } // Normalize the target capacity to the power of 2. final int fastWritable = maxFastWritableBytes();//允许写入字节数(多此一举) //计算扩容后容量 int newCapacity = fastWritable >= minWritableBytes ? writerIndex + fastWritable : alloc().calculateNewCapacity(targetCapacity, maxCapacity); // Adjust to the new capacity. //扩容后需要新建缓冲区,复制不同子类实现不同, capacity(newCapacity); } /** * AbstractByteBufAllocator.java * 计算扩容后容量 * minNewCapacity 容量下限 * maxCapacity 容量上限 */ public int calculateNewCapacity(int minNewCapacity, int maxCapacity) { // 参数合法性校验 checkPositiveOrZero(minNewCapacity, "minNewCapacity"); if (minNewCapacity > maxCapacity) { throw new IllegalArgumentException(String.format( "minNewCapacity: %d (expected: not greater than maxCapacity(%d)", minNewCapacity, maxCapacity)); } // 设置阈值 4MB final int threshold = CALCULATE_THRESHOLD; // 4 MiB page //如果是 扩容为阈值直接返回阈值 if (minNewCapacity == threshold) { return threshold; } // If over threshold, do not double but just increase by threshold. // 扩容超过阈值,不翻倍,而是步进阈值(增加阈值的倍数) if (minNewCapacity > threshold) { int newCapacity = minNewCapacity / threshold * threshold; if (newCapacity > maxCapacity - threshold) { newCapacity = maxCapacity; } else { newCapacity += threshold; } return newCapacity; } // Not over threshold. Double up to 4 MiB, starting from 64. // 小于阈值,倍增(初始值64 ->64 *2 -> 64*2*2) int newCapacity = 64; while (newCapacity < minNewCapacity) { newCapacity <<= 1; } // 不超过预设的最大容量 return Math.min(newCapacity, maxCapacity); } -
重用缓冲区(discardReadBytes)
public ByteBuf discardReadBytes() { //无可重用 if (readerIndex == 0) { ensureAccessible(); return this; } //读写位置不同(暗含读位置>0) if (readerIndex != writerIndex) { // 复制数组,未读取的数据复制到其实位置 setBytes(0, this, readerIndex, writerIndex - readerIndex); //重置读写位置 writerIndex -= readerIndex; adjustMarkers(readerIndex); readerIndex = 0; } else { //读写位置相等,无可读数据,不需要复制,直接位置置0即可重用 ensureAccessible(); adjustMarkers(readerIndex); writerIndex = readerIndex = 0; } return this; } -
对引用计数进行分析(AbstractReferenceCountedByteBuf.java)
// 颞部通过原子(AtomicIntegerFieldUpdater)的方式对成员变量进行操作 private static final ReferenceCountUpdaterupdater = new ReferenceCountUpdater () { // 追踪对象引用次数 private volatile int refCnt = updater.initialValue(); //引用计数器 +1 public ByteBuf retain() { return updater.retain(this);// 最终CAS处理updater().getAndAdd(instance, -rawIncrement); } // 引用计数器 -1 public boolean release(int decrement) { return handleRelease(updater.release(this, decrement));//最终调用 updater().compareAndSet(instance, expectRawCnt, 1) } -
非池化堆内存Buf(UnpooledHeapByteBuf)
频繁内存分配&回收会对性能造成一定影响,但是申请和释放的成本会低一些private final ByteBufAllocator alloc; --内存分配器 byte[] array; -- 缓冲数据(这里可以使用Nio中Buffer替代,这里是为了提升性能和更加便捷的进行位操作,) private ByteBuffer tmpNioBuf; --实现与JDK原生Buffer的转换 // 这里对AbstractByteBuf中要求子类实现的方法进行讲解 // get & set 就是简单的赋值 protected byte _getByte(int index) { return HeapByteBufUtil.getByte(array, index); } protected void _setByte(int index, int value) { HeapByteBufUtil.setByte(array, index, value); } //扩容 public ByteBuf capacity(int newCapacity) { //参数校验 checkNewCapacity(newCapacity); byte[] oldArray = array; int oldCapacity = oldArray.length; if (newCapacity == oldCapacity) {//无修改 return this; } //拷贝的末尾下标 int bytesToCopy; if (newCapacity > oldCapacity) { bytesToCopy = oldCapacity; } else { //如果是缩容,需要截取到新容量位置,调整readerIndex & writerIndex trimIndicesToCapacity(newCapacity); bytesToCopy = newCapacity; } // 创建新数组 byte[] newArray = allocateArray(newCapacity); //拷贝数据到新数组 System.arraycopy(oldArray, 0, newArray, 0, bytesToCopy); //替换关联数组 setArray(newArray); //释放旧数组(NOOP) freeArray(oldArray); return this; } //ByteBuf转原生ByteBuffer public ByteBuffer nioBuffer(int index, int length) { ensureAccessible(); return ByteBuffer.wrap(array, index, length).slice(); } //数组转为ByteBuffer public static ByteBuffer wrap(byte[] array, int offset, int length) { try { //将数组转为ByteBuffer return new HeapByteBuffer(array, offset, length); } catch (IllegalArgumentException x) { throw new IndexOutOfBoundsException(); } }UnpooledDirectByteBuf与此类类似,将array换位ByteBuffer,分配实现为:
ByteBuffer.allocateDirect(initialCapacity) -
池化Buf如何复用
PooledByteBufAllocator //创建堆外Buffer protected ByteBuf newDirectBuffer(int initialCapacity, int maxCapacity) { //获取线程线程绑定的池缓冲 PoolThreadCache cache = (PoolThreadCache)this.threadCache.get(); // 通过缓冲获取到池域 PoolArenadirectArena = cache.directArena; Object buf; if (directArena != null) { // 分配内存 buf = directArena.allocate(cache, initialCapacity, maxCapacity); } else { buf = PlatformDependent.hasUnsafe() ? UnsafeByteBufUtil.newUnsafeDirectByteBuf(this, initialCapacity, maxCapacity) : new UnpooledDirectByteBuf(this, initialCapacity, maxCapacity); } return toLeakAwareBuffer((ByteBuf)buf); } PooledByteBuf allocate(PoolThreadCache cache, int reqCapacity, int maxCapacity) { //创建缓存 PooledByteBuf buf = newByteBuf(maxCapacity); //分配内存 allocate(cache, buf, reqCapacity); return buf; } //创建ByteBuf protected PooledByteBuf newByteBuf(int maxCapacity) { //是否支持un_safe if (HAS_UNSAFE) { return PooledUnsafeDirectByteBuf.newInstance(maxCapacity); } else { return PooledDirectByteBuf.newInstance(maxCapacity); } } // 创建Buf实例 static PooledUnsafeDirectByteBuf newInstance(int maxCapacity) { //采用对象线程池(先复用不行再创建) PooledUnsafeDirectByteBuf buf = RECYCLER.get(); buf.reuse(maxCapacity); return buf; } public final T get() { if (maxCapacityPerThread == 0) { return newObject((Handle ) NOOP_HANDLE); } //获取线程绑定栈 Stack stack = threadLocal.get(); //获取对象句柄 DefaultHandle handle = stack.pop(); if (handle == null) { //无法获取,创建对象 handle = stack.newHandle(); handle.value = newObject(handle); } return (T) handle.value; } //复用重置相关参数 final void reuse(int maxCapacity) { maxCapacity(maxCapacity); resetRefCnt(); setIndex0(0, 0); discardMarks(); } /** *分配内存 * 主要实现以下逻辑 * 每个Chunk是由多个Page组成,PoolChunk主要用来组织管理多个Page的内存分配和释放, * 其中的Page被构建成二叉树,内存选择是对树的深度优先遍历,但是同层随机选择, * 如果分配内存小于page,PoolSubpage会分成相等的块,分多大是由第一次申请决定的, * 后面所有的申请都按这个来,无论是Chunk还是Page都是通过状态位来标识是否可用, */ private void allocate(PoolThreadCache cache, PooledByteBuf buf, final int reqCapacity) { final int normCapacity = normalizeCapacity(reqCapacity); if (isTinyOrSmall(normCapacity)) { // capacity < pageSize int tableIdx; PoolSubpage [] table; boolean tiny = isTiny(normCapacity); if (tiny) { // < 512 if (cache.allocateTiny(this, buf, reqCapacity, normCapacity)) { // was able to allocate out of the cache so move on return; } tableIdx = tinyIdx(normCapacity); table = tinySubpagePools; } else { if (cache.allocateSmall(this, buf, reqCapacity, normCapacity)) { // was able to allocate out of the cache so move on return; } tableIdx = smallIdx(normCapacity); table = smallSubpagePools; } final PoolSubpage head = table[tableIdx]; /** * Synchronize on the head. This is needed as {@link PoolChunk#allocateSubpage(int)} and * {@link PoolChunk#free(long)} may modify the doubly linked list as well. */ synchronized (head) { final PoolSubpage s = head.next; if (s != head) { assert s.doNotDestroy && s.elemSize == normCapacity; long handle = s.allocate(); assert handle >= 0; s.chunk.initBufWithSubpage(buf, null, handle, reqCapacity); incTinySmallAllocation(tiny); return; } } synchronized (this) { allocateNormal(buf, reqCapacity, normCapacity); } incTinySmallAllocation(tiny); return; } if (normCapacity <= chunkSize) { if (cache.allocateNormal(this, buf, reqCapacity, normCapacity)) { // was able to allocate out of the cache so move on return; } synchronized (this) { allocateNormal(buf, reqCapacity, normCapacity); ++allocationsNormal; } } else { // Huge allocations are never served via the cache so just call allocateHuge allocateHuge(buf, reqCapacity); } }
-
- 工作原理
-
Channel
- 工作原理
- 主要负责客户端的连接、网络的读写,链路的关闭、一些框架功能等,在原生Channel诸多不便的情况下,Netty重新设计
- 采用Facade封装、功能齐全、聚合原生Channel统一分配调度,
- 核心方法
io.netty.channel.Channel#alloc --获取Buf分配器
io.netty.channel.Channel#config --配置信息
io.netty.channel.Channel#eventLoop --获取eventLoop
io.netty.channel.Channel#flush --将Buf中的写入Channel
io.netty.channel.Channel#isActive --是否激活
io.netty.channel.Channel#isOpen --是否打开
io.netty.channel.Channel#isRegistered --是否注册到EventLoop
io.netty.channel.Channel#isWritable --是否可写
io.netty.channel.Channel#localAddress --本地地址
io.netty.channel.Channel#metadata --元数据
io.netty.channel.Channel#pipeline --获取pipeLine
io.netty.channel.Channel#read --读取到Buf
io.netty.channel.Channel#remoteAddress --远端地址

io.netty.channel.ChannelOutboundInvoker#bind(java.net.SocketAddress) --绑定本地Socket地址
io.netty.channel.ChannelOutboundInvoker#connect(java.net.SocketAddress) --连接服务器地址
io.netty.channel.ChannelOutboundInvoker#deregister() --注销
io.netty.channel.ChannelOutboundInvoker#disconnect() --断开连接
io.netty.channel.ChannelOutboundInvoker#writeAndFlush(java.lang.Object) --写入channel
- 源码解析
-
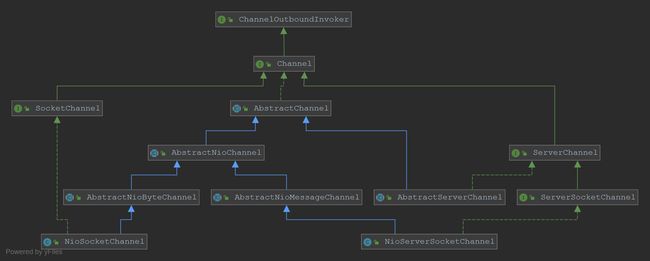
继承关系
-
抽象统一处理的核心
- 属性
//AbstractChannel private final Channel parent; --父Channel private final Unsafe unsafe; private final DefaultChannelPipeline pipeline; --所属Pipeline private final CloseFuture closeFuture = new CloseFuture(this); private volatile SocketAddress localAddress; private volatile SocketAddress remoteAddress; private volatile EventLoop eventLoop; --所注册的EventLoop // AbstractNioChannel.java private final SelectableChannel ch; --server 、client的统一父类 protected final int readInterestOp; --OP_READ事件 volatile SelectionKey selectionKey; --注册到Selector中的Key(volatile 多线程可见) //AbstractNioByteChannel //继续写半包消息 private final Runnable flushTask = new Runnable() { public void run() { // Calling flush0 directly to ensure we not try to flush messages that were added via write(...) in the // meantime. ((AbstractNioUnsafe) unsafe()).flush0(); } }; - 方法
//AbstractChannel
//基本操作都是委托到Pipeline处理
public ChannelFuture bind(SocketAddress localAddress) {
    return pipeline.bind(localAddress);
}

public ChannelFuture connect(SocketAddress remoteAddress) {
    return pipeline.connect(remoteAddress);
}

public ChannelFuture connect(SocketAddress remoteAddress, SocketAddress localAddress) {
    return pipeline.connect(remoteAddress, localAddress);
}

public ChannelFuture disconnect() {
    return pipeline.disconnect();
}

public ChannelFuture close() {
    return pipeline.close();
}

// AbstractNioChannel.java
//当前Channel注册到EventLoop
protected void doRegister() throws Exception {
boolean selected = false; //注册标识
  for (;;) {
        try {
          selectionKey = javaChannel().register(eventLoop().unwrappedSelector(), 0, this); //将当前channel注册到eventLoop中的Selector ,其中0标识对任何事件不感兴趣
          return;
        } catch (CancelledKeyException e) {//连接异常(当前被取消)
          if (!selected) {//首次异常
              // Force the Selector to select now as the "canceled" SelectionKey may still be
              // cached and not removed because no Select.select(..) operation was called yet.
              eventLoop().selectNow();//将失效的SelectorKey移除,继续下次注册
              selected = true;
          } else {
              // We forced a select operation on the selector before but the SelectionKey is still cached
              // for whatever reason. JDK bug ?
              throw e;
          }
      }
  }
}
// 读操作
protected void doBeginRead() throws Exception {
    // Channel.read() or ChannelHandlerContext.read() was called
    final SelectionKey selectionKey = this.selectionKey;
    if (!selectionKey.isValid()) { //是否有效
        return;
    }
    readPending = true; //设置读等待
    final int interestOps = selectionKey.interestOps();
    if ((interestOps & readInterestOp) == 0) {
        selectionKey.interestOps(interestOps | readInterestOp);//设置家监听读操作
    }
}
//AbstractNioByteChannel
protected void doWrite(ChannelOutboundBuffer in) throws Exception {
    int writeSpinCount = config().getWriteSpinCount();//写操作最大循环次数,默认16,
    do {
        Object msg = in.current();//消息循环数组弹出消息
        if (msg == null) {//无消息 所有消息发送完成
            // Wrote all messages.
            clearOpWrite(); // 清楚半包标识
            // Directly return here so incompleteWrite(...) is not called.
            return;
        }
        writeSpinCount -= doWriteInternal(in, msg);//这里执行写,写的过程可能发生TCP缓冲区已满,导致空循环占用CPU资源,导致IO线程无法处理其他线程
    } while (writeSpinCount > 0);

    incompleteWrite(writeSpinCount < 0);//根据循环是否到达极限,设置写半包标识为true
}
private int doWriteInternal(ChannelOutboundBuffer in, Object msg) throws Exception {
    if (msg instanceof ByteBuf) {  //是否Byte类型
        ByteBuf buf = (ByteBuf) msg;
        if (!buf.isReadable()) { //是否可读
            in.remove(); //不可读移除消息
            return 0;
        }

        final int localFlushedAmount = doWriteBytes(buf); //进行消息发送
        if (localFlushedAmount > 0) {
            in.progress(localFlushedAmount);
            if (!buf.isReadable()) {
                in.remove();
            }
            return 1;// 本次没有发送为0字节(TCP缓冲区已满,可发送循环次数 -1)
        }
    }
}
//设置是否写完全(写半包处理)
protected final void incompleteWrite(boolean setOpWrite) {
    / / Did not write completely.
    if (setOpWrite) {//是否写完全
        setOpWrite();//未写完全,后续Selector会继续轮询处理为发送完的消息
    } else {
        // It is possible that we have set the write OP, woken up by NIO because the socket is writable, and then
        // use our write quantum. In this case we no longer want to set the write OP because the socket is still
        // writable (as far as we know). We will find out next time we attempt to write if the socket is writable
        // and set the write OP if necessary.
        clearOpWrite();//清除写半包标识

        // Schedule flush again later so other tasks can be picked up in the meantime
        //启动任务,后续写操作
        eventLoop().execute(flushTask);
    }
}
//写不完全,设置标识
protected final void setOpWrite() {
    final SelectionKey key = selectionKey();
    // Check first if the key is still valid as it may be canceled as part of the deregistration
    // from the EventLoop
    // See https://github.com/netty/netty/issues/2104
    if (!key.isValid()) {//是否有效
        return;
    }
    final int interestOps = key.interestOps();
    if ((interestOps & SelectionKey.OP_WRITE) == 0) {
        key.interestOps(interestOps | SelectionKey.OP_WRITE);
    }
}
- 属性
-
NioServerSocketChannel.java
//创建ServerSocketChannel private static ServerSocketChannel newSocket(SelectorProvider provider) { try { return provider.openServerSocketChannel(); } catch (IOException e) { throw new ChannelException( "Failed to open a server socket.", e); } } //基本所有的基础操作都依赖于原生ServerSocketChannel protected void doBind(SocketAddress localAddress) throws Exception { if (PlatformDependent.javaVersion() >= 7) { javaChannel().bind(localAddress, config.getBacklog());// } else { javaChannel().socket().bind(localAddress, config.getBacklog()); } } protected int doReadMessages(List -
NioSocketChannel.java
//连接服务 protected boolean doConnect(SocketAddress remoteAddress, SocketAddress localAddress) throws Exception { if (localAddress != null) { doBind0(localAddress);//绑定地址 } boolean success = false; try { boolean connected = SocketUtils.connect(javaChannel(), remoteAddress);//连接服务 if (!connected) { selectionKey().interestOps(SelectionKey.OP_CONNECT);//没有立即连接成功,注册连接事件 } success = true; return connected; } finally { if (!success) { doClose();//连接失败,关闭连接 } } } -
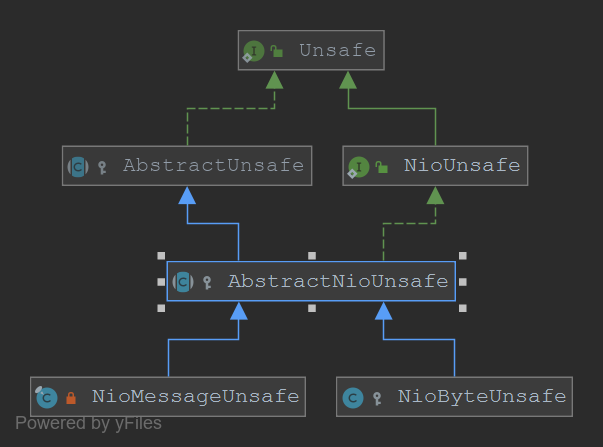
UnSafe(Channel的辅助接口)
//将Channel注册到EventLoop中的Selector
public final void register(EventLoop eventLoop, final ChannelPromise promise) {
    ObjectUtil.checkNotNull(eventLoop, "eventLoop");
    if (isRegistered()) {//是否已经注册过
         promise.setFailure(new IllegalStateException("registered to an event loop already"));
        return;
    }
    if (!isCompatible(eventLoop)) {//是否是兼容Loop
        promise.setFailure(
                new IllegalStateException("incompatible event loop type: " + eventLoop.getClass().getName()));
        return;
    }
    AbstractChannel.this.eventLoop = eventLoop;

    if (eventLoop.inEventLoop()) {//当前线程是否为EventLoop线程
        register0(promise); //同一线程,无并发问题
    } else {
        try {
            eventLoop.execute(new Runnable() {//放到任务队列
                @Override
                public void run() {
                    register0(promise);// 注册
                }
            });
        } catch (Throwable t) {//异常关闭
            logger.warn(
                 "Force-closing a channel whose registration task was not accepted by an event loop: {}",
                AbstractChannel.this, t);
            closeForcibly();
            closeFuture.setClosed();
            safeSetFailure(promise, t);
        }
    }
}

private void register0(ChannelPromise promise) {
    try {
        // check if the channel is still open as it could be closed in the mean time when the register
        // call was outside of the eventLoop
        if (!promise.setUncancellable() || !ensureOpen(promise)) {
            return;
        }
        boolean firstRegistration = neverRegistered;//是否首次注册
        doRegister();
    //设置标记位
    neverRegistered = false;
    registered = true;
    pipeline.invokeHandlerAddedIfNeeded();//回调pipeline中的handlerAdded()方法,通知注册成功
    safeSetSuccess(promise);//设置异步状态
    pipeline.fireChannelRegistered(); //回调pipeLine.fireChannelRegistered()
    if (isActive()) {//是否激活
        if (firstRegistration) {//第一次激活
            pipeline.fireChannelActive();//回调pipeLine.fireChannelActive()
        } else if (config().isAutoRead()) {
            // This channel was registered before and autoRead() is set. This means we need to begin read
            // again so that we process inbound data.
            //
            // See https://github.com/netty/netty/issues/4805
            beginRead();//首次激活,开始读
        }
    }
} catch (Throwable t) {
    // Close the channel directly to avoid FD leak.
    closeForcibly();
    closeFuture.setClosed();
    safeSetFailure(promise, t);
  }
}
//其他放方法不再赘述
-
- 工作原理
-
ChannelPipeline
- 工作原理
类似与过滤器组,通过职责链模式对用户是的事件拦截处理,在前面我们已经大体介绍了原理。Netty中的事件分为inbound与outbound,- inbound事件方法:fireXXX()
- outbound事件方法:bind()、 connect()、 write()、 flush()、 read()、disconnect()、 close()
- 源码解析
public final ChannelPipeline addBefore(
     EventExecutorGroup group, String baseName, String name, ChannelHandler handler) {
 final AbstractChannelHandlerContext newCtx;
 final AbstractChannelHandlerContext ctx;
 synchronized (this) {//保证线程安全
     checkMultiplicity(handler);//如果handler不共享 & 在pipeLine中已经存在
     name = filterName(name, handler);
     ctx = getContextOrDie(baseName);//更具名称获取HandlerContext
     newCtx = newContext(group, name, handler);//创建新HandlerContext

     addBefore0(ctx, newCtx);//双向列表添加handler
     /**
       * newCtx.prev = ctx.prev;
       *newCtx.next = ctx;
       *ctx.prev.next = newCtx;
       *ctx.prev = newCtx;
       */
     // If the registered is false it means that the channel was not registered on an eventLoop yet.
     // In this case we add the context to the pipeline and add a task that will call
     // ChannelHandler.handlerAdded(...) once the channel is registered.
     if (!registered) {
         newCtx.setAddPending();
         callHandlerCallbackLater(newCtx, true);
         return this;
     }

     EventExecutor executor = newCtx.executor();
     if (!executor.inEventLoop()) {
         callHandlerAddedInEventLoop(newCtx, executor);
         return this;
     }
 }
 callHandlerAdded0(newCtx);
 return this;
}

//事件是如何传递的(以fireChannelActive事件分析)
public ChannelHandlerContext fireChannelRead(final Object msg) {
 invokeChannelRead(findContextInbound(MASK_CHANNEL_READ), msg);
 return this;
}
//查找inBound相关ctx并返回(Handler的顺序执行核心代码)
private AbstractChannelHandlerContext findContextInbound(int mask) {
 AbstractChannelHandlerContext ctx = this;
 do {
     ctx = ctx.next;
 } while ((ctx.executionMask & mask) == 0);//是否Inbound相关实现,旨在寻找俩一个handler
 return ctx;
}
//执行channelRead方法
static void invokeChannelRead(final AbstractChannelHandlerContext next, Object msg) {
 final Object m = next.pipeline.touch(ObjectUtil.checkNotNull(msg, "msg"), next);
 EventExecutor executor = next.executor();
 if (executor.inEventLoop()) {//是否EventLoop线程
     next.invokeChannelRead(m);//直接调用
 } else {
     executor.execute(new Runnable() {//新起Task
         @Override
         public void run() {
             next.invokeChannelRead(m);
         }
     });
 }
}
private void invokeChannelRead(Object msg) {
 if (invokeHandler()) {//是否调用过该Handler
     try {
         ((ChannelInboundHandler) handler()).channelRead(this, msg);//调用过,传递事件
     } catch (Throwable t) {
         notifyHandlerException(t);
     }
 } else {
     fireChannelRead(msg);//直接调用
 }
}
- 工作原理
-
ChannelHandler
- 工作原理
-
继承关系
-
- 源码解析
主要分析ByteToMessageDecoderpublic void channelRead(ChannelHandlerContext ctx, Object msg) throws Exception { if (msg instanceof ByteBuf) {//是否ByteBuf CodecOutputList out = CodecOutputList.newInstance(); try { first = cumulation == null;//是否存在未解码的消息 cumulation = cumulator.cumulate(ctx.alloc(), first ? Unpooled.EMPTY_BUFFER : cumulation, (ByteBuf) msg);//根据是否半包消息,分配Buf callDecode(ctx, cumulation, out);//解码 } catch (DecoderException e) { throw e; } catch (Exception e) { throw new DecoderException(e); } finally {//释放资源 if (cumulation != null && !cumulation.isReadable()) { numReads = 0; cumulation.release(); cumulation = null; } else if (++ numReads >= discardAfterReads) { // We did enough reads already try to discard some bytes so we not risk to see a OOME. // See https://github.com/netty/netty/issues/4275 numReads = 0; discardSomeReadBytes(); } int size = out.size(); firedChannelRead |= out.insertSinceRecycled(); fireChannelRead(ctx, out, size); out.recycle(); } } else { ctx.fireChannelRead(msg); } } //解码 protected void callDecode(ChannelHandlerContext ctx, ByteBuf in, List
- 工作原理
-
EventLoop
- 工作原理
-
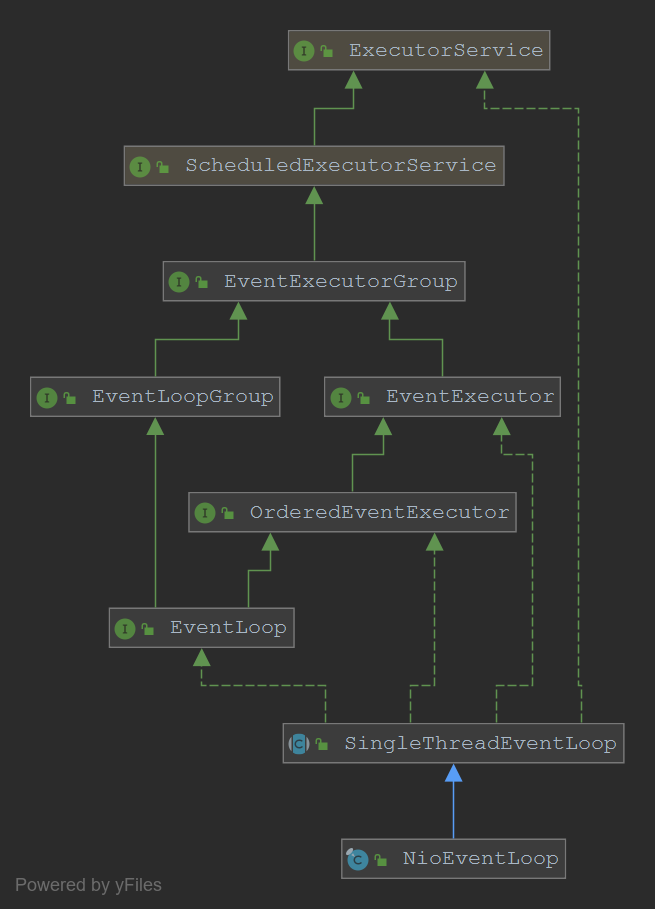
继承关系
是Netty线程设计的完美体现,提升并发性能,很大程度避免锁,局部无锁话,前面已经分析了线程模型的原理,如何通过参数就可以在Reactor各个模型间完美切换等,这里不再赘述
-
- 源码解析
private Selector selector; //selector的包装对象(通过 **io.netty.noKeySetOptimization** 配置是否开启,默认不开启) private Selector unwrappedSelector; //原生Selector对象 private SelectedSelectionKeySet selectedKeys; private final SelectorProvider provider; //Selector提供者,通过SPI实现 //开启Selector private SelectorTuple openSelector() { final Selector unwrappedSelector; try { unwrappedSelector = provider.openSelector();//设置原生Selector } catch (IOException e) { throw new ChannelException("failed to open a new selector", e); } if (DISABLE_KEY_SET_OPTIMIZATION) {//是否开启Selector优化(io.netty.noKeySetOptimization) return new SelectorTuple(unwrappedSelector);//未开启,直接返回 } //反射获取Selector实现 Object maybeSelectorImplClass = AccessController.doPrivileged(new PrivilegedAction
- 工作原理
五、总结
Netty作为高性能的NIO通信框架,延续了NIO的诸多特性的同时,还对NIO存在的问题,做统一的规避与优化,主要从内存、线程、编解码、传输等方面,通过巧妙地线程模型设计、堆与直接内存的合理使用、环形数组缓冲区、无锁并发、内存池化重用、引用计数器等技术对性能做了很大的提升,通过学习Netty架构在分层、稳定、扩展等方面的巧妙设计,受益良多。

