项目从去年6月份到9月中旬,历时3个半月,我一个人开发,学习了一些东西,现在作一篇总结,加深印象.
整体架构
以前没有架构项目的经验,所以项目开始时,上网学习了一些别人的架构经验,我的整体架构思想主要参考了MarkZhai的系列文章.主要考虑到实际项目需求,领导要求将这个APP做成一个公用模板,以便日后将它换个名字什么,换个界面什么的作为公司另外的购物网站APP(''马甲APP'').
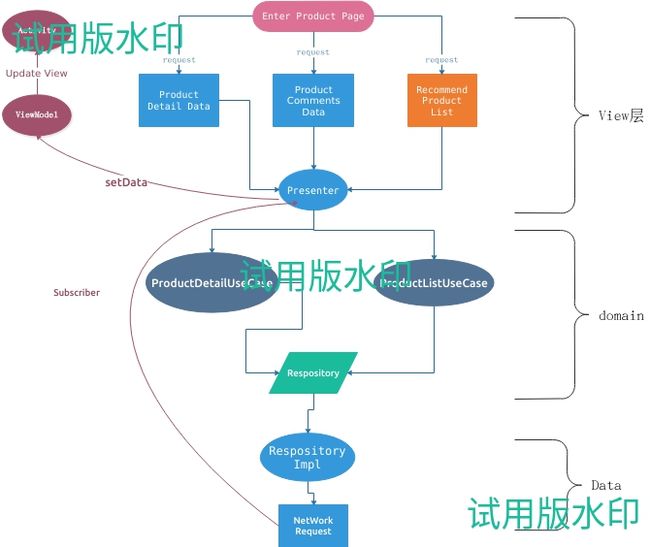
先来看下项目整体结构:
module 功能说明:
- app对应与界面相关功能,主要包括View,以及为View服务的一些功能.
- data对应数据仓库,项目中一切数据来源都应该来自它,其他module不管数据来源,只是向data要.data提供.
- domain 对应用户Usecase,主要封装一些rxjava代码,属于Java层,负责连接app和data.
项目引入了Dagger2进行解耦,引入原因是因为我想学习怎么用,目前看来大材小用,因为项目不大,感觉没有完全发挥出它的强大作用,并且在项目开始时由于对它的不熟悉,常常出现一些自己不知道错在哪里的问题,花费了不少精力,重写了不少界面,特别是在和kotlin结合使用的时候,错在那个位置都不会报,在使用dagger2时,只要一个界面使用了它的功能,那你必须马上build工程一遍,不然等你连续写好几个界面后,都不知道到底是哪个出了问题,不过现在看来也算是学习了它,有所收获.
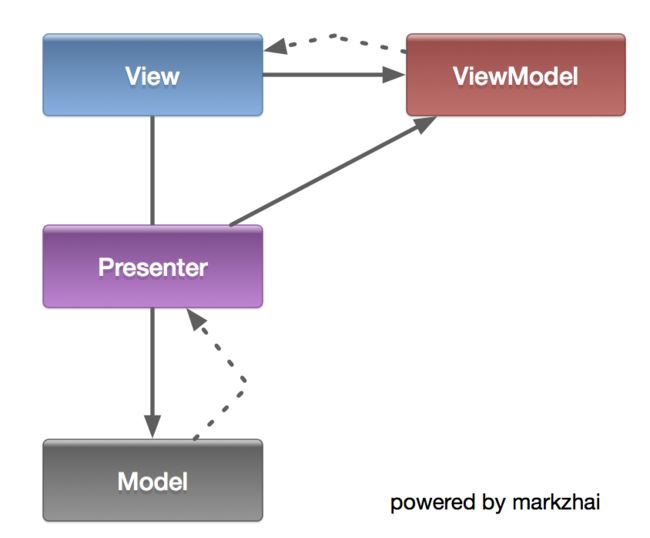
View 层(app module)在MVP模式中引入了DataBinding构成了MVPVM (Model-View-Presenter-ViewModel)模式- Model:data和domain模块组成.
- View:Activity和fragment
- Presenter:连接View和Model
- ViewModel:继承BaseObservable,对Model进行wrap,处理成View需要的数据,通过DataBinding绑定到View中.
关于MVPVM模式可以看看Markzhai的这篇文章.下面我通过项目中用户进入产品详情界面来具体说明MVPVM是怎么工作的.
产品界面数据请求流程如下:在说明整个请求流程前,先介绍下Dagger2在我的项目中是怎样组织各个组件的:
ApplicationComponent:负责将项目中一直存在的组件(和应用同生命周期)inject到每一个需要这些组件的View中,并且保证这些组件只有一个实例.
@Singleton
@Component(modules = {ApplicationModule.class, ApiModule.class})
public interface ApplicationComponent {
   void inject(BaseActivity baseActivity);
   void inject(BaseFragment baseFragment);
   void inject(MessageUtils messageUtils);

   Context context();
   ThreadExecutor threadExecutor();
   PostExecutionThread postExecutionThread();
   AppApi api();

   void inject(@NotNull EditVariantBottomSheet editVariantBottomSheet);
}
ApplicationModule 提供组件:
/**
 * Dagger module that provides objects which will live during the application lifecycle.
 */
@Module
public class ApplicationModule {
    private final BaseApplication baseApplication;

    public ApplicationModule(BaseApplication baseApplication) {
        this.baseApplication = baseApplication;
    }


    @Provides
    @Singleton
    Context provideApplicationContext() {
        return this.baseApplication;
    }

    @Provides
    @Singleton
    ThreadExecutor provideThreadExecutor(JobExecutor jobExecutor) {
        return jobExecutor;
    }

    @Provides
    @Singleton
    PostExecutionThread providePostExecution(UIThread uiThread) {
        return uiThread;
    }

    @Provides
    @Singleton
    JsonSerializerUtil provideJsonSerializerUtil(){
        return new JsonSerializerUtil();
    }
}
在具体的界面Component中, 如ProductDetailComponent,负责将当前界面需要的实例注入到界面中.
@Component(dependencies = ApplicationComponent.class, modules = {ProductDataModule.class, ActivityModule.class})
public interface ProductDetailComponent {

    void inject(ProductDetailFragment productDetailFragment);

    void inject(ProductListFragment productListFragment);

    void inject(HomeFragment homeFragment);

    void inject(ProductDetailActivity productDetailActivity);

    void inject(ProductActivity productActivity);
}
ProductDataModule:
@Module
public class ProductDataModule {


    private final Context context;

    public ProductDataModule(Context context) {
        this.context = context;
    }

    @Provides
    ProductRepository provideProductRepository(ProductDataRepository productDataRepository) {
        return productDataRepository;

    }

}
在ProductActivity onCreate()方法中进行ProductDetailComponent的注入:
private fun initializeInjector() {
        DaggerProductDetailComponent.builder()
                .applicationComponent(applicationComponent)
                .productDataModule(ProductDataModule(BaseApplication.getContext()))
                .build().inject(this)
    }
到这一步时,我们的Activity中已经存在JobExecutor ,UIThread(ApplicationModule提供);ProductDataRepository(ProductDataModule提供)这些在后面生产ProductDetailPresenter实例需要的实例.
ProductDetailPresenter通过@Inject直接注入到ProductActivity中:
class ProductActivity : MvpActivity(), ProductDetailView {
    @Inject
    lateinit var productDetailPresenter: ProductDetailPresenter
来看下ProductDetailPresenter:
public class ProductDetailPresenter extends MvpBasePresenter {
private final ProductDetailsUseCase productDetailsUseCase;
private final ProductListUseCase productListUseCase;
private final ProductBuyUseCase productBuyUseCase;
private String productId;
private int skip;
public ProductDetailEntity getProductDetailEntity() {
return productDetailEntity;
}
private ProductDetailEntity productDetailEntity;
@Inject
LikeProductUseCase likeProductUseCase;
@Inject
ProductShareToUseCase productShareToUseCase;
@Inject
public ProductDetailPresenter(ProductDetailsUseCase productDetailsUseCase, ProductListUseCase productListUseCase, ProductBuyUseCase productBuyUseCase) {
this.productDetailsUseCase = productDetailsUseCase;
this.productListUseCase = productListUseCase;
this.productBuyUseCase = productBuyUseCase;
}
@Override
public void initialize() {
productId = getView().getProductId();
getProductData();
getRelativeProduct(false);
}
public void getRelativeProduct(boolean b) {
productListUseCase.execute(new RelativeProductSubscriber(b), ProductListUseCase.Params.relativeProduct(productId, skip));
}
public void getProductData() {
        productDetailsUseCase.execute(new ProductDetailSubscriber(), ProductDetailsUseCase.Params.forProduct(productId, 2));
    }
@Override
public void detachView(boolean retainInstance) {
super.detachView(retainInstance);
productDetailsUseCase.dispose();
productBuyUseCase.dispose();
productListUseCase.dispose();
likeProductUseCase.dispose();
}
public void saveProduct(int position, String id, boolean like) {
likeProductUseCase.executeCanEmitNull(new LikeSubscriber(position, id, like), LikeProductUseCase.Params.forProduct(id, like));
}
public void shareSuccess(String shareTo) {
productShareToUseCase.executeCanEmitNull(new ShareToSubscriber(),ProductShareToUseCase.Params.shareProduct(productId,shareTo));
}
public void productBuy(String id, int num, String unifiedId, String warehouseId, String countryCode, boolean isBuy, boolean limitTimeOver) {
ProductBuyUseCase.Params params = ProductBuyUseCase.Params.buyProduct(id, num, unifiedId, warehouseId, countryCode,limitTimeOver);
productBuyUseCase.execute(new ProductBuySubscriber(isBuy), params);
}
//.....省略一些代码...
private class ProductDetailSubscriber extends DefaultObserver ProductDetailPresenter的生产还需要ProductDetailsUseCase,ProductListUseCase,等一些UseCase,这些UseCase又通过Dagger2注入进来.
ProductDetailsUseCase:
public class ProductDetailsUseCase extends UseCase {
private final ProductRepository productRepository;
@Inject
ProductDetailsUseCase(ProductRepository productRepository, ThreadExecutor threadExecutor, PostExecutionThread postExecutionThread) {
super(threadExecutor, postExecutionThread);
this.productRepository = productRepository;
}
@Override
Observable ProductDetailsUseCase的生产又需要ProductRepository,ThreadExecutor,PostExecutionThread的实例,这3个都是接口,他们的实现类的实例就是前面已经生产出来的3个实例分别对应ProductDataRepository,JobExecutor,UIThread(其实就是对 AndroidSchedulers.mainThread()的一个封装).所以到此ProductDetailsUseCase实例将会被生产,其他Usecase的生产类似,等所有的Usecase实例被Dagger2生产出来后,presenter实例随后会被生产,这样Activity中就可以进行数据请求了.
Presenter中请求产品数据
public void getProductData() {
productDetailsUseCase.execute(new ProductDetailSubscriber(), ProductDetailsUseCase.Params.forProduct(productId, 2));
}
基础Usecase类封装了execute方法:
/**
     * Executes the current use case.
     *
     * @param observer {@link DisposableObserver} which will be listening to the observable build
     *                 by {@link #buildUseCaseObservable(Params)} ()} method.
     * @param params   Parameters (Optional) used to build/execute this use case.
     */
    public void execute(DisposableObserver observer, Params params) {
        Preconditions.checkNotNull(observer);
        final Observable observable = this.buildUseCaseObservable(params);
        observable
                .subscribeOn(Schedulers.from(threadExecutor))
                .observeOn(postExecutionThread.getScheduler())
                .subscribeWith(observer);
        addDisposable(observer);
    }

    /**
     * Rxjava2 can't emit null ,so some success callback should use this method.
     * @param observer
     * @param params
     */
    public void executeCanEmitNull(DisposableObserver> observer, Params params) {
        Preconditions.checkNotNull(observer);
        final Observable> observable = this.buildUseCaseObservableCanEmitNull(params);
        observable
                .subscribeOn(Schedulers.from(threadExecutor))
                .observeOn(postExecutionThread.getScheduler())
                .subscribeWith(observer);
        addDisposable(observer);
    }
在网络请求完成后在ProductDetailSubscriber的onNext()方法中将数据发送给View.
        @Override
        public void onNext(Object o) {
            super.onNext(o);
            if (getView() == null) {
                return;
            }
            if (o instanceof ProductDetailEntity) {
                productDetailEntity = (ProductDetailEntity) o;
                getView().productDetail(productDetailEntity);
            } else if (o instanceof ProductCommentEntity) {
                getView().productComments(((ProductCommentEntity) o));
            }
        }
随后数据交给viewModle wrap后,绑定到View上.
产品列表adapter里面的数据绑定:
private inner class ItemProductViewHolder(var binding: ItemProductViewBinding) : RecyclerView.ViewHolder(binding.root) {

        fun bind(productEntity: ProductEntity, position: Int) {
            val listViewModule = ProductListViewModule(productEntity)
            binding.product = listViewModule//数据被绑定
            val params = binding.ivProduct.layoutParams
            params.width = listViewModule.itemWidth
            params.height = listViewModule.itemHeight
            binding.ivProduct.layoutParams = params
            binding.root.setOnClickListener { context?.startActivity(ProductActivity.navigator(context!!, productEntity.id, null, PageIndex.PRODUCT_DETAIL)) }
            binding.ibLike.setOnClickListener {
                if (BaseApplication.mSession.hasLogin()) {
                    binding.ibLike.setLike(!listViewModule.isWishlist)
                    onButtonClickListener?.onSave(position, productEntity.id, !listViewModule.isWishlist)
                } else {
                    onButtonClickListener?.onLogin()
                }
            }
        }
    }
对应的产品列表布局文件:
Databinding让我更加简单的实现所有产品列表功能统一的封装.不过有些操作不好放在xml中完成,还是放在Java代码或者Kotlin实现吧.
记录下项目中databinding使用的比较爽的地方:
自定义一些BindingAdapter,提高效率和封装,比如
//定义一个imageUrl标签,然后我们在xml中使用app:imageUrl="{url}"
//就可以实现图片加载,不用在每一个需要加载图片的地方写重复代码
@BindingAdapter(value = {"imageUrl", "placeHolder"}, requireAll = false)
    public static void loadImageFromUrl(ImageView imageView, String url, int placeHolder) {
        if (imageView.getContext() == null) {
            return;
        }
        GlideApp.with(imageView.getContext()).load(url).placeholder(R.color.color_cccccc).into(imageView);
    }

    @BindingAdapter(value = {"colorFilter"})
    public static void setColorFilter(ImageView imageView, boolean filterColor) {
        if (filterColor) {
            ColorMatrix matrix = new ColorMatrix();
            matrix.setSaturation(0);
            ColorMatrixColorFilter filter = new ColorMatrixColorFilter(matrix);
            imageView.setColorFilter(filter);
        } else {
            imageView.clearColorFilter();
        }
    }
    //这个标签被用来在线性布局中自动添加order 条目,因为这些条目
   //不需要滚动,直接通过addview()进来最方便,因为order条目布局也使用databinding,你就
   //不用在Java中写那些更新布局的代码
    @BindingAdapter(value = {"orders"})
    public static  void setEntries(ViewGroup viewGroup, List orders) {
        viewGroup.removeAllViews();
        if (orders != null) {
            Context context = viewGroup.getContext();
            LayoutInflater inflater = (LayoutInflater)
                    context
                            .getSystemService(Context.LAYOUT_INFLATER_SERVICE);
            for (int i = 0; i < orders.size(); i++) {
                T item = orders.get(i);
                if (item instanceof OrderConfirmNo) {
                    ViewOrderItemHeadBinding binding = ViewOrderItemHeadBinding.inflate(inflater, viewGroup, true);
                    binding.setOrderNo((OrderConfirmNo) item);
                    binding.executePendingBindings();
                } else if (item instanceof OrderItem) {
                    ItemOrderViewBinding binding = ItemOrderViewBinding.inflate(inflater, viewGroup, true);
                    binding.setOrderItemModule(new OrderItemViewModule(((OrderItem) item)));
                    binding.executePendingBindings();
                    if (((OrderItem) item).status == 10) {
                        binding.tvReview.setVisibility(View.VISIBLE);
                        binding.tvReview.setOnClickListener(view -> context.startActivity(ProductRateActivity.Companion.navigator(context, ((OrderItem) item))));
                    }
                }

            }
        }
    }
整个网络请求使用的是Retrofit2+Rxjava2的模式,记录下一些遇到的问题:
- 后台数据结构在正确的请求和错误的请求时,数据结构不一致,正确时{success,code,result} result对应的会是一个对象也有可能是null,错误的时候result对应的会是String
- 在后台返回数据时,如果success为false,我希望在onError()中收到错误消息,成功时,在onNext()中收到我请求数据时传入的Entity.
Retrofit2 自带的GsonConverterFactory 将会直接把json转成你传入的Entity,不能保证每次请求都是成功的,正确的请求,所以不能满足我的实际需求.
解决方案就是继承Converter.Factory,重写responseBodyConverter方法, 返回一个实现Converter接口的GsonErrorHandleResponseBodyConverter,在这里面进行json解析:
public class GsonErrorHandleConverterFactory extends Converter.Factory {

    private final Gson gson;

    private GsonErrorHandleConverterFactory(Gson gson) {
        if (gson == null) throw new NullPointerException("gson == null");
        this.gson = gson;
    }

    public static GsonErrorHandleConverterFactory create() {
        return create(new Gson());
    }

    public static GsonErrorHandleConverterFactory create(Gson gson) {
        return new GsonErrorHandleConverterFactory(gson);
    }

    @Override
    public Converter responseBodyConverter(Type type, Annotation[] annotations, Retrofit retrofit) {
        return new GsonErrorHandleResponseBodyConverter<>(gson,type);
    }

    @Override
    public Converter requestBodyConverter(Type type, Annotation[] parameterAnnotations, Annotation[] methodAnnotations, Retrofit retrofit) {
        TypeAdapter adapter = gson.getAdapter(TypeToken.get(type));
        return new CustomGsonRequestBodyConverter<>(gson,adapter);
    }
}

public class GsonErrorHandleResponseBodyConverter implements Converter {

    private final Gson gson;
    private final Type type;

    GsonErrorHandleResponseBodyConverter(Gson gson, Type type) {
        this.gson = gson;
        this.type = type;
    }

    @Override
    public T convert(ResponseBody value) throws IOException,ApiException {
        String response = value.string();
        ResultResponse resultResponse = gson.fromJson(response, ResultResponse.class);
        //请求失败success为false时,抛出异常ApiException,里面封装了code和失败原因result
        if (!resultResponse.success) {
            value.close();
            ErrResponse errResponse = gson.fromJson(response, ErrResponse.class);
            throw new ApiException(errResponse.code, errResponse.result);
        }

        try {
            return gson.fromJson(response,type);
        } finally {
            value.close();
        }
    }
}
在请求数据时传入的Entity用一个BaseResponse包裹:
public class BaseResponse {
    public boolean success;
    public int code;
    public T result;//具体返回的对象
}

    @POST(BuildConfig.INTERFACE_VERSION + "login-customer/anon/login")
    @FormUrlEncoded
    Observable> login(@Header("deviceToken") String deviceToken, @Field("email") String email, @Field("password") String password);
我们在请求的时候传入的是BaseResponse
写一个BaseObserver,在里面做统一处理,每个Observer都继承它.
public abstract class BaseObserver extends DisposableObserver> {
    @Override
    public void onNext(BaseResponse tBaseResponse) {
        T result = tBaseResponse.result;
        onHandleSuccess(result);
    }

    protected abstract void onHandleSuccess(T result);

    @Override
    public void onError(Throwable e) {
        if (e instanceof SocketTimeoutException || e instanceof UnknownHostException) {
            onNetWorkError(e);
        } else if (e instanceof ApiException) {
            handleServerError(((ApiException) e));
        }
    }

    @Override
    public void onComplete() {

    }

    protected void handleServerError(ApiException e) {

    }

    protected void onNetWorkError(Throwable e) {

    }
}
如此就达到了我的目的.onHandleSuccess返回我传入的真正Entity.


