可参考https://material.io/develop/android/docs/getting-started/
material 简介,左侧列表有分类
2020902
最近看新版的maetrial库,发现有些控件属性都发生变化了,所以下边的仅供参考,用的时候点进源码,看下构造方法里都支持哪些参数就可以了。
建议看上边的文档,文档是新的.
题外话
studio3.5已经修复无法预览的bug,所以最好升级下Studio
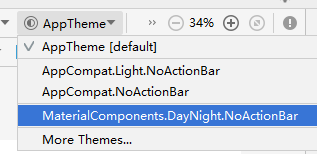
使用这个material的话,会发现xml的布局预览有问题,好像只有第一次启动studio的时候能正常看到布局,过一会就无法预览了,提示异常,感觉是个bug,临时的解决办法就是修改主题,xml布局界面上边修改主题为蓝色那个即可,这样改以后布局可以看,只是material的效果都没了。
另一种解决办法
stackoverflow
比较简单的办法,添加一个预览的style
上边的帖子有说道3.5修复了这个bug,确实最新版可以正常预览了
这样加完以后,在xml里使用material主题就可以正常预览了
开始使用
gradle里添加库,我这种是androidX的,非x的好像是design库里的吧。
implementation 'com.google.android.material:material:1.1.0-alpha05'
首先要使用MaterialButton,要生效,有几种方法
测试后建议第一种,唯一的问题就是把以前的Button都默认改成了MaterilaButton,高度低了点。
其他两种,material控件少了好多默认值,所以控件看起来不舒服,还得自己配置参数
- MaterialComponents主题
使用材料库修改为这个主题以后,问题多多,简单看下源码,了解下新控件的特性。
1. TabLayout
以前修改TabLayout默认的字母大写的问题,结果换了主题以后,提示这个style是私有的,需要添加
tools:override="true"才可以生效
后来又更新了,完事发现上边的不生效了,用下边的方法
app:tabTextAppearance="@style/tabTextStyle"
TabLayout也增加了几个属性
以前只有tabIndicatorColor 来设置下边的线条颜色,现在可以设置一张图片,二选一
app:tabIndicator:图片大小是按照选中的tab的宽度拉伸的,重心是bottom。
        app:tabIndicator="@drawable/iv_leaf_1"//图片默认是被主题色染色的,
        app:tabIconTint="#FF9800" //这个是给文字上边那个icon染色用的
       app:tabRippleColor="#8BC34A"//可以设置点击的波纹颜色了
代码和效果如下
        tab.apply {
            addTab(tab.newTab().setText("hello").setIcon(R.drawable.iv_leaf_3))
            addTab(tab.newTab().setText("good").setIcon(R.drawable.iv_leaf_2))
            addTab(tab.newTab().setText("morning").setIcon(R.drawable.iv_leaf_3))
        }
自定义TabLayout的问题
以前继承TabLayout,获取indicator的高度和颜色,然后自己处理,现在发现这个高度成0了,颜色也不对
临时解决办法,在xml布局里手动添加高度
app:tabIndicatorHeight="2dp"
app:tabIndicatorColor="@color/colorPrimary"
查看源码找到源头
- app:tabIndicatorColor
这个颜色不对头,是代码有问题
源码构造方法里有个默认的style,而我这里自定义的把这个构造方法省了,所以默认的这个style也没了
`  public TabLayout(Context context, AttributeSet attrs) {
    this(context, attrs, R.attr.tabStyle);
  }
修改成如下的代码即可
- app:tabIndicatorHeight
这个高度在当前的Theme.MaterialComponents下确实没有默认值了,具体的自己可以点击主题,搜索上边的默认的tabStyle
- @style/Widget.MaterialComponents.TabLayout
继续父类点击
- @drawable/mtrl_tabs_default_indicator
那么看下源码,为啥系统默认的游标有个高度,这个高度哪来的。
tabSelectedIndicator:就是设置的指针图片,这个系统是有默认值的,看下高度是2dp
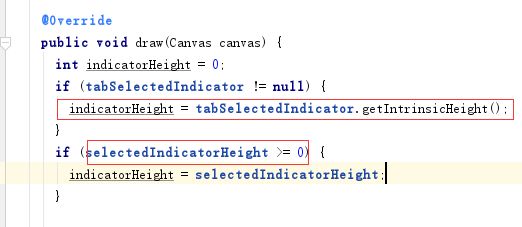
上边图片代码可以看到,indicatorHeight首先获取的是这张图片的高度,完事再看用户设置的selectedIndicatorHeight高度是否大于0,再改为这个,默认值没有这个,所以是0,最后就是第一个if条件的值了,也就是下边的图片高度了。
-
看到这里就顺道看下,indicator到底咋画的
tabSelectedIndicator:这个就是上边那个2dp的图片了。
defaultSelectionIndicator:这个就是个GradientDrawable,啥也画不出来。
selectedIndicatorPaint的颜色就是在构造方法里设置的indicatorColor,材料主题下就是primaryColor
    void setSelectedIndicatorColor(int color) {
      if (selectedIndicatorPaint.getColor() != color) {
        selectedIndicatorPaint.setColor(color);
        ViewCompat.postInvalidateOnAnimation(this);
      }
    }
所以啊,如果你不想要那线条,很简单了,下边这个属性弄成null,就成了defaultSelectionIndicator,啥也画不出来。
app:tabIndicator="@null"
现在也就知道了,下边的color可以给那图片染色拉
    app:tabIndicatorColor="#F44336"
    app:tabIndicator="@drawable/iv_leaf_1"
Tab 可以支持加个小红点了
不过感觉默认的小红点有点小啊,还得自定义字体大小,麻烦.
// Get badge from tab (or create one if none exists)
val badge = tab.getOrCreateBadge()
// Customize badge
badge.number = number
// Remove badge from tab
tab.removeBadge()
2 FloatingActionButton
看下材料主题下的默认属性
- @style/Widget.MaterialComponents.FloatingActionButton
可以看到FloatingActionButton的默认颜色
看你主题里设置的这个item是啥颜色就是啥,如果没设置,看下默认的
- @color/design_dark_default_color_secondary
弄个实际列子说下参数的意义
如果显示隐藏的时候带动画,可以调用hide和show方法
效果图
继续看下另一个
3 ExtendedFloatingActionButton
- @style/Widget.MaterialComponents.ExtendedFloatingActionButton.Icon
public class ExtendedFloatingActionButton extends MaterialButton implements AttachedBehavior
这玩意好像就是比MaterialButton 多了个动画。
动画还得研究,不知道咋生效。。
默认宽高,单行显示,啥也不设置看下结果
第三个是默认的
动画测试
这个有4种状态,对应4个方法
show()
hidden()
显示隐藏没啥说的,就是gone和visible的转换
说下下边这两个,展开收缩,是有前提条件的
shrink()
extend()
icon和text必须同时存在,只有文字或者只有图片,动画都不会执行的
    if (extended == this.isExtended || getIcon() == null || TextUtils.isEmpty(getText())) {
      return;
    }
测试的时候,宽高是可以随便设置的,初始显示的时候也都可以,可进行展开收缩以后,初始设置的宽高就没意义了。
如下图,初始修改了下高度
执行shrink方法以后,直接就成原样了
来看下源码,展开和收缩就是反向的,我们看一个就行。看下extend吧
  private boolean isExtended = true;//默认这个是true,所以先调用extend是无效的,得先shrink才有效
  private void setExtended(
      final boolean extended, boolean animate, @Nullable final OnChangedListener listener) {
    if (extended == this.isExtended || getIcon() == null || TextUtils.isEmpty(getText())) {
      return;
    }
    this.isExtended = extended;
    if (currentCollapseExpandAnimator != null) {
      currentCollapseExpandAnimator.cancel();
    }

    if (animate && shouldAnimateVisibilityChange()) {
//展开的时候,宽高的测量,用的unspecified,也就是wrap的方式了,你设置的宽高固定值没啥用了
      measure(MeasureSpec.UNSPECIFIED, MeasureSpec.UNSPECIFIED);
      Animator collapseExpandAnimator =
          createShrinkExtendAnimator(
              isExtended ? getCurrentExtendMotionSpec() : getCurrentShrinkMotionSpec(),
              !isExtended);
先看下系统默认提供的motionSpec文件,可以看到,里边只有属性,没有对应的值,那么这个值哪里设置的。
继续看源码里的方法,其中用到了一个类MotionSpec,用来存储上边xml里的动画属性的,如下
  public static MotionSpec createFromResource(Context context, @AnimatorRes int id) {
    try {
      Animator animator = AnimatorInflater.loadAnimator(context, id);
      if (animator instanceof AnimatorSet) {
        AnimatorSet set = (AnimatorSet) animator;
        return createSpecFromAnimators(set.getChildAnimations());
      } else if (animator != null) {
        List animators = new ArrayList<>();
        animators.add(animator);
        return createSpecFromAnimators(animators);
      } else {
        return null;
      }
    } catch (Exception e) {
      return null;
    }
  }
然后是数据的设置
  private AnimatorSet createShrinkExtendAnimator(@NonNull MotionSpec spec, boolean shrinking) {
    int collapsedSize = ViewCompat.getPaddingStart(this) * 2 + getIconSize();
//收缩的时候,控件的大小就是icon的size加上2倍的paddingStart
//至于展开的大小,就是下边getMeasuredWidth了,上边动画开始前进行了测量,用的unspecified
    if (spec.hasPropertyValues("width")) {
      PropertyValuesHolder[] widthValues = spec.getPropertyValues("width");
      if (shrinking) {
        widthValues[0].setFloatValues(getMeasuredWidth(), collapsedSize);
      } else {
//valueanimator都知道,需要一个起始和结束值,下边2个参数就是
        widthValues[0].setFloatValues(getWidth(), getMeasuredWidth());
      }
      spec.setPropertyValues("width", widthValues);
    }

    if (spec.hasPropertyValues("height")) {
      PropertyValuesHolder[] heightValues = spec.getPropertyValues("height");
      if (shrinking) {
        heightValues[0].setFloatValues(getMeasuredHeight(), collapsedSize);
      } else {
        heightValues[0].setFloatValues(getHeight(), getMeasuredHeight());
      }
      spec.setPropertyValues("height", heightValues);
    }

    if (spec.hasPropertyValues("cornerRadius")) {
      PropertyValuesHolder[] cornerRadiusValues = spec.getPropertyValues("cornerRadius");
      if (shrinking) {
        cornerRadiusValues[0].setFloatValues(getCornerRadius(), getAdjustedRadius(collapsedSize));
      } else {
        cornerRadiusValues[0].setFloatValues(getCornerRadius(), getAdjustedRadius(getHeight()));
      }
      spec.setPropertyValues("cornerRadius", cornerRadiusValues);
    }

    return createAnimator(spec);
  }
继续看,可以看到这个控件支持5种属性变化,源码里可以看到默认的动画,没有opacity和scale,如果想支持,可以自己写个动画文件。而且系统默认的动画,高度是wrap的,至于宽度,收缩的时候就是icon大小+2paddding,展开的时候就是wrap大小了。
  private AnimatorSet createAnimator(@NonNull MotionSpec spec) {
    List animators = new ArrayList<>();

    if (spec.hasPropertyValues("opacity")) {
      animators.add(spec.getAnimator("opacity", this, View.ALPHA));
    }

    if (spec.hasPropertyValues("scale")) {
      animators.add(spec.getAnimator("scale", this, View.SCALE_Y));
      animators.add(spec.getAnimator("scale", this, View.SCALE_X));
    }

    if (spec.hasPropertyValues("width")) {
      animators.add(spec.getAnimator("width", this, WIDTH));
    }

    if (spec.hasPropertyValues("height")) {
      animators.add(spec.getAnimator("height", this, HEIGHT));
    }

    if (spec.hasPropertyValues("cornerRadius")) {
      animators.add(spec.getAnimator("cornerRadius", this, CORNER_RADIUS));
    }

    AnimatorSet set = new AnimatorSet();
    AnimatorSetCompat.playTogether(set, animators);
    return set;
  }
上边源码分析完了,也知道,宽,高,角度,源码里自己处理,这个我们没有可操作的空间,而透明度和拉伸,系统没处理,我们可以自己写,动画时间也可以自己处理下。
        app:extendMotionSpec="@animator/mtrl_extended_fab_extend_motion_spec2"
        app:shrinkMotionSpec="@animator/mtrl_extended_fab_shrink_motion_spec2"
写在布局里就行,当然了代码里也可以的。
res下新建个animator目录,添加下边的文件即可
话说这玩意是继承
4 MaterialButton的
而public class MaterialButton extends AppCompatButton implements Checkable
简单再看下,都有哪些属性
主要就是多了个icon的属性,可以在左边加个图片,单色图片,如果你是彩色的图片,最后看到的就是一片白或黑【和白天黑夜模式有关,如果你没有设iconTint的话】
至于material的通性就不细究了,比如ripple,阴影,边界,圆角等
iconTint:图片染色用的
注意事项
button以前的android:background属性无效了。现在设置背景只能通过app:background,只能是个颜色,可以是带状态的颜色。
效果
具体添加了哪些属性,可以看下源码
使用中问题
-
文字比较大的时候发现间距也很大
如下 上边的button和下边的textview的字体大小颜色是一样的,结果明显上边的字体间距大
查下源码,看下materialButton的默认字体,可以看到它设置了fontFamily,而且还设置了
android:letterSpacing
要和textview显示的文字一样,button里添加如下的属性
        android:fontFamily=""
        android:letterSpacing="0"
- button的高度看着小很多
xml布局里可以修改这两个值,弄小点就ok了
- @dimen/mtrl_btn_inset
- @dimen/mtrl_btn_inset
5 MaterialButtonToggleGroup
3个属性可以设置,
app:singleSelection="true" //是否单选
app:checkedButton="@+id/mbtn1"//默认选中的button id
app:selectionRequired="true"//Sets whether we prevent all child buttons from being deselected. 是否阻止所有的child取消选择,可以防止单选的时候选中那个再点一下取消选择了.
public class MaterialButtonToggleGroup extends LinearLayout
实际使用,看名字就知道,它的child只支持MaterialButton,源码addView里能看到限制
6 MaterialCardView
public class MaterialCardView extends CardView implements Checkable
比以前的CardView多个icon
check状态生效并是图片显示出来,需要设置这两种
        android:checkable="true"
        android:clickable="true"
setChecked(true)可以看到图片是在右上角的
简单源码分析,布局过程
public class MaterialCardView extends CardView implements Checkable {
  public MaterialCardView(Context context, AttributeSet attrs, int defStyleAttr) {
//CardView 本来就是个FrameLayout,这里又new了一个添加进来
//特殊处理都放在helper里了
    contentLayout = new FrameLayout(context);
//这里调用的super是正常添加方法,它自己本身的addview重写了,
    super.addView(contentLayout, -1, new LayoutParams(MATCH_PARENT, MATCH_PARENT));
    cardViewHelper = new MaterialCardViewHelper(this, attrs, defStyleAttr, DEF_STYLE_RES);

}

  protected void onMeasure(int widthMeasureSpec, int heightMeasureSpec) {
    super.onMeasure(widthMeasureSpec, heightMeasureSpec);
    cardViewHelper.onMeasure(getMeasuredWidth(), getMeasuredHeight());
  }
//可以看到自己本该add的view,都添加到我们new的那个FrameLayout里了
  public void addView(View child, int index, ViewGroup.LayoutParams params) {
    contentLayout.addView(child, index, params);
  }

  @Override
  public void removeAllViews() {
    contentLayout.removeAllViews();
  }

  @Override
  public void removeView(View view) {
    contentLayout.removeView(view);
  }
看下helper里的方法
  void onMeasure(int measuredWidth, int measuredHeight) {
    if (materialCardView.isCheckable() && clickableForegroundDrawable != null) {
      Resources resources = materialCardView.getResources();
      // TODO: support custom sizing
      int margin = resources.getDimensionPixelSize(R.dimen.mtrl_card_checked_icon_margin);
      int size = resources.getDimensionPixelSize(R.dimen.mtrl_card_checked_icon_size);
      int left = measuredWidth - margin - size;
      int bottom = measuredHeight - margin - size;
      int right = margin;
      if (ViewCompat.getLayoutDirection(materialCardView) == View.LAYOUT_DIRECTION_RTL) {
        // swap left and right
        int tmp = right;
        right = left;
        left = tmp;
      }

//CHECKED_ICON_LAYER_INDEX这个索引就是那个icon图层的索引
//看下4个方向的偏移量就知道了是在右上角的,偏移了margin以及icon的size距离
      clickableForegroundDrawable.setLayerInset(
          CHECKED_ICON_LAYER_INDEX, left, margin /* top */, right, bottom);
    }
  }
简单看下上边用到的drawable
3层,ripple,foregroundContent,以及checked icon[索引是2也就是CHECKED_ICON_LAYER_INDEX]
    if (clickableForegroundDrawable == null) {
      Drawable checkedLayer = createCheckedIconLayer();
      clickableForegroundDrawable =
          new LayerDrawable(
              new Drawable[] {rippleDrawable, foregroundContentDrawable, checkedLayer});
      clickableForegroundDrawable.setId(CHECKED_ICON_LAYER_INDEX, R.id.mtrl_card_checked_layer_id);
    }
实际测试中,这玩意有bug
测试条件,在修改这个CardView的setChecked状态的同时,调用了同级组件ExtendedFloatingActionButton的extend或者shrink方法,会发现check图片显示异常,cardview的大小也越来越大。如下
7 ChipGroup
public class ChipGroup extends FlowLayout
顾名思义,就是个容器,流式布局,一行装不下就换行
看下有撒属性
app:chipSpacingHorizontal:就是item之间的距离
app:chipSpacingVertical:每行之间的间隔
app:checkedChip="@+id/cp1" //默认选中的chip id
app:singleLine="false" //是否是单行
app:singleSelection="true"//是否是单选 ,它的child都是Chip 也就是checkbox
app:itemSpacing="80dp"
app:lineSpacing="50dp"
这两个是父类FlowLayout的属性,在这里是无效的,被chipSpacing替换掉了
看下这个就知道为啥上边的itemSpacing和lineSpacing无效了
8 Chip
public class Chip extends AppCompatCheckBox implements Delegate, Shapeable
先看下
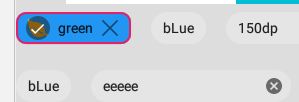
第一个Chip 是设置了chipIcon 文字左边的,以及closeIcon,文字右边
最后一个是系统默认的选中状态,以及默认的close icon。其他是啥都没设置的
如果设置了chipIcon又设置了可以选中,那么选中的对号会盖在chipIcon上的
这个控件默认checkable是false的,如果需要选中状态,那么得手动设置checkable为true,
其他属性看名字大概就知道干啥的。
如果需要这种,默认就个边框,选中带背景的,可以这样设置style
因为这东西其实是个checkbox也就是button,所以有个灰色的背景的,修改android:backgroundTint即可
测试的时候还发现有两个chip开头的属性,可感觉没啥用啊,只是测试surfaceColor会盖住backgroundColor
可这两种都会被android:backgroundTint影响啊,那我要这两个干啥?
chipBackgroundColor
chipSurfaceColor
使用中碰到的问题
studio 3.5已修复此问题
只有布局里代码MaterialButton或者它的子类,预览大部分时候是挂掉的,偶尔是好的。
日志如下
java.lang.IllegalArgumentException: java.lang.ClassCastException@7c1e37a5
    at sun.reflect.GeneratedMethodAccessor4200.invoke(Unknown Source)
    at sun.reflect.DelegatingMethodAccessorImpl.invoke(DelegatingMethodAccessorImpl.java:43)
    at java.lang.reflect.Method.invoke(Method.java:498)
    at android.animation.PropertyValuesHolder_Delegate.callMethod(PropertyValuesHolder_Delegate.java:108)
    at android.animation.PropertyValuesHolder_Delegate.nCallFloatMethod(PropertyValuesHolder_Delegate.java:143)
    at android.animation.PropertyValuesHolder.nCallFloatMethod(PropertyValuesHolder.java)
    at android.animation.PropertyValuesHolder.access$400(PropertyValuesHolder.java:38)
    at android.animation.PropertyValuesHolder$FloatPropertyValuesHolder.setAnimatedValue(PropertyValuesHolder.java:1387)
    at android.animation.ObjectAnimator.animateValue(ObjectAnimator.java:990)
    at android.animation.ValueAnimator.setCurrentFraction(ValueAnimator.java:674)
    at android.animation.ValueAnimator.setCurrentPlayTime(ValueAnimator.java:637)
    at android.animation.ValueAnimator.start(ValueAnimator.java:1069)
    at android.animation.ValueAnimator.start(ValueAnimator.java:1088)
    at android.animation.ObjectAnimator.start(ObjectAnimator.java:852)
    at android.animation.ValueAnimator.startWithoutPulsing(ValueAnimator.java:1081)
    at android.animation.AnimatorSet.handleAnimationEvents(AnimatorSet.java:1142)
    at android.animation.AnimatorSet.startAnimation(AnimatorSet.java:1227)
    at android.animation.AnimatorSet.start(AnimatorSet.java:729)
    at android.animation.AnimatorSet.start(AnimatorSet.java:684)
    at android.animation.StateListAnimator.start(StateListAnimator.java:188)
    at android.animation.StateListAnimator.setState(StateListAnimator.java:181)
    at android.view.View.drawableStateChanged(View.java:21105)
    at android.widget.TextView.drawableStateChanged(TextView.java:5283)
    at androidx.appcompat.widget.AppCompatButton.drawableStateChanged(AppCompatButton.java:156)
- 发现个异常的地方
前提条件:
线性布局,水平方向的,然后里边添加MaterialButton和TextView,高度一样,结果textview的高度不正常最后发现不是高度不正常,是位置不正常,打印了下textview的日志,发现top是40,bottom是140.一部分跑到屏幕下边去了。
看效果图以及代码
又添加一个wrap_content的Button,如下,感觉他们是文字对齐啊?
看下线性布局水平方向的onLayout方法
看下child的top获取方法,如下,默认的重心就是Top了。
                    case Gravity.TOP:
                        childTop = paddingTop + lp.topMargin;
                        if (childBaseline != -1) {
                            childTop += maxAscent[INDEX_TOP] - childBaseline;
                        }
                        break;
通过反射打印了下数组 [-1, 55, -1, -1], 而Index_top 是1也就是55了
然后看下几个view的baseLine
第一个button是55,第二个是29,第三个textView是15,和最终的layout位置符合。这里就说明了为啥结果是这样了。
而这个数组的赋值是在下边的方法里,循环child,找到最大的baseLine赋值给数组。
void measureHorizontal(int widthMeasureSpec, int heightMeasureSpec)
解决办法很简单了,让TextView的gravity为center即可。
9 BottomAppBar
看名字,这个是显示在底部用的,是个Toolbar,主要用来和FloatingActionBar一起的
上边是默认的设置,看下效果
打开构造方法,找到默认的style,看下默认的值先
5dp
8dp
0dp
特殊属性就是为了设置fab的位置的
            app:menu="@menu/menu_nav_bottom"//和toolbar一样设置item的
            app:backgroundTint="#673AB7"//背景色
            app:fabAlignmentMode="end"//fab的位置,默认居中的,这个end是在右边
            app:fabAnimationMode="slide"//
            app:fabCradleVerticalOffset="0dp"
            app:fabCradleMargin="20dp"
            app:fabCradleRoundedCornerRadius="10dp"
            app:navigationIcon="@drawable/iv_leaf_1"//最左边那个图片
 app:hideOnScroll="true"//页面滚动的时候这个appbar会自动隐藏显示的
app:fabCradleVerticalOffset
这个是fab的中心位置和appbar的top位置的距离,默认是0,fab的中心刚好在top上,修改这个可以修改fab的位置
app:fabCradleMargin
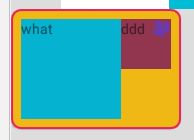
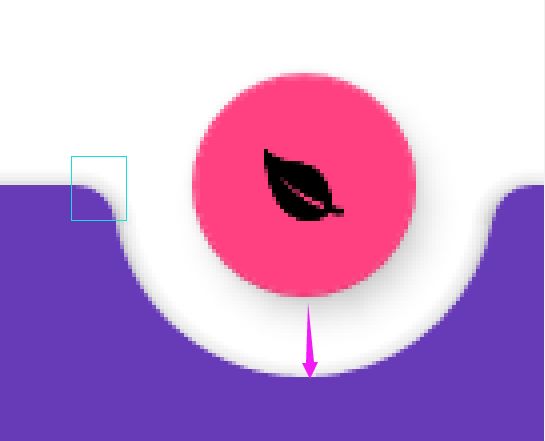
这个就是上图那个紫色箭头的距离 ,就是fab和appbar之间的留白距离,也可以理解为appbar上那个半圆的半径位置就是fab的半径加上这个margin
app:fabCradleRoundedCornerRadius
这个就是上图那个浅蓝色框起来的圆弧半径。
复制的英文解释
The starting alignment mode (fabAlignmentMode) can be set to either center or end. Changing the fabCradleMargin will increase or decrease the distance between the FloatingActionButton and the BottomAppBar. The fabCradleRoundedCornerRadius specifies the roundness of the corner around the cutout. The fabCradleVerticalOffset specifies the vertical offset between the FloatingActionButton and the BottomAppBar. If fabCradleVerticalOffset is 0, the center of the FloatingActionButton will be aligned with the top of the BottomAppBar.
item的点击事件处理
- xml里添加menu
app:menu="@menu/menu_nav_bottom"
        bar.setOnMenuItemClickListener {

            return@setOnMenuItemClickListener true
        }
- 设置为actionbar,系统处理
上边说了这个就是个toolbar,你也可以按照以前的调用setsupportActionBar(bar),
然后下边2个方法加载menu,以及处理menu的点击事件了
    override fun onCreateOptionsMenu(menu: Menu?): Boolean {
        menuInflater.inflate(R.menu.article_add,menu)
        return super.onCreateOptionsMenu(menu)
    }
    override fun onOptionsItemSelected(item: MenuItem): Boolean {

        return super.onOptionsItemSelected(item)
    }
其他,源码如下,可以看到,不支持title和subTitle
  public void setTitle(CharSequence title) {
    // Don't do anything. BottomAppBar can't have a title.
  }

  @Override
  public void setSubtitle(CharSequence subtitle) {
    // Don't do anything. BottomAppBar can't have a subtitle.
  }
checkbox 里的button属性染色
补充知识
前提,我们的主题用的是
影响是代码里的Button,CheckBox等基础控件,运行的时候自动就会被转换成对应的MaterialXXX了,所以有时候状态可能就不对了,button上边讲了这里是没研究 的
代码
//默认使用的主题就是上边的,所以这个为true
    useMaterialThemeColors =
        attributes.getBoolean(R.styleable.MaterialCheckBox_useMaterialThemeColors, false);

  protected void onAttachedToWindow() {
    super.onAttachedToWindow();

//我们没有设置buttonTint
    if (useMaterialThemeColors && CompoundButtonCompat.getButtonTintList(this) == null) {
      setUseMaterialThemeColors(true);//就是给button染色
    }
  }

